
Sign in to your Jira Automation Cloud account
To update a field automation in Jira, you first need to sign in to your Jira Automation Cloud account. This will give you access to the necessary settings and configurations to make the desired changes.
Start by opening your preferred web browser and navigating to the Jira Automation Cloud website. Enter your login credentials and click on the “Sign In” button to access your account.
Once you are logged in, you will be redirected to the Jira Automation Cloud dashboard, where you can manage all your automation rules and settings. Now, you are ready to proceed with updating the field automation for your chosen Jira project.
It is important to note that only users with the appropriate permissions can access and modify field automation in Jira. If you do not have the necessary permissions, reach out to your Jira administrator or a user with administrative privileges to assist you.
When signing in to your Jira Automation Cloud account, ensure that you are using a secure connection and that your login credentials are kept confidential to protect your account and data.
By signing in to your Jira Automation Cloud account, you will have the authority to update field automation and customize it according to your project’s requirements. Let’s move on to the next step to select the Jira project you want to update the field automation for.
Select the Jira project you want to update the field automation for
After signing in to your Jira Automation Cloud account, the next step is to select the specific Jira project for which you want to update the field automation. Jira projects are used to organize and manage different aspects of your work, and each project may have its own set of field automation rules.
To select the project, navigate to the Jira dashboard and locate the project selection menu. It is usually displayed at the top left corner of the screen. Click on the menu to view a list of available projects associated with your account.
Scroll through the list and find the project that you want to update the field automation for. If required, you can also use the search bar provided in the project selection menu to quickly locate your desired project.
Click on the project name to access the project-specific settings and configurations. This will take you to the project’s main page, where you can manage various aspects of the project, including field automation.
It is important to ensure that you have the necessary permissions to modify field automation for your selected project. Depending on your user role and project settings, you may need administrative or project-specific privileges to make changes.
By selecting the Jira project you want to update the field automation for, you are directing your focus to a specific project’s requirements. This allows you to tailor the field automation rules to match the unique needs of that particular project.
Once you have selected the project, you are now ready to navigate to the project settings and proceed with the field automation updates. Let’s move on to the next step to learn how to access the project settings in Jira.
Navigate to the project settings
Now that you have selected the Jira project you want to update the field automation for, it’s time to navigate to the project settings. The project settings menu allows you to configure various aspects of the project, including the field automation options.
To access the project settings, start by locating the project navigation menu. Depending on your Jira setup, this menu is usually found on the left-hand side of the screen.
Click on the project navigation menu to expand its options. Look for the “Project Settings” or “Settings” option and select it from the list. This will take you to the project settings page, where you can customize and manage different aspects of the project.
Alternatively, some Jira setups may have a gear or cog icon next to the project name. Clicking on this icon will also direct you to the project settings page.
Once you are on the project settings page, take a moment to familiarize yourself with the available options. This is where you can configure field schemes, workflows, issue types, and other project-specific settings.
Keep in mind that accessing project settings and modifying certain configurations may require administrator or project-specific permissions. If you do not have the necessary privileges, reach out to your Jira administrator or a user with administrative access.
Navigating to the project settings is crucial as it allows you to access the specific configurations of the project. This is where you will find the options to update the field automation rules and optimize them according to your project’s needs.
Now that you have successfully navigated to the project settings, let’s proceed to the next step to learn how to locate the “Apps” menu option in Jira.
Click on the “Apps” menu option
After accessing the project settings in Jira, the next step is to locate and click on the “Apps” menu option. This menu provides access to the various apps and plugins installed in your Jira instance, including the Automation app which is responsible for managing field automation.
To find the “Apps” menu option, look for the sidebar on the left-hand side of the screen. In some Jira setups, it may be labeled as “Apps” or “Manage Apps,” while in others, it could be represented by an icon or symbol.
Click on the “Apps” menu option to expand the menu and reveal the list of installed apps and plugins. This menu provides a comprehensive overview of all the available app functionalities and integration options within your Jira instance.
If you cannot find the “Apps” menu option in the sidebar, it is possible that you do not have the necessary permissions or that the Automation app is not installed. In such cases, it is essential to contact your Jira administrator or a user with administrative access to resolve the issue.
Once you have clicked on the “Apps” menu option, take a moment to familiarize yourself with the available apps and their functionalities. Locate the Automation app in the list, as this is the app you will be using to manage and update the field automation rules.
By clicking on the “Apps” menu option, you are one step closer to updating the field automation for your chosen Jira project. Let’s move on to the next step to learn how to access the “Rules” section in the Automation app.
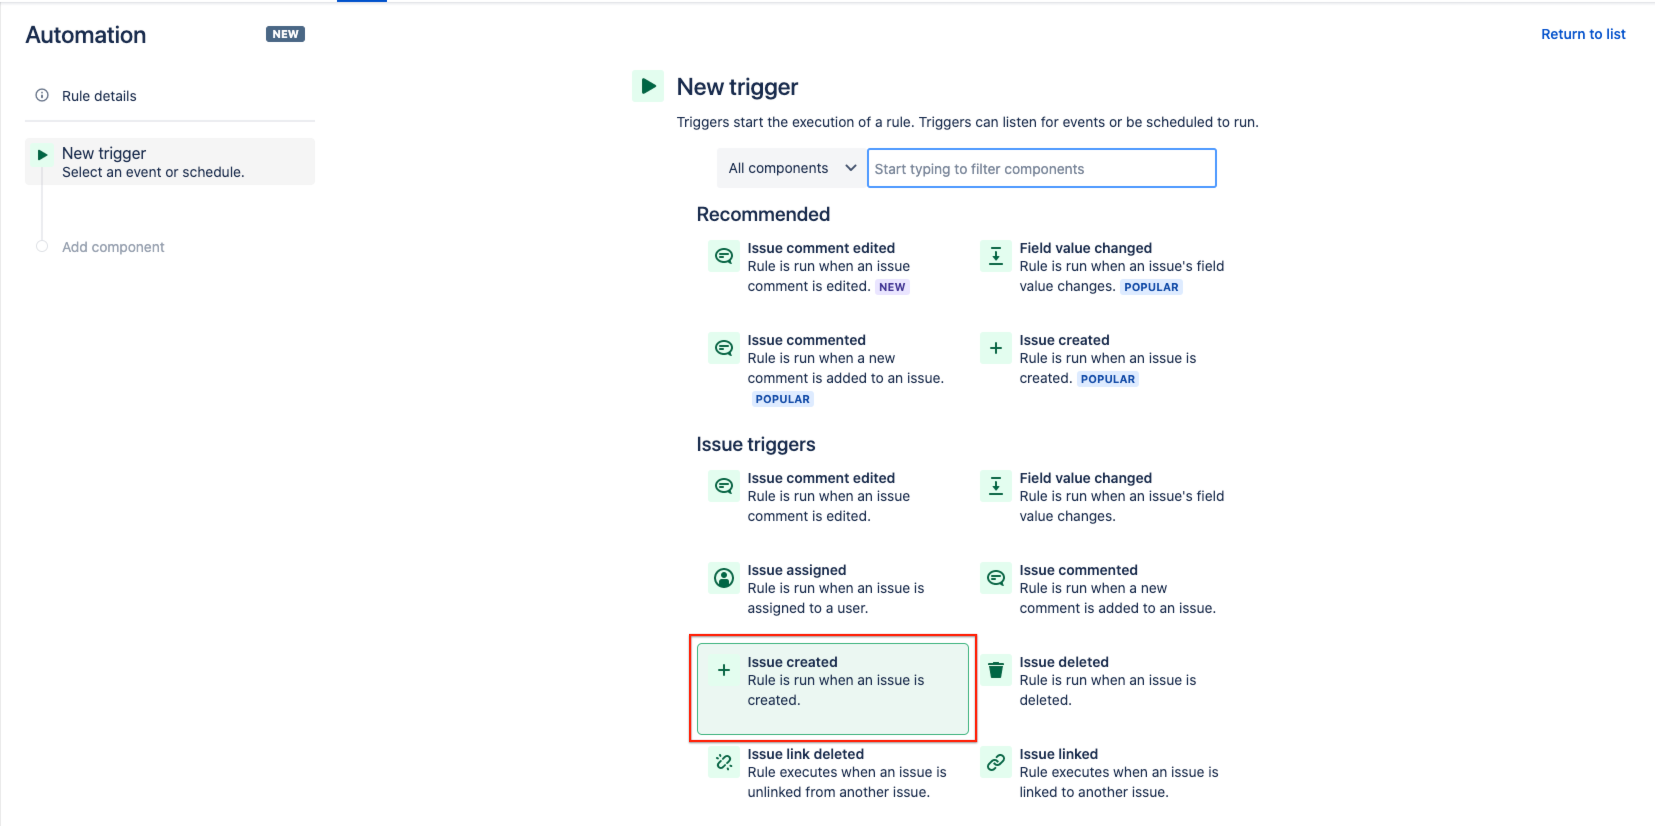
Locate and select the “Automation” app
After clicking on the “Apps” menu option in Jira, your next task is to locate and select the “Automation” app. This app is responsible for managing field automation and contains all the necessary tools and features to update the automation rules.
Look for the Automation app in the list of installed apps and plugins. It is usually labeled as “Automation” or “Automation for Jira.” If the list is long, you may have to scroll down or use the search function provided to quickly locate the app.
Once you have located the Automation app, click on it to select it. This will take you to the main page of the Automation app, where you can view and manage all the automation rules set up for your Jira project.
If you are unable to find the Automation app in the “Apps” menu, it is possible that it is not installed in your Jira instance. In such cases, reach out to your Jira administrator or a user with administrative access to install and configure the Automation app for your project.
Upon selecting the Automation app, take a moment to familiarize yourself with its interface and options. This is where you will be working to update the field automation rules, so it’s essential to understand the available features and functionalities.
By locating and selecting the “Automation” app, you have successfully reached the dedicated space to manage and update field automation for your Jira project. In the next step, we will learn how to navigate to the “Rules” section within the Automation app.
Choose “Rules” from the left-hand sidebar
Once you have accessed the main page of the Automation app, the next step is to choose the “Rules” section. This section is where you can view and manage all the existing automation rules that have been set up for your Jira project.
To find the “Rules” section, look for the left-hand sidebar within the Automation app interface. The sidebar typically contains various navigation options and menu items that allow you to explore different aspects of the app’s functionalities.
Locate the “Rules” option in the sidebar and click on it to select it. This action will redirect you to the “Rules” section, where you will have an overview of all the automation rules currently in place.
If you are unable to find the “Rules” section in the left-hand sidebar, review the interface carefully to ensure you are in the correct app and navigation area. In some cases, the section may be labeled differently or organized differently based on your specific Jira setup.
Once you have selected the “Rules” section, take a moment to familiarize yourself with the available options and features. Here, you can view, modify, and create new automation rules to update field automation for your Jira project.
By choosing the “Rules” section in the left-hand sidebar, you have successfully accessed the area where you can manage and update all the automation rules for your project. In the next step, we will learn how to find and select the specific automation rule you want to update the field for.
Find the automation rule you want to update the field for
Within the “Rules” section of the Automation app, the next step is to locate the specific automation rule that you want to update the field for. This rule defines the conditions and actions that determine how the field automation behaves within your Jira project.
Take a moment to review the list of automation rules displayed on the page. Depending on the complexity of your automation setup, you may have several rules listed, each targeting different aspects of field automation.
Scan through the rules and find the one that corresponds to the field you want to update. You can often identify the rule by its name or description, which may indicate the specific field or scenario it is designed to automate.
If you have trouble locating the desired automation rule, you can use the search or filter options provided in the Automation app to narrow down the list based on keywords, conditions, or specific fields.
Remember that each automation rule will have its own set of conditions and actions configured, so it is important to choose the rule that aligns with the specific field you want to update.
Once you have found the automation rule you want to update the field for, click on it to open the details page. This will allow you to access and modify the actions associated with the automation rule.
By finding the automation rule that targets the field you want to update, you have taken a crucial step towards customizing the behavior of field automation in your Jira project. In the next step, we will explore how to edit the automation action for the selected field.
Click on the rule to open the details page
After locating the automation rule that you want to update the field for in the “Rules” section of the Automation app, the next step is to click on the rule to open the details page. This will allow you to access and modify the specific actions associated with the automation rule.
Review the list of automation rules and identify the one you want to work with. Click on the rule’s name or description to open the details page. The details page provides a comprehensive view of the rule’s conditions, actions, and configuration settings.
Upon opening the details page, ensure that you are presented with the actions section. This is where you will find the specific automation action that is responsible for updating the field you are interested in.
If you are not directed to the actions section automatically, look for a navigation menu or tab within the details page labeled “Actions” or something similar. Clicking on this option will take you directly to the section where you can modify the automation action.
Once you have accessed the actions section within the details page, take a moment to review the existing automation action. Here, you can see how the rule is currently configured to update the field and determine if any modifications are necessary.
Remember to carefully analyze the conditions and outcomes of the automation action to ensure that it aligns with your intended field update. This will help you make the appropriate changes and achieve the desired results.
By clicking on the rule to open the details page, you have reached the section where you can view and modify the automation action responsible for updating the field. In the next step, we will delve into the process of editing the automation action for the selected field.
Scroll down to the “Actions” section
Upon clicking on the automation rule within the Automation app’s details page, the next step is to scroll down to the “Actions” section. This section displays the specific actions that are configured for the rule, including the automation action responsible for updating the field you are interested in.
As you scroll down the page, keep an eye out for the “Actions” section. Depending on your Jira setup and the complexity of the rule, this section may be located towards the bottom of the details page.
Once you have reached the “Actions” section, take a moment to review the existing actions that have been configured for the rule. This will give you an understanding of how the rule is currently set up and provide insights into how the field update is being managed.
To update the field automation, you will need to edit the automation action within the “Actions” section. This action defines the specific behavior and changes that occur when the rule’s conditions are met.
Make sure to carefully analyze the current configuration of the automation action and evaluate if any modifications are necessary to achieve the desired field update. You may need to adjust the conditions, define new outcomes, or modify existing actions to meet your requirements.
Within the “Actions” section, you may find various options and parameters related to the automation action. These can include selecting the field to be updated, specifying the value or condition for the update, and defining any additional actions or triggers that are associated with the field automation.
By scrolling down to the “Actions” section, you have reached the specific area where you can modify and customize the automation action responsible for updating the field you are interested in. In the next step, we will explore how to save the changes made to the automation rule.
Locate the field you want to update
Within the “Actions” section of the Automation app’s details page, the next step is to locate the specific field that you want to update. This field represents the data or information that you wish to modify or customize based on the automation rule.
As you review the “Actions” section, pay attention to the list of available fields that can be updated. This may include standard Jira fields such as Assignee, Status, Priority, or custom fields that have been set up specifically for your project.
Locate the field that you want to update and ensure that it is listed within the actions associated with the automation rule. The field’s name or identifier will typically be displayed alongside the corresponding actions and conditions.
If you’re having trouble finding the specific field, you can use the search functionality provided within the Automation app to quickly locate it. This can be especially useful if you have a large number of fields or if the field you’re interested in is deeply nested within the project settings.
Take a moment to verify that the field you’ve located is the correct one that needs to be updated. Consider the current configuration of the automation rule and compare it with your desired changes to ensure it aligns with your requirements.
By locating the field you want to update within the “Actions” section, you are one step closer to customizing the field automation. In the upcoming steps, we will explore how to edit the automation action for the selected field and save the changes made to the automation rule.
Edit the automation action for the field
Now that you have located the field you want to update within the “Actions” section of the Automation app’s details page, it’s time to edit the automation action associated with that field. Modifying the automation action allows you to customize how the field’s automation behaves based on specified conditions and outcomes.
Review the existing configuration of the automation action for the field. This may include parameters such as the triggering event, conditions for the action to execute, and the specific changes that are applied to the field.
To edit the automation action, click on the “Edit” or “Modify” option associated with the action. This will open a form or dialog box where you can make the desired changes.
Within the edit form or dialog box, you can modify various aspects of the automation action. This may include selecting different conditions, changing the values or conditions for the field update, or even adding additional actions to be performed alongside the update.
Ensure that the changes you make align with your intended field update and meet the requirements of your project. You may need to refer to your project’s guidelines or consult with key stakeholders to ensure that the edited automation action aligns with the desired outcomes.
Take the time to thoroughly test the edited automation action before applying it in a live environment. This can help identify any potential issues or conflicts and allows you to fine-tune the automation action to work seamlessly.
By editing the automation action for the field, you have customized how the automation features of Jira handle the specific field update. In the next step, we will explore how to save the changes you’ve made to the automation rule.
Save the changes to the automation rule
After editing the automation action for the field within the Automation app, the next step is to save the changes you have made to the automation rule. Saving the changes ensures that your modifications are applied and will take effect within your Jira project.
Look for the “Save” or “Apply” button within the edit form or dialog box of the automation action. This button is typically located at the bottom or top right corner of the form or dialog box.
Click on the “Save” or “Apply” button to save the changes you have made to the automation action. Once you do this, the updated rule will be stored and activated within your Jira project.
Before saving, it is essential to review your changes and ensure that they meet your requirements. Double-check the conditions, actions, and other details of the automation action to avoid any unintended or incorrect field updates.
Once you have saved the changes, take a moment to verify that the automation rule has been successfully updated. You can do this by reviewing the automation rules list within the Automation app or by testing the field automation in a controlled environment.
Remember that saving the changes affects the automation behavior for the specific field within your Jira project. It is important to communicate any changes to your team members or stakeholders who may be impacted by the updated automation rule.
If you encounter any issues or need to revert the changes, most Automation apps provide an option to undo or rollback the modifications. Refer to the app’s documentation or consult with your Jira administrator for guidance on how to handle such situations.
By saving the changes to the automation rule, you have successfully updated the field automation for your Jira project. In the next step, we will explore how to test the updated field automation to ensure its proper functioning.
Test the updated field automation in Jira
After saving the changes to the automation rule in the Automation app, it is crucial to test the updated field automation in Jira to ensure that it functions as intended. Testing helps identify any issues or unexpected behavior that may arise from the modifications you have made.
Start by navigating to the relevant Jira project where the field automation has been updated. This will allow you to assess the impact of the changes directly within the project.
In the project, create or select an issue that corresponds to the field you have updated. This will allow you to observe the effects of the automation in real-time.
Perform the specific actions or scenarios that trigger the automation rule. This might involve updating other fields, transitioning the issue to a specific status, or fulfilling certain conditions that activate the automation action.
Observe the behavior of the field automation and ensure that the field is updated correctly and in line with your expectations. Check for any errors, inconsistencies, or unexpected results that may have occurred due to the modifications.
If the field automation does not work as intended or if any issues arise during testing, review the automation rule and verify the conditions, actions, and configurations that have been set. It may require further adjustments or troubleshooting to ensure proper functioning.
Additionally, involve other team members or stakeholders who may be impacted by the field automation changes in the testing process. Gather their feedback and address any concerns or suggestions they may have.
Continuously monitor the field automation after the update to ensure its ongoing effectiveness. Make necessary refinements as needed to optimize the automation and meet evolving project requirements.
By thoroughly testing the updated field automation in Jira, you can confirm that the changes are working as expected and make any necessary adjustments to ensure its smooth operation moving forward.