
Prerequisites
Before you can install the Ripple wallet on your Ledger Nano S, there are a few things you need to have in place:
- A Ledger Nano S hardware wallet
- A computer with a USB port running a compatible operating system (Windows 7+, macOS 10.10+, Linux)
- An internet connection
- The latest version of Ledger Live software
- A USB cable to connect your Ledger Nano S to your computer
Ensure that your Ledger Nano S is genuine and comes from an authorized reseller. Counterfeit devices can compromise the security of your cryptocurrencies. If you have recently purchased your Ledger Nano S, make sure you have initialized it and set up the necessary security measures.
If you haven’t done so already, download and install the Ledger Live software from the official Ledger website (https://www.ledger.com/ledger-live/download). Ledger Live is the companion application that allows you to manage your cryptocurrencies and install apps on your Ledger Nano S.
Make sure that your computer’s operating system is up to date and meets the technical requirements specified by Ledger. Once you have Ledger Live installed, you can proceed with connecting your Ledger Nano S to your computer and installing the Ripple app.
Step 1: Install Ledger Live
In order to install the Ripple wallet on your Ledger Nano S, you first need to install the Ledger Live software on your computer. Ledger Live is the official application developed by Ledger for managing your cryptocurrencies and interacting with your Ledger Nano S.
To install Ledger Live, follow these steps:
- Visit the official Ledger website at https://www.ledger.com/ledger-live/download
- Choose the appropriate version of Ledger Live for your operating system (Windows, macOS, or Linux) and click on the download button
- Once the download is complete, open the installation file and follow the on-screen instructions to install Ledger Live on your computer
- After the installation is complete, launch Ledger Live
Ensure that your computer is connected to the internet during the installation process. Ledger Live will automatically check for any available updates and prompt you to install them.
Once you have successfully installed Ledger Live on your computer, you are ready to move on to the next step: connecting your Ledger Nano S to the computer.
Step 2: Connect Ledger Nano S to the Computer
In order to install the Ripple app on your Ledger Nano S and access your Ripple wallet, you need to connect your device to your computer. Follow the steps below to connect your Ledger Nano S:
- Take the USB cable that came with your Ledger Nano S and connect one end to the USB port on your computer
- Connect the other end of the USB cable to the USB port on your Ledger Nano S
- On your Ledger Nano S, navigate to the main menu by using the buttons on the device
- Scroll through the menu and locate the “Settings” option
- Press both buttons on your Ledger Nano S simultaneously to enter the Settings menu
- Within the Settings menu, find the “USB” option and make sure it’s set to “On”
- Exit the Settings menu and your Ledger Nano S should now be connected to your computer
Once your Ledger Nano S is connected to your computer, Ledger Live should automatically detect the device. You may be prompted to enter your PIN code on the Ledger Nano S to authenticate the connection.
Ensure that you have a stable internet connection throughout the process to ensure a smooth installation and synchronization.
With your Ledger Nano S connected to your computer, you are now ready to proceed to the next step: opening Ledger Live and installing the Ripple app.
Step 3: Open Ledger Live and Install Ripple App
Now that your Ledger Nano S is connected to your computer, it’s time to open Ledger Live and install the Ripple app. Follow these steps:
- Launch the Ledger Live application on your computer
- If prompted, enter your Ledger Live password to unlock the application
- In the Ledger Live main screen, you will see a list of supported cryptocurrencies
- Click on the “Manager” tab located on the left-hand side
- In the Manager screen, you will see a list of available apps
- Scroll through the list or use the search bar to find the “Ripple” app
- Once you locate the Ripple app, click on the “Install” button next to it
- Follow the on-screen instructions to install the Ripple app on your Ledger Nano S
- During the app installation, you might be asked to confirm the installation on your Ledger Nano S. Follow the instructions displayed on the device’s screen to proceed
- Once the installation is complete, Ledger Live will notify you that the Ripple app has been successfully installed
Now, the Ripple app is installed on your Ledger Nano S, and you can proceed to open the app directly on the device itself.
Keep in mind that the Ledger Live application might need to synchronize with the Ledger servers to retrieve the latest information. This synchronization process might take a few minutes, so please be patient and ensure that you have a stable internet connection.
With the Ripple app installed, you are ready to move on to the next step: accessing your Ripple wallet on Ledger Live.
Step 4: Open the Ripple App on Ledger Nano S
After installing the Ripple app on your Ledger Nano S, the next step is to open the app on your device. Here’s how:
- Disconnect your Ledger Nano S from your computer, if it is still connected
- Navigate to the main menu on your Ledger Nano S by using the device’s buttons
- Scroll through the menu and locate the “Ripple” app
- Once you find the Ripple app, press both buttons on your Ledger Nano S simultaneously to open the app
After a few seconds, the Ripple logo will appear on the screen, indicating that the app is successfully opened on your Ledger Nano S.
It’s important to note that the Ripple app on your Ledger Nano S only displays the app’s interface and allows you to securely manage your Ripple funds. All interactions, such as sending and receiving Ripple, will be done through the companion Ledger Live application on your computer.
Now that you have successfully opened the Ripple app on your Ledger Nano S, it’s time to access your Ripple wallet on Ledger Live.
Step 5: Access Ripple Wallet on Ledger Live
With the Ripple app installed on your Ledger Nano S and the app open on the device, you can now access your Ripple wallet using the Ledger Live software on your computer. Follow these steps:
- Connect your Ledger Nano S to your computer using the USB cable
- Launch the Ledger Live application if it’s not already open
- Enter your Ledger Live password to unlock the application
- In the Ledger Live main screen, click on the “Accounts” tab on the left-hand side
- You will find a list of supported cryptocurrencies, including Ripple (XRP)
- Click on the “Ripple” account to access your Ripple wallet
- In the Ripple account view, you will see your Ripple balance, transaction history, and various options for managing your Ripple funds
- You can use the “Send” button to initiate a Ripple transaction and enter the recipient’s address and the amount you want to send
- To receive Ripple, click on the “Receive” button to generate a unique Ripple address that you can share with others to receive funds
It’s important to note that all transactions and operations involving your Ripple wallet will be conducted through Ledger Live. The role of the Ripple app on your Ledger Nano S is to securely store your keys and authorize transactions.
Make sure to keep your Ledger Nano S and Ledger Live software up to date to benefit from the latest security enhancements and features.
Now that you have successfully accessed your Ripple wallet on Ledger Live, you can proceed to send and receive Ripple using your Ledger Nano S.
Step 6: Send and Receive Ripple on Ledger Nano S
Now that you have accessed your Ripple wallet on Ledger Live, you can easily send and receive Ripple using your Ledger Nano S. Follow these steps:
Send Ripple:
- In the Ripple account view on Ledger Live, click on the “Send” button
- Enter the recipient’s Ripple address in the designated field
- Specify the amount of Ripple you want to send
- Review the transaction details and confirm that everything is correct
- If you’re satisfied, click on the “Send” button to initiate the transaction
- Follow any additional prompts or confirmations on your Ledger Nano S to authorize the transaction
- Once the transaction is confirmed on the Ripple network, the sent Ripple will be deducted from your wallet balance
Receive Ripple:
- In the Ripple account view on Ledger Live, click on the “Receive” button
- A unique Ripple address will be generated for you
- You can copy the address or click on the designated button to generate a QR code for easy sharing
- Share the generated Ripple address or QR code with the sender to receive funds
- The received Ripple will be reflected in your Ledger Live account once the transaction is confirmed on the Ripple network
It’s important to double-check the recipient’s Ripple address when sending funds to ensure accuracy. Ripple transactions are irreversible, so once the funds are sent, they cannot be reversed or refunded.
Remember to keep your Ledger Nano S and recovery phrase secure at all times to prevent unauthorized access to your Ripple funds.
With these steps, you can easily send and receive Ripple using your Ledger Nano S and Ledger Live.
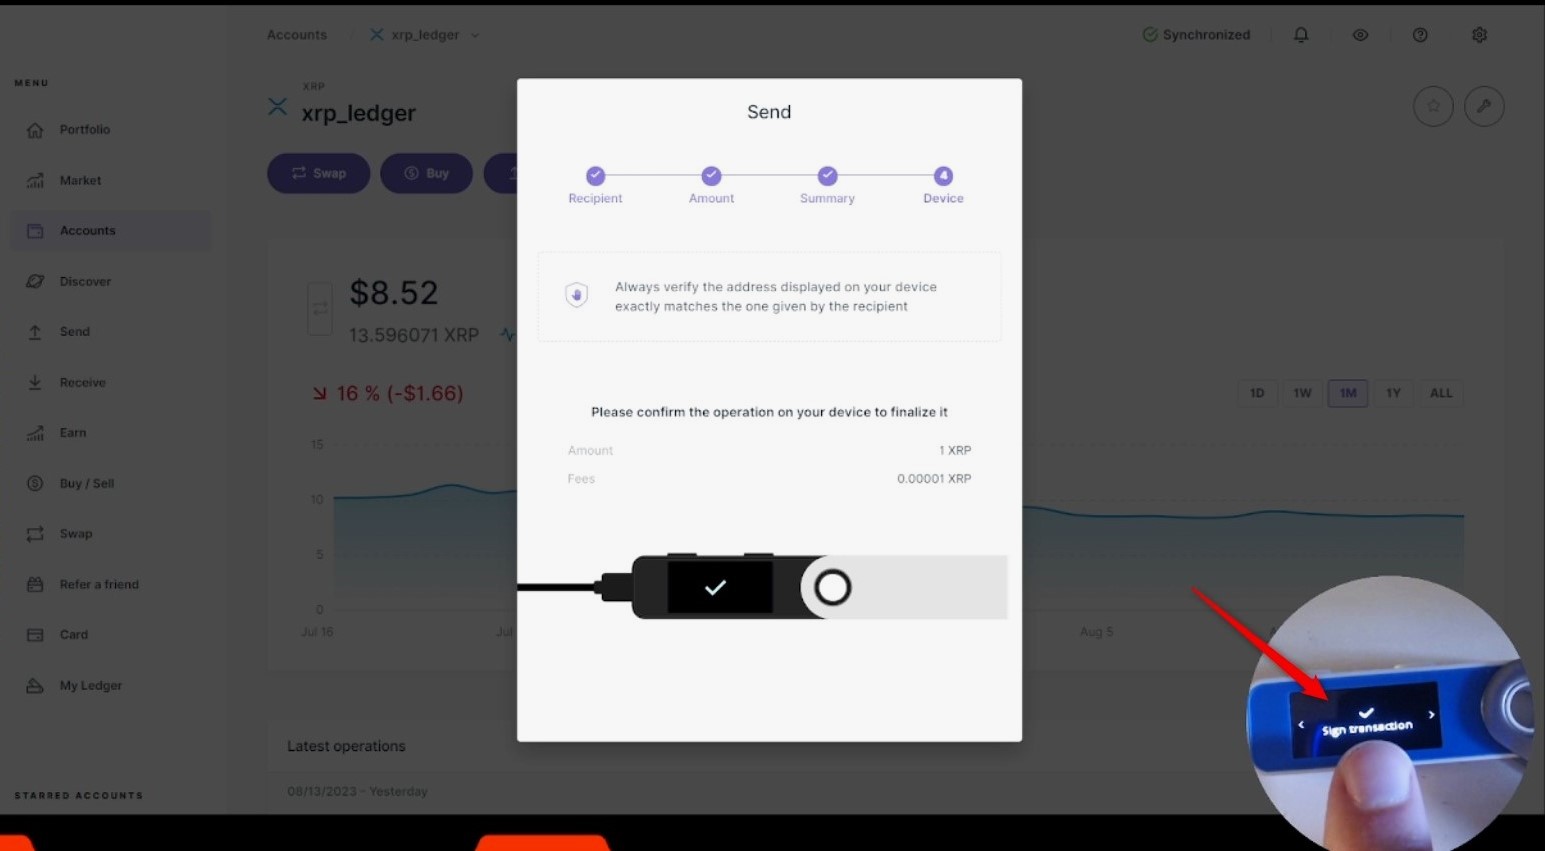
Step 7: Verify Transaction on Ledger Nano S
Verifying transactions on your Ledger Nano S is an essential step to ensure the accuracy and security of your Ripple transactions. Follow these steps to verify transactions:
- Initiate a transaction in Ledger Live by sending or receiving Ripple
- Before confirming the transaction on Ledger Live, your Ledger Nano S will display a prompt to review and approve the transaction
- On your Ledger Nano S, carefully review the details of the transaction displayed on the device’s screen
- Verify the recipient’s address, the amount, and any additional information related to the transaction
- If all the information is accurate and matches your intention, press the button on your Ledger Nano S to confirm and authorize the transaction
Verifying transactions on the Ledger Nano S is an important security measure to ensure that you are authorizing the correct transaction and prevent any unauthorized or mistaken transfers.
Always take the time to thoroughly review the transaction details on your Ledger Nano S before proceeding. If you notice any discrepancies or suspicious activity, immediately cancel the transaction and investigate further.
After verifying the transaction on your Ledger Nano S, the transaction will be executed and recorded on the Ripple network. It may take some time for the transaction to be confirmed and visible in your Ledger Live account.
By following these steps and carefully verifying each transaction on your Ledger Nano S, you can have peace of mind knowing that your Ripple transactions are secure and accurate.