
Setting up Gmail on iPhone 10
Setting up Gmail on your iPhone 10 is a straightforward process that allows you to access your emails, contacts, and calendar seamlessly. Whether you're creating a new Gmail account or adding an existing one, the steps are user-friendly and can be completed in just a few minutes.
To begin, ensure that your iPhone 10 is connected to a stable Wi-Fi network or cellular data. Once this is confirmed, follow these steps to set up Gmail on your device:
-
Open the Settings App: Locate and tap the "Settings" app on your iPhone 10's home screen. The Settings app is represented by a gear icon and is an essential tool for customizing your device's configurations.
-
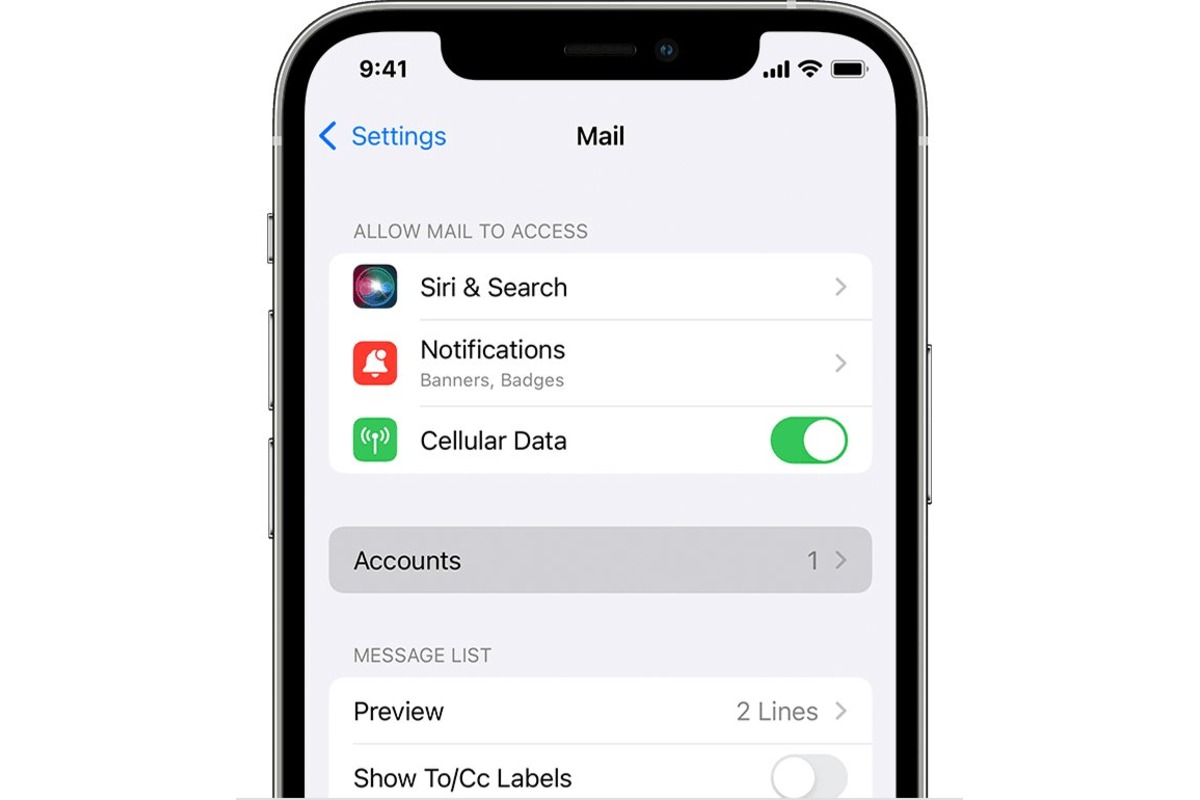
Select "Mail": Scroll down the Settings menu and tap on "Mail." This action will open a new window where you can manage your email accounts and settings.
-
Choose "Accounts": Within the Mail settings, select "Accounts" to view the existing email accounts linked to your iPhone 10. If this is your first time setting up an email account, this section will be empty.
-
Tap "Add Account": To add a new email account, tap on the "Add Account" option. This will prompt a list of popular email service providers to appear.
-
Select "Google": From the list of email providers, tap on "Google" to initiate the Gmail setup process. This will redirect you to the Google sign-in page.
-
Sign in to Your Gmail Account: Enter your Gmail email address and tap "Next." Then, input your password and tap "Next" again. If you have two-factor authentication enabled, you may need to complete an additional verification step.
-
Grant Permissions: After signing in, you will be prompted to grant permission for your iPhone to access your Gmail account. Tap "Allow" to authorize the synchronization of your emails, contacts, and calendar.
-
Customize Sync Settings: Once your account is added, you can customize the sync settings for your Gmail account. This includes options to sync Mail, Contacts, Calendars, and Notes. Toggle the switches based on your preferences.
-
Finish Setup: After customizing the sync settings, tap "Save" to complete the setup process. Your Gmail account is now successfully added to your iPhone 10, and you can access it through the Mail, Contacts, and Calendar apps.
By following these simple steps, you can seamlessly integrate your Gmail account with your iPhone 10, ensuring that you stay connected and organized while on the go.
Creating a New Gmail Account on iPhone 10
Creating a new Gmail account on your iPhone 10 is a fundamental step in harnessing the full potential of your device's email capabilities. Whether you're setting up your first email account or adding an additional one, the process is designed to be user-friendly and efficient. Here's a detailed guide on how to create a new Gmail account on your iPhone 10:
-
Access the Settings App: Begin by unlocking your iPhone 10 and locating the "Settings" app on the home screen. The Settings app, represented by a gear icon, serves as the control center for customizing various aspects of your device.
-
Navigate to Mail Settings: Scroll through the Settings menu and tap on "Mail." This action will open a new window where you can manage your email accounts and settings.
-
Select "Accounts": Within the Mail settings, tap on "Accounts" to view the existing email accounts linked to your iPhone 10. If this is your first time setting up an email account, this section will be empty.
-
Tap "Add Account": To create a new email account, tap on the "Add Account" option. This will prompt a list of popular email service providers to appear.
-
Choose "Google": From the list of email providers, tap on "Google" to initiate the Gmail account creation process. This will redirect you to the Google sign-in page.
-
Initiate the Account Creation: On the Google sign-in page, tap on the "Create account" link located at the bottom of the screen. This will prompt you to enter your first and last name, as well as your desired email address.
-
Set Up Your Email Address: After entering your first and last name, proceed to create your Gmail email address. If your preferred email address is unavailable, Google will provide alternative suggestions or allow you to input a different variation.
-
Create a Password: Once your email address is confirmed, create a secure password for your new Gmail account. It's essential to choose a strong password that combines letters, numbers, and special characters to enhance security.
-
Complete the Account Creation: After setting up your password, follow the on-screen prompts to input your phone number, recovery email address, and birthdate. This information is crucial for account recovery and security verification.
-
Agree to the Terms and Conditions: Review and accept Google's Terms of Service and Privacy Policy to proceed with creating your new Gmail account.
-
Verification and Security: Google may require additional verification steps to ensure the security of your new account. This can include a verification code sent to your phone number or recovery email address.
-
Confirmation and Access: Once your new Gmail account is successfully created, you can access it through the Mail, Contacts, and Calendar apps on your iPhone 10. Your account is now ready for use, allowing you to send and receive emails, manage contacts, and organize your schedule seamlessly.
By following these comprehensive steps, you can effortlessly create a new Gmail account on your iPhone 10, empowering you to stay connected and productive while on the go.
Adding an Existing Gmail Account to iPhone 10
Adding an existing Gmail account to your iPhone 10 is a seamless process that allows you to consolidate your email, contacts, and calendar in one convenient location. Whether you're transitioning to a new device or simply integrating additional accounts, the steps to add an existing Gmail account are designed to be user-friendly and efficient. Here's a detailed guide on how to seamlessly incorporate an existing Gmail account into your iPhone 10:
-
Access the Settings App: Begin by unlocking your iPhone 10 and locating the "Settings" app on the home screen. The Settings app, represented by a gear icon, serves as the control center for customizing various aspects of your device.
-
Navigate to Mail Settings: Scroll through the Settings menu and tap on "Mail." This action will open a new window where you can manage your email accounts and settings.
-
Select "Accounts": Within the Mail settings, tap on "Accounts" to view the existing email accounts linked to your iPhone 10. If you have previously added email accounts, they will be displayed in this section.
-
Tap "Add Account": To add an existing email account, tap on the "Add Account" option. This will prompt a list of popular email service providers to appear.
-
Choose "Google": From the list of email providers, tap on "Google" to initiate the Gmail account setup process. This will redirect you to the Google sign-in page.
-
Sign in to Your Gmail Account: Enter the email address of your existing Gmail account and tap "Next." Then, input the password associated with the account and tap "Next" again. If two-factor authentication is enabled, you may need to complete an additional verification step.
-
Grant Permissions: After signing in, you will be prompted to grant permission for your iPhone to access your existing Gmail account. Tap "Allow" to authorize the synchronization of your emails, contacts, and calendar.
-
Customize Sync Settings: Once your existing account is added, you can customize the sync settings for your Gmail account. This includes options to sync Mail, Contacts, Calendars, and Notes. Toggle the switches based on your preferences.
-
Finish Setup: After customizing the sync settings, tap "Save" to complete the setup process. Your existing Gmail account is now successfully added to your iPhone 10, and you can access it through the Mail, Contacts, and Calendar apps.
By following these straightforward steps, you can effortlessly integrate an existing Gmail account with your iPhone 10, ensuring that you have access to all your important communications and scheduling information in one centralized location. This streamlined approach enhances productivity and convenience, allowing you to stay connected and organized while on the go.
Configuring Gmail Settings on iPhone 10
Configuring Gmail settings on your iPhone 10 allows you to personalize your email experience and optimize the functionality of your Gmail account within the iOS ecosystem. By customizing various settings, you can tailor your email management, notifications, and synchronization preferences to align with your specific needs and preferences. Here's a comprehensive guide on how to configure Gmail settings on your iPhone 10:
1. Access the Settings App
Begin by unlocking your iPhone 10 and locating the "Settings" app on the home screen. The Settings app serves as the central hub for adjusting and customizing your device's configurations.
2. Navigate to Mail Settings
Scroll through the Settings menu and tap on "Mail." This action will open a window where you can manage your email accounts and settings.
3. Select Your Gmail Account
Within the Mail settings, tap on your Gmail account to access its specific configuration options. This section allows you to fine-tune the settings related to your Gmail account.
4. Customize Mail Settings
Under the Gmail account settings, you can customize various options related to mail management. This includes setting the frequency of fetching new mail, choosing the default email address for outgoing messages, and enabling or disabling the archiving of emails.
5. Manage Contacts and Calendars
In addition to mail settings, you can also manage the synchronization of contacts and calendars associated with your Gmail account. By toggling the switches, you can control the syncing of contacts and calendar events between your iPhone 10 and your Gmail account.
6. Adjust Notification Settings
To ensure timely notifications for incoming emails, you can customize the notification settings for your Gmail account. This includes configuring the notification sound, enabling or disabling banner notifications, and managing alerts for specific email threads.
7. Enable Advanced Settings
For advanced users, the Gmail settings on iPhone 10 offer additional options to fine-tune the behavior of your account. This includes managing labels, enabling or disabling the importance markers, and customizing the behavior of archived messages.
8. Review Other Options
Explore other options within the Gmail account settings to tailor your experience further. This may include managing the storage usage, configuring the signature for outgoing emails, and adjusting the default reply behavior.
By following these steps, you can effectively configure Gmail settings on your iPhone 10, ensuring that your email management aligns with your preferences and enhances your overall productivity and communication experience.