
Checking FaceTime Compatibility
Before setting up FaceTime on your iPhone 12, it's essential to ensure that your device is compatible with this popular video calling feature. FaceTime is a native application on Apple devices, allowing users to make video and audio calls over Wi-Fi or cellular networks. Here's how to check the compatibility of FaceTime on your iPhone 12:
-
Device Compatibility: FaceTime is supported on various Apple devices, including the iPhone, iPad, and Mac. For iPhone 12 users, FaceTime is readily available, as it comes pre-installed with the iOS operating system.
-
Operating System Version: To use FaceTime on your iPhone 12, it's crucial to have the latest iOS version installed. You can check for updates by navigating to Settings > General > Software Update. Ensure that your device is running the latest iOS version to access the full functionality of FaceTime.
-
Network Connection: FaceTime requires a stable internet connection to function seamlessly. Whether you're using Wi-Fi or cellular data, it's important to have a reliable network to support FaceTime calls without interruptions.
-
Region Restrictions: In some regions, FaceTime may be restricted due to local regulations. However, for most users, FaceTime is readily available without any restrictions.
By confirming the compatibility of FaceTime on your iPhone 12, you can proceed with confidence, knowing that your device is fully equipped to leverage this powerful communication tool.
Updating iPhone 12 Software
Ensuring that your iPhone 12 is running the latest software version is crucial for a seamless FaceTime experience. Apple regularly releases software updates to enhance device performance, introduce new features, and address security vulnerabilities. Here's a detailed guide on updating the software on your iPhone 12:
-
Check for Updates: To begin, navigate to the "Settings" app on your iPhone 12 and select "General." From there, tap on "Software Update." Your device will then check for available updates. If an update is available, you will be prompted to download and install it.
-
Download and Install: If an update is available, tap "Download and Install." Ensure that your iPhone 12 is connected to a stable Wi-Fi network to facilitate the download process. Additionally, it's advisable to have your device connected to a power source to prevent any interruptions during the update.
-
Install Overnight: For larger updates, you can opt to install the update overnight. Your iPhone 12 will automatically install the update during the night if it's connected to power and Wi-Fi.
-
Enter Passcode: If prompted, enter your device passcode to initiate the update installation. This step is essential to ensure the security of the update process.
-
Agree to Terms and Conditions: During the update installation, you may be required to agree to Apple's terms and conditions. Review the terms and proceed with the installation.
-
Restart and Verify: Once the update is installed, your iPhone 12 will restart. After the restart, navigate back to "Settings" > "General" > "Software Update" to verify that your device is now running the latest software version.
By keeping your iPhone 12's software up to date, you not only ensure the smooth functioning of FaceTime but also benefit from the latest security patches and performance improvements. Regularly checking for and installing software updates is a proactive measure that contributes to the overall reliability and functionality of your device.
Updating the software on your iPhone 12 is a straightforward process that empowers you to make the most of FaceTime and other features, while also safeguarding your device against potential security risks.
Enabling FaceTime in Settings
Enabling FaceTime on your iPhone 12 involves navigating through the device's settings to activate this feature, allowing you to seamlessly connect with friends, family, or colleagues through video and audio calls. Here's a step-by-step guide to enable FaceTime in the settings of your iPhone 12:
-
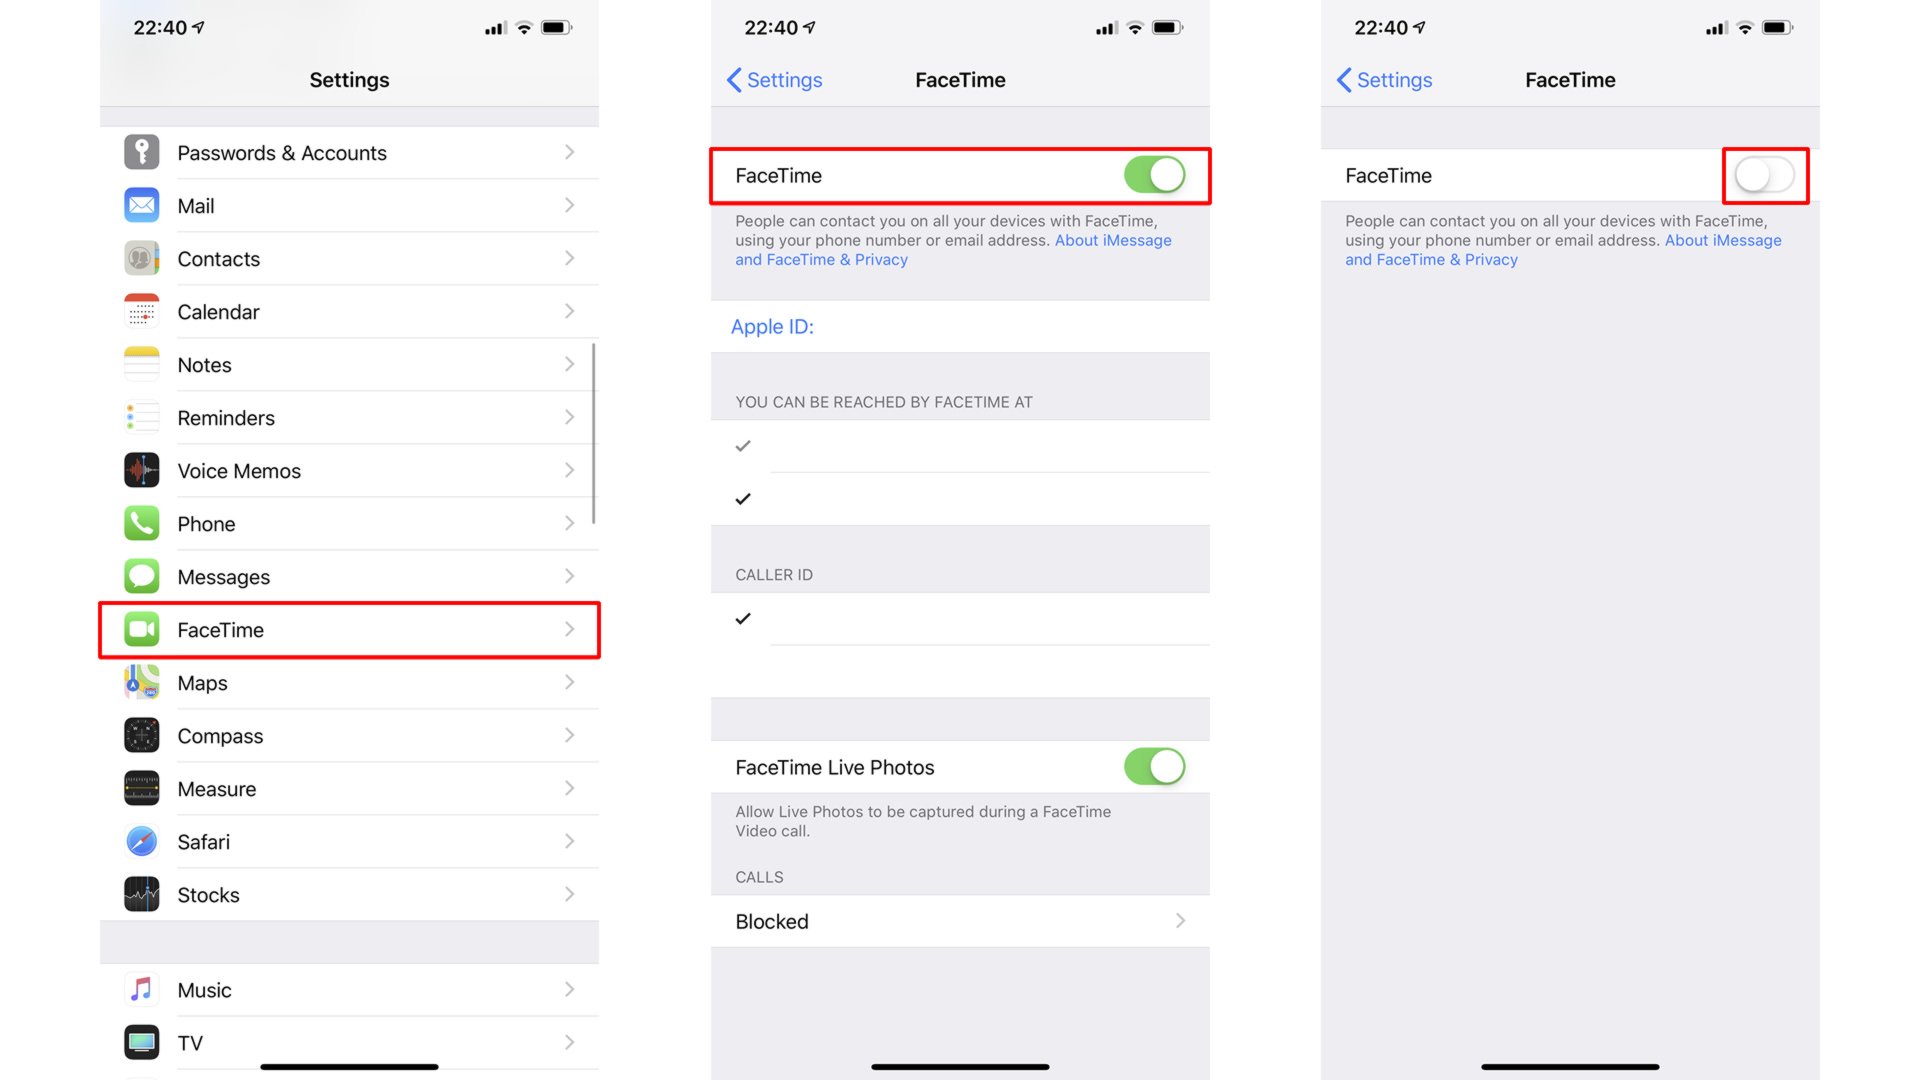
Accessing Settings: Begin by unlocking your iPhone 12 and locating the "Settings" app on the home screen. The Settings app is represented by a gear icon and is an essential hub for customizing various aspects of your device.
-
Locating FaceTime: Once inside the Settings app, scroll down and look for the "FaceTime" option. It is usually located below the "Messages" and "Phone" settings. Tapping on the FaceTime option will take you to a dedicated menu for managing FaceTime settings.
-
Enabling FaceTime: In the FaceTime settings menu, you will find a toggle switch next to "FaceTime." To activate FaceTime, simply tap the toggle switch to turn it on. Once enabled, the toggle switch will appear green, indicating that FaceTime is now active on your iPhone 12.
-
Adjusting Additional Settings: While in the FaceTime settings menu, you can customize additional preferences, such as choosing the phone number and email addresses that others can use to reach you via FaceTime. You can also set your caller ID for outgoing FaceTime calls and configure other related options to personalize your FaceTime experience.
-
Verifying Activation: After enabling FaceTime, it's essential to verify that the feature is fully activated and ready for use. You can do this by returning to the home screen and locating the FaceTime app. If the app is visible and accessible, it indicates that FaceTime has been successfully enabled on your iPhone 12.
Enabling FaceTime in the settings of your iPhone 12 is a straightforward process that empowers you to harness the capabilities of this powerful communication tool. Once activated, you can seamlessly engage in video calls with other Apple device users, fostering meaningful connections and enhancing your overall communication experience.
Verifying Apple ID for FaceTime
Verifying your Apple ID for FaceTime on your iPhone 12 is an essential step to ensure seamless connectivity and accessibility to this popular video calling feature. Your Apple ID serves as a unique identifier that allows you to engage in FaceTime calls and ensures that you can be reached by others using your associated email address or phone number. Here's a comprehensive guide on verifying your Apple ID for FaceTime:
-
Accessing Apple ID Settings: Begin by navigating to the "Settings" app on your iPhone 12. Scroll down and tap on your name at the top of the screen to access your Apple ID settings. This section provides a centralized platform for managing various aspects of your Apple ID, including FaceTime settings.
-
Selecting FaceTime: Within the Apple ID settings, locate and tap on the "FaceTime" option. This will direct you to a dedicated menu for configuring FaceTime preferences and verifying your Apple ID for this feature.
-
Verifying Apple ID: In the FaceTime settings menu, you will find your Apple ID listed at the top of the screen. This serves as a confirmation of the Apple ID associated with your FaceTime account. It's important to ensure that the displayed Apple ID is accurate and up to date.
-
Adding Additional Contact Information: While in the FaceTime settings, you have the option to add additional contact information, such as email addresses and phone numbers, that can be used to reach you via FaceTime. Verifying that the contact details associated with your Apple ID are correct enhances the accessibility and reachability of your FaceTime account.
-
Checking Caller ID: You can also verify and customize your caller ID for outgoing FaceTime calls. This allows you to control how your identity appears to others when you initiate a FaceTime call. Ensuring that your caller ID is accurate and reflects your preferred contact information is an integral part of verifying your Apple ID for FaceTime.
By meticulously verifying your Apple ID for FaceTime on your iPhone 12, you establish a solid foundation for engaging in seamless video calls with friends, family, and colleagues. This verification process not only ensures the accuracy of your contact information but also enhances the overall user experience by facilitating effortless communication through the FaceTime platform.
Verifying your Apple ID for FaceTime is a proactive measure that contributes to the reliability and accessibility of this feature, empowering you to stay connected with others through high-quality video calls on your iPhone 12.
Adding Contacts for FaceTime
Expanding your FaceTime contacts list on your iPhone 12 enables you to effortlessly connect with friends, family, and colleagues through high-quality video calls. Adding contacts for FaceTime is a simple yet impactful process that enhances the accessibility and convenience of this popular communication platform. Here's a detailed guide on how to add contacts for FaceTime on your iPhone 12:
-
Accessing Contacts: Begin by navigating to the "Contacts" app on your iPhone 12. This app serves as a centralized repository for managing your contacts, including those you can reach via FaceTime.
-
Selecting a Contact: Scroll through your contacts list and select the individual you wish to add for FaceTime. You can choose from existing contacts or add a new contact by tapping the "+" icon and entering the required details.
-
Verifying Contact Information: Once you've selected a contact, ensure that their associated phone number or email address is suitable for FaceTime communication. If the contact's details are not complete, you can edit and add the necessary information to facilitate FaceTime calls.
-
Enabling FaceTime: After verifying the contact's information, ensure that FaceTime is enabled for the selected contact. You can do this by tapping on the contact's name and navigating to the "Edit" option. From there, you can enable FaceTime for the contact by toggling the FaceTime switch.
-
Customizing Caller ID: While adding contacts for FaceTime, you have the option to customize the caller ID for each contact. This allows you to control how your identity appears to the contact when initiating a FaceTime call. Customizing the caller ID enhances personalization and ensures that your contacts can easily recognize your incoming calls.
-
Completing the Process: Once you've added the contact for FaceTime and customized the caller ID, ensure that the changes are saved. You can then proceed to initiate FaceTime calls with the added contact directly from the FaceTime app or the Contacts app.
By adding contacts for FaceTime on your iPhone 12, you expand your network of individuals with whom you can engage in meaningful video calls. This process not only enhances the accessibility of FaceTime but also fosters seamless communication, allowing you to stay connected with your contacts in a visually engaging and interactive manner.
Expanding your FaceTime contacts list on your iPhone 12 empowers you to leverage the full potential of this feature, fostering meaningful connections and enhancing your overall communication experience.
Making a FaceTime Call
Initiating a FaceTime call on your iPhone 12 is a seamless process that allows you to engage in high-quality video conversations with your contacts. Whether you're connecting with friends, family, or colleagues, making a FaceTime call is a visually engaging and interactive way to communicate. Here's a comprehensive guide on how to make a FaceTime call, ensuring that you can effortlessly connect with others using this popular feature.
Step-by-Step Guide:
-
Accessing the FaceTime App: Begin by locating the FaceTime app on your iPhone 12. The FaceTime app icon features a video camera and is easily accessible from the home screen or the app library. Tapping on the FaceTime app will launch the interface, providing you with the platform to initiate video calls.
-
Selecting a Contact: Once inside the FaceTime app, you can choose the contact with whom you wish to initiate a video call. You can select a contact from your existing FaceTime contacts list or enter the name, email, or phone number of the individual you want to call.
-
Initiating the Call: After selecting the desired contact, tap on the video camera icon to initiate the FaceTime call. This action prompts your iPhone 12 to establish a connection with the selected contact, initiating a high-quality video call that allows you to engage in real-time conversations.
-
Customizing Call Settings: Before placing the call, you have the option to customize call settings, such as enabling or disabling the camera, muting or unmuting the microphone, and adjusting the audio output. These settings allow you to personalize your FaceTime call experience based on your preferences and the nature of the conversation.
-
Connecting and Communicating: Once the call is initiated, your iPhone 12 establishes a connection with the selected contact, and the FaceTime interface transforms into a live video conversation. You can engage in meaningful communication, share experiences, and interact visually with the individual on the other end of the call.
-
Ending the Call: When you're ready to conclude the FaceTime call, simply tap the red phone icon to end the conversation. This action gracefully terminates the video call, allowing you to wrap up the interaction and return to the FaceTime app interface or the home screen of your iPhone 12.
By following these steps, you can confidently make a FaceTime call on your iPhone 12, leveraging the power of visual communication to connect with others in a dynamic and engaging manner. Making a FaceTime call is a user-friendly process that empowers you to foster meaningful connections and enhance your overall communication experience through the seamless integration of video calling technology.