
Check Compatibility
Before enabling Wi-Fi calling on your iPhone 13, it's crucial to ensure that your device and carrier support this feature. Wi-Fi calling allows you to make and receive calls over a Wi-Fi network instead of a cellular network, which can be incredibly useful in areas with poor cellular coverage. Here's how to check the compatibility of your iPhone 13 for Wi-Fi calling:
-
Carrier Support: Firstly, verify that your carrier supports Wi-Fi calling. Most major carriers offer this feature, but it's always best to confirm with your specific carrier. You can typically find this information on the carrier's official website or by contacting their customer support.
-
iPhone Compatibility: Wi-Fi calling is supported on various iPhone models, including the iPhone 13. However, it's essential to ensure that your specific iPhone 13 variant is compatible with Wi-Fi calling. Generally, newer iPhone models are more likely to support Wi-Fi calling, but it's advisable to double-check to avoid any potential issues.
-
Software Update: Check if your iPhone 13 is running the latest version of iOS. Apple frequently releases software updates that may include enhancements and bug fixes related to Wi-Fi calling. To check for updates, go to Settings > General > Software Update on your iPhone 13.
-
SIM Card Compatibility: Some carriers may require a specific type of SIM card to enable Wi-Fi calling. Ensure that your iPhone 13 is equipped with a compatible SIM card as per your carrier's requirements.
By confirming the compatibility of your iPhone 13 and carrier support for Wi-Fi calling, you can proceed with confidence to enable this convenient feature on your device. Once you've verified compatibility, the next steps involve updating your iOS, enabling Wi-Fi calling, setting your preferred Wi-Fi network, and testing the functionality to ensure a seamless experience.
Update iOS
Keeping your iPhone 13's operating system up to date is essential for ensuring optimal performance and accessing the latest features, including Wi-Fi calling capabilities. Apple regularly releases iOS updates to address security vulnerabilities, improve device stability, and introduce new functionalities. Here's a detailed guide on updating the iOS on your iPhone 13:
-
Check for Updates: To begin, navigate to the "Settings" app on your iPhone 13 and tap on "General." From there, select "Software Update." Your device will then check for available updates. If an update is available, you will be prompted to download and install it. It's important to perform this check regularly, as updates may not always be automatically downloaded.
-
Download and Install: If an iOS update is available, tap "Download and Install." Depending on the size of the update and your internet connection speed, this process may take some time. Ensure that your iPhone 13 is connected to a stable Wi-Fi network and has sufficient battery life or is connected to a power source during the update process.
-
Install Overnight: If the iOS update is large and you prefer not to interrupt your daily usage, you can opt to install the update overnight. Your iPhone 13 will automatically install the update during the night, provided it is connected to power and connected to Wi-Fi.
-
Enter Passcode: During the installation process, your iPhone 13 may require you to enter your device passcode. This is a security measure to ensure that only authorized users can install updates on the device.
-
Agree to Terms and Conditions: Once the update is downloaded, your iPhone 13 will prompt you to agree to the terms and conditions before proceeding with the installation. Review the terms and conditions, and if you agree, proceed with the installation.
-
Restart and Verify: After the installation is complete, your iPhone 13 will automatically restart. Once it has restarted, navigate back to "Settings" > "General" > "Software Update" to verify that your device is now running the latest version of iOS.
By regularly updating the iOS on your iPhone 13, you can ensure that your device is equipped with the latest security patches and features, including the ability to enable Wi-Fi calling. This simple yet crucial maintenance task can significantly enhance the overall performance and functionality of your iPhone 13.
Enable Wi-Fi Calling
Enabling Wi-Fi calling on your iPhone 13 is a straightforward process that empowers you to make and receive calls over a Wi-Fi network, providing a reliable communication option, especially in areas with weak cellular coverage. Here's a detailed guide on how to enable Wi-Fi calling on your iPhone 13:
-
Access Settings: Begin by unlocking your iPhone 13 and navigating to the "Settings" app on the home screen. Tap on "Phone" to access the phone settings.
-
Wi-Fi Calling Option: Within the "Phone" settings, look for the "Wi-Fi Calling" option. Depending on your carrier and region, this option may be labeled differently, such as "Wi-Fi Preferred" or "Wi-Fi Calls." Tap on this option to proceed.
-
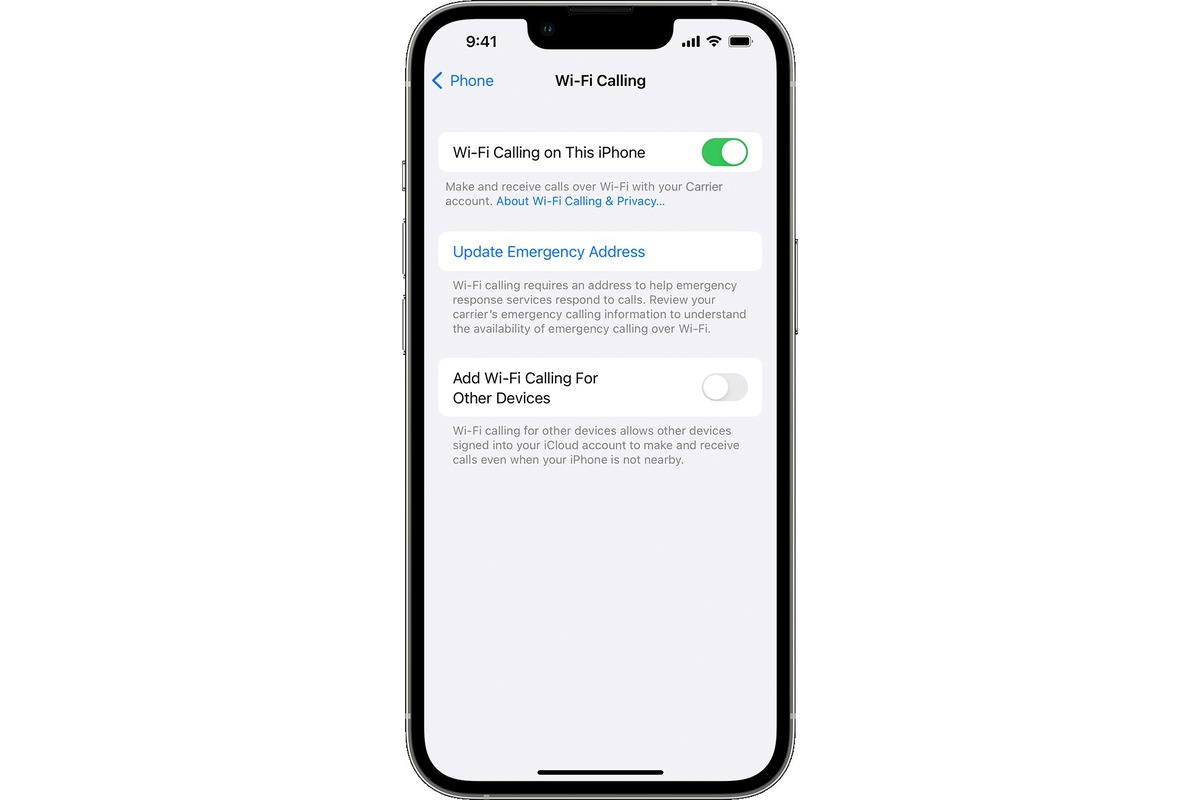
Enable Wi-Fi Calling: Toggle the switch to enable Wi-Fi calling. You may be prompted to review and accept the terms and conditions related to Wi-Fi calling. Once enabled, your iPhone 13 will configure the necessary settings to support Wi-Fi calling on your device.
-
Address Verification: In some cases, especially when using Wi-Fi calling for the first time, your carrier may require you to verify your address for emergency services. Follow the on-screen prompts to provide the necessary address details for verification.
-
Confirmation: After enabling Wi-Fi calling, your iPhone 13 will display a confirmation message indicating that Wi-Fi calling is now active on your device. You may also notice a Wi-Fi calling icon in the status bar, indicating that the feature is ready for use.
-
Additional Settings (Optional): Depending on your carrier and specific preferences, there may be additional settings related to Wi-Fi calling, such as call handoff preferences and other customization options. Explore these settings to tailor the Wi-Fi calling experience to your liking.
By following these steps, you can seamlessly enable Wi-Fi calling on your iPhone 13, expanding your communication capabilities beyond traditional cellular networks. Once Wi-Fi calling is activated, your iPhone 13 will intelligently switch between Wi-Fi and cellular networks to ensure uninterrupted call connectivity, offering a valuable solution for staying connected in various scenarios.
Enabling Wi-Fi calling on your iPhone 13 is a proactive step toward enhancing your communication experience, particularly in areas with limited cellular coverage. With this feature enabled, you can enjoy reliable voice calls over Wi-Fi, ensuring that you stay connected when traditional cellular signals may be weak or unavailable.
Set Preferred Wi-Fi Network
Setting your preferred Wi-Fi network on your iPhone 13 is a crucial step in optimizing the Wi-Fi calling experience. By specifying a preferred Wi-Fi network, you can ensure that your device automatically connects to the designated network for Wi-Fi calling, providing a seamless and reliable communication solution. Here's a comprehensive guide on how to set your preferred Wi-Fi network for Wi-Fi calling on your iPhone 13:
-
Access Wi-Fi Calling Settings: Begin by unlocking your iPhone 13 and navigating to the "Settings" app on the home screen. Tap on "Phone" to access the phone settings, and then select "Wi-Fi Calling" or the equivalent option based on your carrier and region.
-
Preferred Wi-Fi Network: Within the Wi-Fi calling settings, look for the "Preferred Wi-Fi Network" or similar option. Tap on this setting to specify your preferred Wi-Fi network for Wi-Fi calling.
-
Select the Desired Network: Your iPhone 13 will display a list of available Wi-Fi networks. Choose the Wi-Fi network that you prefer to use for Wi-Fi calling. This is typically a network with strong and reliable Wi-Fi coverage, such as your home or office network.
-
Save the Preferred Network: After selecting the desired Wi-Fi network, your iPhone 13 will save this preference for Wi-Fi calling. Whenever you are within range of the specified network, your device will automatically prioritize it for Wi-Fi calling purposes.
-
Automatic Connection: Once the preferred Wi-Fi network is set, your iPhone 13 will intelligently connect to this network when Wi-Fi calling is initiated, ensuring that you can seamlessly make and receive calls over the designated network.
-
Network Prioritization: By setting a preferred Wi-Fi network, you can prioritize a reliable and stable Wi-Fi connection for Wi-Fi calling, enhancing the overall call quality and ensuring consistent communication performance.
By following these steps to set your preferred Wi-Fi network for Wi-Fi calling on your iPhone 13, you can optimize the Wi-Fi calling experience and leverage the benefits of reliable voice communication over Wi-Fi networks. This proactive approach ensures that your device seamlessly connects to the designated network, offering a dependable solution for staying connected in various environments.
Test Wi-Fi Calling
After enabling Wi-Fi calling and setting your preferred Wi-Fi network on your iPhone 13, it's essential to conduct a thorough test to ensure that the feature functions seamlessly and meets your communication needs. Testing Wi-Fi calling allows you to verify call quality, network handoff capabilities, and overall reliability, providing confidence in using this feature in various scenarios. Here's a detailed guide on how to effectively test Wi-Fi calling on your iPhone 13:
-
Place Test Calls: Initiate several test calls to different numbers while connected to a Wi-Fi network. This can include calls to landline numbers, mobile phones, and other devices. Pay close attention to call clarity, volume, and any potential disruptions during the calls.
-
Move Between Wi-Fi and Cellular Networks: While on a Wi-Fi call, intentionally move out of the Wi-Fi network's range to test the device's ability to seamlessly transition the call to the cellular network. Similarly, re-enter the Wi-Fi network's coverage area to observe the handoff back to Wi-Fi calling. This test ensures that your iPhone 13 can adapt to network changes without interrupting the call.
-
Test in Various Locations: Conduct Wi-Fi calling tests in different environments, such as your home, workplace, or public Wi-Fi hotspots. By testing Wi-Fi calling in diverse settings, you can assess its performance under varying network conditions and identify any specific environments where it may excel or encounter challenges.
-
Evaluate Call Stability: During the test calls, evaluate the stability of Wi-Fi calling by monitoring for call drops, audio delays, or other irregularities. Assessing call stability across multiple test scenarios provides valuable insights into the reliability of Wi-Fi calling on your iPhone 13.
-
Verify Emergency Calling: If applicable, verify the functionality of emergency calls over Wi-Fi. Place a test call to your local emergency services number to ensure that Wi-Fi calling seamlessly supports emergency calls, providing an additional layer of security and peace of mind.
-
Review Call Logs and Quality: After conducting the test calls, review the call logs on your iPhone 13 to assess the duration and quality of each Wi-Fi call. This review can help identify any patterns or trends related to call quality and performance.
By meticulously testing Wi-Fi calling on your iPhone 13, you can gain valuable insights into its functionality, performance, and reliability. This proactive approach allows you to identify any potential limitations or areas for improvement, ensuring that Wi-Fi calling meets your communication requirements effectively. Additionally, thorough testing provides the opportunity to familiarize yourself with the intricacies of Wi-Fi calling, empowering you to leverage this feature with confidence in various real-world scenarios.