
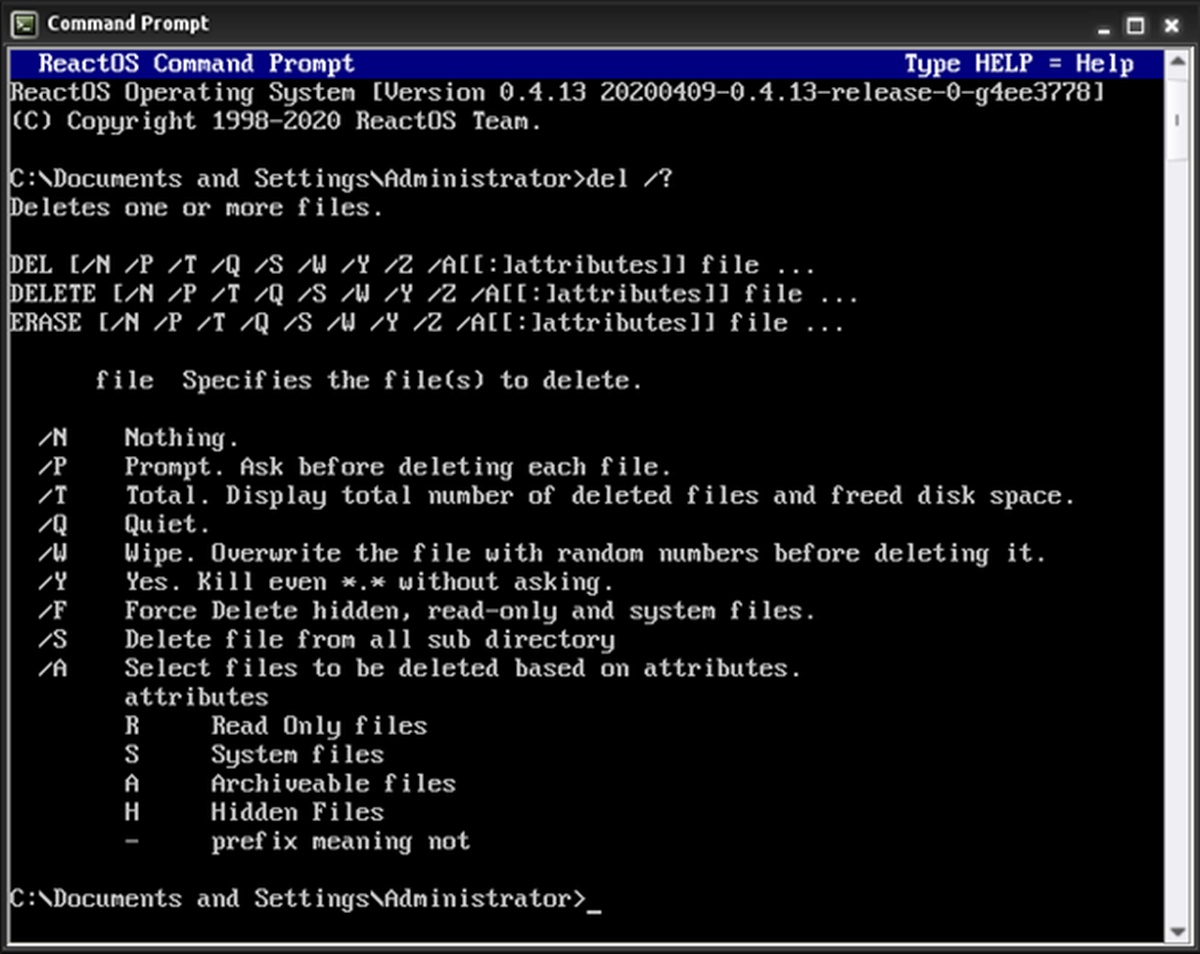
Examples of using the Del command
The Del command is a powerful tool in the command line interface that allows you to delete files and folders quickly and efficiently. Whether you want to delete a single file or remove multiple files and folders at once, the Del command provides a simple yet effective solution. Let’s explore some examples of how you can use the Del command in different scenarios.
1. Basic del command: To delete a single file, you can use the basic Del command followed by the filename. For example, to delete a file named “example.txt”, you would use the command “del example.txt”.
2. Deleting multiple files with Del command: If you want to delete multiple files, you can specify multiple filenames separated by spaces. For instance, to delete three files named “file1.txt”, “file2.txt”, and “file3.txt”, you would use the command “del file1.txt file2.txt file3.txt”.
3. Using wildcards with Del command: The Del command supports the use of wildcards to delete files that match a specific pattern. For example, “del *.txt” would delete all files with the .txt extension in the current directory.
4. Deleting folders and subfolders with Del command: To delete folders and their contents, you can add the “/S” option to the Del command. For instance, “del /S foldername” would delete the specified folder and all its subfolders.
5. Permanent deletion with Del command: By default, the Del command sends deleted files to the Recycle Bin. However, if you want to permanently delete a file without sending it to the Recycle Bin, you can use the “/P” option. For example, “del /P filename” would prompt you to confirm the permanent deletion of the file.
6. Restoring deleted files with Del command: Unfortunately, the Del command doesn’t provide a direct way to restore deleted files. Once a file is deleted, it will be permanently removed from the system. It’s always a good practice to create backups of important files before using the Del command.
7. Bypassing confirmation prompt with Del command: If you want to delete files without being prompted for confirmation, you can use the “/Q” option. For example, “del /Q filename” would delete the file without any confirmation prompt.
8. Deleting read-only files with Del command: If you encounter a read-only file and want to delete it, you can add the “/F” option to the Del command. For instance, “del /F filename” would force delete the read-only file.
9. Deleting empty folders with Del command: To delete empty folders, you can use the “/R” option with the Del command. For example, “del /R foldername” would remove the specified empty folder.
These are just a few examples of how you can use the Del command to delete files and folders in different scenarios. Experiment with different command options and parameters to make the most out of this powerful tool.
Basic del command
The basic Del command is used to delete a single file in the command line interface. It is a fundamental and frequently used command for file management tasks. To utilize the basic Del command, follow the syntax: del filename, where “filename” represents the name of the file you want to delete.
For example, if you have a file named “example.txt” that you want to delete, you would use the command del example.txt. Upon executing the command, the file will be permanently deleted from the system.
It is important to note that when using the basic Del command, the file will be sent to the Recycle Bin by default. Therefore, if you accidentally delete a file, you can typically restore it from the Recycle Bin before it is permanently removed from the system.
However, there might be instances when you want to bypass the Recycle Bin and permanently delete a file. In such cases, you can use the /P option. Adding the /P option prompts a confirmation message asking for your approval to permanently delete the file. For instance, the command del /P filename will ask for confirmation before deleting the specified file.
It is crucial to exercise caution when using the basic Del command to avoid accidentally deleting important files. Make sure to double-check the filenames and ensure that you have backups of any critical files before performing any deletion operations. Using the basic Del command correctly can help you organize and manage your files efficiently.
Deleting multiple files with Del command
The Del command not only allows you to delete a single file but also provides the capability to delete multiple files simultaneously. This can greatly expedite the file management process, especially when dealing with a large number of files that need to be removed.
To delete multiple files with the Del command, you simply need to specify the filenames of the files you want to delete, separated by spaces. For example, imagine you have three files named “file1.txt”, “file2.txt”, and “file3.txt” that you want to delete. Using the Del command, you would execute the command del file1.txt file2.txt file3.txt.
Upon running the command, all three specified files will be deleted. It is important to ensure that the filenames are accurate and correctly entered to avoid accidentally deleting the wrong files.
Using the Del command to delete multiple files not only saves time but also provides flexibility. You can delete files of different types and extensions in a single command. For instance, the command del *.txt *.docx deletes all .txt and .docx files in the specified directory.
Additionally, you can combine the use of wildcards with the Del command to delete files that match a specific pattern or criteria. For example, to delete all files that start with “document” and have the .txt extension, you would use the command del document*.txt. This allows for a more targeted approach to file deletion and can be particularly useful when dealing with a large number of files with similar naming conventions.
When deleting multiple files, it is essential to exercise caution and double-check the filenames and patterns you specify in the command. Verify that you have appropriate backups of any important files to prevent accidental permanent deletion.
The ability to delete multiple files with a single Del command provides a convenient and efficient solution for file management tasks, allowing you to streamline the deletion process and keep your file system organized.
Using wildcards with the Del command
The Del command offers the flexibility to use wildcards when specifying filenames, enabling you to delete files based on specific patterns or criteria. Wildcards are special characters that represent unknown or variable characters in a filename.
One of the commonly used wildcards is the asterisk (*) which matches any sequence of characters. For example, if you want to delete all files with the .txt extension in the current directory, you can use the Del command with the wildcard: del *.txt. This command will delete all files that end with “.txt” regardless of their names. It provides a convenient way to delete multiple files with a similar extension in one go.
You can also use wildcards in conjunction with specific characters to narrow down your file deletion criteria. For instance, if you want to delete all files in a directory that start with “report” and have a three-letter extension, you can utilize a combination of wildcards and specific characters like this: del report???.*. The “?” wildcard represents a single character, and the “*” wildcard matches any sequence of characters. This command will delete files with filenames like “report001.doc”, “reportxyz.txt”, and so on, as long as they have a three-letter extension.
Using wildcards with the Del command can be particularly helpful when dealing with large numbers of files or when you need to delete files that follow a specific naming convention. By being able to define patterns and criteria, you can efficiently delete files that meet your specified conditions without having to provide exact filenames.
It’s important, however, to exercise caution when using wildcards, as the Del command will match and delete any files that satisfy the specified pattern. Make sure to carefully review the files that will be affected by the command before proceeding with the deletion.
Overall, the ability to use wildcards with the Del command adds a powerful dimension to file deletion, allowing you to be more selective and efficient in managing your files based on specific patterns or criteria.
Deleting folders and subfolders with Del command
The Del command not only enables you to delete individual files but also provides the capability to delete entire folders and their contents, including subfolders. This can be immensely useful when you need to remove a directory and all its files without manually deleting each file separately.
To delete a folder and its contents using the Del command, you need to include the “/S” option. For example, suppose you have a folder named “myfolder” that contains multiple files and subfolders. Using the Del command, the command would be del /S myfolder.
When the command is executed with the “/S” option, the Del command recursively deletes all the files and subfolders within the specified folder. It traverses through all the subdirectories, deleting all the files and folders encountered along the way.
It’s important to note that once a folder and its contents are deleted, they cannot be recovered from the Recycle Bin. Therefore, exercise caution and ensure that you have appropriate backups before deleting folders and their contents using the Del command.
When deleting folders with the Del command, you may encounter read-only files or files protected by system attributes. In such cases, the command may prompt for confirmation to delete these files. You can bypass this prompt using the “/F” option. For example, del /S /F myfolder would force delete the folder and its contents, including read-only and system-protected files.
Using the Del command to delete folders and subfolders provides a convenient and efficient way to remove entire directory structures in a single command. It saves time and effort compared to manually deleting each file and folder individually.
Always double-check the folder name and ensure that you are deleting the correct directory and its contents, as the Del command executes the deletion immediately without a confirmation prompt. With proper care and consideration, the Del command can be a helpful tool in managing and organizing your file system.
Permanent deletion with the Del command
By default, when you use the Del command to delete files, they are sent to the Recycle Bin, allowing you to restore them if needed. However, there may be instances when you want to bypass the Recycle Bin and permanently delete files without the option to recover them. In such cases, you can use the Del command with the “/P” option.
The “/P” option stands for “permanently” and prompts the Del command to request your approval before permanently deleting the specified file. For example, to permanently delete a file named “example.txt”, you would use the command del /P example.txt.
Executing this command prompts a confirmation message asking you to verify if you want to permanently delete the file. You can respond by pressing “Y” (yes) or “N” (no) on your keyboard. If you press “Y”, the file will be immediately and irreversibly deleted from the system.
It’s important to exercise caution when using the “/P” option because once a file is permanently deleted, it cannot be recovered through normal means. Make sure to review the file name and contents to avoid mistakenly deleting important files.
Furthermore, when using the “/P” option to delete multiple files, the Del command will prompt the deletion confirmation for each file individually. You have the flexibility to choose whether to permanently delete each file or not.
Keep in mind that the “/P” option is primarily intended for cases where you want to permanently delete files without using the Recycle Bin. If you simply want to delete files and send them to the Recycle Bin as usual, there is no need to include the “/P” option in the Del command.
By utilizing the “/P” option, the Del command allows you to permanently delete files, providing a bypass option for the Recycle Bin. However, it is essential to exercise caution and ensure that you want to permanently delete the files, as recovery becomes impossible after applying this command.
Restoring deleted files with the Del command
When you use the Del command to delete files, they are typically moved to the Recycle Bin from where they can be easily restored if needed. However, it’s important to note that the Del command does not provide a direct way to restore deleted files. Once a file is deleted, it is considered permanently removed from the system.
In order to restore deleted files, you need to access the Recycle Bin, which acts as a temporary storage for deleted files. The Recycle Bin provides a safety net, allowing you to recover mistakenly deleted files or files that you may require later.
To access the Recycle Bin and restore files, you can follow these steps:
- Double-click on the Recycle Bin icon on your desktop to open it. Alternatively, you can navigate to the Recycle Bin through the File Explorer.
- Locate the file or files you want to restore. You can use the search function or manually browse through the files.
- Once you find the desired file, right-click on it and select “Restore”. The file will be restored to its original location.
It’s important to note that the Recycle Bin has a capacity limit, and once it reaches that limit, older files will be automatically deleted to make space for new deleted files. Therefore, it’s recommended to restore deleted files as soon as you realize you need them.
If you want to prevent files from being sent to the Recycle Bin altogether and ensure their immediate permanent deletion, you can use the Del command with the “/P” option. However, keep in mind that once a file is permanently deleted using the “/P” option, it cannot be restored from the Recycle Bin.
It’s always a good practice to regularly back up your important files to an external storage device or cloud storage to provide an additional layer of protection against accidental deletion or loss.
While the Del command itself does not facilitate the restoration of deleted files, the Recycle Bin serves as a crucial tool for recovering files that were mistakenly deleted using the Del command or through other file deletion methods.
Bypassing confirmation prompt with the Del command
When using the Del command to delete files, by default, the command will prompt you with a confirmation message asking for your approval before proceeding with the deletion. This confirmation prompt ensures that you don’t accidentally delete files without intending to. However, in certain cases, you may want to bypass this confirmation prompt and automate the deletion process. The Del command provides the “/Q” option specifically for this purpose.
By including the “/Q” option in the Del command, you instruct the command to skip the confirmation prompt and proceed with the deletion without your explicit confirmation. For example, if you have a file named “example.txt” that you want to delete without any prompt, the command would be del /Q example.txt.
Using the “/Q” option can be particularly useful when you are running batch operations or scripts and need to delete multiple files automatically without any interruptions. Instead of manually confirming each deletion, the Del command executes the deletion process seamlessly and efficiently.
It is important to exercise caution when using the “/Q” option because it removes the safety net of the confirmation prompt. Make sure to double-check the command and verify that you are deleting the correct files. Once you execute the command, the files will be deleted instantly without further confirmation.
It’s worth mentioning that the “/Q” option works with both single file deletion and multiple file deletion scenarios. For bulk deletion, simply provide the filenames separated by spaces. For instance, del /Q file1.txt file2.txt file3.txt would delete three files without any confirmation prompts.
Remember to backup important files before using the Del command with the “/Q” option, as deleted files bypass the Recycle Bin and are immediately removed from the system. Having backups ensures that you can still recover the files if needed.
The ability to bypass the confirmation prompt with the Del command using the “/Q” option streamlines and automates the file deletion process, particularly in situations where manual confirmation is not necessary or desired.
Deleting read-only files with the Del command
While deleting files with the Del command, you may encounter situations where certain files have the read-only attribute set. This attribute prevents files from being modified or deleted without explicitly granting write permission. However, if you need to delete read-only files, you can do so by using the Del command with the “/F” option.
The “/F” option stands for “force” and allows the Del command to forcefully delete files, bypassing any read-only attributes. For example, if you have a read-only file named “example.txt” that you want to remove, the command would be del /F example.txt.
When the Del command is executed with the “/F” option, it overrides the read-only attribute and deletes the file without requiring write permission. This option is particularly useful when dealing with stubborn or locked files that cannot be deleted through regular means.
It’s important to note that when using the “/F” option, the Del command does not prompt for confirmation before deleting the read-only file. Therefore, exercise caution and ensure that you are targeting the correct file for deletion.
It is worth mentioning that the “/F” option not only works for single file deletion but also for multiple files. You can specify multiple filenames separated by spaces to delete multiple read-only files at once. For instance, del /F file1.txt file2.txt file3.txt would delete three read-only files.
However, be cautious when using the “/F” option, as it forcefully deletes files without any possibility of recovering them from the Recycle Bin. Before executing the Del command with the “/F” option, consider making backups of any important files to avoid permanent data loss.
Using the Del command with the “/F” option allows you to delete read-only files that may otherwise be inaccessible or difficult to remove. It provides a straightforward solution to overcome read-only attribute restrictions when deleting files from your system.
Deleting empty folders with the Del command
In addition to deleting files, the Del command can also be used to remove empty folders from your system. Empty folders are folders that do not contain any files or subfolders. The Del command provides a quick and efficient solution to delete these empty folders in just a single command.
To delete an empty folder using the Del command, you need to pass the folder name as an argument. For example, if you have an empty folder named “myfolder” that you want to remove, the command would be del myfolder.
Executing this command will delete the specified empty folder from your system. However, it’s important to note that if the folder contains any files or subfolders, it will not be deleted, and you will need to remove those files and subfolders first before running the Del command to delete the empty folder.
When deleting empty folders, it’s always a good practice to double-check the folder name to ensure you are deleting the correct folder. The Del command executes the deletion process immediately without any prompts or confirmations.
Deleting empty folders using the Del command can be particularly useful when you want to clean up your file system and remove any unnecessary directories. By using this command, you can quickly and efficiently get rid of any empty folders, keeping your file organization neat and tidy.
However, be cautious when using the Del command to delete folders, as it permanently removes the folder and its contents. There is no way to recover the files or subfolders once they are deleted using the Del command.
It’s important to note that the Del command does not delete non-empty folders. If you want to delete a folder and all its contents, including files and subfolders, you can use the Del command with the /S option. This option allows you to delete the folder and its entire directory structure.
Overall, the Del command provides a convenient and efficient way to delete empty folders from your system. By using this command, you can easily declutter your file system and keep it organized.
Using the /P option with the Del command
The Del command provides several options to customize its behavior and add extra functionality. One such option is the “/P” option, which stands for “prompt.” When used with the Del command, the “/P” option prompts for confirmation before deleting each specified file, ensuring that you do not unintentionally delete important files.
By default, when you execute the Del command, it deletes files without asking for confirmation. However, including the “/P” option adds an additional layer of safety by prompting a confirmation message for each file you want to delete.
To use the “/P” option, simply include it in the Del command followed by the filename(s) you want to delete. For example, if you have a file named “example.txt” and want to prompt for confirmation before deleting it, the command would be del /P example.txt.
When the Del command is executed with the “/P” option, a confirmation prompt appears for each file you want to delete. You can choose to proceed with the deletion by pressing “Y” (yes) or cancel the operation by pressing “N” (no). This allows you to selectively delete files and prevent accidental deletion.
The “/P” option is particularly useful when you are deleting files in bulk or performing operations involving critical or sensitive files. It ensures that you have the opportunity to review and confirm the deletion of each file individually, helping you avoid mistakes or hasty removal of files.
It’s important to note that when deleting multiple files using the “/P” option, the confirmation prompt appears for each file separately, allowing you to make an informed decision for each file.
While the additional confirmation prompts may slow down the deletion process, they offer an added layer of protection and give you greater control over which files are deleted. This can be especially helpful when working with important files or during batch operations where accuracy is crucial.
Using the “/P” option with the Del command ensures that you have the opportunity to review and confirm each file deletion individually. By providing an extra level of safety, it allows you to proceed with confidence, minimizing the risk of unintentional file deletion.
Using the /A option with the Del command
The Del command provides various options to enhance its functionality and allow for more specific file deletion operations. One such option is the “/A” option, which stands for “attributes.” When used with the Del command, the “/A” option allows you to delete files based on their specific attributes.
By default, the Del command deletes all files regardless of their attributes. However, the “/A” option enables you to specify certain attributes that you want to consider when deleting files.
To use the “/A” option, you include it in the Del command followed by the attribute(s) you want to target. For example, if you want to delete all read-only files in a directory, the command would be del /A:R.
The “/A” option supports multiple attributes, separated by commas, allowing you to target files with specific combinations of attributes. Here are some common attributes that can be used with the “/A” option:
- R: Read-only files
- A: Files ready for archiving
- S: System files
- H: Hidden files
For example, to delete all read-only and hidden files in a directory, the command would be del /A:R,H.
It’s important to note that when using the “/A” option, the Del command only deletes files that match the specified attributes. Other files in the directory that do not have the specified attributes will not be affected.
Additionally, you can combine the “/A” option with other Del command options, such as “/S” for deleting files in subfolders or “/Q” for bypassing confirmation prompts.
When using the “/A” option, exercise caution and verify that the attribute(s) you specify match exactly with the files you want to delete. Misusing this option may lead to unintentional deletion of files that should not be deleted.
The “/A” option with the Del command provides a powerful way to target files based on their attributes, allowing for more precise and customized file deletion operations. By using this option, you can streamline your file management tasks and delete files that meet specific attribute criteria.
Using the /F option with the Del command
The Del command provides various options to tailor its behavior and perform specific file deletion operations. One such option is the “/F” option, which stands for “force.” When used with the Del command, the “/F” option allows you to forcefully delete files, even if they are set as read-only or have other attributes that prevent normal deletion.
By default, when you attempt to delete a read-only file using the Del command, it will prompt you for confirmation and ask if you want to delete the file. However, including the “/F” option in the Del command overrides this behavior and forces the deletion, regardless of any file attributes that might interfere. This option can be particularly useful when dealing with stubborn or locked files that cannot be deleted through regular means.
To use the “/F” option, simply include it in the Del command followed by the filename(s) you want to delete. For example, to force delete a read-only file named “example.txt”, the command would be del /F example.txt.
When the Del command is executed with the “/F” option, the file(s) specified will be deleted without prompting for confirmation. It is important to exercise caution when using the “/F” option, as deleted files will be permanently removed from the system and cannot be recovered from the Recycle Bin.
In addition to read-only files, the “/F” option also allows you to forcefully delete files with other attributes, such as hidden or system files. This can be particularly useful when you need to delete files that are normally protected or inaccessible.
When using the “/F” option to delete multiple files, the Del command will forcefully delete each file without prompting for confirmation. Be sure to verify the filenames and execute the command carefully to avoid unintentionally deleting important files.
It’s worth noting that although the “/F” option allows you to bypass certain restrictions, it should be used judiciously. Make sure to fully understand the implications of forceful deletion and consider creating backups of important files before using the Del command with the “/F” option.
The “/F” option with the Del command provides a convenient and powerful tool to forcefully delete files, disregarding attributes that might impede normal deletion. When used responsibly, it can help you overcome file restrictions and manage your files more efficiently.
Using the /S option with the Del command
The Del command provides several options to enhance its functionality and perform more complex file deletion operations. One such option is the “/S” option, which stands for “subdirectories.” When used with the Del command, the “/S” option allows you to delete files from a directory and its subdirectories recursively.
By default, the Del command only deletes files in the specified directory and does not remove files from any subdirectories. However, when you include the “/S” option in the Del command, it instructs the command to traverse through all subdirectories, deleting files contained within them as well.
To use the “/S” option, simply include it in the Del command followed by the directory or filenames you want to delete. For example, if you have a directory named “myfolder” and want to delete all files within it and its subdirectories, the command would be del /S myfolder.
When the Del command is executed with the “/S” option, it traverses through all subdirectories of the specified directory and deletes files within them. It offers a convenient way to clean up a directory tree and remove files from multiple levels of subdirectories in one go.
It’s important to exercise caution when using the “/S” option, as all files within the specified directory and its subdirectories will be deleted. Make sure to double-check the directory path and confirm that you are targeting the correct location before executing the Del command.
When deleting files with the “/S” option, keep in mind that the Del command does not prompt for confirmation before deleting each file. Therefore, be extra vigilant and ensure that you have backups of important files to avoid irreversible data loss.
Regardless of whether you are deleting files in a single directory or multiple subdirectories, remember that the Del command only deletes files and not directories. If you want to delete empty directories as well, you can combine the “/S” option with the “/Q” (quiet) option. For example, del /S /Q mydirectory would delete both files and empty directories within the specified directory and its subdirectories.
The “/S” option with the Del command provides a powerful tool for deleting files in a directory and all of its subdirectories. By utilizing this option, you can streamline your file management tasks and remove files from multiple levels of subdirectories with ease.
Using the /Q option with the Del command
When using the Del command to delete files, the default behavior is to prompt for confirmation before proceeding with each deletion. However, there may be situations where you want to perform file deletions silently, without any prompts or confirmations. In such cases, you can utilize the /Q (quiet) option with the Del command.
When the /Q option is included in the Del command, it instructs the command to operate in quiet mode, bypassing any confirmation prompts. This allows for automated or batch deletion operations where you want to delete files without interruption.
To use the /Q option, simply include it in the Del command followed by the filenames or wildcard patterns specifying the files you want to delete. For example, to delete a file named “example.txt” without any prompts, the command would be del /Q example.txt. Alternatively, if you wanted to delete all .txt files in a directory without confirmations, the command would be del /Q *.txt.
When the Del command is executed with the /Q option, all specified files matching the pattern or filenames will be deleted silently and without confirmation. This option allows for a more streamlined and automated deletion process, saving time and effort.
It is important to exercise caution when using the /Q option since the Del command bypasses all confirmation prompts. Be certain of the files you are deleting, especially when using wildcards or deleting files in bulk, as there is no opportunity to review the deletion before it happens.
Using the /Q option can be particularly useful when performing repetitive file deletion tasks or when deleting files programmatically through scripts or command pipelines. It ensures that the deletion process proceeds without interruptions, allowing for a more efficient workflow.
While the /Q option skips confirmation prompts, it does not remove files from the Recycle Bin. Deleted files will still be moved to the Recycle Bin, allowing for potential recovery if needed.
Overall, the /Q option with the Del command provides a convenient way to delete files without being prompted for confirmation. It is ideally suited for situations where you need to automate file deletion operations or perform bulk deletions without interruptions.
Using the /R option with the Del command
When it comes to file deletion, the Del command provides a versatile set of options to meet specific requirements. One such option is the /R (remove directories) option, which enables the deletion of both files and directories within a specified folder and its subdirectories.
By default, the Del command only removes files and does not delete directories. However, when you include the /R option, it instructs the command to remove both files and empty directories found within the specified folder and its subdirectories.
To use the /R option, simply include it in the Del command followed by the folder path. For example, to delete all files and empty directories within a folder named “myfolder” and its subdirectories, the command would be del /R myfolder.
When the Del command is executed with the /R option, it recursively removes files and empty directories within the specified folder and its subdirectories. This allows for a more comprehensive cleanup, eliminating any residual files and empty folder structures.
It’s important to exercise caution when using the /R option because it permanently removes directories and their contents without confirmation prompts. Make sure to double-check the folder path and confirm that you want to delete both the files and directories contained within it.
It’s worth noting that the /R option only deals with empty directories; any directories containing files or subdirectories will not be deleted. To delete directories and their contents regardless of whether they are empty or not, consider using the /S (subdirectories) option in conjunction with /Q (quiet mode) if you want to suppress confirmation prompts.
The /R option with the Del command is a powerful tool for removing both files and empty directories within a specified folder and its subdirectories. Use this option when you need to perform a comprehensive cleanup, ensuring that no residual files or empty folder structures remain.
Using the /Y option with the Del command
The Del command in the command line interface is an efficient tool for deleting files and folders, but it typically prompts for user confirmation before executing each deletion. However, if you want to automate the file deletion process without interruption, you can use the “/Y” option.
When the “/Y” option is included in the Del command, it instructs the command to suppress the confirmation prompts and automatically answer “Yes” to any deletion confirmation. This allows for a streamlined and automated deletion process.
To use the “/Y” option, simply include it in the Del command followed by the filenames or wildcard patterns specifying the files or folders you want to delete. For example, to delete a file named “example.txt” without any prompts, the command would be del /Y example.txt. Similarly, to delete all .txt files in a directory without confirmation prompts, the command would be del /Y *.txt.
When the Del command is executed with the “/Y” option, it proceeds to delete files or folders without prompting for confirmation. This option is particularly useful in situations where you want to automate file deletion tasks or when you are sure about the deletions and want to avoid unnecessary interruptions.
It’s important to exercise caution when using the “/Y” option because the Del command will permanently delete files and folders without any confirmation. Make sure to carefully review the deletion targets and ensure that you want to proceed with the deletions.
Using the “/Y” option can be beneficial in scenarios where you have a large number of files or folders to delete and want to avoid manually confirming each deletion. It enables a more efficient and automated workflow, allowing you to delete files or folders without constant prompts.
However, it’s essential to double-check the command and verify the correctness of the deletions, as there is no opportunity to reverse or recover files or folders once they are deleted using the “/Y” option.
The “/Y” option with the Del command provides a streamlined and automated approach to file and folder deletion, suppressing confirmation prompts. By using this option responsibly and with full awareness, you can save time and effort in managing and organizing your files and folders.
Using the /J option with the Del command
When it comes to file deletion, the Del command provides various options to customize the process and meet specific requirements. One such option is the /J (junction) option, which allows you to delete junction points or symbolic links while still preserving the actual files or directories they point to.
A junction point is a feature in Windows that allows you to create a link between a directory and another location on your system. Deleting a junction point using regular file deletion methods would delete the actual files or folders it is pointing to. However, with the /J option, you can delete the junction point itself without affecting the target files or directories.
To use the /J option, simply include it in the Del command followed by the junction point you want to delete. For example, if you have a junction point named “myjunction” that you want to remove, the command would be del /J myjunction.
When the Del command is executed with the /J option, it specifically targets the junction point, allowing you to delete it without affecting the files or directories it points to.
It’s important to exercise caution when using the /J option, as deleting the wrong junction point may result in unintended consequences. Make sure to carefully verify the junction point you are targeting before executing the Del command.
Additionally, note that the /J option only applies to junction points or symbolic links. It does not affect regular files or directories. If you want to delete regular files or directories, you can use the Del command without the /J option.
The /J option provides a convenient way to manage junction points or symbolic links, allowing you to delete them without affecting the actual files or directories they reference. This can be particularly useful when you no longer need a junction point and want to remove it while preserving the integrity of the target content.
Exercise caution and double-check the junction points you are working with to ensure that you are deleting the correct ones with the /J option. Being mindful of the file system hierarchy and utilizing the /J option correctly can help maintain the integrity and organization of your files and directories.
Using the /X option with the Del command
The Del command in the command line interface provides a range of options to customize and enhance its functionality. One such option is the /X (exclude) option, which allows you to exclude specific files or directories from deletion when using wildcard patterns.
When you include the /X option in the Del command, you can specify files or directories to be excluded from the delete operation. This is particularly useful when you want to delete a group of files or folders with a wildcard pattern but need to exclude certain files or directories that match the pattern.
To use the /X option, include it in the Del command followed by the exclusion list. For instance, if you want to delete all .txt files in a directory but exclude a file named “important.txt”, the command would be del /X important.txt *.txt.
When the Del command is executed with the /X option, it will delete all files matching the wildcard pattern, except those specified in the exclusion list.
It’s important to note that the /X option only works with wildcard patterns and cannot exclude individual files or directories without a wildcard. Wildcards such as “*” and “?” can be used for pattern matching within the exclusion list.
The /X option provides flexibility and control when deleting files or directories with wildcard patterns. It allows you to fine-tune your delete operation, excluding specific files or directories that need to be preserved.
It’s crucial to verify and double-check the exclusion list to ensure that you are excluding the correct files or directories from deletion, especially when working with wildcard patterns. Careful attention to detail will help avoid unintentionally deleting important files or directories.
With the /X option, the Del command enables you to delete files or directories with wildcard patterns while excluding specific items from the deletion process. By utilizing this option effectively, you can better manage your file deletions and ensure that critical files or directories remain untouched.
Using the /Z option with the Del command
The Del command in the command line interface provides options to customize and enhance its functionality. One such option is the /Z (zap) option, which forces the deletion of files that are currently in use by other applications or processes.
By default, if the Del command encounters a file that is in use, it prompts for confirmation before proceeding with the deletion. However, when you include the /Z option in the Del command, it forcefully deletes files that are in use without any prompts or confirmations.
To use the /Z option, include it in the Del command followed by the filename(s) you want to delete. For example, if you want to delete a file named “example.txt” that is currently in use, the command would be del /Z example.txt.
When the Del command is executed with the /Z option, it bypasses any file locks and deletes the file immediately. It is important to exercise caution when using the /Z option, as deleting files that are in use may lead to unexpected consequences or data loss within the application using the file.
It’s worth noting that the /Z option works for individual file deletions. If you want to delete multiple files at once, you can specify multiple filenames separated by spaces after the /Z option.
It is crucial to verify that you are targeting the correct files for deletion when using the /Z option, as there is no confirmation prompt or opportunity to review the deletions. Double-checking the files and ensuring that they are not critical to any running applications is essential for maintaining data integrity.
Using the /Z option can be particularly useful when dealing with temporary files or when you need to forcefully delete a file that is no longer needed and is causing issues. However, it should be used carefully and responsibly to avoid unintended consequences or disruption to ongoing processes.
With the /Z option, the Del command provides a way to forcefully delete files that are currently in use by other applications or processes. By incorporating this option into your file management tasks, you can overcome file locking issues and expedite your file deletion process.