
Customize Safari Toolbar
One of the great features of Safari is its customizable toolbar. With the ability to add, remove, rearrange, and resize buttons, you can tailor the toolbar to suit your browsing needs. Here are some ways you can customize the Safari toolbar:
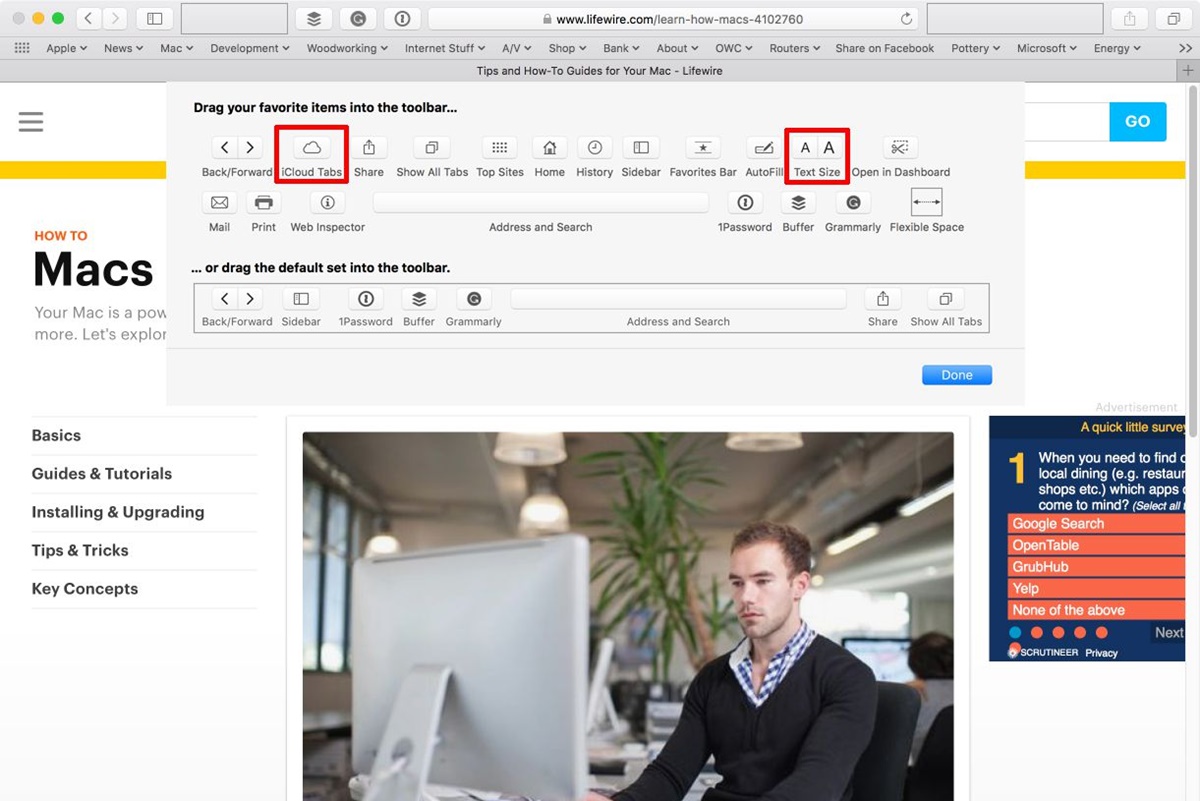
- Adding and removing buttons: Safari provides a wide range of buttons for quick access to various features and functionalities. To add a button, right-click on the toolbar and select “Customize Toolbar.” A new window will open, allowing you to drag and drop desired buttons onto the toolbar. To remove a button, simply drag it off the toolbar and it will disappear.
- Rearranging buttons: You may want to organize the toolbar according to your preferences. To rearrange buttons, click and hold on a button, then drag it to a new position on the toolbar. Release the mouse button to place it in the new spot.
- Changing button size: Safari offers two sizes for buttons: regular and small. To change the size of a button, right-click on it and select either “Use Small Size” or “Use Regular Size” from the contextual menu.
- Enabling and disabling toolbar items: In addition to buttons, Safari toolbar can also display other items such as the search field and the favorites bar. To enable or disable these items, again, right-click on the toolbar, choose “Customize Toolbar,” and then simply check or uncheck the items you want to show or hide.
- Adding and editing the search field: The search field in Safari’s toolbar allows you to quickly search the web or specific websites. By clicking on the magnifying glass icon at the left end of the toolbar, you can choose the search engine you want to use. You can also edit the default search engine by going to Safari Preferences, selecting the “Search” tab, and choosing your preferred search engine.
By customizing the Safari toolbar, you can optimize your browsing experience and have easy access to the features and tools you use most frequently. Remember to experiment with different configurations until you find the setup that works best for you.
Adding and Removing Buttons
The Safari toolbar provides a range of buttons for quick access to various features and functionalities. However, the default toolbar may not include all the buttons you need. Thankfully, Safari allows you to customize the toolbar by adding and removing buttons. Here’s how you can do it:
To add a button to the Safari toolbar, right-click on the toolbar and select “Customize Toolbar.” A new window will open, displaying a collection of available buttons. Simply drag and drop the desired button onto the toolbar. You can add buttons for functions like back and forward navigation, reload, print, bookmarks, and more.
If you find that the toolbar is becoming cluttered or you rarely use certain buttons, it’s easy to remove them. You can either right-click on the button you want to remove and choose “Remove Item” from the contextual menu, or you can simply click and drag the button off the toolbar.
By customizing the toolbar and adding the buttons you frequently use, you can streamline your browsing experience, accessing essential features with just a click. Remember that Safari allows you to experiment with different button configurations, so don’t hesitate to make adjustments until you find the setup that suits your needs.
Rearranging Buttons
The ability to rearrange buttons on the Safari toolbar allows you to customize its layout according to your preferences and browsing habits. Instead of being stuck with the default order of buttons, you can easily rearrange them to create a personalized toolbar. Here’s how you can do it:
To rearrange buttons on the Safari toolbar, simply click and hold on the button you want to move. While holding the mouse button, drag the button to the desired location on the toolbar. As you move the button, you’ll notice that the other buttons adjust to make room for it. Release the mouse button to drop the button into its new position.
By rearranging buttons, you can prioritize the functions that are most important to you. For example, if you frequently use the bookmarks feature, you might want to move the bookmarks button closer to the left. Alternatively, if you rarely use certain buttons, you can move them to the far right of the toolbar or remove them altogether.
Experiment with different arrangements until you find a layout that suits your browsing style. Remember that you can always change the order of buttons as your needs evolve, so don’t be afraid to adapt and customize your toolbar as you go.
Changing Button Size
The size of buttons on the Safari toolbar can affect both the aesthetics and the usability of the browser. Safari offers two sizes for buttons: regular and small. By adjusting the button size, you can customize the toolbar to your preference. Here’s how you can change the button size:
To change the size of a button, right-click on the toolbar and select “Customize Toolbar”. In the customization window that appears, you’ll see a collection of buttons available for customization. Right-click on the button you want to resize, and from the contextual menu, choose either “Use Small Size” or “Use Regular Size”.
The small button size allows you to fit more buttons into a limited space, which can be particularly useful if you have a smaller window or if you prefer a more compact toolbar. On the other hand, the regular button size may be more comfortable to click if you have larger fingers or prefer a more distinctive visual appearance.
Experiment with different button sizes to find the one that suits your preferences and enhances your browsing experience. You can change the size of buttons individually, allowing you to customize the toolbar to your liking.
Remember that the button size is a personal preference, and there is no right or wrong choice. It’s all about finding the size that feels most comfortable and convenient for you when using Safari.
Enabling and Disabling Toolbar Items
Safari’s customizable toolbar not only allows you to add and rearrange buttons but also gives you the flexibility to enable or disable various toolbar items. These items include the search field, favorites bar, and more. By enabling or disabling these items, you can streamline your toolbar and have quick access to the features you find most useful. Here’s how you can enable or disable toolbar items in Safari:
To begin, right-click on the toolbar and select “Customize Toolbar”. A window will appear, displaying a list of available toolbar items. To enable an item, simply drag and drop it onto the toolbar. Conversely, to disable an item, click and drag it from the toolbar back into the customization window.
By selectively enabling and disabling toolbar items, you can create a toolbar that caters to your specific needs. For example, if you frequently use the search field to look up information, make sure it’s enabled on the toolbar for easy access. On the other hand, if you rarely use certain items, such as the favorites bar, you can disable it to free up space on the toolbar.
Customizing toolbar items allows you to declutter your browsing experience and prioritize the features you use most frequently. It’s important to regularly evaluate the items on your toolbar and make adjustments based on your browsing habits and preferences.
Remember that enabling and disabling toolbar items is a simple and reversible process. Don’t be afraid to experiment and customize your toolbar until it perfectly matches your needs and enhances your Safari browsing experience.
Adding and Editing the Search Field
The search field in the Safari toolbar is a powerful tool that allows you to quickly search the web or specific websites without having to navigate to a search engine’s homepage. Safari gives you the ability to customize the search field, enabling you to use your preferred search engine and adjust other search-related settings. Here’s how you can add and edit the search field in Safari:
To access the search field settings, click on the magnifying glass icon at the left end of the toolbar. A dropdown menu will appear, showing a list of available search engines. Click on the desired search engine to set it as your default choice. Safari offers popular options like Google, Bing, Yahoo, and DuckDuckGo. If the search engine you prefer isn’t listed, click on “Manage Search Engines” to add or remove search engines from the list.
In addition to selecting your preferred search engine, Safari allows you to further customize the search field by adjusting search-related settings. To do this, go to Safari Preferences and select the “Search” tab. In this menu, you can choose whether to show the bookmarks and history suggestions while typing, enable the option to use smart search field, and even set specific search engines for private browsing mode.
By customizing the search field settings, you can optimize your browsing experience and tailor it to your preferences. You can efficiently search the web, access your favorite search engines, and benefit from various search-related features in Safari.
Remember that your search field customization options extend beyond just choosing a search engine. Take the time to explore the different settings available and fine-tune them to create a search experience that works best for you.
Customize Safari Bookmark Bar
The bookmark bar in Safari provides a convenient way to save and access your favorite websites with just a click. Like other customizable features in Safari, the bookmark bar allows you to personalize its appearance and organization to better suit your browsing needs. Here are some ways you can customize the Safari bookmark bar:
- Show or hide the bookmark bar: By default, the bookmark bar is displayed just below the address bar. However, you can hide it if you prefer a cleaner browsing interface. To show or hide the bookmark bar, go to the “View” menu and toggle the “Show Bookmarks Bar” option.
- Adding and removing bookmarks: Adding bookmarks to the bookmark bar is simple. When you visit a website you want to bookmark, click on the “Share” button in the Safari toolbar (it looks like a square with an arrow pointing up). From the options, select “Add Bookmark” and choose the bookmark bar as the location. To remove a bookmark, right-click on it and select “Delete” from the contextual menu.
- Organizing bookmarks into folders: To keep your bookmark bar organized, you can create folders and group similar bookmarks together. Right-click on the bookmark bar and select “New Folder” to create a new folder. You can then drag and drop bookmarks into the folder or right-click on a bookmark and select “Move to Folder” to move it into an existing folder.
- Editing bookmark names and URLs: You can easily edit the names and URLs of bookmarks saved on the bookmark bar. Simply right-click on a bookmark and select “Edit Address” or “Edit Name” from the contextual menu. Make the necessary changes and press Enter to save the edits.
- Syncing bookmarks across devices: If you have multiple Apple devices, you can sync your Safari bookmarks across them using iCloud. This ensures that you have access to the same bookmarks no matter which device you’re using. To enable bookmark syncing, go to Safari Preferences, select the “General” tab, and check the box next to “Bookmarks – Safari”.
Customizing the Safari bookmark bar can increase your productivity and make it easier to access your frequently visited websites. By organizing your bookmarks, managing folders, and syncing them across devices, you can create a personalized and efficient browsing experience.
Showing or Hiding the Bookmark Bar
The bookmark bar in Safari is a handy tool that allows you to access your favorite websites with a single click. By default, the bookmark bar is displayed just below the address bar in Safari. However, you have the option to show or hide the bookmark bar depending on your preference and browsing needs. Here’s how you can customize the visibility of the bookmark bar:
To show or hide the bookmark bar, you can use the “View” menu in Safari. Simply click on “View” at the top of the screen and then select “Show Bookmarks Bar” from the dropdown menu. When the bookmark bar is visible, you will see a row of bookmarked websites displayed on the bar, making it easy to access your favorite online destinations.
If you prefer a clutter-free browsing experience and want to hide the bookmark bar temporarily, you can follow the same steps and click on “Hide Bookmarks Bar” in the “View” menu. This will free up space on the browser window and provide a clean interface for focused browsing.
Whether you choose to show or hide the bookmark bar, it ultimately depends on personal preference and browsing habits. Some users find the bookmark bar to be a convenient way to quickly access frequently visited websites, while others prefer a less cluttered view of the browser window.
By customizing the visibility of the bookmark bar, you can tailor Safari to your needs, either keeping it visible for quick access to bookmarks or hiding it for a more minimalist browsing experience. Experiment with different settings to find the setup that works best for your browsing style.
Adding and Removing Bookmarks
The bookmark bar in Safari allows you to save and organize your favorite websites for quick access. Adding bookmarks to the bookmark bar is a simple process, and you can easily remove them as needed. Here’s how you can add and remove bookmarks on the Safari bookmark bar:
To add a bookmark to the bookmark bar, first, navigate to the website you want to bookmark. Then, click on the “Share” button in the Safari toolbar. The Share button looks like a square with an arrow pointing up. From the options that appear, select “Add Bookmark”.
A window will pop up, allowing you to specify where you want to save the bookmark. Choose the bookmark bar as the location. You can also customize the bookmark name if necessary. Once you’ve made the desired selections, click “Add” to save the bookmark to the bookmark bar. The bookmark will now appear as a clickable link on the bar, making it easy to access the website with a single click.
If you no longer need a bookmark on the bookmark bar or want to reorganize your bookmarks, you can remove them. Simply right-click on the bookmark you want to remove and select “Delete” from the contextual menu. The bookmark will be removed from the bookmark bar, but it will still be accessible in the bookmarks menu under the sidebar.
Organizing your bookmark bar with relevant and frequently visited websites can help improve your browsing efficiency. By adding bookmarks to the bookmark bar, you can easily access your favorite websites without having to type in URLs or perform searches every time.
Remember to regularly review and clean up your bookmark bar, removing any outdated or less frequently used bookmarks to keep it clutter-free and maximize its usefulness for the sites you visit most often.
Organizing Bookmarks into Folders
As your collection of bookmarks grows, it becomes essential to organize them for easy access and efficient browsing. Safari enables you to create folders and group similar bookmarks together, providing a structured and organized experience. Here’s how you can organize your bookmarks into folders:
To begin organizing your bookmarks, right-click on the bookmark bar and select “New Folder” from the contextual menu. A new folder will appear on the bookmark bar, ready to be named and populated with related bookmarks.
You can name the folder according to a specific category, such as “News Sites” or “Favorite Blogs.” To rename the folder, right-click on it and select “Edit Name.” Then, enter the desired name for the folder.
Once you’ve created a folder, you can start organizing your bookmarks into it. To do this, simply click and drag a bookmark onto the folder. You can also right-click on a bookmark and select “Move to Folder” to choose the target folder.
If you have multiple bookmarks to organize, you can use the same drag-and-drop or right-click methods to move them into the desired folder. This allows you to group together bookmarks that are related or that you frequently visit for a specific purpose.
By organizing bookmarks into folders, you can declutter your bookmark bar, making it easier to locate specific bookmarks. It also helps you have a more streamlined browsing experience, as you can access relevant bookmarks with just a click or two.
Remember to regularly review your folders and make any necessary updates. Remove bookmarks that are no longer relevant or move them to different folders if your organization needs change over time. This ensures that your bookmark bar remains tidy and tailored to your browsing habits and preferences.
Editing Bookmark Names and URLs
Safari allows you to easily edit the names and URLs of your bookmarks, providing flexibility and customization options for your bookmark collection. Whether you want to give a bookmark a more descriptive name or update its URL, here’s how you can edit bookmark names and URLs in Safari:
To edit the name of a bookmark, right-click on the bookmark you want to modify and select “Edit Name” from the contextual menu. Alternatively, you can also click on the bookmark to select it and press the Enter key on your keyboard. This will activate the editing mode, allowing you to modify the name directly on the bookmark.
Once in the editing mode, simply type the new name for the bookmark and press Enter to save your changes. You can give bookmarks more meaningful names or add additional details to help you remember their purpose or content.
If you need to modify the URL of a bookmark, right-click on the bookmark and select “Edit Address” from the contextual menu. A window will appear, allowing you to edit the URL. Make the necessary changes and click “Save” to update the bookmark’s URL.
Editing bookmark names and URLs gives you the ability to keep your bookmark collection organized and up to date. By ensuring that the names and URLs are accurate and descriptive, you can quickly identify and access the bookmarks you need without confusion.
Remember to periodically review your bookmarks and make any necessary edits. This is especially important for bookmarks that may undergo changes, such as websites that update their URLs or rebrand their names.
With the flexibility to edit bookmark names and URLs, Safari empowers you to customize your browsing experience and keep your bookmark collection organized and relevant.
Syncing Bookmarks Across Devices
With Safari, you can sync your bookmarks across multiple devices, allowing you to access your saved websites seamlessly from any device. This convenient feature ensures that your bookmark collection stays up to date and readily available, no matter which device you’re using. Here’s how you can sync bookmarks across devices in Safari:
To enable bookmark syncing, you’ll need to have an iCloud account and be signed in to it on all your devices. Once you’re signed in, follow these steps:
- On your Mac, go to Safari Preferences and select the “General” tab.
- Check the box next to “Bookmarks – Safari” under the iCloud section.
- Repeat these steps on your iPhone, iPad, or other Apple devices, ensuring that iCloud syncing is enabled for bookmarks.
Once you’ve set up bookmark syncing, any changes you make to your bookmarks on one device will be automatically reflected on all your other devices. This includes adding or removing bookmarks, organizing them into folders, and editing their names or URLs.
Syncing bookmarks across devices not only saves you time but also ensures a consistent browsing experience. You can bookmark a website on your Mac and easily access it from your iPhone or iPad without the need for manual imports or exports.
It’s important to note that bookmark syncing requires a stable internet connection and may take some time to propagate changes across devices. Be patient if you don’t immediately see your bookmarks synced on all devices.
By leveraging bookmark syncing in Safari, you can enjoy seamless access to your favorite websites, making your browsing experience more efficient and consistent across all your Apple devices.
Customize Safari Tab Bar
The tab bar in Safari is where you manage and navigate between multiple open tabs. Safari offers several customization options for the tab bar, allowing you to personalize it to suit your browsing preferences. Here are some ways you can customize the Safari tab bar:
- Opening new tabs: To open a new tab in Safari, you can click on the plus (+) button located on the right side of the tab bar. Alternatively, you can use keyboard shortcuts like Command+T (Mac) or Ctrl+T (Windows) to open a new tab.
- Closing and rearranging tabs: Closing a tab is as simple as clicking on the close (X) button on the tab itself or using the keyboard shortcut Command+W (Mac) or Ctrl+W (Windows). If you want to rearrange tabs, you can click and drag a tab to the left or right, changing its position on the tab bar.
- Viewing all open tabs: When you have numerous tabs open, you may find it helpful to view all of them at once. To do this, click on the “Show All Tabs” button on the far right side of the tab bar. This will display a grid of thumbnails representing each open tab, allowing you to easily switch between them.
- Merging all windows into one: If you have multiple windows open, Safari provides an option to merge them all into one window. Simply go to the Window menu and select “Merge All Windows”. This consolidates all tabs from different Safari windows into a single window, decluttering your workspace.
- Managing tab preferences: Safari offers additional customization options in its preferences menu. To access these options, go to Safari Preferences and select the “Tabs” tab. Here, you can choose whether new tabs open with a homepage, a blank page, or the same page as the current tab. You can also specify tab-opening behavior when clicking on links and configure how tab closing works.
By customizing the Safari tab bar, you can personalize your browsing experience and effortlessly manage multiple open tabs. Whether it’s opening new tabs, rearranging them, or customizing tab preferences, Safari provides the flexibility to tailor the tab bar to your needs.
Opening New Tabs
Opening new tabs in Safari is essential for multitasking and navigating between multiple webpages without cluttering your browsing experience. Fortunately, Safari offers easy and convenient ways to open new tabs. Here are some methods to open new tabs in Safari:
The most common way to open a new tab is by clicking the plus (+) button located on the right side of the tab bar in Safari. Simply click on the plus button, and a new tab will appear next to your current tab. You can then begin typing a URL or search query in the address bar to load a specific webpage or perform a search.
If you prefer using keyboard shortcuts, Safari offers a shortcut to open a new tab as well. On Mac, you can press Command+T, and on Windows, it’s Ctrl+T. Using these shortcuts will open a new tab instantly, ready for you to start typing in the address bar or perform any other action.
Another way to open a new tab is by right-clicking on a link or a webpage and selecting “Open Link in New Tab” from the contextual menu. This allows you to quickly open a linked webpage in a separate tab without navigating away from the current page.
Opening new tabs provides a range of benefits, such as keeping different webpages accessible for reference, researching multiple topics simultaneously, or opening links while preserving your current browsing session. It’s a powerful tool for efficient multitasking.
Remember to manage your tab usage effectively to avoid overwhelming your browser with too many open tabs. Utilize features like tab grouping, tab tiling, or the “Show All Tabs” function in Safari to keep your tabs organized and easily accessible.
Whether you prefer using mouse clicks or keyboard shortcuts, opening new tabs in Safari is a seamless process, empowering you to navigate the web effortlessly and efficiently.
Closing and Rearranging Tabs
In Safari, it’s important to know how to manage your tabs effectively to keep your browsing experience organized and clutter-free. Safari offers simple methods to close and rearrange tabs with just a few clicks or keyboard shortcuts. Here are some ways to close and rearrange tabs in Safari:
To close a tab, you can simply click on the small “X” button that appears on the left side of the tab in the tab bar. Alternatively, you can use the keyboard shortcuts Command+W (Mac) or Ctrl+W (Windows) to close the currently active tab. Closing tabs is useful to declutter your workspace and remove webpages that are no longer needed.
If you have multiple tabs open and want to rearrange their order, Safari allows you to do so effortlessly. Click and hold on a tab, then drag it to the left or right to change its position on the tab bar. Release the mouse button to drop the tab in its desired position. Rearranging tabs gives you the flexibility to organize them based on your preference or to group related tabs together for easier access.
If you find yourself with numerous tabs open and want a more visual overview, Safari provides an option to view all open tabs at once. Click on the “Show All Tabs” button located on the far right side of the tab bar. This will display a grid of thumbnails representing each open tab, making it easier to browse through and choose specific tabs.
By mastering the art of closing and rearranging tabs, you can maintain a clean and organized browsing experience. Close tabs that are no longer needed, rearrange them for better organization, and use the “Show All Tabs” feature to navigate through your open tabs more efficiently.
Remember to be mindful of the number of open tabs to prevent overwhelming your browser. Excessive tabs can slow down your browsing speed and make it challenging to find the specific tab you need.
With the ability to close and rearrange tabs in Safari, you have the freedom to streamline your browsing and stay in control of your online activities.
Viewing All Open Tabs
When you have numerous tabs open in Safari, it can sometimes be challenging to keep track of all the webpages you’re browsing. Fortunately, Safari provides a convenient feature that allows you to view all open tabs at once, making it easier to manage your browsing experience. Here’s how you can view all open tabs in Safari:
To view all open tabs, click on the “Show All Tabs” button located on the far right side of the tab bar. This button resembles a square overlaid with smaller squares. Alternatively, you can use the keyboard shortcut Option+Command+\ (Mac) or Ctrl+Tab (Windows) to access the tab overview feature.
Once you activate the “Show All Tabs” view, Safari will display a grid of thumbnail previews representing each open tab. You can scroll through the grid to find the specific tab you’re looking for. Move your cursor over a particular thumbnail to see a larger preview of the webpage content.
From the tab overview, you can easily click on a thumbnail to switch to that tab, bringing it to the forefront of your browsing experience. If you have an extensive number of tabs open, the thumbnail grid allows you to visually identify and navigate to the desired webpage more efficiently.
Additionally, within the tab overview, you have the option to close a tab by clicking on the small “X” button that appears on the top-left corner of each thumbnail. This feature enables you to declutter your browsing session by closing unnecessary tabs without the need to individually switch to each tab.
Viewing all open tabs provides a convenient way to manage and organize your browsing activity. By taking advantage of this feature, you can quickly locate and switch between tabs, ensuring a smooth and efficient browsing experience.
Remember to periodically review your open tabs and close any that are no longer needed or relevant. Excessive open tabs can impact browser performance and make it more challenging to find the specific webpage you need.
With Safari’s tab overview feature, you have a powerful tool at your disposal to efficiently manage and navigate through your open tabs, enhancing your productivity and overall browsing satisfaction.
Merging All Windows into One
If you find yourself with multiple Safari windows open, each with its own set of tabs, merging them into a single window can help declutter your workspace and streamline your browsing experience. Safari offers a convenient feature that allows you to merge all open windows into one, simplifying your navigation and organization. Here’s how you can merge all Safari windows into a single window:
To merge all open windows in Safari, go to the “Window” menu at the top of the screen. From the dropdown menu, select “Merge All Windows.” When you select this option, Safari will combine all open windows into a single window, consolidating all tabs into the tab bar of the newly merged window.
Merging windows is particularly useful if you have accidentally opened multiple Safari windows or if you frequently work with multiple windows but want to minimize clutter. By merging windows, you can have all your open tabs in one place, making it easier to navigate and manage your browsing sessions.
It’s important to note that merging windows may cause changes to the order or position of your tabs. Safari will place the tabs in the merged window in the same order as they were in their respective windows. However, if you had tabs with the same URLs in multiple windows, the merged window will only display one instance of those duplicated tabs.
Remember to review and rearrange your tabs accordingly after merging the windows if needed. You can click and drag tabs within the tab bar to change their position or group them into folders for better organization.
By merging all windows into one, you can declutter your workspace, reduce the number of open windows, and simplify your browsing experience. This feature helps you stay focused and organized, keeping all your tabs easily accessible in a single window.
Take advantage of the ability to merge windows in Safari whenever you find yourself with multiple windows open, and enjoy a more streamlined and efficient browsing experience.
Managing Tab Preferences
Safari offers a range of tab preferences that allow you to customize the behavior and appearance of your tabs, tailoring your browsing experience to suit your preferences. By accessing Safari’s preferences menu, you can configure various settings related to tab behavior and enhance your productivity. Here’s how you can manage tab preferences in Safari:
To access tab preferences, go to the “Safari” menu at the top of the screen and select “Preferences.” In the preferences window, click on the “Tabs” tab to reveal the available tab-specific settings and options.
Within the tab preferences, you can choose how new tabs behave when opened. You have the option to open new tabs with your homepage, a blank page, or the same page as the current tab. Simply select the preferred option from the dropdown menu labeled “Open pages in tabs instead of windows.”
Safari also offers the ability to choose how tabs open when you click on links. You can choose whether to open links in new tabs or in the same tab. Adjust this behavior by selecting the desired option in the dropdown menu labeled “Open links from applications.”
Additionally, Safari provides a setting to determine how tabs close. You can set it to automatically close the rightmost tab, the previously selected tab, or the tabs to the right of the current tab. This can be useful when you prefer a specific tab closing behavior. Select your preference from the dropdown menu labeled “Close tabs to the right of the current tab when closing.”
Managing tab preferences allows you to fine-tune your browsing experience and streamline your workflow. By customizing how new tabs open, selecting the behavior for opening links, and specifying tab closing preferences, you can optimize Safari to align with your browsing habits and preferences.
Remember to periodically review and adjust your tab preferences as needed. Take advantage of the customization options available in Safari to tailor your tab behavior to match your evolving needs.
With Safari’s tab preferences, you have the flexibility to customize your browsing experience, making it more efficient and tailored to your preferences.
Customize Safari Status Bar
The status bar in Safari provides valuable information and functionality at the bottom of the browser window. It displays useful details such as the website’s loading progress, destination URL when hovering over a link, and various icons related to browser features. Safari allows you to customize the status bar, enabling you to personalize the information displayed and enhance your browsing experience. Here’s how you can customize the Safari status bar:
To show or hide the status bar in Safari, go to the “View” menu at the top of the screen and select “Show Status Bar.” By default, the status bar is visible, but you can toggle its visibility to suit your preference.
Once the status bar is visible, you have the option to customize the information displayed. Right-click on the status bar itself or within an empty space on the bar, and a menu will appear with various options. From this menu, you can enable or disable specific status bar items, such as the loading progress bar, the SSL icon, the download status, and more.
Enabling or disabling status bar icons allows you to streamline the information presented, focusing on the details that are most relevant to you. For example, if you frequently download files, you may want to have the download status icon displayed, but if you don’t frequently use SSL secured websites, you can disable the SSL icon.
In addition to built-in status bar items, Safari also provides developer tools on the status bar. These tools can be enabled or disabled based on your needs. To access developer tools, right-click on the status bar and select “Customize Status Bar.” From there, you can add or remove developer tools icons from the status bar, allowing for quick access to these features.
Remember to regularly adjust and customize the status bar to reflect your preferences and browsing habits. Periodically review the status bar items to ensure that the displayed information remains relevant and useful.
By customizing the Safari status bar, you can personalize your browsing experience, focusing on the details that matter most to you. Whether it’s enabling or disabling status bar items or accessing developer tools, Safari offers the flexibility to tailor the status bar to your needs.
Showing or Hiding the Status Bar
The status bar in Safari provides valuable information and quick access to various features, making it a useful component of the browser interface. However, there may be times when you want to customize the appearance of Safari by showing or hiding the status bar. Here’s how you can customize the visibility of the status bar in Safari:
By default, the status bar is visible in Safari. To show or hide the status bar, go to the “View” menu at the top of the screen. From the dropdown menu, select “Show/Hide Status Bar” to toggle the visibility of the status bar. Alternatively, you can use the keyboard shortcut Shift+Command+/ (Mac) or Shift+Ctrl+/ (Windows) to show or hide the status bar.
If you choose to hide the status bar, it will free up some space at the bottom of the browser window, providing a clean and minimalistic browsing experience. This can be particularly useful when you want to maximize the viewing area for the webpage content or if you prefer a less cluttered interface.
On the other hand, if you find the information provided by the status bar valuable, such as the loading progress of a webpage or the URL when hovering over a link, you may want to keep the status bar visible. Having the status bar displayed allows for quick access to important details without having to rely on other indicators or features.
Whether you choose to show or hide the status bar in Safari ultimately depends on your personal preference and browsing habits. Take the time to experiment with different configurations to find the setup that suits your needs. You can always toggle the visibility of the status bar as desired.
Remember that some websites may have certain features or functionalities that rely on the status bar. If you encounter any issues or difficulties while browsing with the status bar hidden, consider re-enabling it to see if the problem resolves.
By customizing the visibility of the status bar in Safari, you can optimize your browsing experience, adapting the interface to your convenience and preferences.
Customizing the Information Displayed
In Safari, the status bar provides essential information about the browsing experience, such as loading progress, secure connection indicators, and more. However, Safari also offers the ability to customize the information displayed on the status bar. This allows you to prioritize and personalize the details that are most relevant to your browsing needs. Here’s how you can customize the information displayed on the status bar:
To start customizing the status bar, right-click anywhere on the status bar itself or within an empty space on the bar. This will open a contextual menu with various options related to the status bar.
From the contextual menu, you can enable or disable specific status bar items according to your preferences. For example, if you frequently download files, you may want to enable the download status item to see the progress of ongoing downloads. Conversely, if you find the loading progress bar redundant, you can choose to disable it.
Additionally, the status bar offers SSL (secure socket layer) indicators to notify you about the security status of the webpage you’re visiting. If you frequently access SSL-secured websites, you may want to enable the SSL icon to have a visual confirmation of a secure connection.
By customizing the information displayed on the status bar, you can streamline it to show the details that are most relevant to your browsing habits. This allows for a more focused browsing experience and reduces clutter in the status bar.
Remember to review and adjust the status bar items periodically to ensure they align with your current needs. As your browsing habits change, you may want to enable or disable different items on the status bar to reflect those changes.
Safari aims to provide flexibility and customization options, allowing you to tailor your browser interface to suit your preferences. By customizing the information on the status bar, you can optimize your browsing experience and have quick access to the details that matter most to you.
Enabling and Disabling Status Bar Icons
Safari’s status bar is equipped with various icons that provide valuable information and quick access to specific features. However, not all icons may be relevant or necessary for your browsing needs. Safari allows you to enable or disable specific status bar icons, giving you control over the information displayed. Here’s how you can customize the status bar icons in Safari:
To customize the status bar icons, right-click anywhere on the status bar or within an empty space on the bar. This will bring up a menu that lists the available status bar icons.
From the menu, you can enable or disable specific icons based on your preferences. For example, if you frequently use the Reader feature, you may want to enable the Reader icon, which allows you to simplify the layout of webpages for easier reading. On the other hand, if you rarely use certain features, you can choose to disable their corresponding icons to reduce visual clutter on the status bar.
Some commonly available status bar icons include the RSS icon for handling RSS feeds, the Share icon for quickly sharing web content, the iCloud Tabs icon for accessing tabs open on your other devices, and more. Enabling or disabling these icons gives you the ability to customize the status bar to cater to your specific browsing habits and priorities.
Customizing the status bar icons not only helps declutter the interface but also allows you to quickly locate the icons that are most relevant and useful to you. It streamlines your browsing experience and ensures that the status bar provides the information and functionality you need without unnecessary distractions.
Remember to periodically review your status bar icons and make adjustments as your browsing habits and needs evolve. Enabling or disabling icons can be done based on your current usage patterns, allowing you to stay focused on the features and information that matter most.
With the ability to enable or disable status bar icons, Safari empowers you to customize your browsing interface, making it more tailored to your preferences and enhancing your overall browsing experience.
Using Developer Tools in the Status Bar
Safari provides a range of powerful developer tools that can help you debug, analyze, and optimize web pages. These developer tools are conveniently accessible through the status bar, giving you quick access to these valuable features. Here’s how you can use developer tools in the Safari status bar:
To access developer tools, right-click anywhere on the status bar and select “Customize Status Bar” from the contextual menu. This will open a customization window where you can add or remove icons from the status bar.
In the customization window, you’ll find a list of available developer tools icons. These icons represent various features and functionalities that can assist with web development. Examples of developer tools icons include the Elements Inspector, JavaScript Console, Network Requests, and more.
To enable a specific developer tool, simply click and drag its icon from the customization window onto the status bar. The icon will be added to the status bar, providing one-click access to the corresponding developer tool.
Once you have the developer tools icons in the status bar, you can click on them to open their respective developer tool windows. For example, clicking on the Elements Inspector icon will open a panel that allows you to inspect and modify the HTML and CSS of a web page in real-time.
Using developer tools in the status bar can greatly aid in troubleshooting issues with web pages, optimizing performance, and improving the overall user experience. Whether you need to debug JavaScript code, analyze network requests, or inspect the structure of a page, these tools provide invaluable insights and capabilities.
Remember that the availability and functionality of developer tools may vary depending on the version of Safari and your specific needs as a web developer. It’s worthwhile to explore and familiarize yourself with the available tools to take full advantage of their capabilities.
By leveraging the developer tools available in the status bar, Safari empowers web developers to analyze and fine-tune their web pages with ease. Take advantage of these tools to enhance your development workflow and create exceptional online experiences.
Restoring the Default Status Bar Settings
If you have made customizations to the status bar in Safari and want to revert back to the original default settings, Safari provides a simple way to restore the default configuration. Here’s how you can restore the default status bar settings in Safari:
To restore the default status bar settings, right-click anywhere on the status bar or within an empty space on the bar. This will open a contextual menu that provides various options related to the status bar.
From the menu, select the option that says “Customize Status Bar” or “Reset to Default.” The exact wording may vary depending on the version of Safari you’re using.
Upon selecting this option, Safari will automatically restore the default status bar settings, removing any customizations you have made. The status bar will revert back to its original configuration, including the default status bar icons and their corresponding functionalities.
Restoring the default status bar settings can be useful if you want to start fresh or if you accidentally make unwanted changes and wish to undo them. It allows you to go back to the default setup provided by Safari and provides a clean slate for further customizations, if desired.
Remember that restoring the default settings will remove any additional icons you have added to the status bar or disabled any default icons you previously enabled. If there are specific status bar icons or functionalities that you want to keep, make sure to customize the status bar accordingly before restoring the default settings.
By offering the option to restore the default status bar settings, Safari gives users the flexibility to personalize their browsing experience while still having the ability to start fresh if needed. Take advantage of this feature to maintain the status bar configuration that best suits your browsing preferences.