
Choosing the Right Location and Lighting
When it comes to creating captivating videos on your iPhone 13, choosing the right location and lighting is crucial. The right setting can elevate the visual appeal of your videos, making them more engaging and professional. Here's how you can ensure that your chosen location and lighting are optimal for video creation:
-
Natural Light is Key: When selecting a location for your video shoot, prioritize areas with ample natural light. Whether it's outdoors or near large windows indoors, natural light can significantly enhance the clarity and vibrancy of your videos. It's best to avoid harsh, direct sunlight, as it can create unflattering shadows. Instead, opt for soft, diffused light for a more flattering and balanced look.
-
Consider the Background: The background of your video plays a crucial role in setting the scene and capturing the viewer's attention. Choose a location with a visually appealing backdrop that complements the content of your video. Whether it's a scenic outdoor setting, a well-decorated room, or a minimalist backdrop, ensure that it enhances the overall visual impact of your video without distracting from the main subject.
-
Minimize Distractions: When scouting for a location, be mindful of potential distractions that could detract from the focal point of your video. Look for areas with minimal background noise, visual clutter, or sudden movements that could disrupt the flow of your recording. A quiet and uncluttered environment can help maintain the focus on the subject of your video.
-
Indoor Lighting Considerations: If you're shooting indoors, pay attention to the lighting conditions. Soft, diffused lighting can be achieved through sheer curtains or by positioning your subject near a window. Additionally, consider using artificial lighting sources, such as desk lamps or ring lights, to supplement natural light and ensure consistent illumination.
-
Experiment with Angles: Once you've identified a suitable location, explore different angles and perspectives to determine the most visually compelling setup. Test various vantage points to find the optimal positioning that captures the essence of your subject while making the most of the available lighting.
By carefully selecting the right location and paying attention to lighting considerations, you can set the stage for visually stunning videos on your iPhone 13. The interplay between location, lighting, and composition can elevate the overall quality of your content, making it more engaging and professional. With these foundational elements in place, you're ready to embark on the journey of creating captivating videos that resonate with your audience.
Setting Up Your iPhone 13 Camera
Setting up your iPhone 13 camera for video recording is a pivotal step in ensuring that your footage is of the highest quality. The advanced capabilities of the iPhone 13 camera allow you to capture stunning videos with ease. Here's a comprehensive guide to optimizing your iPhone 13 camera settings for video recording:
1. Accessing the Camera App
To begin, unlock your iPhone 13 and locate the Camera app on the home screen or in the app library. Tap on the Camera icon to launch the app and prepare for video recording.
2. Choosing the Video Mode
Upon opening the Camera app, swipe to the right or left until you reach the "Video" mode. This mode is specifically designed for capturing high-quality videos. Once in the Video mode, you can further customize your settings to suit your recording preferences.
3. Adjusting Video Settings
Before you start recording, it's essential to review and adjust the video settings to achieve the desired outcome. Tap on the "Settings" icon within the Camera app to access a range of adjustable parameters. These settings may include video resolution, frame rate, and video stabilization options.
4. Selecting the Ideal Resolution and Frame Rate
The iPhone 13 offers various video resolution and frame rate options, allowing you to tailor your settings based on the intended use of the footage. For instance, if you aim to capture cinematic sequences, selecting a higher resolution and frame rate can enhance the visual appeal of your videos. Conversely, for casual or social media content, a standard resolution and frame rate may suffice.
5. Enabling Video Stabilization
Video stabilization is a valuable feature that minimizes camera shake and ensures smoother, more professional-looking footage. Within the Camera settings, you can enable video stabilization to enhance the overall quality of your videos, especially when capturing motion or panning shots.
6. Utilizing Gridlines and Focus Lock
To enhance the composition of your videos, consider enabling gridlines within the Camera settings. Gridlines assist in aligning your shots and adhering to the rule of thirds, resulting in visually balanced and aesthetically pleasing compositions. Additionally, utilize the focus lock feature to maintain sharp focus on your subject, especially when dealing with dynamic or moving scenes.
7. Exploring Additional Camera Features
The iPhone 13 camera offers a plethora of additional features, such as adjustable exposure, HDR recording, and depth control. Familiarize yourself with these advanced settings to harness the full potential of your iPhone 13 camera and elevate the quality of your video recordings.
By meticulously configuring your iPhone 13 camera settings, you can unleash its full potential and capture breathtaking videos with ease. The intuitive interface and advanced capabilities of the iPhone 13 camera empower you to create compelling visual content that resonates with your audience. With the camera set up optimally, you're poised to embark on a seamless video recording experience, bringing your creative vision to life with every frame.
Selecting the Right Video Mode
Selecting the right video mode on your iPhone 13 is a pivotal decision that directly impacts the visual quality and style of your recorded footage. The iPhone 13 offers a diverse range of video modes, each tailored to specific scenarios and creative preferences. Understanding and leveraging these modes can significantly enhance the overall impact of your videos. Here's a comprehensive exploration of the various video modes available on the iPhone 13 and how to choose the most suitable option for your recording needs.
Standard Video Mode
The standard video mode serves as a versatile choice for everyday recording. It provides a balanced combination of video quality and file size, making it ideal for a wide array of content, including vlogs, casual recordings, and social media posts. When opting for the standard video mode, you can expect a seamless balance between visual clarity and manageable file sizes, ensuring compatibility with various platforms and devices.
Cinematic Mode
The iPhone 13 introduces the revolutionary Cinematic mode, which simulates the depth of field and focus transitions found in traditional cinema. This mode adds a cinematic flair to your videos by automatically adjusting focus based on the subjects' positions, creating a captivating sense of depth and visual storytelling. Cinematic mode is particularly well-suited for narrative-driven content, interviews, and artistic visual storytelling, elevating the overall production value of your videos.
Time-Lapse and Slo-Mo Modes
For capturing captivating time-lapse sequences or mesmerizing slow-motion footage, the iPhone 13 offers dedicated Time-Lapse and Slo-Mo modes. Time-Lapse mode condenses extended periods into short, dynamic clips, ideal for showcasing the passage of time, bustling cityscapes, or mesmerizing natural phenomena. On the other hand, Slo-Mo mode enables you to capture stunning slow-motion sequences, adding a dramatic and visually compelling element to your videos, particularly for action shots, sports, and expressive visual narratives.
High-Frame-Rate (HFR) Modes
The iPhone 13 boasts high-frame-rate (HFR) modes, allowing you to record videos at exceptionally high frame rates, such as 60 or 120 frames per second (fps). These modes excel in capturing smooth, detailed motion, making them perfect for fast-paced action, sports, and visually dynamic scenes. By leveraging HFR modes, you can infuse your videos with a heightened sense of energy and fluidity, creating visually captivating content that resonates with viewers.
ProRes Video Mode (Coming Soon)
In the near future, the iPhone 13 will introduce the highly anticipated ProRes video mode, offering unparalleled control over video quality and post-production flexibility. ProRes mode will empower creators with the ability to capture videos in stunning cinematic quality, facilitating seamless integration into professional editing workflows. This mode is poised to revolutionize the landscape of mobile video production, catering to filmmakers, content creators, and visual storytellers seeking uncompromising video fidelity and creative latitude.
By carefully evaluating the unique characteristics and applications of each video mode, you can make informed decisions that align with your creative vision and content objectives. Whether you aim to convey cinematic narratives, capture dynamic action, or document the passage of time, the diverse video modes of the iPhone 13 equip you with the tools to bring your creative concepts to life with unparalleled visual impact. Selecting the right video mode sets the stage for immersive storytelling and visually compelling content, ensuring that your videos resonate with audiences on a profound and emotive level.
Framing Your Shots
Framing your shots effectively is a fundamental aspect of creating visually compelling videos on your iPhone 13. The composition and framing of your shots play a pivotal role in conveying your intended message, capturing the viewer's attention, and evoking emotional responses. By mastering the art of framing, you can elevate the visual impact of your videos and imbue them with a sense of artistry and narrative depth.
Rule of Thirds
Embracing the rule of thirds is a cornerstone of proficient shot framing. This guideline involves dividing the frame into a 3×3 grid, with intersecting points that serve as natural focal areas. When framing your shots, aligning key elements, such as the subject or prominent visual elements, with these intersecting points can create a balanced and visually engaging composition. By adhering to the rule of thirds, you can instill a sense of harmony and visual flow within your videos, enhancing their overall aesthetic appeal.
Leading Lines and Symmetry
Incorporating leading lines and symmetry within your shot compositions can guide the viewer's gaze and instill a sense of visual coherence. Utilize natural or architectural elements, such as roads, fences, or building facades, to create leading lines that draw attention towards the focal point of your video. Additionally, leveraging symmetrical compositions can evoke a sense of balance and order, contributing to the overall visual impact of your shots. Whether capturing landscapes, urban environments, or interior spaces, integrating leading lines and symmetry can enrich the visual storytelling within your videos.
Depth and Perspective
Infusing your shots with depth and perspective can add a layer of visual dynamism and immersive storytelling. Experiment with foreground elements to create a sense of depth, drawing the viewer into the scene and establishing a multi-dimensional visual narrative. By incorporating foreground, midground, and background elements, you can construct visually rich compositions that invite viewers to explore and engage with the content on a deeper level. Furthermore, varying perspectives, such as low-angle or high-angle shots, can imbue your videos with a distinct visual flair, offering fresh vantage points that captivate and intrigue the audience.
Dynamic Movement and Framing
When capturing dynamic subjects or scenes, consider the interplay between movement and framing to convey energy and vitality. Tracking moving subjects within the frame or employing dynamic camera movements can infuse your videos with a sense of kinetic energy and visual excitement. By skillfully framing the action within the context of the surrounding environment, you can create immersive and visually arresting sequences that resonate with viewers on an emotive and visceral level.
Embracing Creative Freedom
While adhering to established framing principles can yield visually compelling results, embracing creative freedom is equally essential. Experiment with unconventional framing techniques, asymmetrical compositions, and innovative perspectives to inject a sense of artistic expression and individuality into your videos. By pushing the boundaries of traditional framing conventions, you can craft visually distinctive content that captivates and resonates with your audience, fostering a unique and memorable viewing experience.
Mastering the art of framing your shots empowers you to craft visually captivating videos that transcend mere documentation, evolving into immersive visual narratives that resonate with audiences on a profound and emotive level. By leveraging the principles of composition, perspective, and creative expression, you can harness the full potential of your iPhone 13 camera to create videos that captivate, inspire, and leave a lasting impression.
Using the Built-in Editing Tools
Harnessing the built-in editing tools on your iPhone 13 empowers you to refine and enhance your video content with precision and creativity. These intuitive tools offer a comprehensive suite of editing capabilities, allowing you to elevate the visual quality, storytelling impact, and overall cohesiveness of your videos. Here's a detailed exploration of the powerful built-in editing tools at your disposal, along with insights on how to leverage them to craft polished and captivating video content.
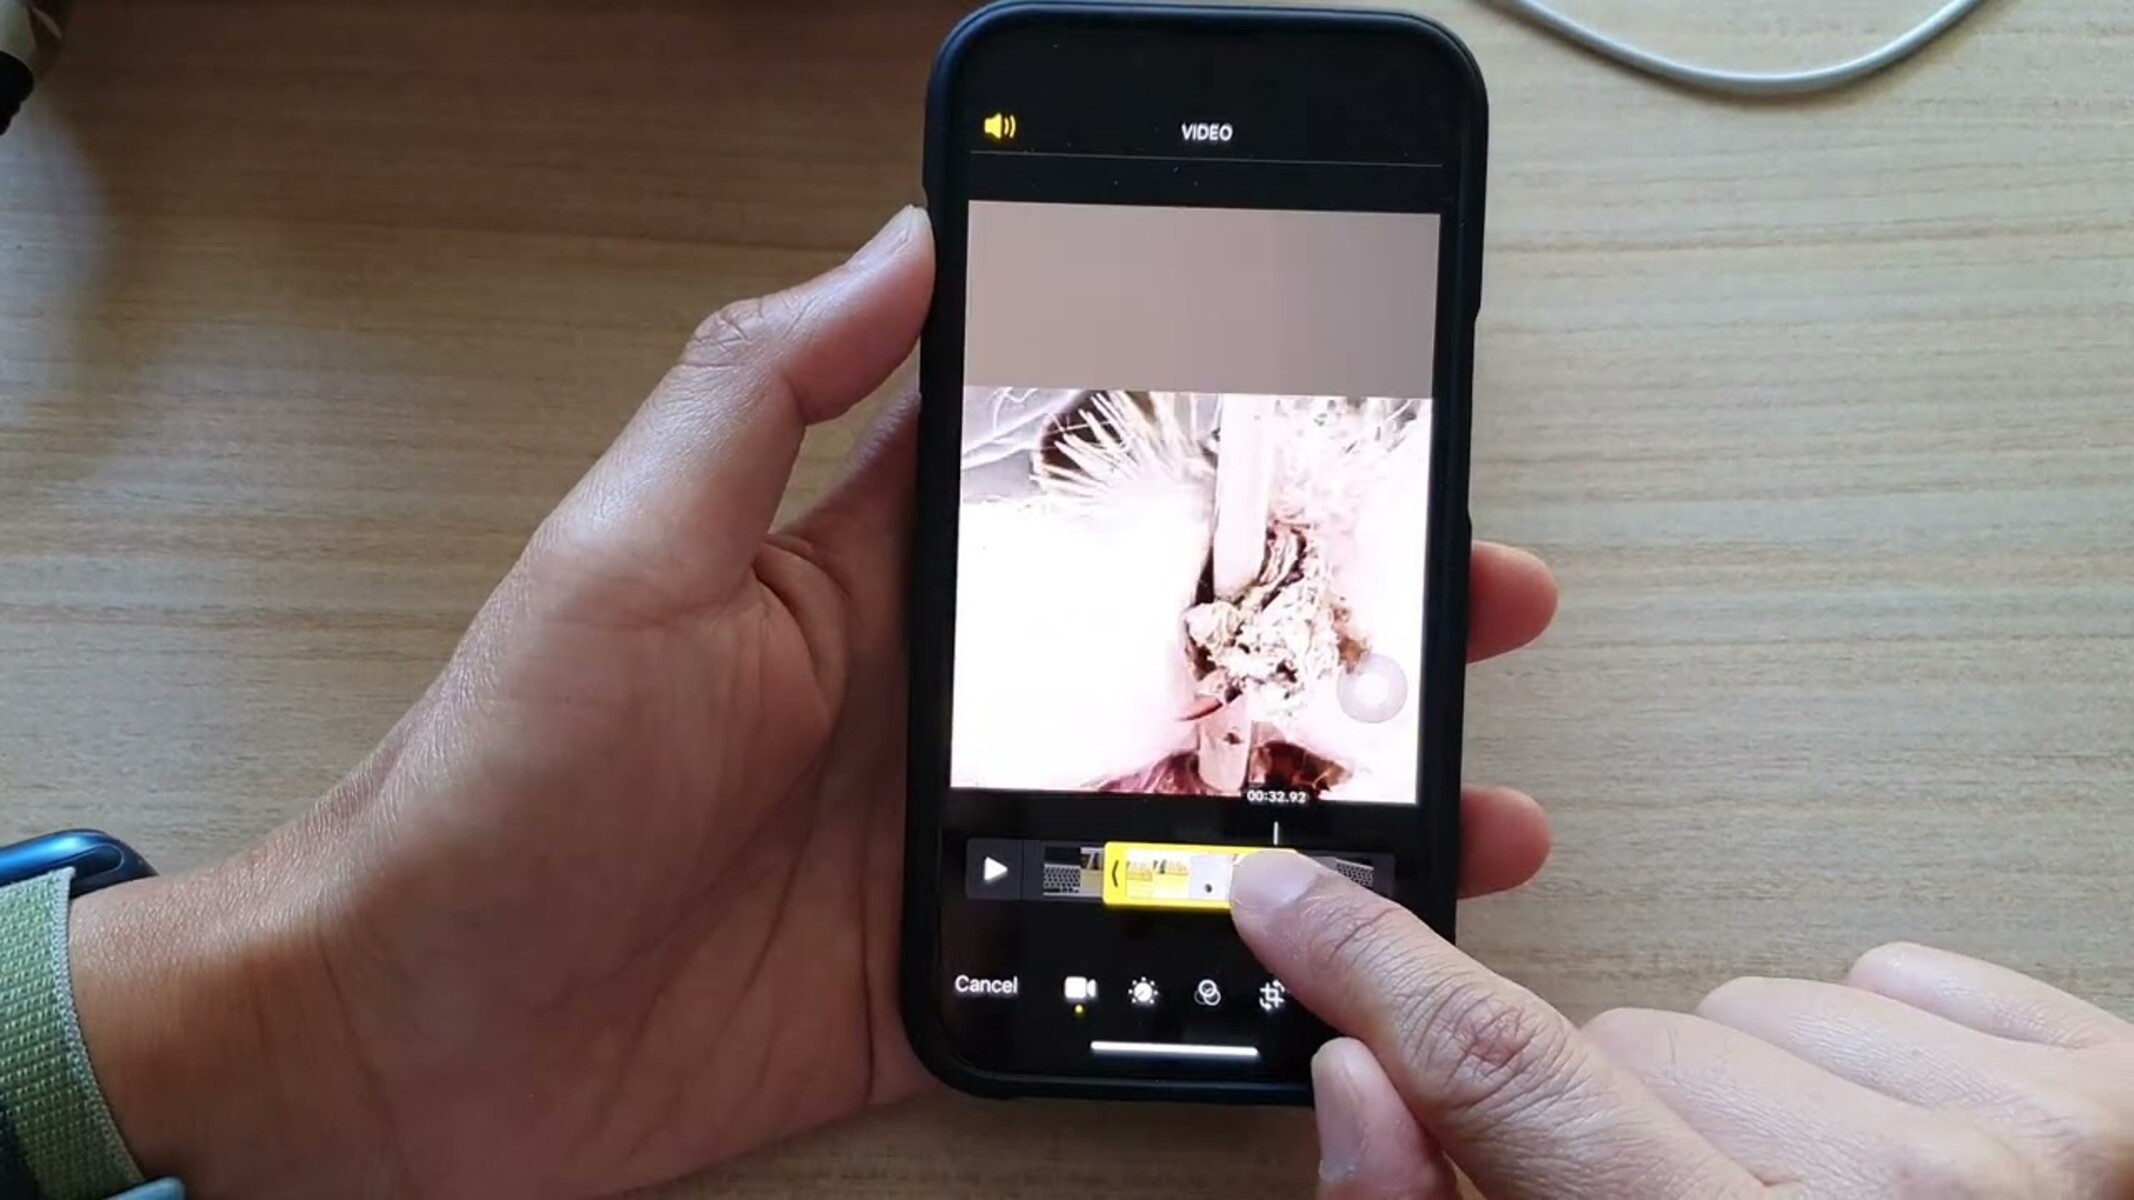
1. Editing Interface and Navigation
Upon capturing your video footage, accessing the editing interface is seamless and intuitive. Simply open the Photos app, locate the desired video, and tap the "Edit" button to enter the editing mode. The interface provides a user-friendly platform for navigating through various editing options, enabling you to effortlessly fine-tune every aspect of your video.
2. Trimming and Cutting
The ability to trim and cut video segments is a fundamental editing function that allows you to refine the pacing and narrative flow of your content. With precision controls, you can easily trim the beginning and end of your videos, remove unwanted sections, and seamlessly transition between scenes, ensuring a cohesive and engaging viewing experience.
3. Adjusting Exposure and Color
The built-in editing tools offer granular control over exposure, color balance, and tonal adjustments, enabling you to optimize the visual aesthetics of your videos. Fine-tune the exposure to achieve optimal brightness and contrast, adjust the color temperature to evoke specific moods, and enhance the vibrancy of your footage to captivate viewers with vivid and lifelike visuals.
4. Adding Filters and Effects
Leverage a diverse array of filters and effects to imbue your videos with distinct visual styles and atmospheres. From cinematic filters to artistic effects, the built-in library provides a spectrum of creative options to infuse your videos with personality and thematic coherence, elevating their visual impact and emotive resonance.
5. Incorporating Transitions and Titles
Seamless transitions and captivating titles can enrich the storytelling dynamics of your videos. The editing tools offer a selection of transitions to elegantly connect scenes and evoke a sense of continuity. Additionally, you can integrate dynamic titles and text overlays to convey information, set the tone, and guide the viewer's attention, enhancing the narrative clarity and visual engagement of your videos.
6. Audio Enhancement and Mixing
Audio plays a pivotal role in the overall impact of your videos, and the built-in editing tools provide capabilities for audio enhancement and mixing. Adjust the volume levels, apply audio effects, and synchronize soundtracks to complement the visual narrative, ensuring a harmonious and immersive audiovisual experience for your audience.
7. Exporting and Sharing Options
Once you've perfected your video through the editing process, the built-in tools offer seamless exporting and sharing options. Whether you intend to showcase your content on social media platforms, share it with friends and family, or integrate it into professional projects, the editing tools facilitate effortless exportation and sharing, ensuring that your videos reach their intended audience with ease.
By leveraging the robust suite of built-in editing tools on your iPhone 13, you can transform raw video footage into polished, visually captivating content that resonates with audiences on a profound level. The intuitive interface, comprehensive editing capabilities, and creative flexibility provided by these tools empower you to unleash your artistic vision, elevate the storytelling impact of your videos, and craft immersive visual experiences that leave a lasting impression.