
Accessing the Envelope options in Microsoft Word
In Microsoft Word, creating and customizing envelopes for your documents is a simple process that can save you time and give your correspondence a professional touch. To access the envelope options, follow these easy steps:
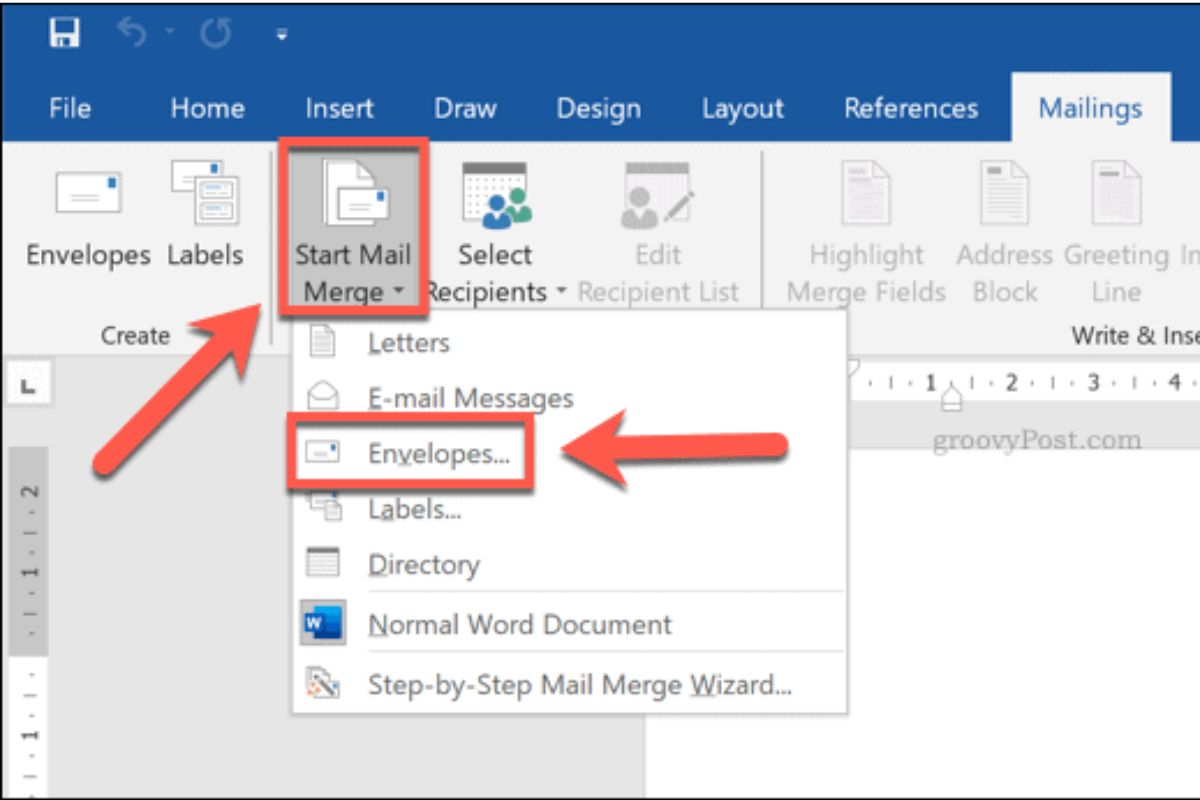
- Open Microsoft Word and navigate to the “Mailings” tab at the top of the screen.
- Click on the “Envelopes” button, which can be found in the “Create” section of the toolbar.
- A “Envelopes and Labels” dialog box will appear, with the “Envelopes” tab selected by default. This is where you can customize the layout and design of your envelope.
The envelope options allow you to choose the size, layout, font, and formatting for the recipient and return addresses. Additionally, you can add elements such as a company logo or a personalized design to further enhance the appearance of your envelope.
Once you have accessed the envelope options, you are ready to create and customize your envelopes according to your specific requirements. In the following sections of this article, we will explore how to create a new envelope, customize its size and layout, add addresses, select fonts and formatting, include additional elements, and finally, save and print the completed envelope.
By familiarizing yourself with the envelope options in Microsoft Word, you can streamline your document management process and create professional-looking envelopes effortlessly.
Creating a new envelope
To create a new envelope in Microsoft Word, follow these simple steps:
- Access the envelope options as discussed in the previous section.
- In the “Envelopes and Labels” dialog box, under the “Envelopes” tab, you will see the “Delivery address” section. This is where you will enter the recipient’s address.
- Type the recipient’s address in the “Delivery address” field. Make sure to include their name, street address, city, state, and ZIP code.
- If you want to add a return address, you can check the “Return address” box in the “Return address” section. By default, your return address will be the one associated with your Microsoft Word profile. If you want to use a different return address, you can click on the “Change” button and enter the desired return address.
- Once you have entered the necessary information, click on the “Print” button to print the envelope or the “Add to Document” button if you want to add the envelope layout to your current document.
By following these steps, you can create a new envelope with the recipient’s address and optionally, a return address. This allows you to conveniently print envelopes for mailing letters, invitations, or other correspondence directly from Microsoft Word.
It’s worth noting that you can also use the “Envelopes and Labels” dialog box to create multiple envelopes at once. Simply enter the addresses for all recipients and choose the desired options before printing or adding the envelopes to your document.
Now that you know how to create a new envelope, let’s explore how you can further customize its size, layout, and appearance.
Customizing envelope size and layout
Microsoft Word allows you to easily customize the size and layout of your envelope to accommodate different envelope types and preferences. Here’s how you can do it:
- Access the envelope options in Microsoft Word as mentioned in the previous section.
- In the “Envelopes and Labels” dialog box, under the “Envelopes” tab, you will find the “Envelope size” section.
- By default, the “Automatic” option is selected, which adjusts the envelope size based on the paper size and orientation set in your printer settings. However, if you prefer to use a specific envelope size, you can select the “Custom size” option and enter the dimensions manually.
- Next, choose the envelope layout that matches your envelope type from the available options. Microsoft Word provides standard layout options for popular envelope sizes such as #10 envelopes and A4 envelopes.
- If you are using a custom-sized envelope, you can adjust the layout further by clicking on the “Customize” button. This will allow you to specify the position of the delivery address, return address, and other elements on the envelope.
- Once you have customized the size and layout according to your preferences, click on the “OK” button to apply the changes.
Customizing the envelope size and layout ensures that your printed envelopes fit perfectly and present a professional appearance. Whether you’re using standard-sized envelopes or custom ones, Microsoft Word provides the flexibility to create envelopes that meet your specific needs.
Now that you have customized the envelope size and layout, let’s move on to adding the recipient’s address to the envelope.
Adding the recipient’s address
Once you have accessed the envelope options and customized the size and layout in Microsoft Word, it’s time to add the recipient’s address to the envelope. Follow these steps:
- In the “Envelopes and Labels” dialog box, under the “Envelopes” tab, locate the “Delivery address” section.
- Click on the text box next to “Delivery address” to enter the recipient’s address.
- Type the recipient’s name, street address, city, state, and ZIP code in the respective fields. Ensure that the address is accurate and complete.
- You can format the recipient’s address by highlighting specific parts of the address and applying changes such as bold, italics, or underline, using the formatting options available in Microsoft Word.
- Preview the recipient’s address on the envelope in the “Preview” section of the dialog box to ensure it appears as desired.
By adding the recipient’s address to the envelope, you ensure that the mail is delivered accurately and promptly. Microsoft Word provides you with the tools to easily customize the appearance of the address, making it stand out or match your document’s style.
Now that we’ve added the recipient’s address, let’s explore how to add the return address to the envelope, if desired.
Adding the return address
In addition to the recipient’s address, you may want to include a return address on your envelope. Adding a return address ensures that any undeliverable mail can be returned to you. Here’s how you can add the return address:
- In the “Envelopes and Labels” dialog box, under the “Envelopes” tab, locate the “Return address” section.
- If you want to include a return address, check the “Return address” box.
- By default, the return address will be the one associated with your Microsoft Word profile. If you want to use a different return address, click on the “Change” button and enter the desired return address.
- You have the option to format the return address by applying various formatting options such as font style, size, bold, italics, and underline.
- Preview the return address on the envelope in the “Preview” section of the dialog box to verify its appearance.
Adding a return address is particularly helpful when sending important mail or if you have multiple addresses. It ensures that any non-deliverable items can be returned to the correct location.
Now that we have added the return address, let’s move on to choosing a font and formatting for the addresses on the envelope.
Choosing a font and formatting for the addresses
When creating and customizing envelopes in Microsoft Word, selecting an appropriate font and formatting for the addresses is essential to ensure readability and maintain a professional appearance. Follow these steps to choose a font and formatting options:
- In the “Envelopes and Labels” dialog box, under the “Envelopes” tab, you can find various font and formatting options for the addresses.
- Click on the “Font” button to choose a specific font for the addresses. A font selection dialog box will appear, displaying a variety of font options for you to choose from.
- Select the desired font style and size that you prefer for the addresses. It’s recommended to choose a legible font that is easy to read.
- You can also apply formatting options such as bold, italics, underline, or font color to make the addresses stand out.
- Preview the addresses on the envelope in the “Preview” section of the dialog box to ensure that the font and formatting choices meet your expectations.
Choosing a suitable font and formatting for the addresses adds a professional touch to your envelopes and enhances the overall aesthetics. It’s important to strike a balance between legibility and visual appeal.
Now that we have covered font and formatting options, let’s explore how you can add additional elements to your customized envelope.
Adding additional elements to the envelope
In addition to the recipient’s and return addresses, Microsoft Word allows you to add other elements to your customized envelope to further personalize it. Here are some elements you can consider adding:
- Company logo: If you are sending business-related correspondence, you can add your company’s logo to the envelope. Click on the “Insert” tab, select “Picture,” and browse for your logo file to insert it into the envelope.
- Design or artwork: To add a creative touch, you can include design elements or artwork on the envelope. You can either draw something using the drawing tools or insert an image from your computer.
- Watermark: A watermark adds a subtle branding or decorative element to the envelope. You can insert a watermark using the “Watermark” option under the “Design” tab.
- Seal or sticker: For special occasions, consider adding a seal or sticker to the envelope. This can add a decorative and personal touch. You can find pre-made seals/stickers or create your own using image editing software.
Adding these additional elements allows you to create a unique and visually appealing envelope that reflects your personality or brand. However, make sure not to overcrowd the envelope and maintain readability.
Now that you have added all the desired elements to your envelope, let’s move on to saving and printing the customized envelope.
Saving and printing the customized envelope
Once you have customized your envelope in Microsoft Word, you have the option to save it for future use or print it directly. Follow these steps to save and print your customized envelope:
- To save the customized envelope, click on the “File” tab at the top left corner of the screen.
- From the drop-down menu, select “Save As” to open the save dialog box.
- Choose a location on your computer where you want to save the envelope file.
- Provide a name for the file and select the desired file format (such as .docx or .pdf) from the drop-down menu.
- Click on the “Save” button to save the customized envelope.
To print the customized envelope, ensure your printer is connected and ready. Follow these steps:
- In the “Envelopes and Labels” dialog box, verify that the envelope settings are as desired, including the correct paper size and orientation.
- Click on the “Print” button to send the envelope to your printer.
- Adjust any printer settings if needed, such as the number of copies or print quality.
- Click on the “Print” button to begin printing the customized envelope.
By saving the customized envelope, you can easily access and reuse it for future mailings without having to recreate the design. Printing the envelope allows you to have a physical copy ready for use.
Now that you have saved and printed your customized envelope, you are ready to send out your beautifully designed and personalized correspondence.
Troubleshooting common issues with envelopes
While creating and printing envelopes in Microsoft Word is generally a straightforward process, you might encounter some common issues along the way. Here are a few troubleshooting tips for common envelope-related problems:
- Incorrect alignment: If the addresses on your printed envelope are not aligned properly, double-check the envelope size and layout settings in the “Envelopes and Labels” dialog box. Make sure the selected options match the dimensions of your envelope and adjust if necessary.
- Address cutoff: If part of the recipient’s or return address is cut off on the printed envelope, ensure that the addresses fit within the printable area. Use shorter or abbreviated versions if needed. You can also try adjusting the margins or scaling options in the printer settings.
- Inconsistent font formatting: If the font formatting of the addresses is inconsistent or does not match your settings, ensure that you apply the desired formatting to the entire text. Highlight the address and check that the font, size, and other formatting properties are consistent.
- Printing on the wrong side: If your envelope is being printed on the wrong side or orientation, review the page setup options in Microsoft Word. Verify that the correct envelope orientation (portrait or landscape) is selected and adjust if necessary. Additionally, confirm that your printer settings match the envelope orientation.
- Print quality issues: If the print quality on your envelopes is poor, blurry, or faded, check the ink or toner levels of your printer. Consider replacing any low or empty cartridges. You can also experiment with different print quality settings in your printer settings or adjust the envelope thickness or paper type in Microsoft Word.
By troubleshooting these common issues, you can address any problems that arise during the envelope customization and printing process. If the issues persist, consult the manufacturer’s instructions for your printer or seek technical support for further assistance.
With these troubleshooting tips, you can overcome envelope-related challenges and ensure that your printed envelopes look professional and presentable.