
Why Change Your Name on Facebook?
Changing your name on Facebook can be a crucial step in establishing or rebranding your online identity. Whether you are recently married, divorced, or simply want to present yourself differently, updating your name on social media platforms like Facebook is essential. Here are a few reasons why you might consider changing your name on Facebook:
- Reflecting a New Life Event: Changing your name on Facebook allows you to showcase a significant milestone or life event, such as marriage or a legal name change. It helps you align your online presence with your current identity.
- Professional Rebranding: If you have gone through a career change or want to establish a professional online reputation, updating your name on Facebook can be an important step. It allows you to present yourself consistently across various platforms, enabling colleagues, employers, and clients to easily identify you.
- Privacy and Security: In some cases, changing your name on Facebook can help enhance your privacy and security. If you have faced harassment or unwanted attention, updating your name may provide an additional layer of protection by confusing or deterring potential harassers.
- Gender Identity: For individuals who identify as transgender or non-binary, changing their name on Facebook can be an empowering step in affirming their identity. It allows them to be recognized and addressed by their chosen name, promoting inclusivity and respect.
- Expressing Your Authentic Self: Your name is an essential part of your identity. By changing your name on Facebook, you have the freedom to express yourself authentically, aligning your online presence with who you truly are.
These are just a few reasons why changing your name on Facebook can be significant. Whether it’s for personal, professional, or identity-related motives, updating your name on this popular social media platform allows you to present yourself accurately and confidently.
How to Change Your Name on Facebook
If you’ve decided to change your name on Facebook, don’t worry – the process is relatively straightforward. Here are the steps to follow:
- Step 1: Access Your Account Settings
- Step 2: Click on “Edit” Next to Your Name
- Step 3: Enter Your New Name
- Step 4: Review and Confirm
- Step 5: Wait for Approval
First, log in to your Facebook account and locate the arrow icon in the top-right corner of the screen. Click on it to reveal a dropdown menu, then select “Settings & Privacy” and choose “Settings” from the options.
On the Settings page, you’ll find various sections. Look for the “Name” section and click on the “Edit” link located next to your current name.
In the Name Editor, enter your new name in the provided fields. Facebook allows you to modify various aspects, including your first, middle, and last name. Keep in mind that you must use your real name; using a fake name or a name that is not yours goes against Facebook’s policies.
Take a moment to review your new name carefully. Make sure it accurately reflects the changes you want to make. Remember that you can only change your name once every 60 days, so it’s essential to ensure everything is correct before proceeding. Once you’re satisfied, click the “Review Change” button to proceed.
After reviewing your name change request, Facebook will process it and usually approve or deny it within 24 to 48 hours. During this time, it’s essential to be patient. You’ll receive a notification once your name change has been approved or if any issues arise.
That’s it! By following these steps, you can successfully change your name on Facebook. Remember to choose a name that aligns with your identity and follows Facebook’s guidelines. Avoid using symbols, numbers, or excessive punctuation in your name, as Facebook may reject those changes.
Step 1: Access Your Account Settings
Changing your name on Facebook starts with accessing your account settings. Follow these simple steps:
- Log in to Your Facebook Account
- Find the Arrow Icon
- Select “Settings & Privacy”
- Choose “Settings”
- Navigate to “Name” Section
Visit facebook.com and log in using your email address or phone number and password. Enter the security verification if prompted.
In the top-right corner of the Facebook homepage, you will see a small arrow pointing downwards. Click on this arrow to open a dropdown menu.
In the dropdown menu, locate and click on “Settings & Privacy”. This will reveal more options in a submenu.
From the submenu, click on “Settings” to access your account settings.
On the left side of the settings page, you will see a list of sections. Scroll down until you find “Personal Information”. Under this section, you will see “Name”. Click on “Edit” next to your current name.
By following these steps, you will be able to access your account settings on Facebook. This is the first step towards changing your name on the platform. It’s important to note that Facebook may ask you to re-enter your password for security purposes during this process.
Step 2: Click on “Edit” Next to Your Name
Once you have accessed your account settings, the next step in changing your name on Facebook is to click on “Edit” next to your name. Follow these instructions:
- Locate the “Name” Section
- Enter Your Password
- Click on “Edit” Next to Your Name
On the settings page, scroll down until you find the “Personal Information” section. Under this section, you will see “Name”. Click on the “Edit” link located next to your current name.
Facebook may ask you to re-enter your password as a security measure before proceeding. This step ensures that only you have access to change your name.
Once your password has been confirmed, you will see the option to edit your name. Click on the “Edit” button next to your name to proceed.
Following these steps will allow you to access the name editing feature on Facebook. It’s important to remember that changing your name on Facebook should reflect your real identity and abide by Facebook’s guidelines. Avoid using fake names, symbols, numbers, or any other terms that violate Facebook’s policies.
Now that you have clicked on “Edit” next to your name, you can move on to the next step of actually entering your new name.
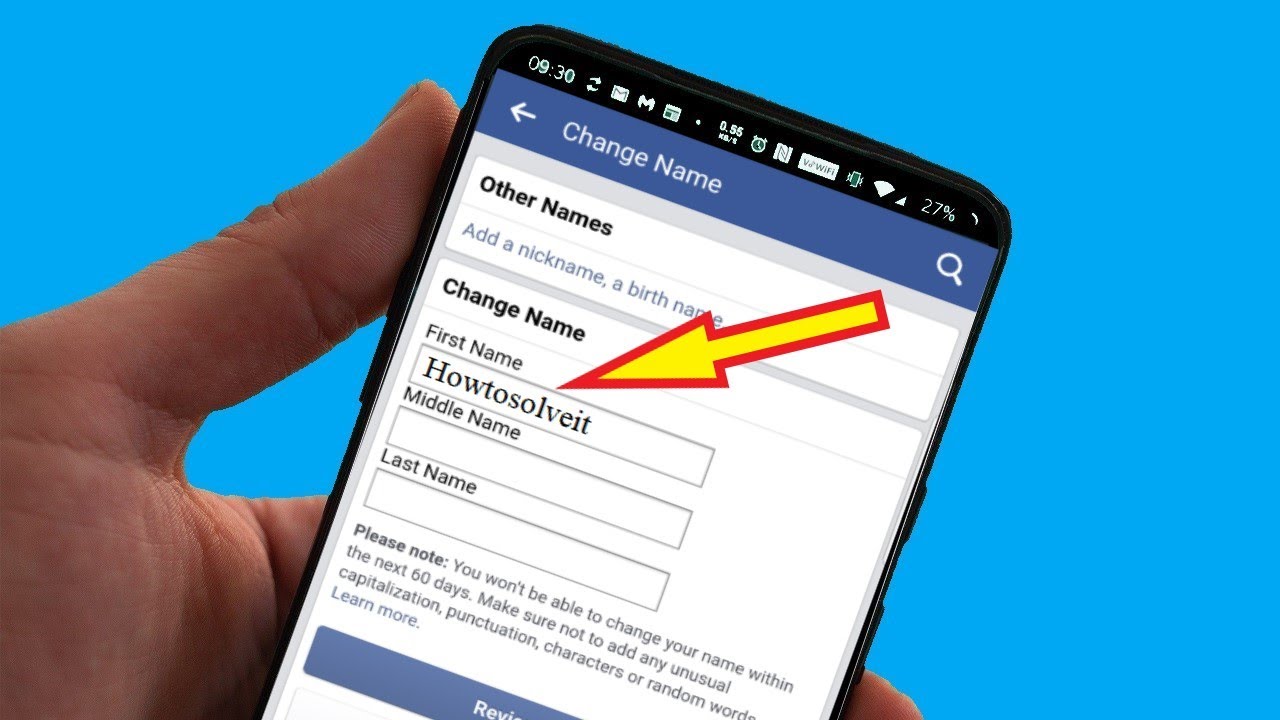
Step 3: Enter Your New Name
After clicking on “Edit” next to your name, you will proceed to the step of entering your new name on Facebook. Follow these instructions to successfully update your name:
- Name Editing Options
- Enter Your New Name
- Choose Your Display Name
- Preview Your New Name
Once you have clicked on “Edit,” you will be directed to the name editor screen. In this section, you’ll have various options for modifying your name, such as your first name, middle name, and last name.
In the provided fields, enter your new name exactly as you wish it to be displayed on Facebook. You can modify any part of your name as long as it adheres to Facebook’s guidelines, which require the use of your real name.
Facebook allows you to modify the way your name is displayed. You can choose to display your full name, only your first name and the initial of your last name, or any other variation that complies with their guidelines.
As you type your new name, Facebook will provide a preview of how it will appear on your profile. Take a moment to review it and ensure it looks the way you want it.
Remember to be mindful of Facebook’s policies when choosing your new name. Avoid using characters, symbols, excessive punctuation, or any other elements that may violate their guidelines. It’s important to use your true identity and present yourself authentically on the platform.
Once you are satisfied with your new name, you can proceed to the next step of reviewing and confirming the changes.
Step 4: Review and Confirm
After entering your new name on Facebook, it is essential to review and confirm the changes before finalizing them. Follow these instructions to ensure that everything is accurate:
- Review Your New Name
- Check for Spelling and Accuracy
- Make Adjustments if Necessary
- Consider the Name Change Limitation
- Confirm the Name Change
Take a moment to carefully review the new name you entered in the designated fields. Ensure that it accurately reflects the changes you want to make to your Facebook profile.
Double-check the spelling and accuracy of your new name. Pay attention to capitalization, spaces, and any special characters. It’s crucial to enter the correct name to maintain consistency and avoid confusion.
If you notice any errors or want to make adjustments to your new name, you can still modify it in the name editor. Simply go back to the previous step and make the necessary changes before proceeding further.
Keep in mind that Facebook allows you to change your name once every 60 days. Take this into account when confirming your changes and ensure that it is the name you want to be associated with on the platform.
Once you have carefully reviewed your new name and made any adjustments if needed, click on the “Review Change” button to proceed. This will initiate the process of changing your name on Facebook.
By following these steps, you can confidently review and confirm the changes you have made to your name on Facebook. Remember to carefully review the accuracy of the new name to avoid any confusion or misunderstandings with your friends, family, or colleagues.
After confirming the name change, you will need to wait for the approval process, which is the next step in changing your name on Facebook.
Step 5: Wait for Approval
Once you have reviewed and confirmed your name change on Facebook, the final step is to wait for the platform to process and approve your request. Here’s what you need to know:
- Processing Time
- Notification
- Email Confirmation
- Contact Support if Necessary
- Next Steps
Facebook typically takes 24 to 48 hours to review and approve name change requests. During this time, it is essential to be patient and refrain from making any further changes to your name.
Facebook will notify you of the status of your name change request through a notification on your account. Keep an eye out for any updates or messages regarding your name change.
In some cases, Facebook may send you an email confirming the approval or denial of your name change request. Make sure to check your email inbox, including the spam or junk folder, for any communication from Facebook.
If it has been more than 48 hours and you have not received any notification regarding your name change request, you can reach out to Facebook support for assistance. They can provide you with further information or help resolve any issues that may have arisen.
If your name change request is approved, your new name will be reflected on your Facebook profile, allowing you to present your updated identity to your friends, family, and network. You can now enjoy using Facebook with your new name.
Remember that changing your name on Facebook is subject to their policies and guidelines. If your name change request is denied, it is important to review Facebook’s guidelines and make any necessary adjustments to comply with their requirements.
Be patient throughout this process and ensure you follow Facebook’s guidelines to avoid any issues or complications. Soon enough, your new name will be associated with your Facebook profile, allowing you to present yourself authentically and accurately on the platform.
Tips for a Smooth Name Change Process
Changing your name on Facebook can be a straightforward process if you follow these tips to ensure a smooth transition:
- Choose a Clear and Consistent Name
- Familiarize Yourself with Facebook’s Policies
- Use Your Real Name
- Check for Spelling and Accuracy
- Be Patient during the Approval Process
- Follow Facebook’s Community Standards
- Update Your Contacts and Networks
Select a name that is clear, easy to spell, and consistent with your identity. Avoid using ambiguous or hard-to-pronounce names that may lead to confusion or misunderstandings.
Before changing your name, take the time to read and understand Facebook’s policies and guidelines regarding name changes. Ensure that your new name complies with their requirements to avoid any issues or rejections.
Facebook requires users to use their real names. Avoid using a fake name or a name that does not accurately represent your identity. Using your true name will help maintain transparency and authenticity on the platform.
Double-check the spelling and accuracy of your new name before confirming the changes. This will help avoid any mistakes and ensure that your name is correctly displayed on your Facebook profile.
Once you have submitted your name change request, allow Facebook time to review and process it. Be patient and refrain from making further changes to your name during this time.
While changing your name, it’s important to continue adhering to Facebook’s Community Standards. Ensure that your profile and content align with their guidelines to maintain a positive online presence.
Inform your contacts, friends, and networks about your name change to prevent confusion. Update your name on other social media platforms as well to maintain consistency across your online presence.
By following these tips, you can streamline the process of changing your name on Facebook. Remember to choose a name that aligns with your true identity, comply with Facebook’s policies, and be patient throughout the approval process.
Changing your name on Facebook allows you to present yourself accurately and authentically to your online community, contributing to a positive and genuine social media experience.
Reasons Your Name Change Request May Be Denied
While Facebook generally allows users to change their names, there are some reasons why your name change request may be denied. It’s important to be aware of these potential issues to avoid any setbacks in the process. Here are some common reasons for name change request denials:
- Violation of Facebook’s Policies
- Using a Fake Name
- Impersonation or Misrepresentation
- Recent Name Changes
- Reporting by Other Users
If your new name violates Facebook’s policies and guidelines, your request will likely be denied. Make sure your new name complies with their requirements, such as using your real name and avoiding symbols, numbers, or excessive punctuation.
Facebook requires users to use their real names. If you attempt to change your name to a fake or fictitious name, your request will likely be denied. It’s important to provide your authentic identity to maintain transparency on the platform.
If Facebook suspects that you are attempting to impersonate someone or misrepresent your identity through your name change request, it will be denied. It’s crucial to be honest and use your own identity when changing your name.
If you have recently changed your name on Facebook and want to make another change, you may encounter some limitations. Facebook allows users to change their names once every 60 days, so if you’re within that time frame, your request may be denied.
If other users report your name change as inappropriate or in violation of Facebook’s policies, it may lead to a denial. Ensure that your new name is respectful and compliant with their guidelines to avoid any potential reporting by others.
It’s important to carefully choose your new name and ensure that it aligns with Facebook’s policies to increase the likelihood of your name change request being approved. If your request is denied, take the time to review their guidelines and make any necessary adjustments before submitting another request.
By being aware of the reasons for name change request denials, you can proactively avoid any issues and undergo a smooth name change process on Facebook.
How to Update Your Name on Facebook Pages
If you manage a Facebook Page and need to update its name, the process is slightly different from updating your personal name. Here’s how you can change the name of your Facebook Page:
- Access Your Page Settings
- Go to “Page Info”
- Click on “Edit” next to “Name”
- Enter the New Name
- Review and Confirm
- Wait for Approval
Log in to your Facebook account and go to your Facebook Page. Click on the “Settings” tab located at the top of your Page. This will take you to the settings page specific to your Page.
On the left-hand side of the settings page, you will see a list of options. Look for “Page Info” and click on it. This section contains the essential information about your Page.
In the “Page Info” section, scroll down until you find the “Name” field. Click on the “Edit” button next to it.
In the name editor, enter the new name you want for your Facebook Page. Make sure the new name accurately reflects the purpose and identity of your Page.
Take a moment to review the new name and ensure it meets the guidelines set by Facebook. Once you are satisfied, click on the “Continue” button.
Similar to personal name changes, your Page name change request will undergo a review process. You will need to wait for Facebook to approve the requested name change. This can take some time, so be patient and check for notifications or email updates regarding the status of your request.
It’s important to note that Facebook has specific guidelines for Page names. Your Page name should accurately represent the entity or topic the Page represents. It should not contain any misleading or inappropriate content. Make sure to review Facebook’s Page guidelines to ensure compliance with their policies.
By following these steps, you can successfully update the name of your Facebook Page. Remember that changing the Page name may affect search rankings and the overall user experience, so choose your new name carefully and consider the impact it may have on your Page’s branding and visibility.
Updating Your Name for Messenger and Instagram
If you’ve changed your name on Facebook and want to ensure that your name is updated on Messenger and Instagram as well, here’s how you can do it:
- Messenger
Option 1: Through Facebook
If you’re using Messenger through your Facebook account, changing your name on Facebook will automatically update your name on Messenger. You don’t need to take any additional steps as the name change is synchronized across both platforms.
Option 2: Separate Account
If you’re using Messenger with a separate account, not linked to your Facebook account, you will need to update your name within the Messenger app itself. Open the Messenger app, go to your profile, tap on your name, and make the necessary changes to update your name.
Option 1: Through Facebook
If your Instagram account is linked to your Facebook account, changing your name on Facebook will also update your name on Instagram. The name change will automatically reflect on your Instagram profile.
Option 2: Separate Account
If your Instagram account is separate from Facebook, you will need to change your name directly within the Instagram app. Open the Instagram app, go to your profile, tap on “Edit Profile,” and update your name in the provided fields.
It’s important to note that when updating your name on Messenger and Instagram, you should ensure that the new name aligns with their respective guidelines and policies. Avoid using fake names or violating any platform-specific rules.
By following these steps, you can update your name on Messenger and Instagram, ensuring consistency and accuracy across multiple platforms. Remember that any updates to your name may take some time to be reflected, so be patient and check your profiles periodically to verify the changes.
FAQs about Changing Your Name on Facebook
Changing your name on Facebook may raise questions and inquiries. To help address some of the common queries, here are answers to frequently asked questions about changing your name on Facebook:
- How often can I change my name on Facebook?
- Can I change my name to something other than my legal name?
- Can I use special characters or symbols in my name?
- Will my friends be notified when I change my name on Facebook?
- What happens to my old posts and comments after I change my name?
- Can I change my name on Facebook Pages that I manage?
- What should I do if my name change request on Facebook gets denied?
You can change your name on Facebook once every 60 days. It’s important to choose a name you’re comfortable with, as you’ll have to stick with it for at least two months.
No, Facebook mandate that you use your real name when changing your name on the platform. Using a fake name or a name that is not legally yours goes against their policies.
Facebook recommends using your real name without any special characters, symbols, numbers, or excessive punctuation. Your name should be easily recognizable and pronounceable.
Your Facebook friends will receive a notification that you have changed your name. This notification will appear in their News Feed or in their notifications, depending on their settings.
Your old posts and comments will be updated to display your new name. However, keep in mind that some older posts and comments may still display your previous name if they have been shared or saved by other users.
Yes, you can change the name of Facebook Pages that you manage by following the specific steps outlined in the Page settings. However, the guidelines and approval process may differ from personal name changes.
If your name change request is denied, Facebook will typically provide a reason for the denial. Review their guidelines and adjust your name accordingly before submitting another request.
These are just a few frequently asked questions regarding changing your name on Facebook. If you have further inquiries or encounter specific issues, it’s recommended to refer to Facebook’s official help center or reach out to their support team for assistance.