
Checking the Battery Health
Before diving into the process of replacing the battery in your iPhone 11, it's crucial to assess the current state of your device's battery health. This step is essential as it provides valuable insights into whether a battery replacement is indeed necessary. Fortunately, Apple has integrated a feature within iOS that allows users to check the battery health of their devices.
To check the battery health of your iPhone 11, follow these simple steps:
-
Open Settings: Navigate to the "Settings" app on your iPhone 11. This can be easily located on the home screen, represented by a gear icon.
-
Select Battery: Once in the Settings menu, scroll down and tap on "Battery." This will open up a range of battery-related options and information.
-
Battery Health: Within the Battery menu, tap on "Battery Health." This section provides a comprehensive overview of your iPhone's battery capacity and peak performance capability.
Upon accessing the Battery Health section, you will be presented with two key pieces of information: Maximum Capacity and Peak Performance Capability. Maximum Capacity indicates the current capacity of your iPhone's battery relative to when it was new. A brand-new iPhone 11 typically boasts a maximum capacity of 100%, indicating that the battery is operating at its full potential. As the device ages and undergoes charging cycles, the maximum capacity may decrease.
Peak Performance Capability, on the other hand, informs users whether the device is capable of supporting peak performance management. If your iPhone experiences an unexpected shutdown due to a depleted battery, this feature will be enabled to prevent such occurrences. However, if the battery health degrades significantly, peak performance management may be impacted.
By assessing these metrics, you can gain a clear understanding of your iPhone 11's battery health. If the Maximum Capacity is notably low, or if the Peak Performance Capability is hindered, it may be time to consider replacing the battery to restore optimal functionality to your device.
Understanding the battery health of your iPhone 11 is the first step towards ensuring its longevity and performance. With this knowledge in hand, you can confidently proceed with the battery replacement process, knowing that it will significantly enhance the overall usability and reliability of your device.
Tools Required for Battery Replacement
When it comes to replacing the battery in your iPhone 11, having the right tools at your disposal is paramount. This ensures that the process is executed smoothly and efficiently, minimizing the risk of damage to the device. Here's a comprehensive list of the essential tools you'll need for a successful battery replacement:
-
Pentalobe Screwdriver: The iPhone 11 is secured with proprietary Pentalobe screws, which require a specialized Pentalobe screwdriver for removal. This tool is crucial for accessing the internal components of the device, including the battery.
-
Phillips Screwdriver: In addition to the Pentalobe screwdriver, a Phillips screwdriver is necessary for disconnecting various components within the iPhone 11. This versatile tool is commonly used in electronic repairs and is indispensable for accessing the battery.
-
Spudger Tool: A spudger tool, often made of nylon or plastic, is essential for safely prying apart the delicate components of the iPhone 11. Its non-conductive properties prevent accidental damage to the internal circuitry while providing the necessary leverage for disassembly.
-
Suction Cup: To facilitate the removal of the display assembly, a suction cup is employed to create a secure grip on the front glass. This enables the careful separation of the display from the device, granting access to the internal components, including the battery.
-
Tweezers: Precision tweezers are indispensable for handling small screws, connectors, and delicate components during the battery replacement process. Their fine tips allow for intricate maneuvering and manipulation of intricate parts within the iPhone 11.
-
Opening Picks: These thin, flexible tools are utilized to gently pry apart the adhesive securing the display and other components. Opening picks are designed to minimize the risk of damage to the device while providing the necessary leverage for disassembly.
-
Adhesive Strips: Upon replacing the battery, adhesive strips are employed to secure the new battery in place within the device. These specialized adhesive strips ensure a secure and stable fit, preventing any movement or displacement of the battery.
By ensuring that you have these essential tools at your disposal, you can confidently embark on the battery replacement process for your iPhone 11. With the right tools and a methodical approach, you can effectively restore the functionality and longevity of your device, ensuring seamless performance and extended usability.
Steps to Remove the Old Battery
-
Power Off the Device: Before commencing the battery removal process, ensure that your iPhone 11 is powered off. This is a crucial safety measure to prevent any potential electrical mishaps during the disassembly.
-
Prepare the Work Surface: Find a clean, well-lit workspace with ample room to maneuver. Lay a soft, static-free surface, such as a microfiber cloth, to place your iPhone 11 during the battery replacement process. This minimizes the risk of scratches or damage to the device.
-
Remove the Pentalobe Screws: Utilizing the specialized Pentalobe screwdriver, carefully remove the two screws located at the base of the device, adjacent to the charging port. These screws secure the display assembly to the iPhone 11 and must be safely set aside for reassembly.
-
Employ the Suction Cup: With the suction cup in hand, gently press it onto the lower half of the front panel, just above the home button. Ensure that the suction cup forms a secure attachment to the display.
-
Separate the Display: Holding the iPhone 11 securely, gently pull up on the suction cup to create a slight gap between the display assembly and the device. Insert an opening pick into the gap, ensuring it is positioned between the display and the device's frame.
-
Carefully Pry Open the Device: Gradually slide the opening pick along the edge of the iPhone 11, separating the adhesive securing the display. Exercise caution and patience to avoid damaging the delicate ribbon cables connecting the display to the device.
-
Lift the Display Assembly: Once the adhesive is loosened, carefully lift the display assembly to an angle of approximately 90 degrees, ensuring it is supported to prevent strain on the ribbon cables.
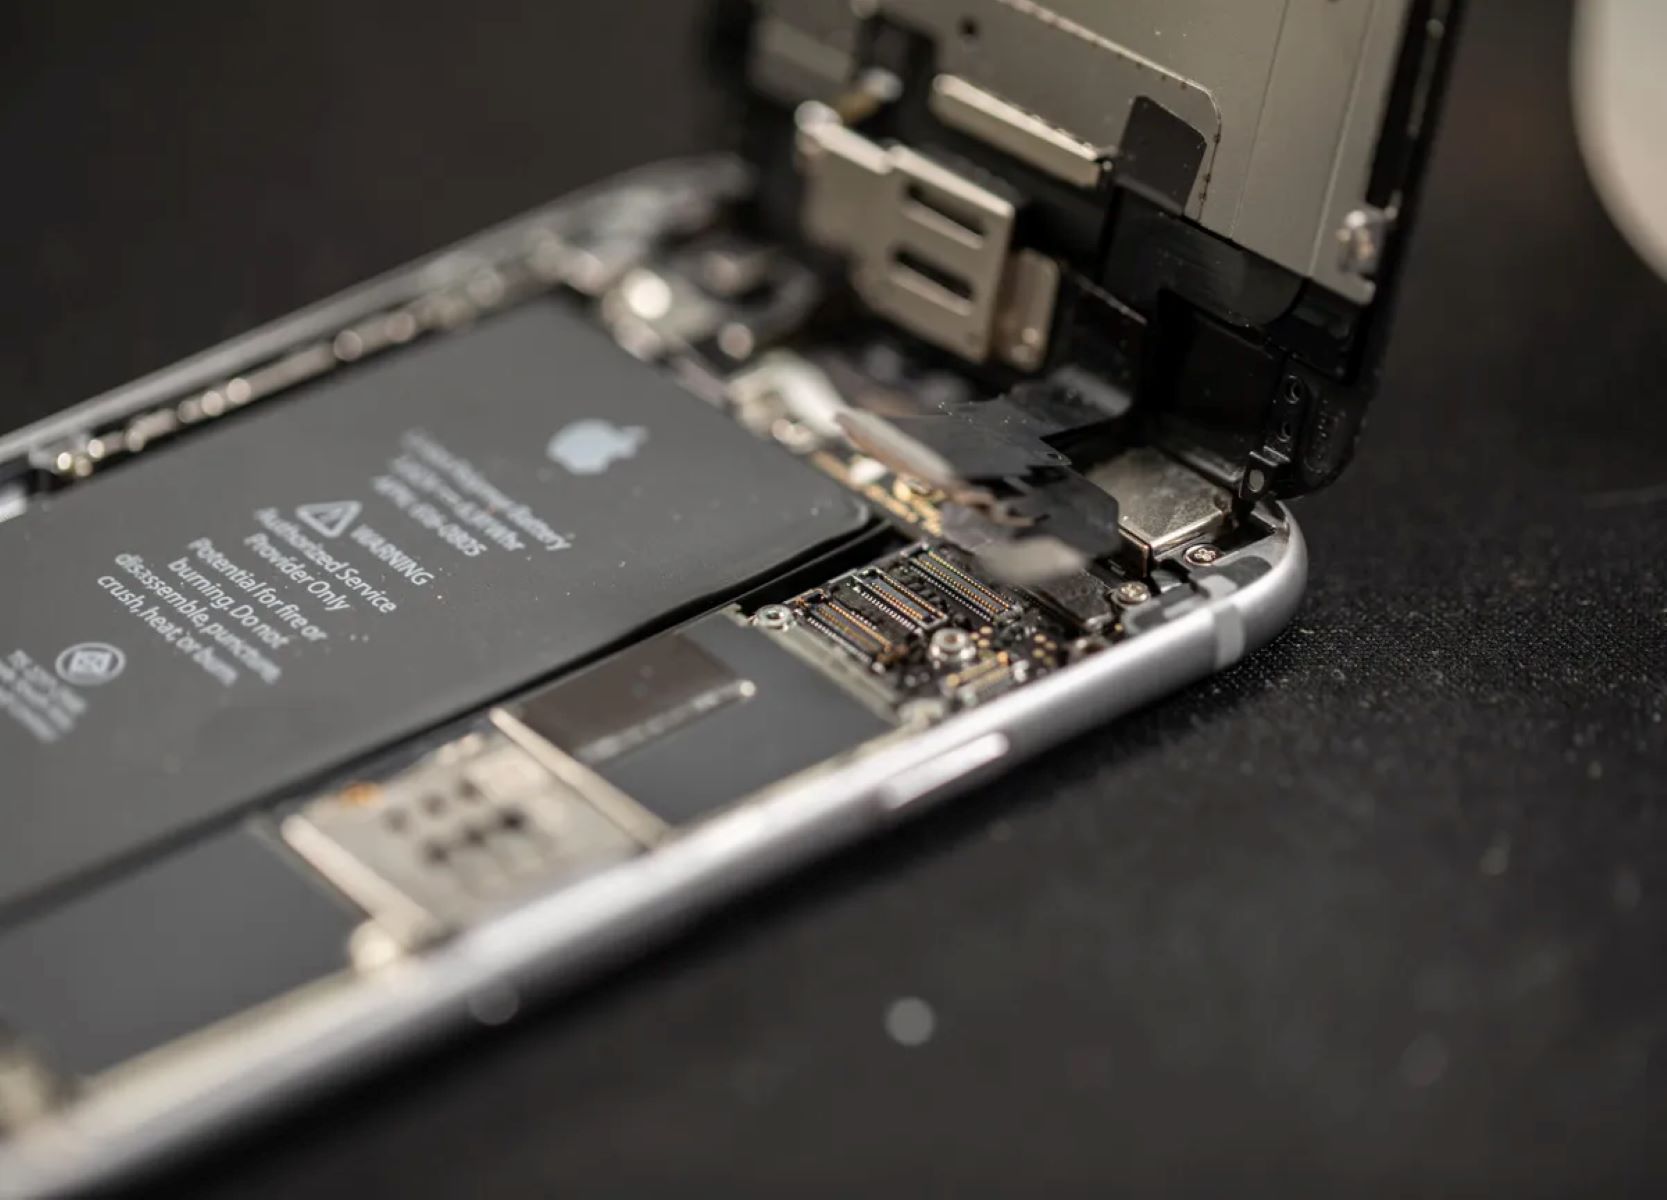
-
Disconnect the Battery Connector: Within the device, locate the battery connector, secured by a metal bracket. Using the Phillips screwdriver, remove the screws holding the bracket in place. Subsequently, gently lift the bracket and disconnect the battery connector from the logic board.
-
Release the Adhesive: Underneath the battery, there are adhesive strips securing it to the device. Utilize the spudger tool to carefully release the adhesive, ensuring that the battery can be safely removed without causing damage to the internal components.
-
Remove the Battery: With the adhesive released and the battery connector disconnected, carefully lift the battery from the device, ensuring that it is maneuvered out smoothly without any excessive force.
By meticulously following these steps, you can effectively remove the old battery from your iPhone 11, paving the way for the installation of a new battery to restore optimal functionality and performance to your device.
Installing the New Battery
After successfully removing the old battery from your iPhone 11, the next crucial step is the installation of the new battery. This process demands precision, attention to detail, and a methodical approach to ensure the seamless integration of the replacement battery. Here's a comprehensive guide to installing the new battery in your iPhone 11:
-
Prepare the Replacement Battery: Prior to installation, carefully inspect the replacement battery to ensure it is free from any defects or damage. Verify that the battery is compatible with the iPhone 11 and aligns with the necessary specifications for optimal performance.
-
Position the New Battery: Gently place the new battery into the designated compartment within the device, ensuring that it aligns perfectly with the battery housing. Exercise caution to avoid any undue pressure on the battery or its connectors during this process.
-
Secure the Battery Connector: Reconnect the battery connector to the logic board and carefully position it in place. Once aligned, reattach the metal bracket and secure it with the respective screws using the Phillips screwdriver. This ensures a stable and reliable connection between the new battery and the device's internal circuitry.
-
Adhere the Battery: If the replacement battery does not come with pre-installed adhesive strips, carefully apply new adhesive to secure the battery in place within the device. Ensure that the adhesive is positioned to provide firm support and stability to the battery, preventing any movement or displacement.
-
Reassemble the Device: With the new battery securely in place, carefully lower the display assembly back onto the device, ensuring that the ribbon cables are correctly aligned. Gently press along the edges to reseal the adhesive and ensure a snug fit of the display assembly.
-
Reinsert the Screws: Using the Pentalobe screwdriver, reinsert the Pentalobe screws at the base of the device, adjacent to the charging port. Tighten the screws securely to reattach the display assembly to the iPhone 11.
-
Power On and Test: Once the device is reassembled, power on your iPhone 11 to verify that the new battery is functioning as expected. Check the battery health within the Settings menu to ensure that the maximum capacity and peak performance capability reflect the installation of the new battery.
By meticulously following these steps, you can effectively install a new battery in your iPhone 11, revitalizing the device and ensuring prolonged usability and performance. The successful installation of a new battery not only enhances the functionality of your iPhone 11 but also contributes to its longevity and reliability, allowing you to continue enjoying its features and capabilities with confidence.
Calibrating the New Battery
Calibrating the new battery in your iPhone 11 is a crucial step to ensure optimal performance and accurate battery level readings. This process is essential for syncing the device's software with the new battery, allowing for precise monitoring of battery health and longevity. By calibrating the new battery, you can maximize its efficiency and reliability, enhancing the overall user experience. Here's a detailed guide on calibrating the new battery in your iPhone 11:
Step 1: Complete Charge Cycle
Initiate the calibration process by fully charging the new battery in your iPhone 11. Connect the device to a power source using the original Apple charger and allow it to charge uninterrupted until the battery reaches 100% capacity. It is essential to ensure that the device remains connected to the power source even after reaching full charge, allowing it to undergo a complete charge cycle.
Step 2: Discharge the Battery
Once the battery reaches 100% charge, disconnect the iPhone 11 from the power source and utilize the device as you normally would. Engage in typical usage patterns, including browsing, calls, and app usage, to gradually deplete the battery. It is crucial to avoid recharging the device during this phase to allow the battery to discharge naturally.
Step 3: Complete Discharge and Shutdown
Continue using the iPhone 11 until the battery is fully depleted, prompting the device to shut down automatically. This signifies the completion of the discharge cycle, indicating that the battery has been drained entirely. It is important to allow the device to remain powered off for a brief period to ensure that the battery is fully discharged.
Step 4: Recharge to Full Capacity
After the iPhone 11 has powered off due to battery depletion, reconnect it to the original Apple charger and allow it to charge uninterrupted until the battery reaches 100% capacity. It is essential to ensure that the device remains connected to the power source even after reaching full charge, enabling it to undergo a complete charge cycle once again.
Step 5: Verify Battery Health
Following the completion of the recharge cycle, navigate to the Battery Health section within the Settings menu of your iPhone 11. Verify that the Maximum Capacity and Peak Performance Capability accurately reflect the installation of the new battery and the calibration process. The Maximum Capacity should ideally align with the specifications of the new battery, indicating its optimal performance.
By meticulously following these steps, you can effectively calibrate the new battery in your iPhone 11, ensuring accurate battery level readings and maximizing its efficiency and longevity. Calibrating the battery not only enhances the device's performance but also provides valuable insights into its overall health and functionality, allowing you to utilize your iPhone 11 with confidence and reliability.