
Exporting Safari Bookmarks from Your Old Mac
If you are moving to a new Mac and want to carry over your Safari bookmarks, there are several methods you can use to export them from your old Mac and transfer them to your new one. Here are a few options to consider:
1. iCloud Sync: If you have iCloud enabled on both your old and new Mac, you can use the built-in iCloud sync feature to automatically sync your Safari bookmarks. Simply ensure that Safari is enabled in your iCloud settings, and your bookmarks will be synced between your devices. This is a convenient method if you want to keep your bookmarks up to date and easily accessible.
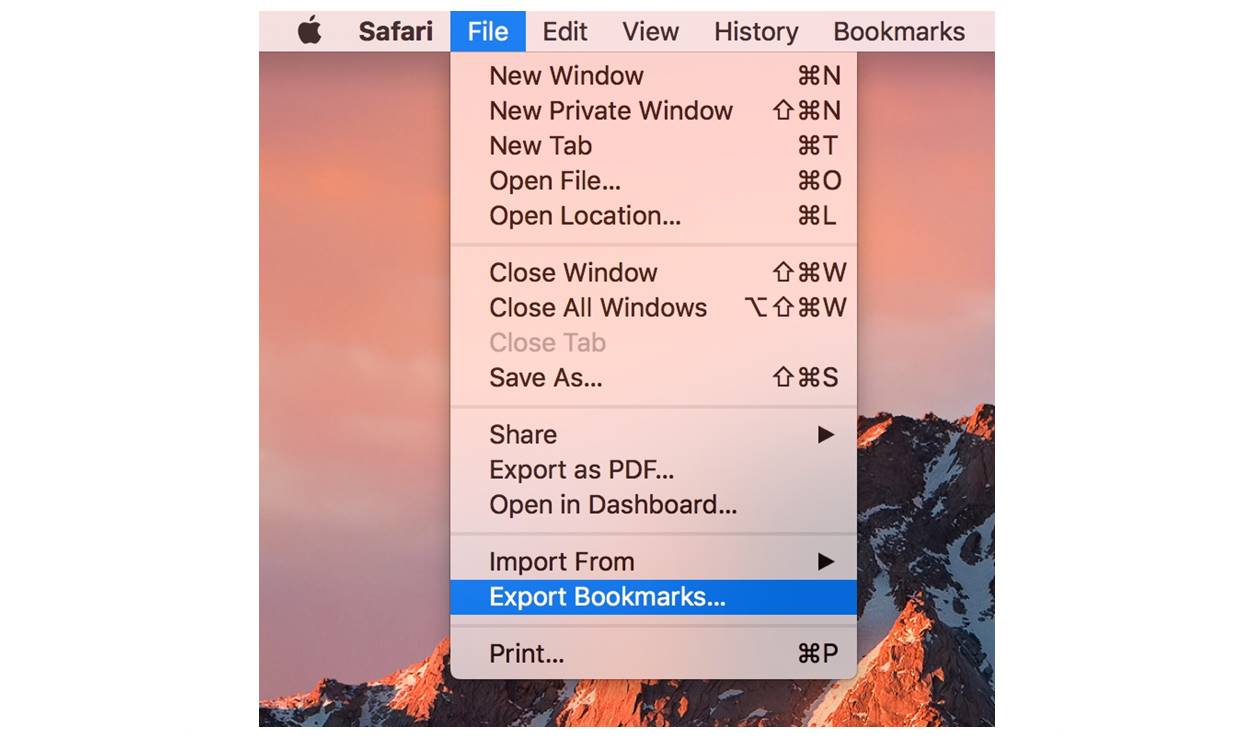
2. Exporting HTML file: Another way to export your Safari bookmarks is by saving them as an HTML file. Open Safari on your old Mac, go to “File” and select “Export Bookmarks.” Choose a location to save the HTML file, and then transfer it to your new Mac using a USB drive, email, or any other file transfer method. Once on your new Mac, open Safari, go to “File,” and select “Import From” and choose the HTML file to import your bookmarks.
3. Third-party tools: There are various third-party applications available that allow you to export and import Safari bookmarks between Macs. These tools offer more flexibility and additional features for managing your bookmarks. Some popular options include BookMacster, Xmarks, and SyncMate.
It’s important to note that regardless of the method you choose, it’s a good idea to make a backup of your Safari bookmarks before transferring them. This ensures that you have a copy in case anything goes wrong during the transfer process.
By following one of these methods, you can easily export your Safari bookmarks from your old Mac and transfer them to your new one. This way, you won’t lose any of your saved websites and can continue browsing seamlessly on your new device.
Transferring Safari Bookmarks to Your New Mac
Once you have exported your Safari bookmarks from your old Mac, it’s time to transfer them to your new Mac. Here are a few methods you can use to accomplish this:
1. iCloud Sync: If you have enabled iCloud on both your old and new Mac, transferring your Safari bookmarks is as simple as signing in with the same iCloud account on your new Mac. Your bookmarks will automatically sync with Safari on your new device. Make sure that Safari is enabled in your iCloud settings to ensure a seamless transfer.
2. Importing from HTML file: If you have exported your Safari bookmarks as an HTML file, you can import them into Safari on your new Mac. Open Safari, go to “File,” select “Import From,” and choose the HTML file containing your bookmarks. Safari will then import the bookmarks into the browser, allowing you to access them on your new Mac.
3. Third-party tools: Some third-party applications offer a direct method for transferring Safari bookmarks from one Mac to another. These tools often provide advanced features and options for managing your bookmarks. Check out applications like BookMacster, Xmarks, and SyncMate, which allow you to sync and transfer bookmarks seamlessly between Macs.
It’s worth noting that regardless of the method you choose, it’s always a good practice to back up your Safari bookmarks before transferring them. This ensures that you have a copy in case anything unexpected happens during the transfer process.
With these methods, you can transfer your Safari bookmarks from your old Mac to your new one effortlessly. Whether you prefer using iCloud sync or utilizing specific tools, you can seamlessly continue your browsing experience on your new Mac with all your saved websites and bookmarks intact.
Using iCloud to Sync Safari Bookmarks
If you want a hassle-free and automatic way to sync your Safari bookmarks between your Mac devices, iCloud is the perfect solution. iCloud sync keeps your bookmarks up to date across all your Apple devices, including Mac, iPhone, and iPad. Here’s how to use iCloud to sync your Safari bookmarks:
1. Enable iCloud: On your Mac, go to System Preferences and click on “Apple ID” or “iCloud.” Sign in with your Apple ID if prompted. Ensure that the “Safari” option is checked. This will enable syncing Safari bookmarks along with other iCloud features like contacts, calendars, and notes.
2. Enable Safari in iCloud: Open the Safari browser on your Mac and go to “Safari” in the menu bar. Select “Preferences” and click on the “General” tab. Check the box next to “Bookmarks” under the “Safari” section. This will enable Safari to sync your bookmarks with iCloud.
3. Repeat these steps on other devices: To sync your Safari bookmarks across your other Apple devices, such as your iPhone or iPad, make sure iCloud is enabled on those devices as well. Open Settings, tap on your Apple ID, and select “iCloud.” Toggle on the “Safari” option to enable bookmark syncing on those devices.
Once you have enabled iCloud sync for Safari, any changes you make to your bookmarks on one device will automatically be reflected on all your other devices. This means that new bookmarks you add, bookmarks you delete, and changes you make to existing bookmarks will be synced in real-time.
It’s important to note that for iCloud syncing to work, you need to have an active internet connection on your devices. Also, make sure you are signed in with the same Apple ID across all your devices, as syncing is tied to your Apple ID.
Using iCloud to sync Safari bookmarks is a simple and convenient way to ensure that you always have access to your bookmarks, regardless of the device you are using. With seamless syncing, you can save, organize, and access your favorite websites effortlessly across all your Apple devices.
Using the iCloud.com Website to Access Safari Bookmarks
Did you know that you can access your Safari bookmarks even when you don’t have your Mac or iOS device with you? With the iCloud.com website, you can easily view and manage your Safari bookmarks from any computer with an internet connection. Here’s how to use the iCloud.com website to access your Safari bookmarks:
1. Open a web browser: Launch any web browser on a computer and go to the iCloud.com website. Sign in with your Apple ID and password. Make sure to use the same Apple ID that you use for iCloud and Safari bookmark syncing.
2. Select Safari: On the iCloud.com homepage, click on the “Safari” icon. This will open the Safari web app on the iCloud website.
3. Access your bookmarks: Once inside the Safari web app, you’ll be able to see all your synced Safari bookmarks. They will be organized into folders, just like they are on your Mac or iOS devices. Click on any bookmark to open it in a new tab or window.
4. Manage your bookmarks: Within the iCloud.com Safari web app, you can also manage your bookmarks. You can add new bookmarks by clicking on the plus icon, organize them into folders, delete bookmarks by selecting them and clicking on the delete icon, and rearrange your bookmarks as desired.
It’s worth mentioning that while the iCloud.com website allows you to view and manage your Safari bookmarks, it doesn’t offer the same browsing experience as the Safari browser on your Mac. You won’t be able to open multiple tabs or access certain Safari features. The iCloud.com website is primarily designed for quick access and management of your bookmarks.
To ensure that your Safari bookmarks are synced with the iCloud.com website, make sure that Safari is enabled in your iCloud settings on your Mac and other iOS devices. Any changes you make to your bookmarks on the iCloud.com website will be reflected on your other devices and vice versa.
Using the iCloud.com website to access Safari bookmarks is a convenient option when you need to quickly reference or manage your bookmarks from a computer that doesn’t have Safari installed. It allows you to stay organized and access your favorite websites wherever you are.
Importing Safari Bookmarks from a Saved HTML File
If you have exported Safari bookmarks from your old Mac as an HTML file, you can easily import them into Safari on your new Mac. This method provides a straightforward way to transfer your bookmarks without relying on cloud services or third-party applications. Here’s how to import Safari bookmarks from a saved HTML file:
1. Locate the HTML file: First, find the HTML file that contains your exported Safari bookmarks on your new Mac. You can transfer the file from your old Mac using a USB drive, email, or any other file transfer method. Place the HTML file in a location where you can easily access it.
2. Open Safari on your new Mac: Launch Safari and go to “File” in the menu bar. From the dropdown menu, select “Import From” and then choose “Bookmarks HTML File.”
3. Select the HTML file: A file browser window will appear. Use it to locate and select the HTML file that contains your Safari bookmarks. Once you have chosen the file, click on “Open” to start the import process.
Safari will now begin importing your bookmarks from the HTML file. The process may take some time, depending on the number of bookmarks you have. Once the import is complete, you will be able to see and access your imported bookmarks in the Safari browser on your new Mac.
It’s important to note that when you import bookmarks from an HTML file, they will be added as a new folder in Safari’s Bookmarks menu. By default, the folder will be named “Imported [Date].” You can rearrange the imported bookmarks, create new folders, and organize them as desired.
Remember to keep a backup of the HTML file containing your Safari bookmarks, as it serves as a safeguard in case anything goes wrong during the import process.
By following these steps, you can easily import Safari bookmarks from a saved HTML file into Safari on your new Mac. This method allows you to maintain the organization of your bookmarks and ensures a smooth transfer of your saved websites.
Syncing Safari Bookmarks with Chrome or Firefox
If you prefer using browsers other than Safari, such as Chrome or Firefox, you might be wondering if it’s possible to sync your Safari bookmarks with these browsers. While there is no built-in syncing feature between different browsers, there are a few workarounds you can try to achieve this. Here’s how you can sync your Safari bookmarks with Chrome or Firefox:
1. Export Safari bookmarks: Start by exporting your Safari bookmarks as an HTML file. Open Safari on your Mac, go to “File,” select “Export Bookmarks,” and save the HTML file to a location where you can easily access it.
2. Import bookmarks to Chrome: Open Chrome on your Mac and go to “Settings” by clicking on the three-dot menu in the top-right corner. In the settings menu, select “Bookmarks” and then choose “Import Bookmarks and Settings.” Locate the HTML file you exported from Safari and select it. Chrome will then import the bookmarks from the HTML file, and they will be accessible in Chrome’s bookmarks menu.
3. Import bookmarks to Firefox: Similarly, open Firefox on your Mac and go to “Library” by clicking on the three-line menu in the top-right corner. From the Library menu, select “Bookmarks” and then choose “Show All Bookmarks.” In the Library window, go to “Import and Backup” and then select “Import Data from Another Browser.” Locate the HTML file exported from Safari and select it. Firefox will import the bookmarks, and you’ll be able to access them in Firefox’s bookmarks menu.
By following these steps, you can successfully sync your Safari bookmarks with Chrome or Firefox. However, it’s important to note that this method is a one-time import, and any changes made to the bookmarks in one browser will not be reflected in the other.
If you want continuous syncing and real-time updates between Safari and other browsers, you can consider using third-party bookmark syncing services like Xmarks or EverSync. These services allow you to sync bookmarks across different browsers and devices by installing their respective extensions or plugins.
Regardless of the method you choose, it’s always a good practice to regularly back up your bookmarks to avoid any accidental loss or data corruption. This ensures that you have a copy of your bookmarks in case anything goes wrong during the syncing or import process.
With these options, you can sync your Safari bookmarks with Chrome or Firefox, allowing you to have consistent access to your favorite websites across different browsers.
Backing Up Safari Bookmarks with Time Machine
Backing up your Safari bookmarks is essential to safeguard your valuable website collection. Time Machine, the built-in backup feature on your Mac, makes it easy to create regular backups, ensuring you never lose your bookmarks. Here’s how you can back up your Safari bookmarks using Time Machine:
1. Connect an external storage device: To start, connect an external storage device to your Mac. This can be an external hard drive, a USB flash drive, or even a network-attached storage (NAS) device. Make sure the storage device has enough free space to accommodate the backups.
2. Enable Time Machine: Open “System Preferences” on your Mac and click on “Time Machine.” Toggle the switch to enable Time Machine. You will be prompted to select the external storage device you connected earlier. Choose it as the backup destination.
3. Start the backup: Once Time Machine is enabled, it will automatically begin creating backups of your entire system, including your Safari bookmarks. The initial backup may take some time, depending on the size of your data. Subsequent backups will be incremental, capturing only the changes made since the last backup.
4. Restore Safari bookmarks: In the event that you accidentally delete or lose your Safari bookmarks, you can restore them from a Time Machine backup. Simply open Finder on your Mac and select the backup destination device, which should appear under “Locations.” Navigate to the backup date when your bookmarks were intact, then go to the following path: “[Your user folder] > Library > Safari > Bookmarks.plist“. Locate and copy the “Bookmarks.plist” file, then paste it into the corresponding directory on your Mac’s hard drive. Confirm the overwrite and relaunch Safari to see your restored bookmarks.
It’s important to note that Time Machine not only backs up your Safari bookmarks but also your entire system, including files, applications, and settings. This ensures a complete and comprehensive backup solution for your Mac.
Regularly check your Time Machine backups to ensure they are up to date. This ensures that your Safari bookmarks are always protected and recoverable in case of data loss or device failure.
By utilizing Time Machine’s backup capability, you can have peace of mind knowing that your Safari bookmarks are safely stored and easily recoverable when needed.
Restoring Safari Bookmarks from a Time Machine Backup
If you have experienced a loss of Safari bookmarks or accidentally deleted them, you can easily restore them from a Time Machine backup. Time Machine, the built-in backup utility on your Mac, allows you to retrieve previous versions of files and folders, including your Safari bookmarks. Here’s how you can restore Safari bookmarks from a Time Machine backup:
1. Connect your Time Machine backup: Make sure your Time Machine backup device is connected to your Mac. It can be an external hard drive, a Time Capsule, or a network-attached storage (NAS) device. Ensure that the backup device contains the backup you want to restore from.
2. Open Finder and locate the Safari bookmarks file: Launch Finder on your Mac and navigate to the location where your Safari bookmarks are stored. The default location of the bookmarks file is “[Your user folder] > Library > Safari > Bookmarks.plist“.
3. Access Time Machine: With the Safari bookmarks file selected, click on the Time Machine icon in the menu bar at the top-right corner of your screen. Alternatively, you can open Time Machine from the Applications folder or Launchpad.
4. Travel back in time: Time Machine will open, and you’ll see a timeline on the right side of the screen. Use it to navigate to the date and time when the bookmark file was intact or the version you want to restore. You can use the arrows or scrub through the timeline to find the appropriate snapshot.
5. Select and restore the bookmarks file: Once you’ve located the desired snapshot, select the Safari bookmarks file (“Bookmarks.plist”) and click on the “Restore” button. Time Machine will begin the restoration process, replacing the existing bookmarks file with the version from the backup.
6. Relaunch Safari: After the restoration is complete, you can relaunch Safari. Your restored bookmarks should now be available, allowing you to access your saved websites.
Remember to keep in mind that restoring from a Time Machine backup will replace the current version of your Safari bookmarks file entirely. It’s always a good idea to create a backup of the current bookmarks file if you want to preserve any changes made since the backup date.
With Time Machine’s ability to retrieve previous versions of files, you can easily restore your Safari bookmarks from a Time Machine backup, ensuring that you never lose your valuable collection of websites.
Using a Third-Party Tool to Transfer Safari Bookmarks
If you’re looking for a more advanced and feature-rich solution to transfer your Safari bookmarks between Macs, you can consider using a third-party tool. These tools offer additional flexibility and options for managing your bookmarks. Here’s how you can use a third-party tool to transfer your Safari bookmarks:
1. Research and choose a suitable tool: Explore different third-party tools available for transferring Safari bookmarks. Look for ones that are compatible with your Mac’s operating system and offer the features you desire. Popular options include BookMacster, Xmarks, and SyncMate.
2. Download and install the tool: Once you have chosen a tool, download it from the official website or trusted source. Follow the installation instructions provided to install the tool on both your old and new Mac.
3. Export bookmarks from your old Mac: Launch the third-party tool on your old Mac. Locate the options to export or sync Safari bookmarks and follow the instructions to export your bookmarks to a supported file format or sync them to a cloud service or the tool’s proprietary platform.
4. Import bookmarks to your new Mac: After exporting the bookmarks from your old Mac, open the third-party tool on your new Mac. Use the import or sync options to retrieve the exported bookmarks or connect to the cloud service or proprietary platform where your bookmarks are stored. Follow the on-screen instructions to import the bookmarks into Safari on your new Mac.
5. Organize and manage your bookmarks: Once the transfer is complete, you can organize and manage your bookmarks using the features provided by the third-party tool. These tools often offer advanced bookmark management options such as merging, deduplicating, and syncing with other browsers.
It’s important to be cautious when using third-party tools. Ensure that you download them from reputable sources and verify that they are compatible with your Mac’s operating system. Additionally, regularly check for updates to ensure compatibility with future macOS releases.
By using a third-party tool, you can transfer your Safari bookmarks with more flexibility and additional features. These tools are especially useful if you have a large number of bookmarks, want to organize them in a specific way, or prefer a more automated and customizable solution.
Remember to keep a backup of your bookmarks before using a third-party tool, as an extra precaution in case anything goes wrong during the transfer process. With the right third-party tool, you can effortlessly transfer your Safari bookmarks and enjoy a seamless browsing experience on your new Mac.