
Best Time to Plant Tomatoes
When it comes to planting tomatoes, timing is everything. The success of your tomato plants largely depends on choosing the right time to sow the seeds or transplant young seedlings. While tomatoes are a warm-weather crop, they are also sensitive to extreme heat and frost. Therefore, finding the balance between the last frost date and the onset of scorching summer temperatures is crucial for a bountiful harvest.
The ideal time to plant tomatoes outdoors will vary depending on your geographic location and climate zone. To determine the best planting time, it’s important to identify your specific planting zone. The United States Department of Agriculture (USDA) has created a comprehensive plant hardiness zone map that divides regions based on their average annual minimum temperatures.
Once you know your planting zone, you can refer to a tomato planting calendar to determine the recommended planting dates. Typically, tomato plants thrive when planted after the danger of frost has passed and when soil temperatures have warmed up to around 60°F (15°C) or higher.
In regions with short growing seasons or cooler climates, starting tomatoes indoors is a popular option. This allows you to get a head start on the growing season by starting seeds indoors six to eight weeks before the last expected frost date. Indeterminate varieties, which continue to grow and produce fruit throughout the season, are particularly well-suited for indoor starting.
For warmer regions or those with longer growing seasons, direct sowing seeds or transplanting outdoors after the last frost date is a suitable approach. Determinate varieties, which tend to grow and produce fruit within a specific timeframe, are commonly chosen for direct sowing.
Before planting, it’s essential to prepare your soil adequately. Tomatoes prefer well-drained, fertile soil with a pH level between 6.0 and 6.8. Loosen the soil with a garden fork or tiller and incorporate organic matter, such as compost or aged manure, to improve nutrient content and water retention.
When transplanting seedlings outdoors, dig a hole slightly deeper than the root ball and gently remove the plant from its container. Place the root ball in the hole and backfill with soil, firming it gently around the base of the plant. Space the plants according to the recommended distance for your particular tomato variety.
As you plant your tomatoes, make sure to provide adequate support, such as tomato cages or stakes, to help keep the plants upright as they grow. Mulching around the plants with straw or wood chips can also help conserve moisture, suppress weeds, and regulate soil temperature.
Protecting tomatoes from frost is essential even after the plants are established. If a late frost is forecasted, cover the plants with a frost cloth or plastic sheeting to shield them overnight. Remove the covers in the morning once the temperatures rise above freezing.
Tomatoes require consistent watering to stay hydrated and healthy. Water deeply and evenly, aiming to keep the soil evenly moist but not waterlogged. Applying a balanced fertilizer according to the package instructions will provide necessary nutrients for robust plant growth and fruitful yields.
By understanding the best time to plant tomatoes, you can give your plants a head start and set them up for success. Remember to consider your planting zone, start seeds indoors if needed, prepare the soil, transplant carefully, provide support as they grow, and protect them from frost. With these tips in mind, you’ll be well on your way to enjoying a delicious harvest of homegrown tomatoes.
Determining Your Planting Zone
Knowing your planting zone is essential for successful gardening, including determining the best time to plant tomatoes. Your planting zone is determined by the average minimum winter temperatures in your region, which helps you choose the most suitable plants for your climate.
The United States Department of Agriculture (USDA) has developed a plant hardiness zone map, which divides the country into 13 zones based on their minimum average annual temperatures. Each zone is further divided into subzones, making it easier to pinpoint your specific planting zone.
To determine your planting zone, you can visit the USDA’s official website and enter your ZIP code or use their interactive map. This will provide you with the information you need to make informed decisions about when to plant tomatoes and other garden crops.
When identifying your planting zone, keep in mind that it’s just a guideline and that microclimates within your area can influence the specific conditions in your garden. Factors such as proximity to bodies of water, shelter from buildings or trees, and local weather patterns can all impact the actual temperatures experienced in your garden.
Understanding your planting zone allows you to choose varieties of tomatoes that are well-suited for your specific climate. Different tomato cultivars have varying degrees of cold and heat tolerance, disease resistance, and productivity. By selecting varieties that thrive in your zone, you increase the chances of a successful harvest.
In addition to the USDA plant hardiness zone map, various gardening websites and plant nurseries also provide tools and resources to determine your planting zone. These resources often offer more detailed information on temperature extremes and growing conditions within your zone, aiding in the selection of plants that are better adapted to your area.
Once you have determined your planting zone, you can refer to planting calendars and guides specifically tailored to your zone. These resources provide valuable information on when to sow seeds or transplant seedlings outdoors, as well as other essential gardening tasks throughout the year.
Remember to regularly check and update your knowledge of your planting zone, as climate patterns can shift over time. Being aware of changes in temperature ranges and growing conditions in your area will help you adjust your gardening practices accordingly.
By understanding your planting zone and its specific characteristics, you are better equipped to make informed decisions when it comes to planting tomatoes and other garden crops. Consider the unique conditions of your zone to maximize the success of your gardening endeavors.
Starting Indoors vs. Direct Sowing
When it comes to planting tomatoes, you have the option of starting seeds indoors or directly sowing them in your garden. Both methods have their advantages and considerations, and choosing the right approach depends on your specific circumstances and preferences.
Starting tomatoes indoors provides several benefits. One significant advantage is the ability to extend the growing season by getting a head start on germination. Indoors, you can control the conditions, ensuring optimal temperatures, moisture levels, and light exposure for seedling development.
Indoor starting is particularly useful in regions with short growing seasons or cooler climates. By starting seeds indoors six to eight weeks before the last expected frost date, you can give your tomatoes a head start and enjoy an earlier harvest. It’s especially beneficial if you prefer to grow indeterminate tomato varieties that require a longer growing season.
To start tomatoes indoors, fill small pots or seed trays with a good-quality seed starting mix. Plant the seeds about a quarter to a half-inch deep, and keep the soil consistently moist until germination occurs. Place the containers in a warm location or use a heating mat to speed up germination.
Once the seedlings emerge and develop their first set of true leaves, you can transplant them into larger containers. This allows the roots to continue to grow and develop before being transplanted outside. Be sure to harden off the seedlings gradually by exposing them to outdoor conditions for short periods each day, gradually increasing the exposure time over a week or two.
On the other hand, direct sowing involves planting tomato seeds directly in your garden. This method is advantageous in regions with longer growing seasons and where the weather warms up quickly after the last frost date. Direct sowing can save you time and effort associated with indoor seed starting.
To directly sow tomato seeds, prepare the soil by removing any weeds or debris and loosening it with a garden fork. Create furrows or dig small holes, and plant the seeds according to the package instructions. Cover the seeds with soil, pat gently to ensure good seed-to-soil contact, and water thoroughly.
When choosing to directly sow, keep in mind that some tomato varieties, especially determinate ones, are better suited for this method. These varieties tend to grow, fruit, and mature within a specific timeframe, making them suitable for direct planting.
One common approach is to use a combination of both methods. Start a portion of your tomato plants indoors for an early harvest, while also directly sowing seeds in the garden for a later crop. This method ensures a continuous supply of fresh tomatoes throughout the growing season.
Ultimately, the decision between starting tomatoes indoors or direct sowing depends on factors such as your climate, available space, and time constraints. Consider your specific circumstances and goals to determine the best approach for your garden. Whether you choose to start indoors, direct sow, or combine both methods, with proper care and attention, you’ll be rewarded with a bountiful harvest of delicious tomatoes.
Preparing the Soil
Preparing the soil is a vital step in successfully growing tomatoes. Tomatoes thrive in well-drained, nutrient-rich soil that provides them with the necessary support and resources to grow and produce bountiful fruits. By taking the time to prepare the soil properly, you can create an optimal growing environment for your tomato plants.
Before planting, it’s essential to assess the condition of your soil. Start by removing any weeds, rocks, or debris from the planting area. This will ensure that the tomato plants have access to the nutrients and space they need to thrive without unnecessary competition.
Next, use a garden fork or tiller to loosen the soil. This process aerates the soil, allowing for better root penetration and water drainage. Loosening the soil also helps break up any compacted areas, promoting healthy root development and preventing waterlogging.
Once the soil is loosened, it’s beneficial to incorporate organic matter into the top layer. This can include materials such as compost, well-rotted manure, or leaf mold. Organic matter improves the soil’s structure, enhances its ability to retain moisture, and provides essential nutrients for plant growth.
Spread a layer of organic matter about 2 to 4 inches thick over the planting area and mix it into the soil using a garden rake or hoe. This will ensure that the organic matter is evenly distributed and incorporated into the top few inches of the soil.
Additionally, it’s essential to test the pH level of your soil. Tomatoes prefer a slightly acidic soil with a pH range of 6.0 to 6.8. A pH level outside of this range can affect nutrient availability and plant health. You can test the soil pH using a testing kit or by sending a sample to a local agricultural extension service for analysis.
If your soil pH is too acidic, you can raise it by adding lime according to the recommended application rates. On the other hand, if the pH is too alkaline, you can lower it by incorporating elemental sulfur or other specific soil amendments. Adjusting the pH to the optimal range will help your tomato plants uptake essential nutrients and grow vigorously.
Before planting, it’s crucial to ensure that the soil is adequately moist but not overly saturated. Water the prepared soil a day or two before planting to ensure it is hydrating the roots effectively.
By properly preparing the soil, you create the ideal growing conditions for your tomato plants. The loosened soil facilitates root development, while the addition of organic matter enhances nutrient availability. With pH balance adjusted and the soil properly hydrated, your tomato plants will have a strong foundation for healthy growth and abundant fruit production.
Soil Temperature Requirements
Soil temperature plays a crucial role in the successful growth and development of tomato plants. Tomatoes are warm-season crops that thrive in soil with specific temperature ranges. Understanding these temperature requirements is essential for ensuring optimal conditions for your tomato plants.
Tomato seeds require a specific range of soil temperatures for successful germination. The optimal soil temperature for tomato seed germination is between 70°F (21°C) and 85°F (29°C). At these temperatures, seeds can germinate within 5 to 10 days, provided that moisture and other growing conditions are favorable.
If the soil temperature is too low, it can significantly delay or inhibit germination. Therefore, it’s best to wait until the soil has warmed up sufficiently before sowing tomato seeds. Using a soil thermometer can help accurately assess the soil temperature and determine if conditions are suitable for planting.
In addition to seed germination, soil temperature affects the growth and overall performance of tomato plants. Once the seedlings have emerged and developed their true leaves, the ideal soil temperature for optimal tomato growth is between 60°F (15°C) and 70°F (21°C).
At temperatures below 60°F (15°C), tomato plants may exhibit slower growth rates and reduced nutrient uptake. Cooler soil temperatures can also lead to increased susceptibility to certain diseases, such as root rot. It’s crucial to ensure that the soil has warmed up adequately before transplanting seedlings outdoors.
On the other hand, extremely high soil temperatures can be detrimental to tomato plants as well. When the soil temperature exceeds 95°F (35°C), tomato plants may experience heat stress, leading to reduced growth, wilting, and even blossom drop.
To moderate soil temperatures, it’s helpful to apply a layer of mulch around the base of tomato plants. Mulching helps regulate soil temperature by providing insulation, preventing extreme temperature fluctuations, and conserving soil moisture.
Before planting tomatoes, it’s important to monitor soil temperatures regularly. Avoid planting when soil temperatures are consistently below the desired range or when heatwaves are predicted. Planting at the optimal soil temperature range ensures that your tomato plants will have the best conditions for healthy growth and productivity.
By understanding the soil temperature requirements for tomatoes, you can time your planting appropriately and provide your plants with the optimal conditions they need to thrive. Proper soil temperature management sets the stage for robust growth and abundant fruit production, allowing you to enjoy a fruitful tomato harvest.
Transplanting Seedlings Outdoors
Transplanting seedlings outdoors is a crucial step in the journey of growing tomatoes. It’s the process of moving young tomato plants from their indoor containers or seed trays to their permanent outdoor growing location. Proper transplanting techniques and timing are essential to ensure the health and success of your tomato plants.
Before transplanting, it’s important to harden off your seedlings. This process involves gradually exposing them to outdoor conditions over a period of 7 to 10 days. Start by placing the seedlings outdoors in a sheltered, shaded area for a few hours each day, gradually increasing their exposure to sunlight and outdoor elements. This helps acclimate the plants to the outdoor environment and prevent shock.
Choose a planting location that receives at least 6 to 8 hours of direct sunlight per day. Tomato plants thrive in full sun, which promotes healthy growth and maximum fruit production. The soil should be well-drained and rich in organic matter, providing the necessary nutrients and structure for optimal root development.
When transplanting, dig a hole slightly deeper and wider than the root ball of the seedling. Gently remove the seedling from its original container, being careful not to damage the fragile roots. Place the plant into the hole, ensuring that the top of the root ball is level with or slightly above the soil surface. Backfill the hole with soil, gently firming it around the base of the plant.
Spacing is important when transplanting tomatoes to ensure proper air circulation and allow the plants to reach their full potential. Refer to the recommended spacing guidelines for your specific tomato variety. Adequate spacing between plants prevents overcrowding, which can lead to increased disease susceptibility and reduced yields.
After transplanting, water the newly planted seedlings thoroughly. This helps settle the soil around the roots and ensures good root-to-soil contact. Maintain regular watering throughout the growing season, aiming to keep the soil consistently moist but not waterlogged. Deep, infrequent watering is preferred over shallow, frequent watering to encourage deep root growth.
Providing support for tomato plants is essential to prevent them from sprawling on the ground and to support the weight of the fruit. Install tomato cages, stakes, or trellises at the time of transplanting or shortly afterward. This allows the plants to grow upward, making it easier for airflow, harvesting, and overall plant management.
It’s also beneficial to mulch around the base of tomato plants. Apply a layer of organic mulch, such as straw or wood chips, to help conserve moisture, suppress weeds, and regulate soil temperature. Mulching can also reduce the risk of soil-borne diseases, as it acts as a barrier between the soil and the lower leaves of the plants.
Throughout the transplanting process, be mindful of weather conditions. Avoid transplanting during periods of extreme heat or cold. If frost is forecasted after transplanting, protect your young tomato plants by covering them with a frost cloth or plastic sheeting overnight.
By following proper transplanting practices, you give your tomato seedlings the best chance for success. Transplanting helps establish the young plants in their permanent growing location, setting them up for healthy growth, abundant flowering, and a productive tomato harvest.
Tips for Planting Tomatoes
Planting tomatoes is an exciting endeavor that can lead to a bountiful harvest of delicious, homegrown fruits. To ensure the success of your tomato plants, here are some valuable tips to keep in mind during the planting process:
1. Choose the right tomato variety: Consider the specific needs and characteristics of each tomato variety before selecting the ones for your garden. Factors such as growth habit (determinate or indeterminate), disease resistance, and flavor should be taken into account.
2. Plant in a sunny location: Tomatoes thrive in full sun, so choose a planting spot that receives at least 6 to 8 hours of direct sunlight per day. The more sunshine your tomato plants receive, the better their growth and fruit production will be.
3. Prepare the soil: Ensure your soil is well-drained, fertile, and rich in organic matter. Amend the soil with compost or aged manure to provide essential nutrients and improve its texture. Tomatoes prefer slightly acidic soil with a pH level between 6.0 and 6.8.
4. Space properly: Proper spacing between tomato plants is crucial for good airflow and prevents overcrowding. Follow the recommended spacing guidelines for your specific tomato variety to give each plant enough room to grow and develop fully.
5. Provide support: Tomato plants benefit from support to help them grow upright and prevent sprawling. Install tomato cages, stakes, or trellises at the time of planting to provide necessary support, especially for indeterminate varieties.
6. Water deeply and consistently: Tomato plants require regular and consistent watering. Water deeply and evenly, aiming to keep the soil consistently moist but not waterlogged. Avoid overhead watering to minimize the risk of disease. Consider drip irrigation or soaker hoses to water at the base of the plants.
7. Mulch: Applying organic mulch around the base of tomato plants helps conserve moisture, suppress weeds, and regulate soil temperature. Mulching also acts as a protective barrier, reducing the risk of soil-borne diseases.
8. Prune and remove suckers: Regularly prune tomato plants by removing suckers – the shoots that emerge from the leaf axils – to focus the plant’s energy on fruit production. This helps improve airflow and reduces the risk of disease.
9. Monitor for pests and diseases: Regularly inspect your tomato plants for signs of pests or diseases. Early detection and intervention are crucial. Consider using natural pest control methods or organic insecticides if necessary.
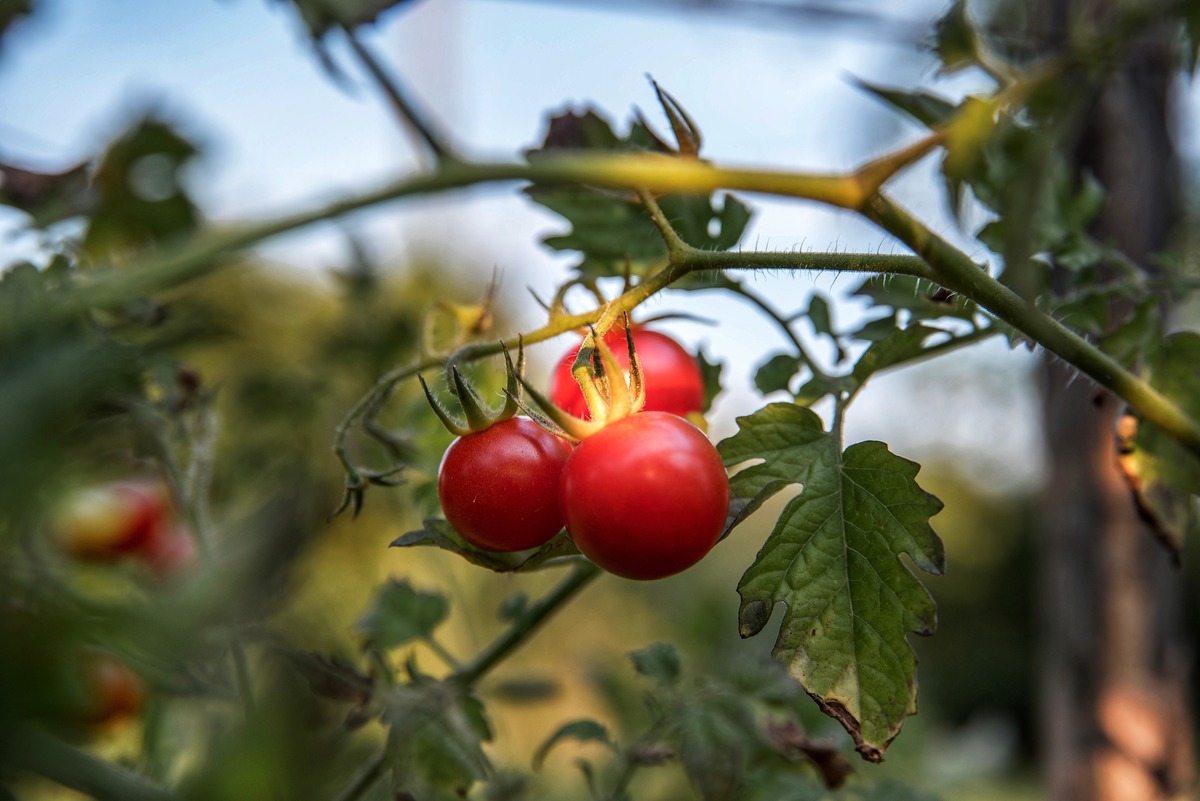
10. Harvest ripe tomatoes promptly: Monitor your tomato plants regularly and harvest ripe fruits promptly. This encourages continued production and prevents overripe or spoiled fruits.
Remember, each tomato plant is unique, and environmental conditions can vary. Observe your plants closely and adjust your care techniques accordingly. With proper planting and care, you’ll soon be enjoying a delicious harvest of homegrown tomatoes.
Mulching Your Tomato Plants
Mulching is an essential practice for growing healthy and productive tomato plants. By applying a layer of organic mulch around the base of your tomato plants, you can enjoy numerous benefits that contribute to their overall success. Here are some key points to consider when mulching your tomato plants:
1. Conserving moisture: Mulch acts as a protective barrier, reducing water evaporation from the soil surface. It helps to maintain consistent soil moisture levels, preventing drought stress and ensuring that your tomato plants have access to adequate water.
2. Suppressing weeds: Mulch serves as a natural weed suppressant, preventing weed growth around your tomato plants. By covering the soil surface, it limits the exposure of weed seeds to sunlight, inhibiting germination and growth. This saves you time and effort in weed management while minimizing competition for nutrients.
3. Regulating soil temperature: Mulch helps moderate soil temperatures by acting as an insulating layer. It keeps the soil cooler in hot summer months and helps retain warmth during cooler periods. This temperature regulation protects the delicate root systems of your tomato plants, promoting healthy growth and development.
4. Reducing soil erosion: By covering the soil surface, mulch helps to prevent soil erosion caused by heavy rainfall or strong winds. It protects the top layer of soil from being washed away or displaced, ensuring that the roots of your tomato plants remain stable and firmly anchored.
5. Preventing diseases: Mulch acts as a physical barrier between the soil and the lower parts of your tomato plants, reducing the risk of soil-borne diseases. It minimizes the splashing of soil particles onto the plant foliage, which can harbor pathogens and lead to the spread of diseases.
6. Choosing the right mulch: Organic mulch options for tomato plants include materials such as straw, wood chips, or shredded leaves. These materials break down over time, enriching the soil with organic matter and nutrients. Avoid using weed-stabilized or chemically treated mulch that may introduce unwanted substances to your garden.
7. Applying mulch properly: Before applying mulch, ensure that the soil is moist. Spread a layer of mulch around the base of your tomato plants, extending it out to the drip line. Aim for a thickness of about 2 to 4 inches, taking care to keep the mulch a few inches away from the stem to avoid creating a damp environment that could invite pests or diseases.
8. Maintaining mulch: Monitor the condition of your mulch throughout the growing season. Replace or top up the mulch as needed to maintain the desired thickness. Mulch can break down over time, so adding fresh material helps ensure its effectiveness in providing the desired benefits.
Remember, mulching is not a one-time task. As the growing season progresses, replenish the mulch as needed and adjust the thickness to maintain its effectiveness. Mulching your tomato plants provides numerous advantages and contributes to overall plant health, leading to robust growth and a bountiful tomato harvest.
Protecting Tomatoes from Frost
Frost can pose a significant threat to tomato plants, especially during the early spring or late fall when temperatures drop below freezing. Exposure to frost can damage or even kill your tomato plants, jeopardizing your harvest. To protect your plants from frost, consider the following strategies:
1. Know your local frost dates: Familiarize yourself with the average last frost date in your region. This information will help you determine when it is safe to plant your tomatoes outdoors. Additionally, monitor weather forecasts and be alert to the possibility of unexpected late or early frosts.
2. Cover your plants: One of the most effective methods to protect your tomatoes from frost is to cover them. Use materials such as floating row covers, old bed sheets, blankets, or frost cloths to create a temporary protective barrier around your plants. Ensure the covers extend all the way to the ground to trap the heat radiating from the soil.
3. Choose the right cover: Select a cover that provides both frost protection and ample airflow. This allows the trapped heat to circulate and prevents excessive humidity buildup, which could lead to fungal diseases. Avoid using plastic sheets directly on the plants, as they can cause condensation and damage the foliage.
4. Install supports: Set up stakes or hoops to support the covers and prevent them from directly touching the foliage. This prevents frost damage caused by contact between the covers and the delicate plant leaves.
5. Apply mulch: Mulching around the base of your tomato plants can help moderate soil temperatures, offering some protection from frost. Apply a layer of organic mulch, such as straw or wood chips, to help insulate the soil and maintain stable temperatures. Ensure the mulch is applied after the soil has warmed up in spring to allow the sun to reach and warm the soil during the day.
6. Water before frost: Moist soil retains heat better than dry soil. Before an expected frost, water your tomatoes well, especially in the evening. This helps the soil absorb and retain heat, providing additional protection to the roots and lower parts of the plants.
7. Time your planting: Consider planting your tomatoes a little later in spring to avoid the peak frost period. This allows your plants to grow stronger and reduces the risk of frost damage. Similarly, plan to harvest mature green tomatoes before the first expected frost in the fall to salvage a portion of your harvest.
8. Monitor temperature: Invest in a reliable thermometer or use weather monitoring apps to track temperature changes in your garden. This allows you to take timely action and provide frost protection when necessary.
9. Remove covers during the day: Once the threat of frost has passed and temperatures rise above freezing in the morning, remove the covers. This allows the plants to receive sunlight, air circulation, and pollination while reducing the risk of overheating.
Remember that frost protection is crucial during the vulnerable periods when temperatures drop below freezing. By employing these protective measures, you can safeguard your tomato plants from the damaging effects of frost and ensure a successful growing season.
Watering and Fertilizing Tomatoes
Proper watering and fertilizing are essential for the healthy growth and productivity of tomato plants. By providing adequate moisture and necessary nutrients, you can ensure that your tomatoes thrive and produce bountiful, flavorful fruits. Consider the following tips for effective watering and fertilizing:
Watering:
1. Consistent watering: Tomato plants require consistent moisture levels to prevent stress and encourage optimal growth. Water deeply and evenly to ensure the entire root system receives moisture. Aim to keep the soil consistently moist but not waterlogged, as excessive moisture can lead to root rot and other diseases.
2. Timing: Water the plants in the morning to allow foliage to dry before nighttime. Wet foliage for prolonged periods can promote the growth of fungal diseases. Avoid overhead watering if possible, as it may cause the leaves to become wet and increase the risk of fungal infections.
3. Water at the base: Direct the water towards the base of the plants, aiming for the soil rather than the foliage. This ensures that the water reaches the root zone where it is most needed. Consider using drip irrigation or soaker hoses for precise and efficient watering.
4. Deep watering: Water deeply and infrequently rather than shallow and frequent watering. This encourages the tomato plant roots to grow deeper into the soil, promoting a stronger, more resilient root system. Be mindful of the weather conditions and adjust watering frequency accordingly.
Fertilizing:
1. Soil testing: Before fertilizing, conduct a soil test to determine the nutrient levels and pH of your soil. Soil testing provides valuable insights into the specific fertilizer needs of your tomato plants, helping you make informed decisions about the type and amount of fertilizer to apply.
2. Choose the right fertilizer: Look for a balanced fertilizer specifically formulated for tomatoes. These fertilizers typically contain a combination of nitrogen, phosphorus, and potassium (N-P-K) along with other essential micronutrients. The N-P-K ratio should be balanced, such as 5-10-10 or 10-10-10, to support overall plant growth and fruit production.
3. Timing: Start fertilizing your tomato plants when they begin to establish and develop their true leaves. Apply the fertilizer according to the package instructions, ensuring proper dosing and appropriate timing. Avoid over-fertilizing as it can lead to excessive vegetative growth at the expense of fruit production.
4. Side-dressing: As the tomato plants grow, consider side-dressing with additional fertilizer to provide a nutrient boost. Apply a small amount of fertilizer alongside the plants, about 4 to 6 inches away from the stem. Follow the recommended rates and timing provided by the fertilizer manufacturer.
5. Organic options: Organic fertilizers, such as compost or well-rotted manure, are excellent alternatives to synthetic fertilizers. They not only provide essential nutrients but also improve soil structure and microbial activity. Apply organic fertilizers in accordance with recommended rates to avoid nutrient imbalances or excessive salt buildup.
6. Foliar feeding: Supplemental foliar feeding can be beneficial by spraying a diluted liquid fertilizer directly onto the tomato plant foliage. This method provides a quick nutrient boost, especially during periods of high growth or when plants show signs of nutrient deficiency. Follow the instructions on the product label and avoid foliar feeding during hot, sunny periods to prevent leaf burn.
Proper watering and fertilizing practices contribute to the overall health and productivity of your tomato plants. Remember to adjust your watering and fertilizing routines based on your specific garden conditions, tomato variety, and weather patterns. With consistent care, your tomato plants will thrive and reward you with a flavorful and abundant harvest.
Common Tomato Planting Mistakes to Avoid
While growing tomatoes can be a rewarding experience, there are some common mistakes that many gardeners make. By being aware of these errors and taking steps to avoid them, you can increase your chances of a successful tomato harvest. Here are some common tomato planting mistakes to steer clear of:
1. Planting too early: Planting tomatoes too early in the season, before the soil and air temperatures have warmed sufficiently, can stunt their growth or even kill them. Wait until after the last expected frost date and when the soil has reached a temperature of at least 60°F (15°C) before planting your tomatoes outdoors.
2. Choosing the wrong tomato variety: Different tomato varieties have different growth habits, disease resistance, and flavor profiles. It’s important to choose varieties that are suitable for your climate, garden space, and personal preferences. Research and select varieties that align with your specific needs.
3. Skipping the hardening-off process: Hardening off is the process of gradually acclimating seedlings to outdoor conditions before transplanting. Failing to harden off seedlings properly can lead to transplant shock or stress. Take the time to gradually expose your seedlings to outdoor conditions, allowing them to adjust to changes in temperature, sunlight, and wind.
4. Planting too close together: Overcrowding tomato plants restricts air circulation, increases disease susceptibility, and reduces the overall yield. Follow the recommended spacing guidelines for your specific tomato variety to allow sufficient room for each plant to grow and develop fully.
5. Not properly preparing the soil: Neglecting to prepare the soil adequately can limit the growth and productivity of your tomato plants. Take the time to loosen the soil, remove weeds and debris, and incorporate organic matter to improve soil structure and nutrient content.
6. Underwatering or overwatering: Consistent and appropriate watering is crucial for tomato plants. Underwatering can cause stress, poor fruit development, and blossom-end rot, while overwatering can lead to root rot and other fungal diseases. Maintain a balance and water deeply and evenly, aiming to keep the soil consistently moist but not waterlogged.
7. Not providing adequate support: Tomato plants require support to grow upright and prevent sprawling. Failure to provide proper support, such as tomato cages, stakes, or trellises, can result in tangled plants and damaged fruits. Install supports at the time of planting or shortly afterward to avoid the disruption of roots later on.
8. Neglecting pests and diseases: Tomatoes are susceptible to various pests and diseases, including aphids, tomato hornworms, and fungal infections. Ignoring pest and disease management can lead to significant damage or even the loss of your harvest. Regularly monitor your plants, take preventive measures, and address any issues promptly.
9. Skipping regular pruning and maintenance: Tomatoes benefit from regular pruning and maintenance to promote airflow, control growth, and minimize disease spread. Remove suckers, damaged leaves, and any signs of diseases or pests. Proper maintenance helps maintain plant health and productivity.
10. Harvesting improperly: Mishandling ripe tomatoes during harvest can cause bruising or damage. Always use a sharp knife or garden shears to carefully remove fully ripened tomatoes from the vine. Handle them gently to avoid any unnecessary bruising or injury.
By avoiding these common tomato planting mistakes, you can set your plants up for success and increase your chances of a healthy, robust tomato harvest. With proper care and attention, you’ll be rewarded with delicious, homegrown tomatoes throughout the growing season.