
Choosing the Right Corner Shelf
When it comes to supporting a corner shelf, selecting the right one is crucial. Not only should it be aesthetically pleasing, but it should also be sturdy enough to hold your desired items. Here are some factors to consider when choosing a corner shelf:
- Material: Corner shelves come in a variety of materials, including wood, glass, metal, and plastic. Consider the overall look and feel of your space and choose a material that complements your existing decor.
- Size and Shape: Measure the available space in your corner to determine the appropriate size and shape for your shelf. You want to ensure that it fits seamlessly without overcrowding the area.
- Weight Capacity: Consider the items you intend to place on the shelf and ensure that it has the weight-bearing capacity to support them. It’s always better to choose a shelf with a higher weight limit to avoid any potential accidents or damage.
- Style: The style of the corner shelf should match your personal taste and the overall theme of the room. Whether you prefer a modern, minimalist design or a vintage-inspired look, there are plenty of options available to meet your preferences.
- Installation: Evaluate the installation process of the corner shelf. Some shelves require drilling into the wall, while others may have adhesive or suction mounting options. Choose the one that aligns with your comfort level and the wall surface you’ll be installing it on.
By considering these factors, you can select a corner shelf that not only fits your space but also provides the necessary support for your belongings. Take your time to research and compare different options before making a final decision.
Determining the Location
Before installing a corner shelf, it’s important to determine the ideal location for it. Here are some considerations to keep in mind when deciding where to place your shelf:
- Function: Think about the purpose of the corner shelf and how you intend to use it. Will it be utilized for decorative items, books, or storage? Depending on its intended function, you may want to place it in a more visible or accessible area of the room.
- Accessibility: Consider how easily you can reach the corner shelf. If you plan to display frequently used items, ensure that the shelf is within arm’s reach. On the other hand, if it’s meant to showcase decorative pieces, you can place it in a more elevated or visually appealing spot.
- Height: Take into account the height of the ceiling and furniture in the room. You want to position the shelf at a height that complements the overall layout and doesn’t appear disproportionate or out of place. Keep in mind any potential obstructions, such as light fixtures or wall outlets, when determining the height.
- Wall Space: Assess the available wall space in the corner where you plan to install the shelf. Ensure that there is enough room to accommodate the size and shape of the shelf without overcrowding the area. Consider the height, width, and depth of the corner shelf to make an informed decision.
- Aesthetics: Think about how the corner shelf will contribute to the overall aesthetics of the room. Consider the existing color scheme, furniture style, and decor theme. Choose a location where the shelf will enhance the visual appeal and complement the surrounding elements.
By carefully considering these factors, you can determine the ideal location for your corner shelf. Remember to take measurements and visualize the space before making a final decision. This way, you can ensure that the shelf not only fulfills its functional purpose but also adds to the overall design and ambiance of the room.
Measuring and Marking
Accurate measurements and proper marking are crucial steps in the installation of a corner shelf. Here’s a guide on how to measure and mark for your corner shelf:
- Height: Measure the height at which you want to install the shelf on the wall. Use a measuring tape or a ruler to determine the desired distance from the floor or any other reference point. Mark this measurement on the wall using a pencil or masking tape.
- Width: Measure the width of the wall from corner to corner, where the shelf will be placed. Note down this measurement to ensure that you purchase a shelf of appropriate dimensions.
- Depth: Determine the desired depth of the corner shelf based on your needs. Measure from the corner outwards to the desired depth and mark it on the walls. Make sure there are no obstructions on the wall, such as electrical outlets or switches, that might interfere with the placement of the shelf.
- Placement: Consider the aesthetic balance of the room when marking the placement of the shelf. You may want to align the shelf with existing furniture or other architectural features for a visually pleasing arrangement. Use a level tool to ensure that the marked points are even and aligned correctly.
- Wall Studs: If you plan to anchor the shelf to wall studs for added support, locate the studs using a stud finder. Mark the position of the studs on the wall, keeping in mind the desired location and width of the shelf. This ensures that you attach the shelf securely to the wall structure.
Remember to double-check your measurements and marks before proceeding to the installation. Taking the time to measure accurately and mark the locations will help ensure that the corner shelf is correctly positioned and properly aligned with the surrounding elements. This will ultimately result in a visually pleasing and functional addition to your space.
Preparing the Wall
Before installing a corner shelf, it’s important to properly prepare the wall to ensure a secure and stable mount. Here are the essential steps to follow when preparing the wall:
- Clean the Wall: Start by cleaning the area where the shelf will be installed. Remove any dust, dirt, or debris using a damp cloth. This will ensure better adhesion of any mounting materials and prevent any particles from interfering with the installation process.
- Repair Damaged Surfaces: Inspect the wall for any cracks, holes, or unevenness. Fill in any imperfections using a suitable wall filler, such as spackle or putty. Smooth out the surface and allow it to dry according to the manufacturer’s instructions. Sand the repaired area if necessary to create a smooth and even surface.
- Paint or Wallpaper: If you plan to paint or apply wallpaper to the wall, it’s best to do so before installing the corner shelf. This will prevent any accidental damage to the shelf during the painting or wallpapering process. Allow the paint or wallpaper to cure fully before proceeding with the shelf installation.
- Locate Wall Studs: If you are planning to anchor the shelf to wall studs for added stability, use a stud finder to locate them. Mark the positions of the studs on the wall, taking into account the width and placement of the shelf. This will ensure that you attach the shelf securely to the structural support of the wall.
- Consider Wall Type: Take into account the type of wall you are working with. Different wall materials, such as drywall, plaster, or brick, may require specific mounting techniques. Be sure to use appropriate anchors, screws, or adhesive based on the wall material to ensure a secure and long-lasting installation.
By properly preparing the wall, you create a sturdy foundation for installing your corner shelf. This not only ensures the shelf is securely mounted but also prevents any damage to the wall surface. Take the time to clean, repair, and prepare the wall before proceeding with the installation, and you’ll be on your way to enjoying a beautiful, functional corner shelf.
Installing Wall Anchors (if Necessary)
Depending on the type of wall and the weight capacity of your corner shelf, you may need to install wall anchors to ensure a secure mount. Here’s a step-by-step guide on how to install wall anchors if they are required:
- Choose the Right Anchors: Select the appropriate wall anchors based on your wall type and the weight capacity of the shelf. There are various types of anchors available, such as plastic anchors, toggle bolts, or molly bolts. Refer to the manufacturer’s instructions to choose the right anchors for your specific needs.
- Mark the Mounting Holes: Hold the shelf bracket in position and align it with your previous markings on the wall. Mark the locations where you need to drill the holes for the wall anchors. Ensure that the marking is accurate and level.
- Drill the Holes: Use a power drill with a drill bit that matches the size of your wall anchors. Carefully drill the holes at the marked locations on the wall. If you are drilling into a stud, choose a drill bit slightly smaller than the width of the screw for a snug fit.
- Insert the Anchors: Insert the wall anchors into the drilled holes. Gently tap them in using a hammer or push them in by hand, depending on the type of anchor. Ensure that the anchors are flush with the wall surface.
- Mount the Shelf Bracket: Align the shelf bracket with the installed anchors and secure it in place using screws or bolts. Use a screwdriver or a drill to tighten the screws, ensuring that they are securely fastened.
- Test Stability: Once the shelf bracket is mounted, give it a gentle shake to ensure that it is stable and secure. If there is any wobbling or instability, double-check the anchors and screws to ensure they are properly installed.
By following these steps, you can install wall anchors to provide additional support and stability for your corner shelf. This will ensure that your shelf is securely mounted and able to bear the weight of your desired items.
Mounting the Shelf Bracket
Once you have prepared the wall and, if necessary, installed wall anchors, it’s time to mount the shelf bracket. Here’s a step-by-step guide to help you with this process:
- Position the Shelf: Hold the corner shelf against the wall, aligning it with the bracket or mounting holes. Ensure that the shelf is level and in the desired position.
- Mark the Bracket Holes: Use a pencil or a marker to mark the holes on the wall through the bracket or mounting holes. These marks will serve as your guide for drilling or screwing in the screws.
- Drill Pilot Holes (if necessary): If the bracket does not have pre-drilled holes, use a drill bit that matches the size of the screws to create pilot holes at the marked locations. The pilot holes will help guide the screws and prevent the wall from splitting or cracking.
- Attach the Bracket: Place the corner shelf aside momentarily and position the bracket on the marked holes. If using screws, secure the bracket to the wall by screwing them into place using a screwdriver or a drill. If using a different mounting system, follow the manufacturer’s instructions to attach the bracket securely.
- Test Stability: Once the bracket is attached, give it a gentle shake to ensure that it is stable and properly mounted. If there is any wobbling or instability, double-check the bracket and screws to ensure they are securely fastened to the wall.
Mounting the shelf bracket is a crucial step in ensuring the stability and support of your corner shelf. Take your time to position the shelf properly and securely attach the bracket to the wall. This will ensure that your corner shelf is safely mounted and ready to hold your desired items.
Securing the Corner Shelf
After mounting the shelf bracket, the next step is to secure the corner shelf onto the bracket. Here’s how to ensure the shelf is properly secured:
- Align the Shelf: Carefully position the corner shelf onto the bracket so that it rests securely. Pay attention to any alignment markers or notches on the bracket that indicate the correct placement of the shelf.
- Attach the Shelf to the Bracket: Depending on the type of corner shelf and bracket, there are different methods for attaching them together. Some shelves may have pre-drilled holes on the bottom surface that align with the bracket. In this case, use screws or bolts to fasten the shelf to the bracket following the provided instructions. Other shelves may simply slide or snap into place on the bracket. Ensure that the shelf is firmly attached and properly seated on the bracket.
- Double-Check Stability: Once the shelf is attached, give it a gentle shake or push to test its stability. Ensure that it does not feel loose or wobbly. If necessary, make adjustments or tighten the screws to secure the shelf firmly in place on the bracket.
- Weight Distribution: Consider the weight distribution of the items you plan to place on the shelf. Spread the weight evenly across the shelf to prevent any strain on one side. Avoid placing disproportionately heavy objects on one end of the shelf, as this can affect its stability and potentially cause it to sag or tilt.
- Follow Manufacturer’s Guidelines: Always refer to the manufacturer’s instructions and guidelines for securing the specific corner shelf and bracket combination you are using. Each product may have its own recommendations or variations in the attachment method.
By following these steps, you can ensure that your corner shelf is securely attached to the bracket and provides a stable surface for your items. Take the time to properly align, attach, and test the shelf to ensure its durability and longevity in your space.
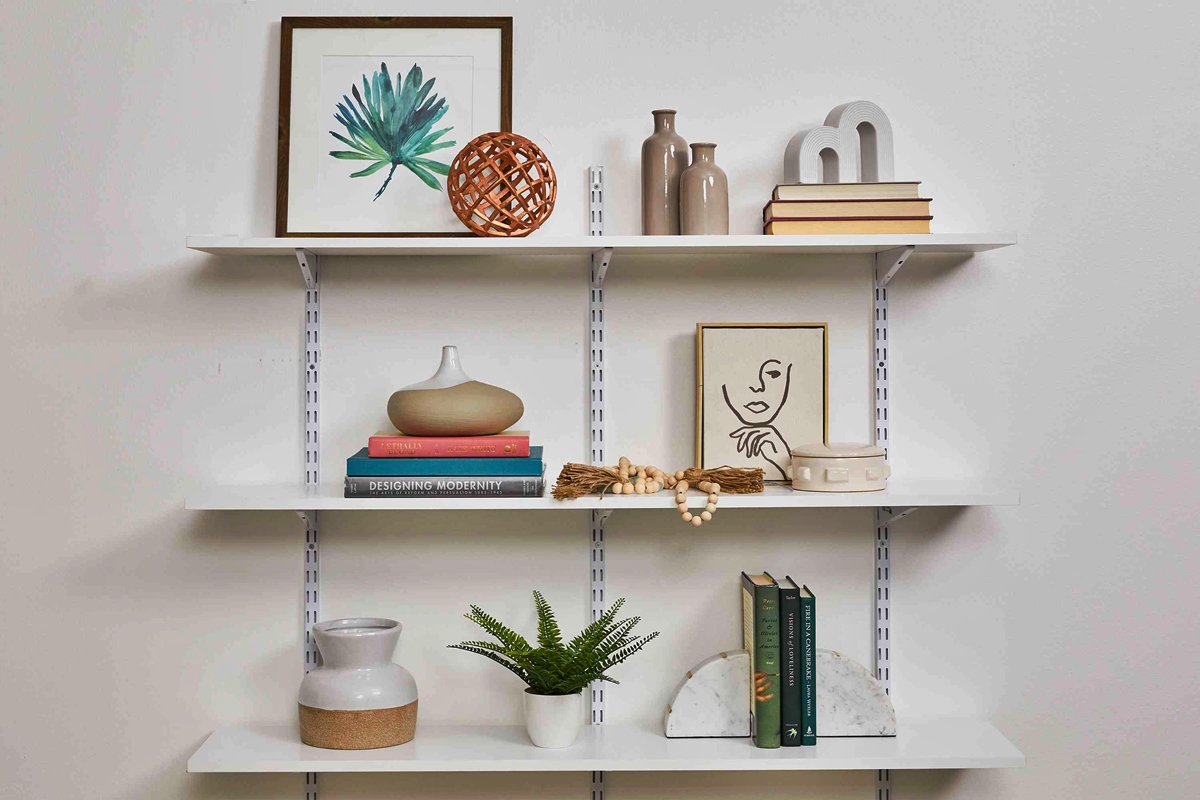
Adding Decorative Touches
An essential part of supporting a corner shelf is adding decorative touches to enhance its visual appeal and integrate it seamlessly into your space. Here are some creative ideas to spruce up your corner shelf:
- Display Decorative Items: Showcase your favorite decorative pieces, such as vases, sculptures, or figurines, on the corner shelf. Arrange them in an aesthetically pleasing manner, considering height, color coordination, and balance.
- Use Potted Plants: Bring some greenery into your corner with potted plants. Choose plants that thrive in low-light conditions and are suitable for indoor spaces. Group different-sized plants together to create a lush and vibrant display.
- Incorporate Books: If your corner shelf has multiple tiers, dedicate a section to displaying your favorite books. Arrange them vertically or horizontally, or even stack them in an attractive way to add an element of visual interest.
- Showcase Artwork: Prop up artwork or framed photographs against the back of the corner shelf to add a personal touch to your display. Mix different sizes and styles to create an eclectic and visually engaging arrangement.
- Add Decorative Storage: Use baskets, bins, or decorative boxes on the shelves to store smaller items while adding a stylish touch. This helps keep the space organized and visually appealing at the same time.
- Experiment with Lighting: Incorporate lighting into your corner shelf to enhance the ambiance of the space. Install LED strip lights or place small battery-operated lights on the shelves to highlight specific items or create a warm glow.
- Rotate and Change Displays: To keep the corner shelf fresh and exciting, periodically update the items on display. Rotate different decorative pieces, swap out plants, or change the artwork to keep the visual appeal dynamic and engaging.
By adding decorative touches to your corner shelf, you can transform it from a functional storage space to a stylish focal point of the room. Let your creativity guide you in curating a display that reflects your personal taste and complements the overall design of your space.
Maintaining the Corner Shelf
To ensure the longevity and continued support of your corner shelf, regular maintenance is essential. Here are some tips for maintaining your corner shelf:
- Cleaning: Regularly clean the surface of the shelf to remove dust, dirt, and any spills or stains. Use a soft, damp cloth or a gentle cleaning solution suitable for the material of your shelf. Avoid abrasive cleaners that can damage or scratch the surface.
- Check for Loose Screws: Periodically inspect the screws or bolts that hold the shelf bracket and shelf together. If any feel loose, tighten them to maintain the stability of the shelf. Replace any damaged or worn-out screws as needed.
- Support Weight Limits: Be mindful of the weight limits specified by the manufacturer for your corner shelf. Overloading the shelf can cause it to sag or potentially lead to structural damage. Distribute the weight evenly and avoid placing excessively heavy items on the shelf.
- Avoid Excessive Moisture: If your corner shelf is in a bathroom or a humid environment, be sure to take precautions to protect it from excessive moisture. Use waterproof trays or liners underneath potted plants and avoid placing wet items directly on the shelf to prevent water damage or warping.
- Inspect Wall Anchors: If your corner shelf is anchored to the wall, periodically check the wall anchors for any signs of wear or loosening. If you notice any issues, such as loose anchors or cracks around the anchor points, re-install or replace the anchors as necessary to maintain a secure mount.
- Adjust for Temperature Changes: Wood and other materials can expand or contract with temperature fluctuations. Be mindful of changes in the environment and make any necessary adjustments to the shelf to prevent warping or damage. Avoid placing the shelf directly in front of heating or cooling sources.
By following these maintenance tips, you can ensure that your corner shelf remains sturdy and supportive for years to come. Regular cleaning and preventive measures will not only keep the shelf looking its best but also help maintain its functional integrity, providing continued support for your belongings.