
\
Common Dehumidifier Problems\
\
Dehumidifiers are valuable appliances that help to remove excess humidity from the air, preventing issues such as mold growth, musty odors, and damage to furniture and walls. However, like any electrical device, dehumidifiers can experience problems over time. Understanding common issues that dehumidifiers encounter can help you troubleshoot and repair them efficiently. Here are some of the most common dehumidifier problems you may encounter:
1. \No Power\: If your dehumidifier fails to turn on, the first thing to check is the power source. Ensure the unit is properly plugged into a working outlet and check if the circuit breaker hasn’t tripped. If there’s still no power, the issue may lie within the unit’s internal wiring or control board.
2. \Poor Performance\: If your dehumidifier is running but not removing moisture effectively, it could be due to a dirty or clogged air filter. A dirty filter restricts airflow and hampers the dehumidification process. Clean or replace the filter regularly to maintain optimum performance.
3. \Excessive Ice Build-Up\: Ice formation on the evaporator coils is a common problem in dehumidifiers. It can occur when the temperature is too low or if the unit is operating in a cold environment. A buildup of ice hampers the unit’s ability to remove moisture. To resolve this issue, turn off the dehumidifier and allow it to thaw. Ensure the room temperature is above 65°F (18°C) before restarting the unit.
4. \Weak Airflow\: If the dehumidifier is running, but the air output is weak, check the fan motor. A malfunctioning or clogged fan motor can restrict the airflow. Clean the motor or have it repaired or replaced if necessary.
5. \Overflowing Water\: If your dehumidifier is leaking water or the water collection tank is constantly overflowing, it may indicate a problem with the drainage system. Check for clogs or blockages in the drainage hose or pump and ensure they are clear.
Remember to consult your dehumidifier’s user manual for specific troubleshooting instructions and safety precautions. If the problem persists or you’re unsure about performing repairs, it’s best to contact a professional technician to handle the repairs for you.
\
Tools and Materials Needed for Repairing a Dehumidifier\
\
Repairing a dehumidifier requires some basic tools and materials to help diagnose and fix common problems. Having these items on hand will enable you to efficiently troubleshoot and repair your dehumidifier. Here are the tools and materials you may need:
1. \Screwdriver Set\: A set of screwdrivers with different sizes and types (such as Phillips and flathead) will be necessary for removing screws and accessing internal components.
2. \Brush or Vacuum Cleaner\: A soft-bristled brush or a vacuum cleaner with a brush attachment is essential for cleaning the air filter, condenser coils, and other areas that are prone to dust and debris buildup.
3. \Multimeter\: A multimeter is a versatile tool used to measure electrical current, voltage, and resistance. It can help you diagnose issues with electrical components such as the fan motor, control board, and humidity sensor.
4. \Condenser Coil Cleaner\: A specialized condenser coil cleaner is recommended for effectively removing dirt, grime, and other debris from the condenser coils. It helps maintain the efficiency of the dehumidifier’s cooling system.
5. \Replacement Parts\: In case you need to replace any faulty components, it’s important to have the necessary replacement parts on hand. These may include a new air filter, fan motor, control board, or any other specific component that requires replacement.
6. \Owner’s Manual\: The manufacturer’s owner’s manual specific to your dehumidifier model is an invaluable resource. It provides detailed information on troubleshooting, repair procedures, and safety guidelines. Make sure to have it readily accessible during the repair process.
Remember to always prioritize safety during repairs. Before starting any work on your dehumidifier, ensure it is unplugged and disconnected from the power source. If you are unsure about any repair procedures, it’s best to consult a professional technician or the manufacturer’s customer service for guidance.
\
Step-by-Step Guide to Repair a Dehumidifier\
\
Repairing a dehumidifier can be a cost-effective and rewarding task if you’re handy and have some basic DIY skills. Here is a step-by-step guide to help you troubleshoot and repair common problems with your dehumidifier:
1. \Check the power source\ – Ensure that the dehumidifier is properly plugged into a working outlet. Check the circuit breaker to ensure it hasn’t tripped. If there’s still no power, you may need to inspect the internal wiring or control board.
2. \Clean the air filter\ – Remove the air filter and clean it according to the manufacturer’s instructions. If the filter is damaged or excessively dirty, replace it with a new one.
3. \Inspect the condenser coils\ – Remove the cover of the dehumidifier and check the condenser coils for any dirt or debris buildup. Use a brush or vacuum cleaner to gently clean the coils, ensuring they are free from obstructions.
4. \Check the drainage system\ – Inspect the drainage hose and pump for any clogs or blockages. If necessary, remove the obstructions to allow proper water drainage.
5. \Test the humidity sensor\ – Use a multimeter to test the functionality of the humidity sensor. If it is not reading the humidity accurately, it may need to be replaced.
6. \Inspect the fan motor\ – Check the fan motor for any signs of damage or wear. If the motor is malfunctioning or making unusual noises, it may need to be repaired or replaced.
7. \Check the compressor\ – Listen for any unusual noises coming from the compressor. If the compressor is not functioning properly, it may need professional servicing or replacement.
8. \Test the control board\ – With the dehumidifier unplugged, visually inspect the control board for any burnt or damaged components. Use a multimeter to test the board’s functionality. If necessary, replace the control board.
9. \Inspect the refrigerant levels\ – Checking the refrigerant levels requires specialized equipment and knowledge. If you suspect a refrigerant leak or low levels, it’s best to call a professional technician to handle this aspect of the repair.
10. \Troubleshoot other potential issues\ – If you have completed the above steps and the dehumidifier still isn’t working correctly, consult the manufacturer’s manual or contact customer support for further troubleshooting guidance.
Remember, safety should always come first when repairing any electrical appliance. If you are unsure about any repair procedures or if the problem persists after your DIY efforts, it’s best to seek professional help from a qualified technician.
\
Check the Power Source\
\
When troubleshooting and repairing a dehumidifier, one of the first steps is to ensure that the power source is working properly. Here are the necessary steps to check the power source:
1. \Plug and Outlet\: Start by ensuring that the dehumidifier is securely plugged into a working power outlet. Sometimes, the plug may become loose or disconnected, resulting in a loss of power. Firmly push the plug into the outlet to ensure a secure connection.
2. \Circuit Breaker\: If the dehumidifier still does not turn on, check the circuit breaker. Locate the circuit breaker panel in your home and inspect the breaker that controls the dehumidifier’s power. If it is in the “off” position, switch it back on. However, if the breaker trips again after resetting, it may indicate an underlying electrical issue that requires professional assistance.
3. \Power Extension Cord\: If you are using an extension cord to power your dehumidifier, make sure that it is in good condition and rated for the appropriate power load. Additionally, ensure that the extension cord is securely connected at both ends and not damaged in any way.
4. \Faulty Outlet\: Test the outlet using another device or plug to confirm if it is functioning correctly. If the outlet is not supplying power, you may need to consult an electrician to replace or repair the faulty outlet.
5. \Internal Wiring\: If you have checked the power source and still have no power, there may be an issue with the dehumidifier’s internal wiring. In that case, it is recommended to contact a professional technician or the manufacturer’s customer service for further guidance.
Always remember to prioritize safety by unplugging the dehumidifier before performing any repairs or inspections related to the power source. Additionally, be cautious when working with electricity and do not attempt any repairs beyond your level of expertise. If in doubt, it is best to seek professional assistance to avoid any potential hazards.
\
Clean the Air Filter\
\
Keeping the air filter of your dehumidifier clean is crucial for its proper functioning and performance. Over time, the air filter can become clogged with dust, dirt, and other pollutants, reducing its effectiveness in removing excess moisture from the air. Here are the necessary steps to clean the air filter:
1. \Locate the Air Filter\: The air filter is typically located at the front or top of the dehumidifier. Refer to the user manual or manufacturer’s instructions to locate the specific position of the air filter in your dehumidifier model.
2. \Remove the Air Filter\: Gently pull out the air filter from its designated slot. Take note of how the filter is positioned and inserted so that you can easily put it back later.
3. \Inspect the Air Filter\: Examine the air filter for any visible dirt, dust, or debris buildup. If the filter appears excessively dirty or damaged, it is advisable to replace it with a new one. Some dehumidifiers may have reusable filters that can be cleaned, while others may require a replacement filter.
4. \Clean the Air Filter\: If the air filter is washable, rinse it under warm running water to remove dirt and debris. Gently scrub the filter with a soft brush or sponge if needed. Allow the filter to air dry completely before reinstalling it. Note that some filters may require specific cleaning instructions, so refer to the manufacturer’s guidelines.
5. \Reinstall the Air Filter\: Once the air filter is dry, carefully slide it back into its original position. Ensure that the filter is correctly inserted and aligned with the arrows or indicators on the dehumidifier’s housing.
6. \Regular Maintenance\: It is recommended to clean or replace the air filter every 2-3 months, depending on the usage and environmental conditions. Regular maintenance of the air filter will help ensure the efficient operation and longevity of your dehumidifier.
By regularly cleaning the air filter, you allow proper airflow through the dehumidifier, which enhances its performance in reducing humidity. This not only improves its ability to remove moisture from the air but also helps prevent dirt and allergens from circulating back into the room.\
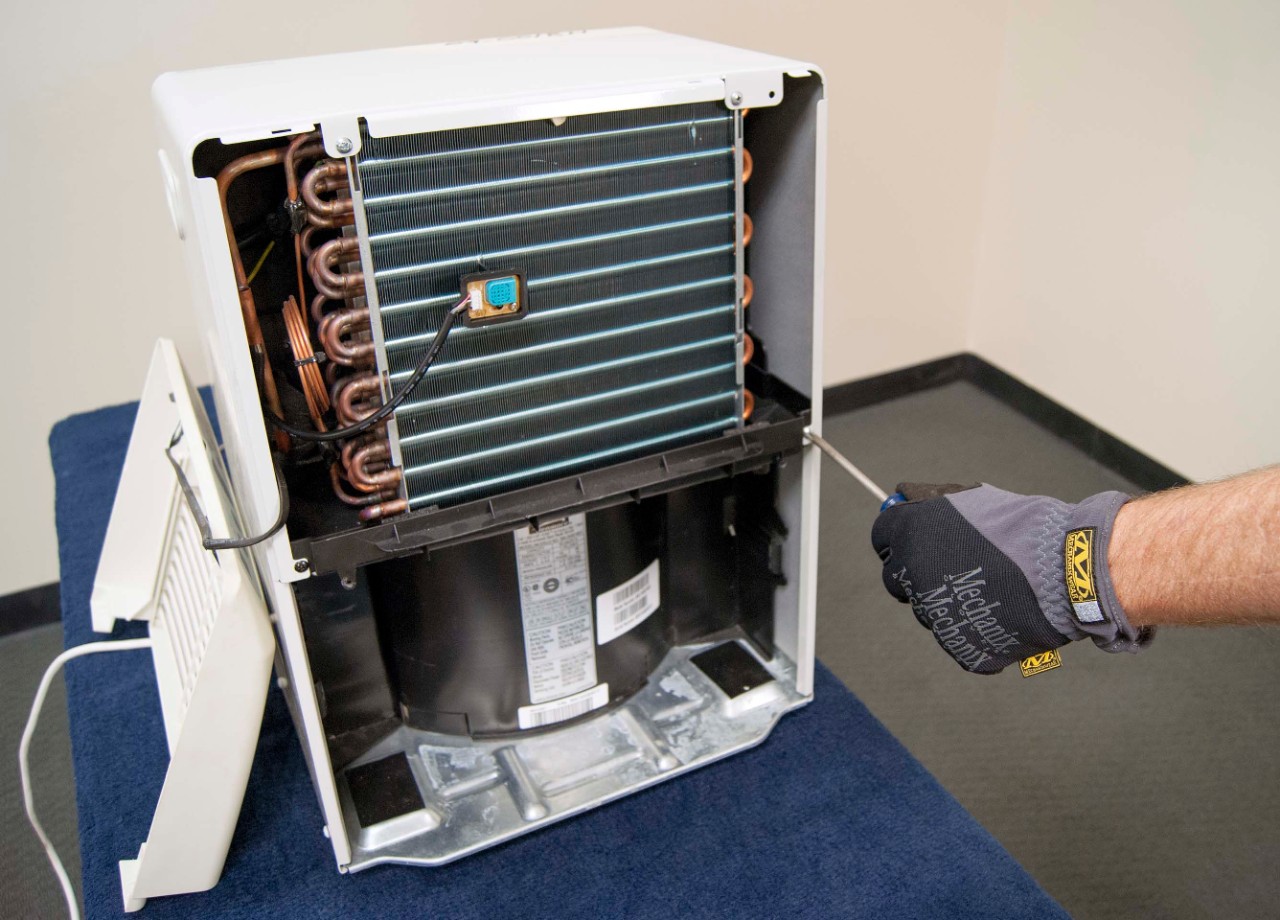
Inspect the Condenser Coils\
\
The condenser coils play a vital role in the dehumidification process by removing heat from the air and condensing moisture. Over time, these coils can accumulate dirt, dust, and other debris, which can hinder their efficiency and reduce the overall performance of the dehumidifier. Here’s how to inspect and clean the condenser coils:
1. \Access the Condenser Coils\: Locate the condenser coils, which are typically found at the back or bottom of the dehumidifier. Refer to the user manual or manufacturer’s instructions to ensure you’re searching in the correct area.
2. \Disconnect the Power\: Before proceeding with any inspection or cleaning, ensure that the dehumidifier is unplugged from the power source for safety purposes.
3. \Visual Inspection\: Take a close look at the condenser coils to inspect their condition. Look for any signs of dirt, dust, or obstructions that could affect their performance. Pay attention to areas of heavy buildup or signs of damage such as bent or flattened fins.
4. \Clean the Coils\: Use a soft brush or a vacuum cleaner with a brush attachment to carefully remove accumulated dirt and debris from the condenser coils. Gently brush or vacuum in the direction of the fins to avoid bending or damaging them. Be thorough in cleaning, ensuring you remove any loose debris stuck between the fins.
5. \Fin Comb\: If you notice the fins on the condenser coils are bent or flattened, you can use a fin comb (available at hardware stores) to straighten them carefully. Gently insert the comb’s teeth between the fins and carefully guide it along the length of the coil to straighten them back into their original position.
6. \Reassemble\: Once you have cleaned the condenser coils and straightened any bent fins, reassemble any components you may have removed during the process. Ensure that everything is properly aligned and securely fastened.
7. \Regular Maintenance\: It is recommended to inspect and clean the condenser coils at least once a year or more frequently if you live in a particularly dusty or humid environment. Regular maintenance of the condenser coils will enhance the efficiency of your dehumidifier and ensure it continues to operate effectively.
By keeping the condenser coils clean and free from debris, you optimize the airflow and heat transfer process in your dehumidifier. This, in turn, improves its ability to remove moisture from the air, leading to a more comfortable and healthier indoor environment.
Check the Drainage System
The drainage system of a dehumidifier is responsible for collecting and removing the water that is extracted from the air. Over time, blockages or malfunctions in the drainage system can occur, leading to water leakage or inefficient water removal. Here are the necessary steps to check the drainage system:
1. Locate the Drainage Components: Depending on the model, the main drainage components may include a drain hose, a drip pan, or a water collection tank. Consult the user manual or manufacturer’s instructions to identify the drainage system components in your dehumidifier.
2. Inspect the Drain Hose: If your dehumidifier is equipped with a drain hose, check for any kinks, twists, or blockages along its length. Straighten any kinks or twists and ensure that the hose is securely connected to both the dehumidifier and the drainage point.
3. Clear Potential Blockages: If water is not flowing freely through the drain hose, use a thin brush or pipe cleaner to dislodge any debris or blockages. Run water through the hose to ensure it flows smoothly. If there are significant blockages that cannot be cleared, consider replacing the hose.
4. Inspect the Drip Pan: If your dehumidifier has a drip pan, check for any visible signs of damage or cracks. Clean the pan with warm soapy water to remove any dirt or grime that may hinder proper water drainage.
5. Water Collection Tank: If your dehumidifier uses a water collection tank, empty the tank and clean it thoroughly. Check for any cracks or damage that could lead to water leakage. Ensure that the tank is properly aligned and securely inserted into the dehumidifier.
6. Gravity Drain Option: Some dehumidifiers offer a gravity drain option, allowing you to connect a hose directly to a floor drain or sink. Make sure the hose is securely connected and that the drain entry point is clear.
7. Regular Maintenance: It is important to regularly check and maintain the drainage system of your dehumidifier, especially during periods of heavy use or high humidity. This helps ensure optimal water removal and prevents potential water damage.
By checking the drainage system of your dehumidifier, you can address any blockages or issues that may impede proper water removal. This will help maintain the efficiency of your dehumidifier and prevent potential water damage in your home.
Test the Humidity Sensor
The humidity sensor in a dehumidifier detects the moisture levels in the air and regulates the operation of the unit accordingly. If the humidity sensor malfunctions, it can affect the accuracy of the dehumidifier’s moisture control, leading to inefficiency or improper operation. Here’s how to test the humidity sensor:
1. Locate the Humidity Sensor: The humidity sensor is typically located near the evaporator coils or within the control panel of the dehumidifier. Refer to the user manual or manufacturer’s instructions to locate the humidity sensor in your specific model.
2. Visual Inspection: Inspect the humidity sensor for any signs of damage, corrosion, or loose connections. Ensure that the sensor is clean and free from any debris or obstructing materials. If you notice any visible issues, such as a damaged sensor or loose wires, consider contacting a professional technician or the manufacturer for assistance.
3. Testing with a Hygrometer: Use a hygrometer, a device that measures humidity levels, to compare the readings of the hygrometer with the dehumidifier’s display. Place the hygrometer near the dehumidifier and wait for it to stabilize. Then, compare the readings on the hygrometer with the displayed humidity level on the dehumidifier. If there is a significant difference, it may indicate a problem with the humidity sensor.
4. Cleaning the Sensor: If the humidity sensor appears dirty or dusty, carefully clean it using a soft brush or a cotton swab lightly moistened with isopropyl alcohol. Gently wipe the sensor to remove any dirt or debris that may be affecting its accuracy. Allow the sensor to dry completely before testing it again.
5. Reassessing after Cleaning: After cleaning the humidity sensor, repeat the testing process with the hygrometer to compare the readings once more. If the readings now align closely, it indicates that the cleaning process was successful in addressing the issue.
6. Further Troubleshooting: If the humidity sensor continues to provide inaccurate readings or malfunctions even after cleaning, it may require replacement. Refer to the manufacturer’s instructions or contact customer support for guidance on obtaining and installing a new humidity sensor.
Testing the humidity sensor allows you to ensure that your dehumidifier accurately detects and regulates the moisture levels in your environment. By maintaining a properly functioning sensor, you can achieve optimal humidity control, leading to a comfortable and healthy living space.
Inspect the Fan Motor
The fan motor in a dehumidifier is responsible for circulating air within the unit and expelling moisture-laden air. If the fan motor malfunctions or becomes damaged, it can affect the overall performance of the dehumidifier. Here’s how to inspect the fan motor:
1. Locate the Fan Motor: The fan motor is typically located near the evaporator coils or within the housing of the dehumidifier. Refer to the user manual or manufacturer’s instructions to locate the fan motor in your specific model.
2. Power off the Dehumidifier: Before inspecting the fan motor, make sure the dehumidifier is powered off and unplugged for safety.
3. Visual Inspection: Carefully examine the fan blades and motor for any signs of damage, such as cracks, excessive dirt build-up, or loose connections. Ensure that the fan blades are clean and free from any obstructions that could hinder their rotation.
4. Listen for Unusual Noises: Turn on the dehumidifier and listen for any abnormal sounds coming from the fan motor. Unusual noises, such as grinding, squeaking, or rattling, may indicate a problem with the motor and should be further investigated.
5. Check the Fan Motor Bearings: If you suspect issues with the fan motor, gently wiggle the fan blades back and forth. Excessive play or looseness may indicate worn-out or damaged bearings, requiring replacement or repair.
6. Clean the Fan Blades: If the fan blades appear dirty or dusty, use a soft brush or a vacuum cleaner with a brush attachment to remove any debris. Ensure that the fan blades are completely clean and balanced.
7. Operational Test: Once you have inspected and cleaned the fan motor, turn on the dehumidifier and observe the fan motor’s operation. Ensure that the fan blades rotate smoothly without any noticeable wobbling or resistance.
8. Professional Assistance: If you detect any major issues with the fan motor, such as motor failure or extensive damage, it may be necessary to seek professional assistance for repair or replacement. Contact the manufacturer’s customer service or consult a certified technician for further guidance.
A well-functioning fan motor is crucial for efficient air circulation and optimal dehumidification. Regular inspection and maintenance of the fan motor can help prolong its lifespan and ensure the proper operation of your dehumidifier.
Check the Compressor
The compressor is a vital component of a dehumidifier, responsible for compressing and circulating refrigerant to extract moisture from the air. If the compressor malfunctions or encounters issues, it can affect the overall cooling and dehumidification process. Here’s how to check the compressor in your dehumidifier:
1. Power off the Dehumidifier: Before inspecting the compressor, ensure that the dehumidifier is powered off and unplugged for safety.
2. Locate the Compressor: The compressor is typically located near the rear of the dehumidifier or within the housing. Refer to the user manual or manufacturer’s instructions to identify the compressor’s specific location in your dehumidifier model.
3. Visual Inspection: Carefully examine the compressor for any signs of physical damage, such as cracks, leaks, or frost buildup. Ensure that there are no loose or disconnected wires around the compressor.
4. Listen for Unusual Sounds: Turn on the dehumidifier and listen for any abnormal sounds coming from the compressor. Unusual noises like rattling, grinding, or clicking may indicate an issue with the compressor’s internal components.
5. Feel for Vibrations: While the dehumidifier is running, gently place your hand on the compressor. Excessive vibrations can indicate a problem with the motor or internal components, requiring further inspection or servicing.
6. Check for Frost or Ice: During operation, ice or excessive frost buildup on the compressor may suggest a refrigerant leak or an issue with the cooling system. If you notice these signs, it is recommended to contact a professional technician for assistance, as handling refrigerant requires specialized knowledge and equipment.
7. Professional Inspection: If you suspect significant issues with the compressor, such as failure or internal damage, it’s best to seek professional assistance. Contact the manufacturer’s customer service or consult a certified technician for a thorough inspection and evaluation.
The compressor is a complex component that requires specialized expertise for repair or replacement. Regular visual inspections and awareness of any unusual sounds or vibrations are key to identifying potential issues early. Addressing compressor problems promptly can help ensure the optimal performance and longevity of your dehumidifier.
Test the Control Board
The control board of a dehumidifier is responsible for managing and coordinating various functions, such as adjusting humidity settings, monitoring sensors, and controlling other components. If the control board malfunctions, it can disrupt the dehumidifier’s operation and result in inaccurate readings or improper functioning. Here’s how to test the control board of your dehumidifier:
1. Power off the Dehumidifier: Before testing the control board, ensure that the dehumidifier is powered off and unplugged to avoid any electrical hazards.
2. Locate the Control Board: The control board is typically housed within the control panel of the dehumidifier. Refer to the user manual or manufacturer’s instructions to identify the control board’s specific location in your dehumidifier.
3. Visual Inspection: Examine the control board for any visible signs of damage, such as burnt components, loose connections, or corrosion. Ensure that all wires and connectors are securely attached to the control board.
4. Test the Power Supply: Use a multimeter to check the voltage supply to the control board. Follow the manufacturer’s instructions or refer to the wiring diagram for the specific voltage range. If the voltage is not within the appropriate range, there may be an issue with the power supply or the control board itself.
5. Functional Testing: Manually adjust the humidity settings on the control board and observe how the dehumidifier responds. Check if the control board accurately displays the changes and instructs the dehumidifier to operate accordingly. Ensure that all functions, such as fan speed control or auto-shutoff, are working as intended.
6. Test Sensor Readings: If your dehumidifier has additional sensors, such as temperature or humidity sensors, test their accuracy by comparing their readings to a reliable external sensor. Any significant discrepancies may indicate a problem with the control board’s sensor input or display.
7. Professional Assistance: If the control board shows signs of damage or if functional or sensor testing reveals abnormalities, it is recommended to consult a professional technician or contact the manufacturer’s customer service for further assistance. Control board replacement or repair may require expertise and specialized equipment.
Testing the control board helps ensure that your dehumidifier accurately interprets and responds to settings and sensor inputs, allowing for proper operation and efficient dehumidification. Identifying any issues with the control board early on can prevent further complications and help maintain the optimal performance of your dehumidifier.
Inspect the Refrigerant Levels
The refrigerant in a dehumidifier is responsible for absorbing heat from the air and facilitating the dehumidification process. If the refrigerant levels are low or depleted, it can impair the dehumidifier’s ability to cool and remove moisture effectively. Here’s how to inspect the refrigerant levels in your dehumidifier:
1. Safety Precautions: Prioritize safety by powering off and unplugging the dehumidifier. Wait for a sufficient amount of time to allow the refrigerant to settle before proceeding with the inspection.
2. Consult the User Manual: Refer to the dehumidifier’s user manual or manufacturer’s instructions to determine whether inspecting the refrigerant levels is a DIY task or if it requires professional assistance. Some dehumidifiers may have a sealed cooling system that prohibits user access, while others may provide instructions for checking refrigerant levels.
3. Visual Inspection: Carefully examine the refrigerant lines and connections for any signs of leaks, oil stains, or frost buildup. Leaks or noticeable damage to the refrigerant system may require professional intervention and should not be addressed by the user.
4. Professional Inspection: If you suspect low refrigerant levels or encounter any signs of a refrigerant leak, it is recommended to seek professional assistance. Certified technicians possess the necessary expertise and equipment to properly assess and address refrigerant issues.
5. Preventing Refrigerant Leaks: To reduce the risk of refrigerant leaks, ensure that the dehumidifier is handled with care, avoiding rough movements or excessive vibrations. Additionally, perform regular maintenance tasks, such as cleaning the coils and filters, to promote optimal dehumidifier performance and minimize the likelihood of refrigerant leaks.
Keep in mind that working with refrigerant requires expertise, as it is regulated and requires specialized equipment for handling, recovery, and disposal. It is crucial to follow manufacturer’s guidelines and consult qualified professionals when dealing with refrigerant-related issues to ensure the safety and effectiveness of your dehumidifier.
Troubleshooting Other Potential Issues
While the previous sections addressed some of the common problems you may encounter with your dehumidifier, there are additional issues that can occur. Here are some troubleshooting steps you can take to identify and address other potential problems:
1. Excessive Noise: If your dehumidifier is making loud or abnormal noises during operation, check for any loose components, such as fan blades or screws, and tighten them if necessary. Also, ensure that the dehumidifier is placed on a stable surface to minimize vibrations. If the noise persists, professional assistance may be required.
2. Unpleasant Odors: If your dehumidifier emits foul or musty odors, clean the unit thoroughly, including the air filter and any accessible internal parts. Consider using an odor-neutralizing spray or placing odor absorbers near the dehumidifier. However, if the odor persists, it could indicate mold growth or other underlying issues that require professional attention.
3. Inaccurate Humidity Readings: If you suspect that the humidity readings displayed on your dehumidifier are incorrect, perform a comparison test with a separate hygrometer. If there is a significant difference, recalibrate the dehumidifier according to the manufacturer’s instructions or contact customer support for guidance.
4. Intermittent Cycling: If your dehumidifier frequently turns on and off, it may indicate an issue with the control board, sensor, or the desired humidity settings. Check that the dehumidifier is set to an appropriate level and ensure that the sensor is not obstructed or affected by external factors, such as nearby heat sources.
5. Water Leakage: If your dehumidifier is leaking water, check for potential causes such as a clogged drain hose, improper positioning of the water collection tank, or a damaged drip pan. Clear any blockages, reposition the tank or replace it if needed, and inspect the drip pan for cracks or damage.
6. Failure to Turn On: If your dehumidifier fails to turn on or respond to commands, check the power source, circuit breaker, and ensure that the control panel is functional. If the issue persists, contact customer support or a professional technician for further assistance.
Remember, if you are unsure about any repair procedures or if the problem persists, it is best to seek professional help. Technicians have the expertise and tools to troubleshoot and repair complex issues with your dehumidifier, ensuring its optimal performance and longevity.