
Measure and Mark for Installation
Before you start mounting your mantel shelf, it’s crucial to measure and mark the precise location on your wall. This step ensures that your shelf will be level and properly aligned. Here’s how to go about it:
- First, grab a measuring tape and determine the desired height for your mantel shelf. Keep in mind any furniture or artwork that will be placed beneath it. Ideally, the shelf should be about 4-6 feet above the floor for eye-level viewing.
- Using a pencil, mark the center point of where you want your mantel shelf to be. Measure the width of your shelf and mark half of that measurement on each side of the center point to indicate the outer edges.
- Now, locate the wall studs using an electronic stud finder. Wall studs provide the necessary support for your mantel shelf. Mark the edges of the studs with a pencil to ensure that the shelf can be securely anchored to them.
- Double-check your measurements to ensure accuracy. It’s always better to be precise at this stage to avoid any issues during installation.
By taking the time to accurately measure and mark the installation points, you can be confident that your mantel shelf will be securely mounted and level. Once you have completed this step, you’re ready to gather the materials and tools needed for the installation.
Gather Materials and Tools Needed
Now that you’ve measured and marked the location for your mantel shelf, it’s time to gather the necessary materials and tools for the installation. Having everything prepared ahead of time will make the process smoother and more efficient. Here’s what you’ll need:
- Mantel shelf: Choose a shelf that matches the style and dimensions you desire. It should be made of sturdy material, such as solid wood or stone, to ensure durability.
- Support brackets or corbels: These are essential for providing the necessary support for your mantel shelf. Make sure they are sturdy and can bear the weight of the shelf.
- Wall anchors and screws: Depending on your wall type, you may need wall anchors to secure the support brackets or corbels. Ensure that the wall anchors are appropriate for the weight of the shelf.
- Level: A level is necessary to ensure that your mantel shelf is properly aligned and straight. It will help you adjust the position as needed during installation.
- Measuring tape: A measuring tape is handy for double-checking measurements and ensuring accuracy during installation.
- Pencil: You’ll need a pencil for marking the installation points on the wall and making any necessary adjustments.
- Screwdriver or drill: Depending on the type of screws you are using, have a screwdriver or drill ready for attaching the support brackets or corbels to the wall.
- Hammer: If you are using wall anchors, a hammer will be necessary for inserting them securely into the wall.
Having all these materials and tools readily available will save you time and effort during the installation process. Ensure you have everything on hand before proceeding, and double-check that you have the correct quantities and sizes to avoid any delays or surprises.
Locate Wall Studs
When installing a mantel shelf, it’s crucial to anchor it securely to the wall. The most reliable way to achieve this is by locating and attaching the shelf to wall studs. Wall studs are the vertical wooden beams within your wall that provide strong support. Here’s how to locate them:
- Start by using an electronic stud finder, following the manufacturer’s instructions. This handy tool detects changes in density behind your wall, indicating the presence of a stud.
- Hold the stud finder against the wall and slowly move it horizontally. Pay attention to the beeping or lighting indicators that signal the presence of a stud.
- Once you locate a stud, mark its edges with a pencil. This will ensure that you know exactly where to position the support brackets or corbels for your mantel shelf.
- Continue using the electronic stud finder to locate additional studs along the same horizontal line. Depending on the size of your mantel shelf, you may need multiple studs for adequate support.
- If the stud finder fails to locate any studs, you may need to resort to alternative methods. For example, you can try tapping the wall lightly with your knuckles or using a small nail to probe the area. A solid, non-hollow sound or resistance will indicate the presence of a stud.
Locating and marking the position of wall studs is crucial to ensure the stability and security of your mantel shelf. Make sure to identify multiple studs along the horizontal line to distribute the weight evenly.
If you’re unable to locate any studs, it may be necessary to consult a professional or consider alternative methods for safely mounting your mantel shelf.
Determine the Proper Height for the Mantel Shelf
Choosing the right height for your mantel shelf is essential to ensure that it complements the overall aesthetic of your space and allows for proper functionality. Here’s how to determine the proper height:
- Consider the purpose of your mantel shelf. If you plan to display artwork or a mirror above the mantel, ensure that there is enough space between the top of the shelf and the ceiling to accommodate the height of these items.
- Take into account the size and scale of your fireplace or the wall space where the mantel will be installed. The mantel shelf should be proportionate to the size of the fireplace or wall and not overpower or overcrowd the area.
- Consider the height of any furniture or decor pieces that will be placed below the mantel. You want to ensure enough space for the items to be displayed without feeling cramped or out of proportion.
- Think about eye-level viewing. For a visually pleasing arrangement, the center of the mantel shelf should be positioned at eye level. This typically falls within the range of 4-6 feet from the floor.
- Account for any architectural features or design elements in the room. The mantel shelf should complement and enhance the overall style and layout of the space.
By taking into consideration these factors, you can determine the proper height for your mantel shelf. Remember to step back and assess the overall balance and harmony of the arrangement before finalizing the installation.
It’s also helpful to seek inspiration from interior design magazines or online sources to gather ideas and see how others have successfully positioned their mantel shelves. Take note of what appeals to you and aligns with your desired aesthetic.
Install Support Brackets or Corbels
Support brackets or corbels are crucial for providing stability and strength to your mantel shelf. Here is a step-by-step guide to installing them:
- Hold the first support bracket or corbel against the wall, aligning it with the marked stud. Make sure it is level, using a spirit level if needed.
- Mark the screw hole locations on the wall through the pre-drilled holes of the support bracket or corbel. Use a pencil to make these marks.
- Set the support bracket or corbel aside and drill pilot holes at the marked locations. The size of the pilot holes will vary depending on the type of screws you are using, so refer to the manufacturer’s recommendations.
- Hold the support bracket or corbel back against the wall, aligning the screw holes with the pilot holes. Insert the screws through the holes and tighten them with a screwdriver or drill.
- Repeat the process for the remaining support brackets or corbels, ensuring that they are evenly spaced and level.
It is important to ensure that the support brackets or corbels are securely attached to the wall and aligned properly. This will provide the necessary support for your mantel shelf.
If you are using corbels, it might be necessary to attach them directly to the mantel shelf before installing. Follow the manufacturer’s instructions for proper installation.
Always double-check that the support brackets or corbels are level with each other and positioned correctly before moving on to mounting the mantel shelf.
Once the support brackets or corbels are securely in place, you are ready to mount the mantel shelf onto them.
Mount the Mantel Shelf onto the Support Brackets or Corbels
With the support brackets or corbels securely installed, it’s time to mount the mantel shelf onto them. Follow these steps to ensure a successful installation:
- Position the mantel shelf on top of the support brackets or corbels, ensuring that it is centered and aligned properly.
- Use a level to check that the mantel shelf is perfectly horizontal. Make any adjustments as needed to achieve a level position.
- If your mantel shelf has pre-drilled holes for mounting, align them with the support brackets or corbels.
- Insert screws through the pre-drilled holes or brackets into the mantel shelf. Depending on the material and design of your shelf, you may need to use different types of screws or hardware. Refer to the manufacturer’s instructions for the recommended method.
- Tighten the screws securely so that the mantel shelf is firmly attached to the support brackets or corbels. Take care not to overtighten and damage the shelf or the brackets.
It’s essential to ensure that the mantel shelf is level and securely mounted onto the support brackets or corbels. This will provide stability and prevent any potential accidents or damage.
Take a step back and visually inspect the installation, ensuring that the mantel shelf appears straight and aligned with the surrounding area. Make any final adjustments to the positioning if necessary.
Once the mantel shelf is securely mounted, you can move on to the next step of securing it to the wall studs.
Secure the Mantel Shelf to the Wall Studs
Securing the mantel shelf to the wall studs is crucial for added stability and support. Follow these steps to ensure a securely attached mantel shelf:
- Using a stud finder, locate the wall studs near the outer edges of the mantel shelf.
- Mark the exact position of the wall studs on the mantel shelf with a pencil. This will help you align the screws properly.
- Drill pilot holes into the mantel shelf at the marked stud locations. The size of the pilot holes should be slightly smaller than the size of the screws you are using.
- Hold the mantel shelf against the wall, aligning the pilot holes with the marked stud locations.
- Insert screws through the pilot holes and into the wall studs. Make sure to tighten the screws securely, but avoid overtightening, as it could risk damaging the mantel shelf.
- Use a spirit level to ensure that the mantel shelf is still level after securing it to the wall studs. Make any adjustments if necessary.
Securing the mantel shelf to the wall studs provides additional support and stability, especially for heavier items that may be placed on the shelf. This step ensures that the mantel shelf will remain securely attached to the wall over time.
After securing the mantel shelf to the wall studs, give it a gentle tug to test its stability. If it feels solid and does not shift or move, then it is properly secured. If you notice any wobbling or looseness, check the screws and connections to ensure they are tightened properly.
Once you are confident that the mantel shelf is securely attached to both the support brackets or corbels and the wall studs, you can proceed to add the finishing touches and decorate the mantel shelf.
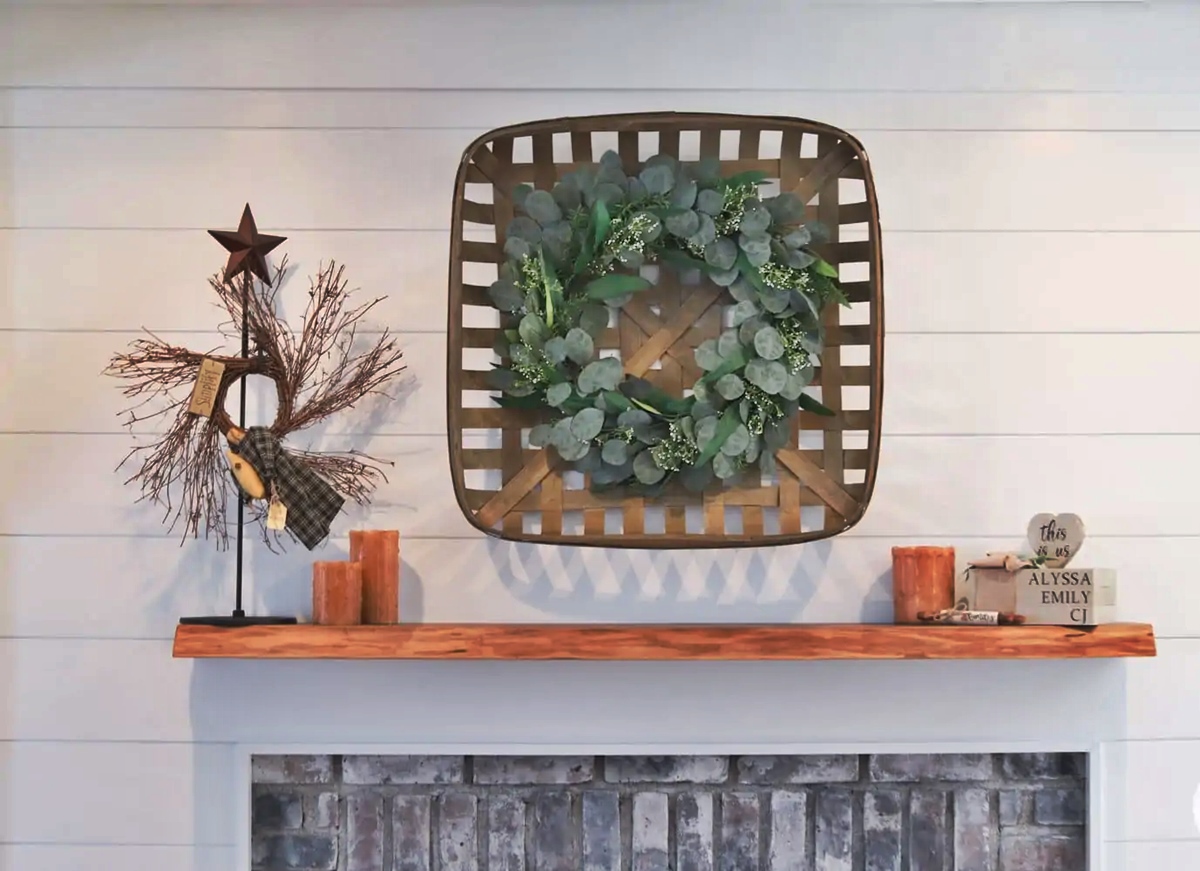
Add Finishing Touches and Decorate the Mantel Shelf
With the mantel shelf securely installed, it’s time to add the finishing touches and decorate it to enhance the overall aesthetic of the room. Here are some ideas to inspire you:
- Start by cleaning the mantel shelf and ensuring it is free from any dust or debris. This will provide a clean and fresh base for your decor.
- Add a focal point, such as a large piece of artwork, a mirror, or a statement decor item, in the center of the mantel. This creates a visually appealing centerpiece.
- Balance the mantel shelf by placing items of varying heights on either side of the focal point. This could include decorative vases, candle holders, or sculptures.
- Add interest and texture by incorporating natural elements such as potted plants, flowers, or branches. These bring life and freshness to the mantel shelf.
- Layer items on the mantel shelf to create depth and visual interest. Mix and match different textures, shapes, and materials to create an eclectic and personalized display.
- Consider adding lighting elements, such as candles or small lamps, to create ambiance and highlight certain decor pieces.
- Include personal touches, such as framed photos, sentimental items, or collectibles, to make the mantel shelf a reflection of your personality and style.
- Regularly update and change the decor on your mantel shelf to keep it fresh and seasonal. This allows you to showcase different items and adapt the mantel to different occasions or holidays.
When decorating your mantel shelf, remember to create balance, avoid clutter, and maintain a cohesive theme or color scheme. Step back and assess the overall composition, making adjustments as needed.
By adding the finishing touches and decorating your mantel shelf, you transform it into a visually pleasing focal point in the room. This space becomes an opportunity to showcase your creativity and style, making it truly unique and inviting.