
Preventing Rug Edges from Curling
Rugs can quickly enhance the aesthetics of any room, but the frustration of dealing with curled edges can dampen the overall experience. Don’t worry, preventing rug edges from curling is easier than you think. By following these simple and effective tips, you can ensure that your rug stays flat and secure.
1. Use Rug Grippers
Rug grippers are adhesive pads that help keep rugs firmly in place on smooth surfaces. These grippers have a sticky side that adheres to the floor and a rough side that grips the back of the rug. Simply attach the grippers beneath the corners and along the edges of your rug to prevent any curling or shifting.
2. Sew a Binding on the Edges
Another effective method to prevent rug edges from curling is by sewing a binding around the sides. A binding not only reinforces the edges but also adds a decorative touch to the rug. You can choose a fabric that matches your décor and sew it neatly along the edges, keeping them flat and secure.
3. Apply Double-Sided Carpet Tape
Double-sided carpet tape is a quick and secure solution for preventing rug edges from curling. Apply the tape along the edges of the rug, removing the protective liner as you go. Press the rug firmly onto the floor, ensuring a strong bond between the tape and the surface. This will effectively keep the edges flat and in place.
4. Use Rug Adhesive
Rug adhesive is a specialized product designed to keep rugs flat and secure on hard surfaces. Apply the adhesive to the back of your rug, focusing on the edges that tend to curl. Smooth out any air bubbles and press the rug firmly onto the floor. The adhesive will create a strong bond, preventing any curling or movement.
5. Weigh Down the Rug Edges
If your rug edges have already started to curl, you can try weighing them down to flatten them out. This can be done by placing heavy objects, like books or furniture, along the curled edges. Leave the weights in place for a few hours or overnight to allow the rug to adjust and flatten back into its original position.
6. Apply Heat to Flatten the Edges
If your rug is made of a material that can withstand heat, such as wool or synthetic fibers, you can try using a hairdryer or a steamer to flatten the curled edges. Gently heat the curled areas while gently stretching and smoothing them with your hands. Be cautious not to overheat the rug, as this could cause damage.
7. Cut and Reshape the Rug
If all else fails, consider cutting and reshaping the rug to eliminate the curling edges. Measure and mark the areas that need to be trimmed to create a straight edge. Use sharp scissors or a utility knife to carefully cut along the marked lines. Remember to take accurate measurements and proceed with caution to avoid damaging the rug.
By implementing these techniques, you can prevent rug edges from curling and enjoy a flat, securely positioned rug that adds beauty and functionality to your space.
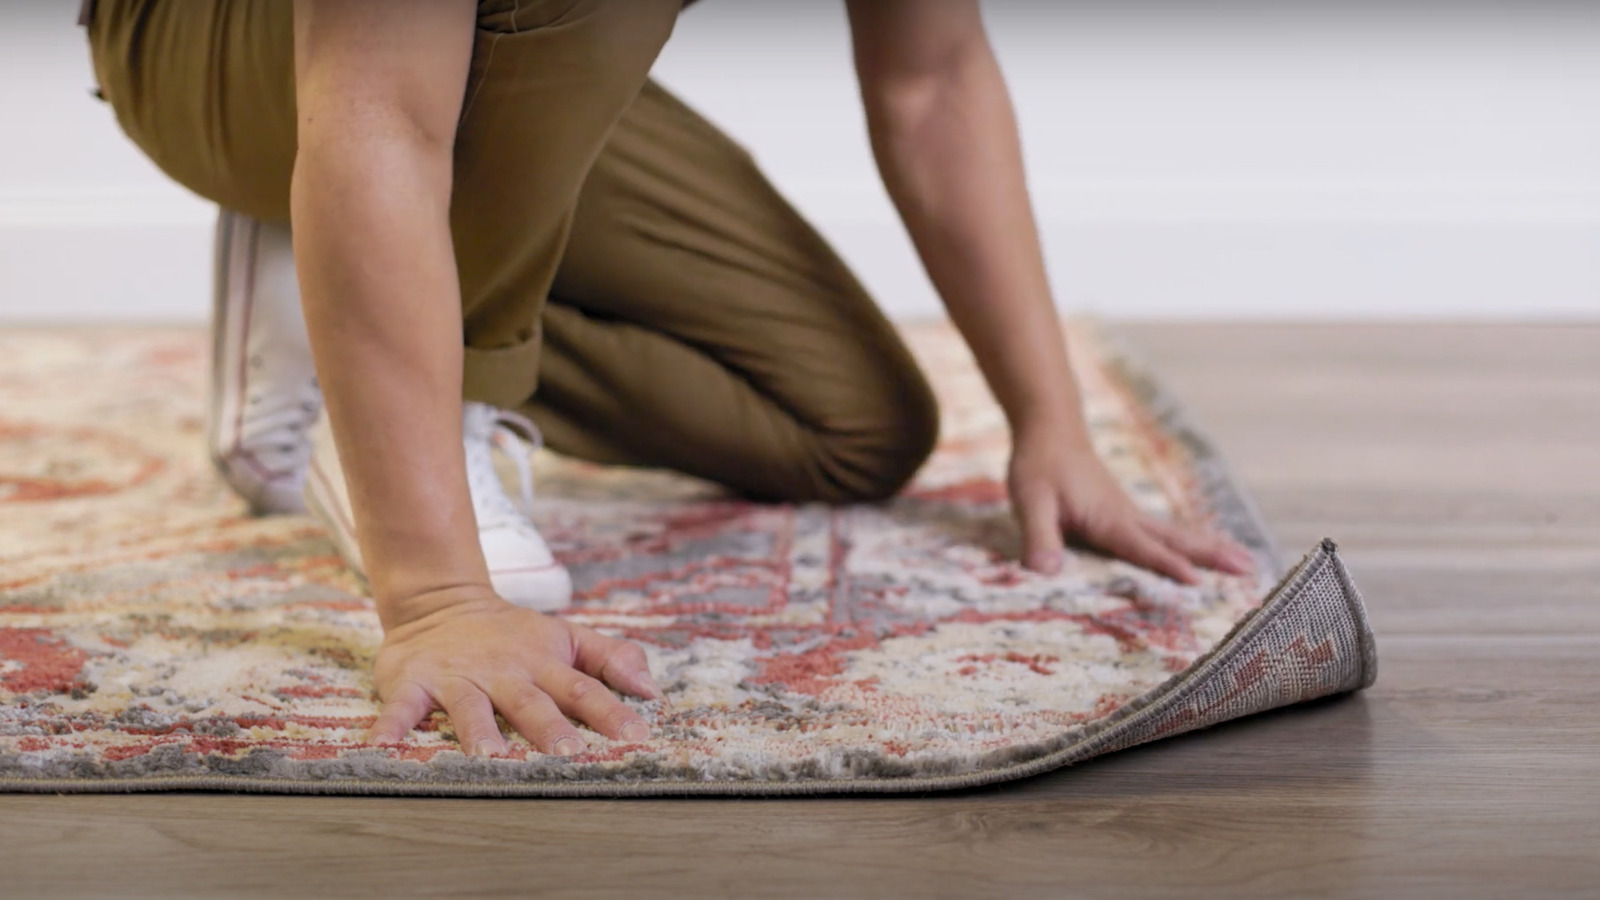
Using Rug Grippers to Secure the Edges
Curled rug edges can be a constant frustration, causing tripping hazards and affecting the overall look of your space. Fortunately, using rug grippers is a simple and efficient solution to keep your rug edges secure and flat. Here’s everything you need to know about using rug grippers to prevent curling:
Rug grippers are adhesive pads that help keep rugs firmly in place on smooth surfaces. They consist of a sticky side that adheres to the floor and a rough side that grips the back of the rug, creating a strong bond that prevents any shifting or curling. Here are some steps to successfully use rug grippers:
1. Clean and Prepare
Start by cleaning the floor surface thoroughly to ensure that there are no dust particles or debris that could hinder the gripper’s adhesive capabilities. Wipe the area clean and make sure it is completely dry before proceeding.
2. Position the Grippers
Place the rug grippers at the corners and along the edges of the rug. Make sure to leave some space between the gripper and the edge of the rug to allow for proper adhesion. Press down firmly to ensure maximum contact with the floor.
3. Attach the Rug
With the grippers in place, carefully lay the rug over them. Align the corners and edges of the rug with the grippers, ensuring a proper fit. Gently press down on the rug, making sure it adheres to the grippers and lies flat on the floor.
4. Test the Grippers
Once the rug is secured, give it a gentle tug to test the hold of the grippers. The rug should not shift or lift from the floor. If you notice any loose areas, readjust the grippers to ensure a strong bond.
5. Regular Maintenance
Keep an eye on the rug grippers to make sure they remain securely in place. Over time, the adhesive might weaken due to wear and tear. If you notice any slippage or lifting, it might be time to replace the grippers.
Rug grippers are an excellent solution for securing rug edges, especially on hard and smooth surfaces like hardwood floors or tiles. They are versatile, easy to use, and can be used with various rug sizes and shapes. Plus, they can easily be removed without leaving any residue or damaging the floor underneath.
By using rug grippers, you can enjoy the benefits of a flat and secure rug, free from the annoyance of curling edges. It provides a safe and comfortable environment while maintaining the aesthetics of your space. So, give rug grippers a try and say goodbye to curled rug edges.
Sewing a Binding on the Edges
If you have a rug with curling edges, sewing a binding can be an effective solution to keep them flat and secure. Not only does this method prevent the edges from curling, but it also adds a decorative touch to your rug. Here’s a step-by-step guide on how to sew a binding on the edges of your rug:
1. Choose the Right Binding
Start by selecting a binding that complements the style and color of your rug. You can choose from various options like fabric binding, twill tape, or even bias tape. Ensure that the binding is sturdy and wide enough to cover the rug’s edges adequately.
2. Prepare the Rug
Clean the rug thoroughly to remove any dirt or debris. Lay it flat on a clean surface and gently smooth out any wrinkles or bumps. If necessary, trim the edges of the rug to create an even and straight surface for attaching the binding.
3. Measure and Cut the Binding
Measure the length of each side of the rug and add a few extra inches to allow for corners and overlaps. Cut the binding accordingly for each side of the rug. If your rug has rounded corners, cut the binding diagonally at each corner to create a smooth transition.
4. Attach the Binding
Starting at one corner of the rug, fold and align the binding over the edge. If using fabric binding, fold the raw edges inward to create a clean and finished look. Pin the binding in place, ensuring it covers the rug’s edge completely.
5. Sew the Binding
Using a sewing machine or hand stitching, sew along the folded edge of the binding to attach it securely to the rug. Use a matching thread color to create a seamless finish. Take your time and sew slowly to ensure neat and even stitches.
6. Corners and Overlaps
When you reach a corner, fold the binding to create a mitered or rounded corner, depending on your preference. Secure the folded corner with pins and sew it in place. For overlapping ends, fold one end of the binding inside the other and sew them together to create a seamless joint.
7. Finishing Touches
After sewing the binding along all the edges of the rug, trim any excess binding if needed. Give the rug a final check to ensure the binding is secure and the edges are flat. If necessary, press the binding with a warm iron to help it lay flat.
Sewing a binding on the edges of your rug not only prevents curling but also adds a touch of craftsmanship and personalization. It enhances the durability of the rug while transforming it into a beautiful focal point for your space. So, grab your sewing supplies and give your rug the perfect finishing touch with a stunning binding!
Applying Double-Sided Carpet Tape
Curling rug edges can be a hassle to deal with, but one effective solution is to use double-sided carpet tape. This handy adhesive product provides a strong and secure hold, keeping your rug edges flat and in place. Here’s a step-by-step guide on how to apply double-sided carpet tape:
1. Prepare the Rug and Floor
Before applying the tape, ensure that both the rug and the floor surface are clean and free from dust or debris. Use a vacuum or broom to remove any loose dirt or particles. Wipe the floor and rug with a damp cloth if needed, allowing them to dry completely.
2. Measure and Cut the Tape
Measure the length of the rug edges that need to be secured. Using a sharp pair of scissors or a utility knife, cut the double-sided carpet tape into strips or pieces that match the measured lengths. It’s better to have slightly longer pieces to ensure a strong hold.
3. Apply the Tape
Start by peeling off the protective liner from one side of the double-sided carpet tape. Carefully place the exposed adhesive side of the tape along the edge of the rug, ensuring it lies flat and aligns with the edge. Press it firmly onto the rug, smoothing out any wrinkles or air bubbles as you go.
4. Secure the Rug
Once the tape is in place, peel off the protective liner from the other side to expose the second adhesive surface. Gently press the rug down onto the floor, aligning the edge with the tape. Apply firm and even pressure along the entire length of the taped edge to ensure a strong bond.
5. Repeat the Process
Continue applying the double-sided carpet tape along all the edges of the rug, repeating the steps above for each side. Ensure that the tape is evenly spaced and adequately secured to keep the rug in place.
6. Test the Hold
Give the rug a gentle tug to test the hold of the double-sided carpet tape. It should resist lifting or shifting, indicating a strong adherence. If you notice any areas that are not securely held, reapply the tape or use additional pieces to reinforce those sections.
Double-sided carpet tape is a versatile and convenient solution to prevent curling rug edges. It works well on various floor surfaces, including hardwood, tile, and laminate. Additionally, it can be easily removed without leaving any residue behind, making it a temporary yet effective fix for your rug.
By following these steps and properly applying double-sided carpet tape, you can enjoy the benefits of a rug with smooth and flat edges, eliminating the frustration of tripping hazards and rug movement. So, grab a roll of double-sided carpet tape and give your rug the stability and security it deserves!
Using Rug Adhesive to Keep the Edges Down
Rug adhesive is a fantastic solution for keeping rug edges from curling and ensuring they stay flat and secure. This specially formulated adhesive creates a strong bond between the rug and the floor, providing long-lasting stability. Here’s a step-by-step guide on how to use rug adhesive:
1. Clean the Rug and Floor
Begin by thoroughly cleaning both the rug and the floor surface. Remove any debris or dirt from the rug by vacuuming or shaking it outside. For the floor, sweep or mop to ensure that it is free of dust, ensuring a proper bond between the adhesive and the surface.
2. Apply the Adhesive
Using a brush or roller, apply a thin and even layer of rug adhesive to the back of the rug along the edges that tend to curl. Pay extra attention to these areas to create a secure bond. Avoid applying excessive amounts of adhesive, as it could soak through the rug and stain the front.
3. Smooth out the Rug
After applying the adhesive, carefully smooth out the rug, ensuring it lies flat on the floor. Gently press down on the areas that were treated with adhesive to encourage a strong bond. Smooth out any air bubbles or wrinkles, ensuring the rug is flat and evenly adhered.
4. Allow the Adhesive to Dry
Depending on the type of adhesive used, allow the adhesive to dry completely. Follow the manufacturer’s instructions for the recommended drying time. This step is crucial for ensuring a proper bond between the rug and the floor.
5. Test the Edges
Once the adhesive has dried, test the edges of the rug to ensure they are securely held in place. Give the edges a gentle tug to check for any movement. If the edges remain flat and stable, you have successfully utilized the rug adhesive to prevent curling.
6. Reapply if Needed
If you notice any areas where the edges are still curling or not holding properly, reapply the rug adhesive and repeat the process. It’s essential to achieve a strong bond along all the edges to ensure the desired result.
Rug adhesive is a versatile solution that can be used on various floor surfaces, including hardwood, tile, and even carpet. It provides a reliable and long-lasting hold, preventing the rug edges from curling and minimizing the risk of tripping hazards.
Remember to always follow the instructions provided with the rug adhesive, as different products may have specific recommendations or precautions. By using rug adhesive correctly, you can enjoy a rug with perfectly flat edges that enhance the overall look and safety of your space.
Weighing Down the Rug Edges with Heavy Objects
If you have rug edges that are curling up and causing tripping hazards, one simple and effective solution is to weigh them down with heavy objects. This method helps flatten the edges and ensures they stay in place. Here’s how you can use this technique:
1. Identify the Curling Edges
Take a close look at your rug and identify the edges that are curling up. These are the areas that require attention. Whether it’s one corner or multiple sides, focus on those specific areas.
2. Select Suitable Heavy Objects
Choose heavy objects that are suitable for the size and shape of your rug. Books, dumbbells, or even furniture can be used as weights. Make sure the objects are flat and stable to provide a consistent weight distribution.
3. Position the Heavy Objects
Place the heavy objects along the curling edges of the rug. Start with the corners and then position additional weights along the sides as needed. Ensure that the objects are placed directly on the edges to exert downward pressure.
4. Leave the Weights in Place
Allow the weights to sit on the rug edges for an extended period, such as several hours or overnight. This time allows the rug fibers to adjust and flatten out. The longer you can leave the weights in place, the better the results.
5. Check for Improvement
After the designated time, carefully remove the weights and inspect the rug edges. You should notice a significant improvement with the edges now lying flat. If there are still areas that seem to curl, you can repeat the process or reposition the weights to apply more pressure.
6. Consider Alternative Weighing Options
If using heavy objects is not practical for your situation, you can also explore alternative weighing down options. For example, you can place adhesive Velcro strips along the curled edges and attach matching Velcro patches on the floor to secure the edges in place.
Weighing down rug edges with heavy objects is a simple and effective way to flatten and secure them. It’s a cost-efficient method that doesn’t require any special tools or adhesives. By applying consistent pressure, you can prevent tripping hazards and enjoy a rug that looks tidy and well-maintained.
Applying Heat to Flatten the Rug Edges
If you’re dealing with rug edges that are curling up, applying heat can be a helpful technique to flatten them out. By using heat, you can soften the fibers and reshape the edges, allowing them to lie flat and secure. Here’s how you can apply heat to flatten the rug edges:
1. Verify Suitability
Before applying heat, make sure your rug material can withstand it. Check the manufacturer’s instructions or conduct a small test on an inconspicuous area to ensure the rug won’t be damaged by the heat. Materials like wool, synthetic fibers, or some flatweave rugs are usually safe to apply heat.
2. Gather Necessary Tools
You’ll need a hairdryer or a steam iron to apply heat to the rug edges. Ensure the hairdryer is on the highest heat setting, and the steam iron is set to the lowest steam setting or the no-steam option. Additionally, prepare a clean cloth or a towel to protect the rug during the process.
3. Prepare the Rug
Lay the rug flat on a clean and stable surface. Smooth out any wrinkles or bumps, ensuring the edges are easily accessible and separate from the rest of the rug. If needed, you can use some weights or tape to hold the rug corners down temporarily.
4. Apply Heat Gradually
Start by directing the heat from the hairdryer or steam iron towards the curled edges of the rug. Keep the heat source moving in a back-and-forth motion, a few inches away from the rug surface. Avoid focusing the heat on one spot for too long, as it may cause damage.
5. Stretch and Smooth the Edges
While applying heat, use your hands or a flat object, such as a ruler or a book, to gently stretch and smooth out the curled edges. Apply light pressure to help reshape the rug and encourage the fibers to lie flat. Continue this process until the edges start to relax and flatten.
6. Protect the Rug
During the heat application, place a clean cloth or towel between the heat source and the rug to protect it from direct contact. This layer acts as a barrier, preventing any potential damage to the rug’s fibers. Regularly check the cloth for any signs of discoloration or damage.
7. Allow the Rug to Cool
Once the edges have been flattened, allow the rug to cool down naturally. This cooling process helps the fibers retain their new shape. Avoid placing any objects or walking on the rug until it has completely cooled and the edges have set.
Applying heat to flatten rug edges is a technique that helps reshape the fibers and promote a flat surface. It is essential to be cautious and follow the manufacturer’s guidelines or consult a professional if you have concerns about your specific rug material.
By using heat responsibly and gently manipulating the rug edges, you can achieve a smooth and secure result, eliminating the annoyance of curling edges and enhancing the overall appearance of your rug.
Cutting and Reshaping the Rug to Eliminate Curling Edges
If you’ve tried other methods to fix curling rug edges with no success, you may need to consider cutting and reshaping the rug. This technique allows you to eliminate the curled areas and create a straight edge, ensuring a flat and secure rug. Here’s how you can cut and reshape your rug:
1. Assess the Rug
Examine the rug and identify the areas where the edges are consistently curling. Take note of the extent of the curling and determine how much needs to be trimmed to create a straight edge. Carefully consider the impact of cutting on the overall design and size of the rug.
2. Measure and Mark
Using a measuring tape or ruler, mark the desired new edge line on the rug. Ensure that the line is straight and follows the natural pattern of the rug. Double-check the measurements to avoid any mistakes that could further damage the rug.
3. Cut Carefully
Using sharp scissors or a utility knife, carefully cut along the marked line. Take your time to ensure precision and maintain a straight edge. Make small, controlled cuts, following the markings. If your rug is thick or has multiple layers, you may need to repeat the cutting process to reach the desired thickness.
4. Reshape the Rug
Once the cut has been made, gently reshape the rug by pulling and stretching it along the newly cut edge. This process helps the rug settle into its new shape and promotes a flattened appearance. Be mindful not to pull too forcefully, as it could distort or damage the rug’s fibers.
5. Secure the New Edge
Depending on the rug material and thickness, you may need to secure the new edge to prevent it from fraying. You can use a binding tape or fabric glue to reinforce the cut edge and ensure it remains intact. Follow the instructions provided with the chosen method to properly secure the new edge.
6. Trim Excess Fibers
After reshaping and securing the new edge, use scissors to carefully trim any excess fibers that may be protruding. This step helps give the rug a neater and more polished appearance along the newly cut edge.
It’s important to note that cutting and reshaping a rug requires careful consideration and precision. If you are unsure about performing this task yourself, it’s best to seek guidance from a professional or explore the option of having the rug professionally tailored.
By cutting and reshaping the rug, you have the opportunity to eliminate curling edges entirely, resulting in a rug that lies flat and securely complements your space. Just remember to plan carefully, measure accurately, and execute the cutting process with patience and caution.