
Choosing the Right T-Shirts
When making a rug out of t-shirts, it is crucial to select the right materials to ensure the durability and aesthetic appeal of the final product. Here are some key considerations when choosing t-shirts for rug making:
1. Condition: Choose t-shirts that are in good condition, without significant stains, holes, or excessive fading. This will ensure that your rug will not only look visually appealing but also withstand regular use.
2. Fabric: Opt for t-shirts made of sturdy materials such as cotton or cotton-blend fabrics. These materials are durable and easy to work with when cutting and weaving.
3. Size: Select t-shirts that are in a similar size range. This will make it easier to cut uniform strips and maintain consistency in the rug’s overall appearance.
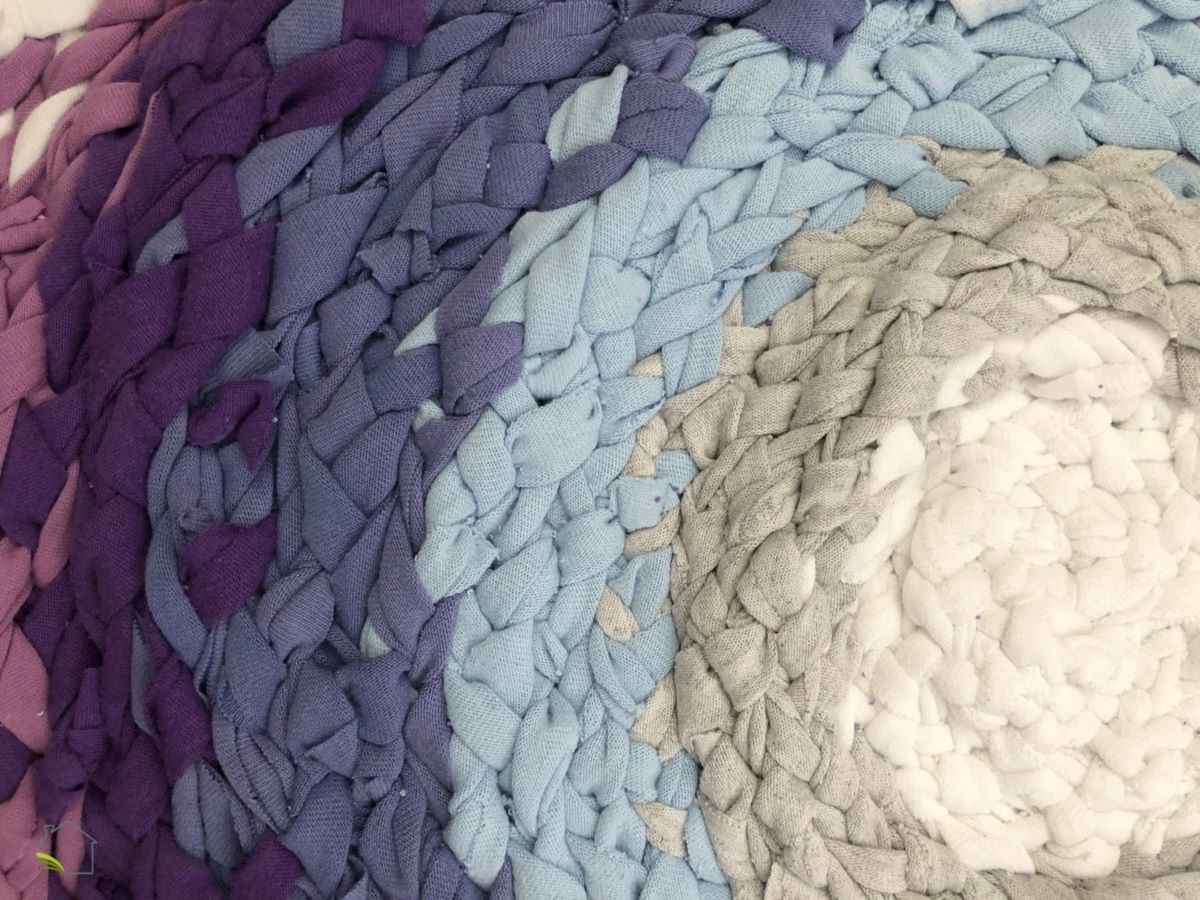
4. Color and Pattern: Consider the color scheme and pattern of the t-shirts. You can either choose t-shirts in a specific color family for a cohesive look or mix and match different colors for a vibrant and eclectic rug.
5. Sentimental Value: If you have old t-shirts with sentimental value, such as concert shirts or ones from memorable events, consider incorporating them into your rug. This will not only add a personal touch but also help repurpose cherished items.
By carefully selecting the t-shirts for your rug-making project, you can ensure that the end result is not only visually appealing but also holds sentiment or meaning. Keep in mind that the number of t-shirts you need will depend on the desired size of your rug. So, take the time to gather the right t-shirts and get ready to transform them into a beautiful and unique rug!
Preparing the T-Shirts for Rug Making
Before you can start turning your t-shirts into a rug, it’s important to prepare them properly to ensure they can be easily cut and woven. Follow these steps to prepare your t-shirts for rug making:
1. Clean the T-Shirts: Give your t-shirts a thorough cleaning to remove any dirt, stains, or odors. Machine wash them using a gentle cycle with mild detergent. Avoid using any fabric softeners or bleach as they can affect the fabric’s texture and color.
2. Iron the T-Shirts: Once your t-shirts are clean and dry, iron them to remove any wrinkles. This will help ensure that the fabric lies flat when you cut it into strips, making the weaving process much easier.
3. Remove Sleeves and Hems: If your t-shirts have sleeves or hems, you’ll want to remove them before cutting the fabric into strips. Use a sharp pair of scissors to carefully cut along the seam lines, removing the unwanted sections. This step will make it easier to cut uniform strips from the t-shirt fabric.
4. Determine Strip Width: Decide on the desired width of your fabric strips. The width can vary depending on your preference and the thickness you want for your rug. Common widths are around one to two inches. Use a ruler or a cutting mat with measurements to help you achieve consistent strip widths.
5. Mark and Cut Strips: Lay the t-shirt flat on a cutting surface and measure and mark the width of the strips you want to cut. Use a ruler or masking tape to make straight and even guidelines. Carefully cut along the marked lines, creating continuous strips that run horizontally across the t-shirt.
6. Roll or Fold the Strips: Once the t-shirt is cut into strips, you can either roll them up or fold them neatly. Rolling the strips can keep them organized and prevent tangling, while folding them can save space and make it easier to access each strip when you start weaving.
By following these steps, you’ll ensure that your t-shirts are clean, wrinkle-free, and properly prepared for the rug-making process. Taking the extra time to prepare your t-shirts will make the cutting and weaving stages more efficient and enjoyable, resulting in a beautifully crafted t-shirt rug.
Cutting the T-Shirts into Strips
Once your t-shirts are prepared, the next step in making a t-shirt rug is to cut them into strips. This process requires careful cutting to ensure uniformity and ease of weaving. Follow these steps to cut your t-shirts into strips:
1. Lay the T-Shirt Flat: Place the t-shirt on a clean, flat surface. Smooth out any wrinkles or folds to ensure an even cut.
2. Start from the Bottom: Begin cutting from the bottom hem of the t-shirt. This is where you’ll get the longest continuous strip. If there are side seams, avoid cutting through them as it may result in shorter strips.
3. Choose Strip Width: Decide on the width of your strips. A width of around one to two inches works well for most t-shirt rugs, but you can adjust it based on your preference. Use a ruler or measuring tape to guide your cuts and ensure consistent strip widths.
4. Make the First Cut: Starting from the bottom hem, make a horizontal cut across the t-shirt, following your chosen strip width. Continue cutting until you reach the other side of the fabric. You’ll be left with a long, continuous strip.
5. Create Additional Strips: Move up the t-shirt, parallel to the first cut, and make another horizontal cut, following the same strip width. Repeat this process until you have cut the entire t-shirt into strips.
6. Repeat with Other T-Shirts: If you are using multiple t-shirts for your rug, repeat the cutting process with each one. Ensure that the strip widths are consistent across all the t-shirts to maintain an even look when weaving.
7. Remove Irregularities: If you encounter areas with seams, buttons, or other irregularities in the fabric, carefully navigate around them to maintain the continuous strip. Alternatively, you can choose to cut these irregular sections into separate smaller strips if desired.
By carefully cutting your t-shirts into strips, you ensure that they are ready for the next stage of the rug-making process. Paying attention to strip width and maintaining a continuous strip from each t-shirt will help create a seamless weaving experience and result in a beautifully woven t-shirt rug.
Creating the Base for the Rug
Once you have your t-shirt strips ready, the next step in making a t-shirt rug is to create the base or foundation for the rug. The base provides stability and structure for the weaving process. Follow these steps to create the base for your t-shirt rug:
1. Choose a Base Material: Decide on the material you’ll use as the base for your rug. You have a few options, including a non-slip rug pad, a piece of canvas fabric, or a sturdy base such as jute or burlap. Consider the size and desired thickness of your rug when choosing the base material.
2. Cut the Base Material: Measure and cut the base material to the desired size for your rug. It should be slightly larger than the finished size of your rug to allow for weaving and trimming.
3. Secure the Base Material: If you’re using a non-slip rug pad or a piece of canvas, simply lay it flat on your work surface. If you’re using jute or burlap, you may need to secure it to a frame or stretcher bars to keep it taut during the weaving process.
4. Mark the Weaving Area: Use a ruler or masking tape to mark the area where you’ll be weaving the t-shirt strips. This will help you maintain a consistent size and shape for your rug.
5. Prepare the T-Shirt Strips: Take your prepared t-shirt strips and organize them by color or pattern if desired. Having them organized and within reach will make the weaving process smoother.
6. Anchor the First Strip: Start weaving by anchoring the first t-shirt strip to the base material. You can use a small knot or a fabric glue to secure it in place. This strip will act as the starting point for weaving the rest of the t-shirt strips.
7. Weave the T-Shirt Strips: Take the next t-shirt strip and weave it over and under the first strip, following the marked weaving area. Continue this weaving pattern, alternating over and under, until you reach the end of the row.
8. Secure the Ends: When you reach the end of a strip, secure it to the base material using a knot, a small stitch, or fabric glue. This will prevent the strips from unraveling or coming undone.
By creating a strong and stable base for your t-shirt rug, you set the foundation for a successful weaving process. Taking the time to choose the right base material and securing the t-shirt strips properly will ensure that your rug turns out both visually appealing and durable.
Starting the Rug Weaving Process
With the base prepared, it’s time to begin the exciting process of weaving your t-shirt rug. Weaving the t-shirt strips together will create a beautiful and unique texture for your rug. Follow these steps to start the rug weaving process:
1. Identify the Starting Point: Determine where you’d like to begin weaving on your base material. This can be any corner or edge of the rug, depending on your preference.
2. Anchor the First Row: Take a t-shirt strip and secure it to the base material at the starting point. You can use a knot, a small stitch, or fabric glue to keep it in place.
3. Weave Over and Under: Take the next t-shirt strip and weave it over the strip lying on the base material, then bring it under the next strip. Repeat this process, alternating over and under, until you reach the end of the row.
4. Push Strips Close Together: After each strip is woven, gently push it close to the previous strip to ensure there are no gaps or loose sections in your rug. This will create a tight and cohesive weave.
5. Continue Weaving: Repeat the process of weaving the t-shirt strips row by row, always working from one side to another, until you reach the desired size of your rug. Take your time to ensure each strip is securely woven to maintain the rug’s stability.
6. Align the Rows: As you weave, check that each row is aligned properly, without any significant gaps or uneven sections. Adjust the strips as necessary to maintain an even and consistent pattern.
7. Weave and Trim the Last Row: When you reach the desired size of your rug, weave the last row and secure the final strip in place. Trim any excess fabric from the last strip to ensure a neat and finished edge.
Starting the rug weaving process is both exciting and fulfilling. As you continue weaving, you’ll begin to see your t-shirt rug take shape and reflect your creative vision. Remember to weave each strip tightly and push them together to create a rug that is sturdy and visually appealing.
Adding New T-Shirt Strips
As you weave your t-shirt rug, you will eventually run out of t-shirt strips from the initial set. Don’t worry! Adding new t-shirt strips is a simple process that allows you to continue weaving and expanding your rug. Here’s how to add new t-shirt strips:
1. Prepare the New T-Shirt Strip: Take a new t-shirt and prepare it by cleaning, ironing, and cutting it into the desired width of strips, following the same process as before.
2. Attach the New Strip to the End: Lay the end of the new strip on top of the last woven strip. Make sure the ends align evenly.
3. Secure the New Strip: Secure the new strip to the last woven strip using a knot, a small stitch, or fabric glue. This will ensure that the new strip stays in place and becomes an integrated part of the rug.
4. Continue Weaving: After securing the new strip, continue weaving over and under as you were doing before. The new strip will seamlessly blend with the rest of the rug.
5. Trim Excess Fabric: Once the new strip is woven in, trim any excess fabric from the end of the strip to maintain a neat and uniform appearance.
6. Repeat the Process: Whenever you run out of t-shirt strips, repeat this process to add new strips and extend the length or width of your rug.
Adding new t-shirt strips allows you to continue the weaving process without interruption. It ensures a seamless transition from one set of strips to the next, creating a cohesive and visually appealing rug. Keep adding new t-shirt strips as necessary until you achieve the desired size and design of your t-shirt rug.
Creating Patterns and Designs
One of the most exciting aspects of making a t-shirt rug is the opportunity to unleash your creativity by experimenting with different patterns and designs. Adding visual interest to your rug can transform it into a unique and personalized piece. Here are some ideas for creating patterns and designs in your t-shirt rug:
1. Color Blocking: Arrange your t-shirt strips in blocks of colors to create a bold and modern look. You can alternate between different colors or group similar colors together for a cohesive design.
2. Ombre Effect: Gradually transition between shades of a single color by using t-shirt strips in varying intensities. This technique adds depth and dimension to your rug.
3. Striped Patterns: Alternate different colors or patterns in horizontal or vertical stripes. This classic design is versatile and can add a visually pleasing element to your rug.
4. Chevron or Zigzag Patterns: Create a chevron or zigzag pattern by weaving the t-shirt strips in a diagonal or zigzag shape. This adds a dynamic and eye-catching design element to your rug.
5. Geometric Patterns: Incorporate geometric shapes such as squares, triangles, or diamonds into your t-shirt rug design. Experiment with different arrangements and sizes to achieve the desired visual impact.
6. Textured Elements: Introduce texture to your rug by using t-shirt strips of varying thickness or by incorporating other materials like yarn or fabric scraps into the weaving process. This adds depth and tactile interest to your rug.
7. Personalized Designs: Customize your t-shirt rug by incorporating initials, symbols, or meaningful motifs using different colored t-shirt strips. This personal touch makes your rug truly one-of-a-kind.
Let your imagination soar and experiment with different patterns, colors, and designs to create a t-shirt rug that reflects your unique style and personality. Remember, there are no limits to the creativity you can bring to your rug-making process!
Securing the T-Shirt Strips
Securing the t-shirt strips in your rug is a crucial step to ensure that they remain in place and maintain the integrity of the weave. By properly securing the strips, you can create a sturdy and long-lasting t-shirt rug. Here are some methods to secure the t-shirt strips:
1. Knots: One of the simplest ways to secure the t-shirt strips is by tying knots. After weaving a strip, leave a small tail and tie a knot close to the base material. This will prevent the strip from unraveling or coming undone during use.
2. Stitches: For added security, you can use a needle and thread to stitch the t-shirt strips together at strategic points. Use small, discreet stitches to connect adjacent strips, ensuring that they are tightly secured.
3. Fabric Glue: Another option is to use fabric glue to adhere the t-shirt strips to the base material. Apply a small amount of fabric glue to the end of each strip before weaving to keep it in place. Be sure to use a fabric glue that is appropriate for the type of fabric you are working with.
4. Weaving Over Previous Strips: As you continue weaving, make sure to weave new strips over the previous strips, trapping them in place. This interlocking technique helps hold the rug together and prevents individual strips from shifting or loosening.
5. Regular Adjustments: Throughout the weaving process, periodically check the tightness of the weave and make any necessary adjustments. This will ensure that the rug remains tightly woven and secure.
By applying these methods, you can successfully secure the t-shirt strips in your rug and create a structure that will withstand regular use. Remember to use the method that works best for you and the type of rug you are creating. Taking the time to secure the t-shirt strips properly will result in a well-crafted and durable t-shirt rug.
Finishing and Cleaning the Rug
Once you have completed the weaving process of your t-shirt rug, it’s important to properly finish and clean it to ensure its longevity and maintain its appearance. Here are the essential steps to finish and clean your t-shirt rug:
1. Trim Excess Fabric: After the final t-shirt strip is woven, take the time to trim any excess fabric from the edges of the rug. This will create a clean and even edge, giving your rug a polished look.
2. Secure Loose Ends: Check the rug for any loose ends or stray threads. Secure them by either stitching them into the base or using a small amount of fabric glue to prevent them from unraveling.
3. Consider Adding a Border: If desired, you can enhance the look of your t-shirt rug by adding a border. This can be done by weaving a strip or multiple strips around the edges, creating a neat boundary for the rug.
4. Clean the Rug: Over time, your t-shirt rug may accumulate dust, dirt, or spills. To clean it, gently vacuum the rug using a handheld attachment or brush. If there are specific stains, spot clean them using a mild detergent and water. Allow the rug to dry completely before using or storing it.
5. Handling and Storage: When moving or storing your t-shirt rug, be mindful of how it is handled to avoid stretching or damaging the weave. Roll the rug rather than folding it to minimize creases and maintain its shape.
6. Periodic Maintenance: To keep your t-shirt rug looking fresh and clean, periodically vacuum it to remove any surface debris. Additionally, avoid placing heavy furniture directly on the rug to prevent unnecessary wear and tear.
7. Spot Treating: If you notice any specific stains or spills on your rug, be prompt in spot treating them. Blot the stain gently with a clean cloth or sponge using a mixture of mild detergent and water. Then allow the spot to air dry completely.
By following these finishing and cleaning steps, you can ensure that your t-shirt rug remains in excellent condition for years to come. Regular maintenance and proper care will help preserve the beauty and functionality of your homemade t-shirt rug.