
Materials Needed
To create your own crocheted rag rug, you’ll need a few essential materials. Here’s a list of what you’ll need to get started:
- Fabric: Choose a variety of fabrics to create a unique and colorful rug. Old t-shirts, bed sheets, or denim are perfect choices. Aim for about 4-6 yards of fabric.
- Scissors: Make sure you have a sharp pair of fabric scissors to cut the fabric into strips.
- Crochet Hook: Select a crochet hook in a size that works well with your chosen fabric. A hook with a size of H/8 or I/9 is commonly used.
- Measuring Tape: This will help you measure the size of your rug as you go along.
- Optional: Non-slip Rug Pad: If you want to ensure your rug stays in place on the floor, consider adding a non-slip rug pad underneath.
These materials can easily be found at your local craft store or online. It’s important to choose fabrics that can withstand the wear and tear of daily use, and select a crochet hook that is comfortable for you to work with.
Once you’ve gathered all the necessary materials, you’re ready to get started on creating your very own crocheted rag rug. Let’s move on to the next step: choosing the right fabric.
Choosing the Right Fabric
When it comes to creating a crocheted rag rug, the fabric you choose is crucial. It not only determines the durability and longevity of your rug but also adds personality and style. Here are a few factors to consider when selecting the fabric for your project:
- Material: Opt for fabrics that are sturdy and can withstand frequent use. Cotton, denim, and polyester blends are popular choices. Avoid delicate or stretchy fabrics that may unravel easily.
- Quantity: Estimate the amount of fabric you’ll need based on the desired size of your rug. Keep in mind that thicker fabrics will require more material compared to thinner ones.
- Color and Pattern: Decide on a color scheme or theme for your rag rug. You can choose a solid color for a classic look or mix and match different patterns for a more eclectic vibe. Remember to consider the overall aesthetic of the room where the rug will be placed.
- Texture: Consider the texture of the fabric strips as it will affect the look and feel of your rug. Experiment with different textures, such as smooth or ribbed, to add dimension to your design.
Keep in mind that the fabric strips for your rug should be approximately one to two inches wide. You can achieve this by cutting the fabric into long strips and then trimming them to the desired width. It’s always a good idea to test a small piece of fabric before committing to a large quantity.
Whether you choose bold and vibrant colors or a more subdued palette, selecting the right fabric for your crocheted rag rug will ensure a beautiful end result. Now that you’ve chosen your fabric, let’s move on to preparing the fabric strips.
Preparing the Fabric Strips
Before you can start crocheting your rag rug, it’s important to prepare the fabric strips. Here’s a step-by-step guide to help you get started:
- Wash and Dry the Fabric: If you’re using old clothes or bed sheets, it’s a good idea to wash them first. This will remove any dirt or residues and ensure that the fabric strips are clean and ready to use.
- Cut the Fabric into Strips: Using a sharp pair of fabric scissors, cut the fabric into long strips, approximately one to two inches wide. The length of the strips can vary depending on your preference and the desired size of your rug.
- Trim the Strips: Once you’ve cut the fabric into strips, give them a neat trim to ensure they are all the same width. This will make the crocheting process easier and result in a more uniform rug.
- Joining Strips: To create longer fabric strips, you can join shorter strips by sewing or knotting them together. This is especially useful when you run out of a particular fabric or want to incorporate different colors into your rug.
- Roll or Fold the Strips: To keep the fabric strips organized and tangle-free, you can either roll them into neat balls or fold them into manageable bundles. This will make it easier to grab the strips as you crochet.
Take your time to prepare the fabric strips properly before you start crocheting. This will ensure that the rug-making process goes smoothly and that your finished rug looks polished and professional. Now that you’ve prepared the fabric strips, it’s time to move on to the next step: starting the rug.
Starting the Rug
Now that you have your prepared fabric strips, it’s time to start crocheting your rag rug. Here’s a step-by-step guide to help you begin:
- Create a Slipknot: Start by making a slipknot with your crochet hook. This will serve as the foundation of your rug.
- Chain Stitch: Next, make a chain stitch by wrapping the fabric strip around the hook and pulling it through the slipknot loop. Continue making chain stitches until you reach the desired width for the center of your rug.
- Forming the Base: To form the base of the rug, single crochet into the second chain from the hook. Continue single crocheting in each chain stitch across the row, adding more fabric strips as needed.
- Turning the Work: Once you reach the end of the row, turn your work, and chain one. This will serve as the turning chain for the next row.
- Continuing the Pattern: Repeat the single crochet stitch across the row, making sure to insert the hook under both loops of each stitch from the previous row. This will create a dense and sturdy fabric for your rug.
- Building the Rows: Continue crocheting rows in the same pattern until your rug reaches the desired length. Remember to add new fabric strips as necessary, joining them securely to the existing ones.
As you progress, you will notice the rug taking shape and growing in size. It’s important to maintain an even tension in your stitches to achieve a uniform appearance. Take breaks as needed and enjoy the process of creating your one-of-a-kind rag rug.
With the first few rows complete, you’re well on your way to crafting a beautiful crocheted rug. Next, we’ll explore how to crochet the center of the rug for added depth and texture.
Crocheting the Center
Now that you’ve started your rag rug, it’s time to add some depth and texture by crocheting the center. This step will give your rug a unique and eye-catching design. Follow these steps to crochet the center of your rag rug:
- Choose a Stitch Pattern: There are various stitch patterns you can use to create the center of your rug. One popular option is the double crochet stitch, which adds height and creates a looser fabric. Alternatively, you can experiment with other stitches like the half double crochet or the treble crochet.
- Create Additional Rows: Start by chaining the appropriate number of stitches for your chosen stitch pattern. Then, work across the row, following the stitch instructions and using the fabric strips. Continue adding new rows until you achieve your desired center size.
- Consider Color Changes: If you want to incorporate different colors into the center of your rug, now is the perfect time to do so. Simply join a new fabric strip of a different color at the end of a row. Weave in any loose ends to keep the rug neat and secure.
- Adjust Tension: As you work on the center section of your rug, keep an eye on your tension. Make sure your stitches aren’t too tight or too loose, as this can affect the overall look and durability of the rug. Practice will help you find the right balance.
- Continue with Base Rows: Once you have completed the desired number of rows for the center, you can go back to crocheting base rows using the same stitch pattern you used in the previous steps. This will seamlessly blend the center with the rest of the rug.
Remember to be patient and enjoy the process of crocheting the center. It’s where your creativity can truly shine and add a personal touch to your rag rug. As you progress, step back and admire the unique design that’s taking shape.
With the center of your rug completed, you’re ready to move on to adding in new fabric strips to continue building your rug. We’ll explore this step in the next section.
Adding in New Fabric Strips
As you crochet your rag rug, you’ll eventually run out of fabric on your current strip. Adding in new fabric strips is a simple process that allows you to seamlessly continue your project. Follow these steps to add new fabric strips to your rug:
- Prepare the New Strip: Cut your next fabric strip, making sure it is approximately the same width as your previous strip. You can use the same fabric or introduce a new color for added variety.
- Overlap the Ends: Take the end of your new strip and overlap it with the end of the previous strip by about an inch. This overlapping will help secure the strips together.
- Sew or Knot the Ends: Using a needle and thread, sew the overlapped ends of the fabric strips together. Alternatively, tie a secure knot to join the ends. Make sure the connection is tight to prevent the strips from coming apart.
- Continue Crocheting: Once the new strip is securely attached, continue crocheting as usual. Work the stitches over the joined area to help hide the seam and create a smooth transition.
- Weave in Loose Ends: As you add new fabric strips, you may have loose ends. Take the time to weave them in using a crochet hook or needle to ensure a neat and tidy finish.
By smoothly incorporating new fabric strips, you can maintain the rhythm of your crocheting and create a seamless appearance in your rug. Don’t be afraid to experiment with different colors and textures to add visual interest and make your rug truly unique.
Now that you know how to add in new fabric strips, let’s explore a fun and creative aspect of crocheting rag rugs: changing colors.
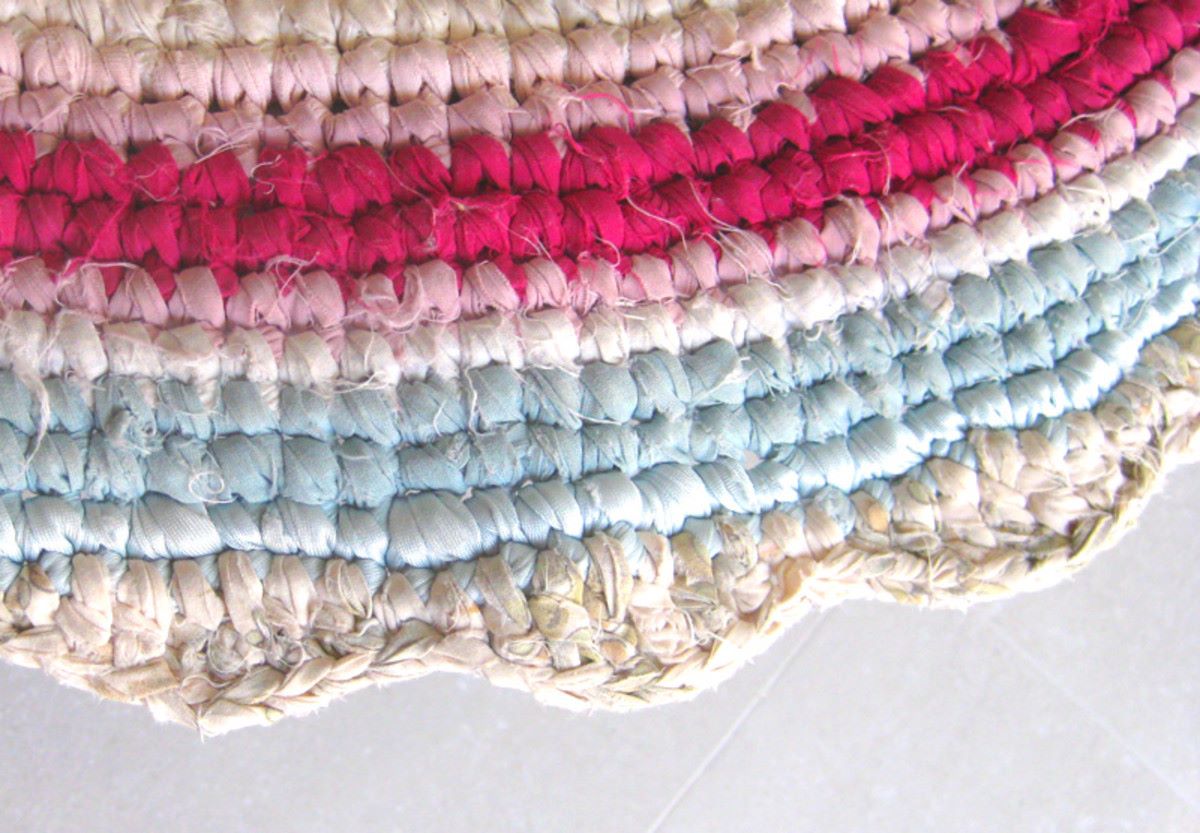
Changing Colors
Changing colors in your crocheted rag rug can add a vibrant touch and create dynamic patterns. Here’s how you can easily switch colors in your project:
- Plan Your Color Changes: Before you start crocheting, decide where you want to change colors in your rug. You can create stripes, add color blocks, or even create intricate designs.
- Finish the Previous Stitch: When you reach the point where you want to change colors, finish the last stitch of the previous row or round. Leave a long enough tail of the old color to weave in later.
- Join the New Color: To join the new color, start a new stitch as you normally would with the old color. Instead of completing the stitch with the old color, use the new color to finish it. You can join the new color by making a slipknot with the new color yarn and pulling it through the last two loops of the stitch, securing the color change.
- Weave in Loose Ends: As you change colors, you may have loose ends from both the old and new colors. Take the time to weave in these ends using a crochet hook or needle. This will ensure a clean and seamless color transition.
- Continue Crocheting: Once you’ve changed colors, continue crocheting with the new color to achieve the desired pattern or design in your rag rug. Remember to maintain an even tension and work the stitches carefully to maintain the integrity of the fabric.
Changing colors in your crocheted rag rug allows you to get creative and personalize your design. Whether you prefer bold and contrasting colors or a more subtle and coordinated palette, experimenting with color changes can take your rug to another level.
Now that you know how to change colors, let’s explore how to shape your rag rug for a customized look.
Shaping the Rug
Shaping your crocheted rag rug is an exciting step that allows you to create unique shapes and contours. Whether you want a circular rug, oval rug, or any other custom shape, here’s how you can shape your rag rug:
- Determine the Shape: Decide on the shape you’d like for your rug. Circular and oval shapes are popular choices, but you can also experiment with other shapes like rectangles or hearts.
- Create Increases and Decreases: To shape your rug, you’ll need to add increases and decreases in your stitches. Increases involve making extra stitches to widen the rug, while decreases involve skipping stitches to narrow the rug.
- Follow a Pattern or Create Your Own: If you’re following a pattern, simply follow the instructions provided for shaping. If you’re creating your own shape, keep in mind that increases and decreases should be evenly distributed to ensure a symmetrical and balanced design.
- Be Patient and Take Your Time: Shaping a rug can be a bit more challenging than the initial stages. Take your time, work slowly, and check your progress regularly to ensure you’re achieving the desired shape.
- Experiment with Stitch Patterns: In addition to shaping, you can also experiment with different stitch patterns to add texture and visual interest to your rug. Consider incorporating stitches like popcorn stitch, shell stitch, or even a simple basketweave pattern.
Shaping your rag rug requires some advanced crochet skills, but with practice and patience, you can achieve stunning results. Remember to enjoy the process and embrace the creative possibilities.
With your rug taking shape, you’re getting closer to completing this wonderful project. In the next section, we’ll explore the final steps: finishing off the rug and caring for it properly.
Finishing Off the Rug
Finishing off your crocheted rag rug ensures that all the hard work you put into creating it results in a polished and professional-looking final product. Here are the steps to finish off your rug:
- Complete the Final Rows: Continue crocheting your rug until you reach the desired size. Make sure to crochet evenly and maintain the stitch pattern you’ve chosen.
- Cut the Yarn: Once you’re ready to finish off your rug, cut the yarn, leaving a long tail of about 6-8 inches.
- Secure the Last Loop: Pull the hook through the last stitch, then thread the tail of yarn through the loop on the hook. Pull tight to secure the final loop.
- Weave in Loose Ends: Using a crochet hook or yarn needle, weave in any loose ends on the back or underside of the rug. This will ensure a clean and tidy finish.
- Block the Rug (Optional): If desired, you can block the rug to help it lay flat and improve its shape. Wetting the rug, shaping it, and allowing it to dry flat will help achieve the desired result.
Finishing off your rag rug gives it a neat and professional appearance. Take your time to weave in the loose ends carefully, as this will make a significant difference in the overall presentation of your rug.
Once you’ve completed these steps, step back and admire your beautifully finished crocheted rag rug. It’s a testament to your creativity and craftsmanship.
Lastly, let’s explore how you can properly care for and maintain your rag rug to ensure its longevity and continued beauty.
Washing and Caring for your Rag Rug
Caring for your crocheted rag rug is essential to maintain its appearance and prolong its lifespan. Follow these tips to keep your rug looking its best:
- Regularly Shake or Vacuum: Depending on the size and placement of your rug, you can either shake it outdoors or use a vacuum cleaner with a brush attachment to remove dust and debris. This will prevent dirt from becoming embedded in the fabric.
- Spot Clean Stains: If your rug develops a stain, it’s important to address it promptly. Blot the stain with a clean cloth or sponge and mild detergent or stain remover. Test any cleaning solution in a small, inconspicuous area first to ensure it doesn’t damage the fabric.
- Hand Wash or Machine Wash (if possible): For thorough cleaning, hand washing is typically the safest method. Fill a bathtub or large sink with lukewarm water and a gentle laundry detergent. Gently agitate the rug and rinse it with clean water. Squeeze out excess water without wringing or twisting. If your rug is large and machine-washable, follow the manufacturer’s instructions for machine washing.
- Dry the Rug: After washing, lay your rug flat to dry on a clean, dry surface. Avoid direct sunlight or high heat, as these can cause fading or shrinkage. Periodically reshape the rug to prevent it from distorting as it dries.
- Rotate and Protect: To prevent uneven wear, periodically rotate your rug or change its placement in the room. Consider using furniture pads or rug pads underneath to protect the floor and add cushioning.
- Store Carefully: If you need to store your rug, make sure it’s clean and completely dry. Roll it up with acid-free tissue paper or a clean sheet to protect it from dust and insects. Store it in a cool, dry place away from moisture and direct sunlight.
By following these care instructions, you can extend the life of your crocheted rag rug and keep it looking beautiful for years to come. Remember to assess any cleaning or washing methods based on the specific type of fabric you used in your rug.
Now that you know how to care for your rag rug, you’re equipped to enjoy its warmth and beauty in your home.