
Choosing the Right Glue
When it comes to gluing up a picture frame, selecting the right type of glue is essential for a strong and durable bond. With a wide range of glues available on the market, it can be overwhelming to choose the one that best suits your needs. Here are some factors to consider before making your decision.
- Wood Type: Take into account the type of wood you are working with. Different glues adhere differently to various types of wood. For example, if you are working with porous or soft woods like pine, consider using a glue that is specifically formulated for these types of wood.
- Drying Time: Consider the drying time of the glue. Some glues require longer drying times, which can be inconvenient if you are working on a tight schedule. If you need a quick result, opt for a glue that dries faster.
- Visibility: Think about the visibility of the glue. If your picture frame has exposed joints or gaps, you may want to choose a glue that dries clear or is tinted to match the color of the wood. This will help create a seamless and professional-looking finish.
- Water Resistance: If your picture frame is intended to be displayed in a humid environment or might come into contact with moisture, select a glue that offers water-resistant properties. This will help prevent the glue from weakening or deteriorating over time.
- Strength: Assess the strength requirements for your picture frame. If you are constructing a large or heavy frame, it is advisable to use a strong adhesive such as epoxy or polyurethane glue that provides superior bonding strength.
When in doubt, consult the manufacturer’s instructions and product recommendations to ensure you are using the right glue for your specific project. Taking the time to choose the appropriate glue will not only ensure a successful picture frame assembly but also contribute to the longevity of your creation.
Preparing the Frame Pieces
Before gluing up a picture frame, it’s important to properly prepare the frame pieces to ensure a strong and seamless joint. Follow these steps to prepare the frame pieces:
- Cut the Pieces: Begin by measuring and cutting the frame pieces to the desired lengths. Use a miter saw or a miter box with a hand saw to achieve accurate and clean mitered corners. Ensure that all pieces are cut at a precise 45-degree angle for a snug fit.
- Sand the Edges: Next, use sandpaper or a sanding block to smooth and chamfer the edges of the frame pieces. This will help remove any rough surfaces or splinters, allowing for a better bond when gluing. Pay attention to the corners and edges, ensuring they are smooth and free from imperfections.
- Dry Fit the Pieces: Before applying any glue, perform a dry fit of the frame pieces to ensure they align properly and form tight mitered joints. This step is crucial for troubleshooting any slight discrepancies before gluing. Make adjustments as needed by sanding or recutting the pieces.
- Label the Pieces: To avoid confusion during the assembly process, it is beneficial to label each frame piece with a pencil or marker. Mark the corresponding sides and angles to ensure you assemble the frame in the correct order.
- Apply Wood Conditioner: If you are working with hardwoods or woods that are prone to splintering, consider applying a wood conditioner to the end grain of the pieces. This will help prevent the wood from absorbing excessive glue, leading to a stronger bond.
By taking the time to properly prepare the frame pieces, you will ensure that the glue-up process goes smoothly and that the joints are strong and secure. The extra effort in preparation will result in a visually appealing and long-lasting picture frame.
Applying the Glue
Once you have prepared the frame pieces, the next step in gluing up a picture frame is applying the glue. Follow these guidelines to ensure proper glue application:
- Choose the Right Amount: Use a small amount of glue on each joint. Applying too much glue can result in excess squeeze-out and messy joints. Remember, a little goes a long way. Use a brush or small glue applicator to spread an even layer of glue along the surfaces to be joined.
- Even Distribution: Ensure that the glue is evenly distributed across the joint surfaces. This will provide maximum contact and bonding strength. Make sure to cover the entire mating surface with a thin layer of glue.
- Work Quickly: Keep in mind that most glues have a limited open time, during which they remain workable. Work efficiently to apply the glue and assemble the frame pieces before the open time expires. Refer to the glue manufacturer’s instructions to determine the recommended open time.
- Avoid Glue on Exposed Surfaces: Be careful not to get glue on the visible surfaces of the frame. Excess glue can be difficult to remove and may cause staining or interfere with the finishing process. If any glue does come in contact with the exposed surface, wipe it away immediately with a damp cloth.
- Double-check Alignment: Before joining the frame pieces, double-check their alignment to ensure that the corners are perfectly matched. Adjust if necessary, and then proceed to join the pieces.
Remember, the quality of the glue application will directly impact the strength and appearance of the final joint. Take your time and be meticulous in applying the glue to achieve optimal results during the assembly process.
Assembling the Picture Frame
With the frame pieces prepared and the glue applied, it’s time to assemble the picture frame. Follow these steps to ensure a successful assembly:
- Dry Fit Confirmation: Before applying the glue, do a final dry fit of the frame pieces to ensure they fit together snugly. Check that the corners align perfectly and that the frame is square. Make any necessary adjustments before proceeding.
- Apply Clamping Pressure: Once you are satisfied with the fit, it’s time to join the frame pieces together. Apply clamping pressure to hold the joints securely. Use band clamps, bar clamps, or corner clamps to ensure even and consistent pressure across all corners.
- Check for Squareness: While the glue is still wet, check that the frame is square by using a framing square or a corner guide. Measure the diagonals of the frame in both directions, ensuring they are equal. Apply gentle adjustments if needed to achieve perfect squareness.
- Wipe off Excess Glue: Use a damp cloth or sponge to wipe away any excess glue that may have squeezed out during the clamping process. It’s important to remove it while it is still wet to prevent it from drying on the surface of the frame.
- Let the Glue Dry: Allow the frame to sit undisturbed in the clamps until the glue has fully cured. Follow the instructions provided by the glue manufacturer to determine the recommended drying time. This step is crucial for achieving a strong and secure bond.
By following these steps, you will be able to assemble the picture frame with precision and ensure that the joints are tight and secure. Take your time during the assembly process to ensure a high-quality final product.
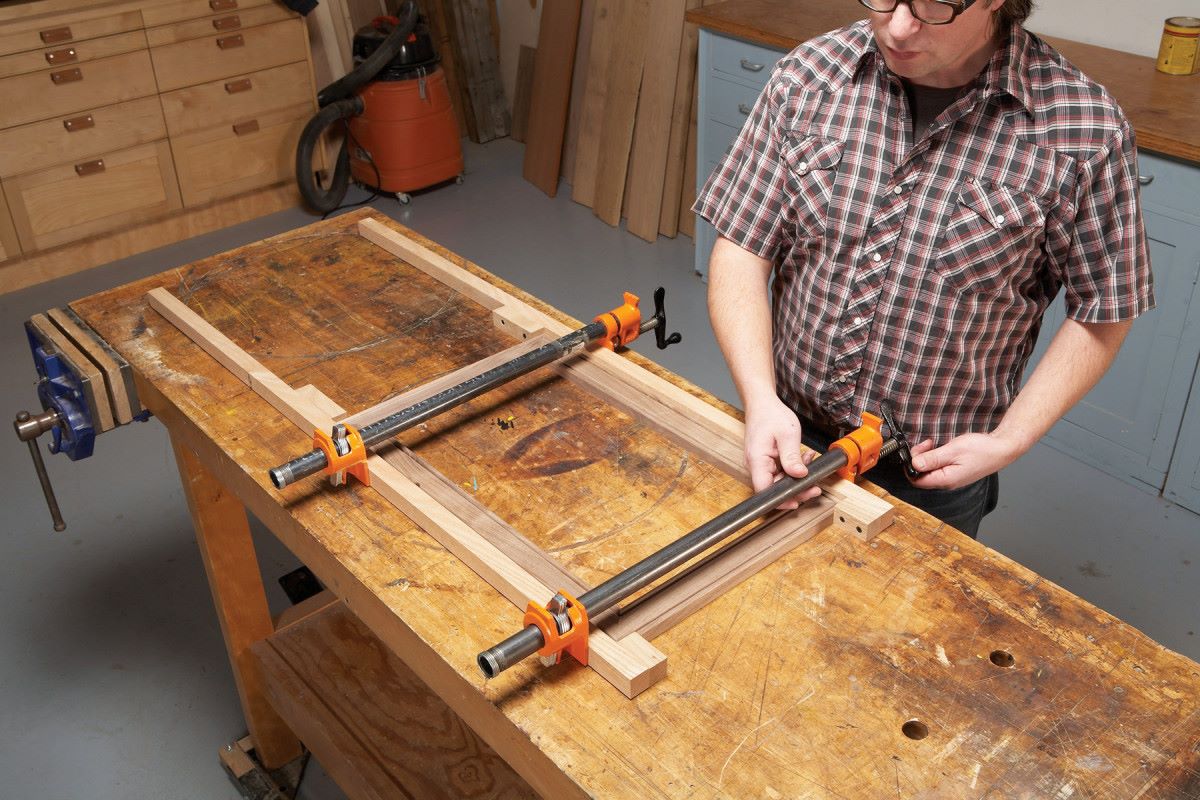
Clamping the Frame
Properly clamping the picture frame during the gluing process is essential to ensure strong and secure joints. Here’s a step-by-step guide on effectively clamping the frame:
- Select the Right Clamps: Choose clamps that are suitable for the size and shape of your picture frame. Band clamps, bar clamps, or corner clamps are commonly used for frame assembly. Ensure that the clamps have enough reach to span across the entire frame.
- Apply Pressure: Position the clamps on opposite corners of the frame, applying equal pressure to each joint. Gradually tighten the clamps to exert even pressure on all four corners. This will help create strong and tight bonds between the frame pieces.
- Check for Alignment: As you tighten the clamps, periodically check the alignment of the frame to ensure it remains square. Use a framing square or a corner guide to verify that the corners are staying at a true 90-degree angle.
- Avoid Over-tightening: While it’s important to apply sufficient pressure, be cautious not to over-tighten the clamps, as this can cause the joints to misalign or warp the frame pieces. Ensure that the clamping pressure is firm but not excessive.
- Clean Up Excess Glue: Use a damp cloth or sponge to carefully remove any glue squeeze-out that may have occurred during clamping. It’s easier to clean up the excess glue while it is still wet, rather than waiting for it to dry and harden.
- Allow Sufficient Drying Time: Leave the clamps in place until the glue has fully dried. Refer to the instructions provided by the glue manufacturer for the recommended drying time. Avoid disturbing or moving the frame while the glue is curing.
Remember to handle the frame with care while it is clamped, as excessive force or movement can disrupt the alignment and compromise the integrity of the joints. By following these clamping techniques, you’ll be well on your way to creating a sturdy and well-assembled picture frame.
Removing Excess Glue
After clamping the picture frame and allowing the glue to dry, it’s important to remove any excess glue that may have squeezed out during the assembly process. Here are some steps to effectively remove excess glue:
- Inspect the Frame: Once the glue has dried, carefully inspect the frame for any visible areas where excess glue may have accumulated. Pay close attention to the joints and corners, as these areas are prone to glue squeeze-out.
- Scrape off Dried Glue: Use a plastic or wooden scraper to gently scrape off the dried excess glue. Be careful not to scratch or damage the surface of the frame. Apply light pressure and work slowly to avoid causing any unintended marks or blemishes.
- Sand the Glue Residue: If there are still traces of glue remaining after scraping, use fine-grit sandpaper or a sanding block to gently sand away the residue. Focus on the areas where the glue has dried, taking care to maintain an even and smooth surface.
- Check for Smoothness: After sanding, inspect the frame to ensure that it is smooth to the touch. Run your fingers along the joints and corners, feeling for any rough or uneven spots. If necessary, continue sanding until the surface is uniformly smooth.
- Clean the Frame: Once the excess glue has been removed, use a damp cloth or sponge to wipe down the frame. This will help remove any remaining residue or dust particles. Allow the frame to air dry before proceeding to the next step.
- Perform a Final Inspection: Take a final look at the frame to ensure that all excess glue has been successfully removed. Check from different angles and lighting conditions to spot any overlooked areas. Address any remaining glue if necessary.
By taking the time to remove any excess glue, you will ensure a clean and professional-looking picture frame. The removal process not only enhances the appearance of the frame but also allows for a smoother and more seamless finishing process.
Allowing the Glue to Dry
After assembling the picture frame and removing excess glue, it’s crucial to allow the glue to fully dry before moving forward with any further steps. Follow these guidelines to ensure proper drying of the glue:
- Refer to Manufacturer’s Recommendations: Check the instructions provided by the glue manufacturer for the recommended drying time. Different glues have varying drying times, ranging from a few hours to several days. Following the manufacturer’s guidelines will help ensure a strong and secure bond.
- Create a Stable Environment: Choose a well-ventilated area with moderate temperature and low humidity to allow the glue to dry properly. Avoid placing the frame in direct sunlight or near sources of heat, as extreme temperature changes can affect drying time and the quality of the bond.
- Leave the Clamps Undisturbed: If clamps were used during the assembly process, it’s essential to leave them in place until the glue has fully dried. Removing the clamps too soon can result in weakened joints or misalignments. Consult the glue manufacturer’s instructions for the recommended clamping duration.
- Exercise Patience: It’s important to resist the temptation to rush the drying process. Allow ample time for the glue to cure thoroughly, even if it seems dry to the touch. Prematurely handling or applying pressure to the frame can compromise the strength of the bond.
- Perform a Test: To ensure that the glue has dried completely, perform a test by gently applying pressure to a discreet area of the frame. If there is any movement or if the joint feels slightly tacky, it indicates that the glue has not fully cured. In this case, allow more time for drying before proceeding.
- Inspect for Solidity: Once the glue has dried, inspect the frame joints for solidity. Gently tap or wiggle the corners to ensure they are secure and stable. If any joints feel loose or show signs of weakening, consult an expert or consider reinforcing them with additional glue or reinforcements.
By allowing the glue to dry thoroughly, you will ensure the strength and integrity of the picture frame. Taking the necessary time and precautions during the drying process will contribute to the overall quality and longevity of your finished frame.
Sanding and Finishing the Frame
After the glue has dried and the frame is fully assembled, it’s time to sand and finish the frame to achieve a polished and professional look. Follow these steps to sand and finish your picture frame:
- Sanding the Frame: Start by sanding the entire frame using sandpaper or a sanding block. Begin with a coarse-grit sandpaper to smooth out any rough surfaces or imperfections. Gradually move to finer-grit sandpaper to achieve a smooth and even finish. Sand in the direction of the wood grain for the best results.
- Round the Corners: If desired, use sandpaper or a sanding block to gently round the corners of the frame. This can give the frame a more artistic and visually appealing look.
- Remove Dust: After sanding, use a brush or a lint-free cloth to remove any dust or particles from the frame. It’s important to have a clean surface before applying a finish.
- Apply Wood Conditioner (optional): Consider applying a wood conditioner to the frame if you plan to use a stain or a dye to enhance the natural beauty of the wood. A wood conditioner helps ensure even absorption of the stain or dye, providing a more uniform finish.
- Apply Finish: Choose your desired finish, such as paint, stain, or varnish, to protect and enhance the appearance of the frame. Apply the finish using a brush, cloth, or spray, following the manufacturer’s instructions. Apply multiple coats if needed, allowing each coat to dry thoroughly before applying the next.
- Remove Excess Finish: After each coat of finish, check for any excess drip marks, runs, or uneven spots. If necessary, carefully sand away any imperfections using fine-grit sandpaper or steel wool. Clean the frame again to remove any sanding residue.
- Final Inspection: Once the desired finish is achieved, inspect the frame for any remaining flaws or areas that may need touch-ups. Make any necessary adjustments or repairs before considering the frame fully finished.
By sanding and finishing the frame, you not only refine its appearance but also provide protection against wear and tear. Remember to work in a well-ventilated area and follow all safety precautions while applying finishes.