
Materials Needed
To create a beautiful seashell picture frame, you will need a few essential materials. Gather the following items before you start:
- Picture frame – Choose a frame that suits your style and the size of the picture you want to display. A wooden or plain white frame works well for a natural and beachy look.
- Seashells – Collect a variety of seashells from your beachcombing adventures or purchase them from a craft store. Opt for different shapes, sizes, and colors to add visual interest to your picture frame.
- Hot glue gun – This will be the primary adhesive for attaching the seashells to the frame. Make sure to have extra glue sticks on hand, as they tend to run out quickly.
- Glue sticks – Ensure a steady supply of glue sticks to avoid any interruptions during the crafting process.
- Protective covering – Lay down a tablecloth or newspaper to protect your workspace from any glue spills or seashell debris.
- Optional: Paint or spray paint – If you want to customize the frame’s color, choose a paint or spray paint that complements your seashell collection.
- Optional: Clear adhesive spray – To give the finished frame a glossy and polished look, consider using a clear adhesive spray. This will also help secure the seashells in place.
- Optional: Decorative accents – Add a personal touch to your seashell picture frame by including additional decorative elements such as small starfish, pearls, or beach-themed charms.
Once you have gathered all the necessary materials, you are ready to embark on the creative journey of making your seashell picture frame. With a little imagination and some crafting expertise, you can transform an ordinary frame into a stunning seaside-inspired piece of art.
Step 1: Gather Seashells
The first step in creating a seashell picture frame is to gather a collection of seashells. If you live in a coastal area, you can head to the beach and collect your own shells. However, if you don’t have easy access to the beach, you can find seashells at craft stores or online.
When collecting seashells, it’s important to be mindful of local regulations. Some beaches have restrictions on collecting shells, so make sure to gather shells from designated areas or obtain them legally.
Look for shells that are intact and free from cracks or other damages. Different types of seashells, such as scallops, conch shells, or cowries, can add variety and visual interest to your frame. Pay attention to the colors, shapes, and sizes of the shells, as these will play a role in the overall design of your picture frame.
While collecting shells, it’s also fun to keep an eye out for other beach treasures, such as small pieces of driftwood, sea glass, or interesting rocks. These items can be used to customize your frame and add extra charm.
Once you have gathered a sufficient number of seashells, take some time to clean them. Rinse them with water to remove any sand or debris, and allow them to dry completely. This will ensure that your seashells are in perfect condition and ready to be used in the next steps of the frame-making process.
Step 2: Prepare the Picture Frame
After gathering your seashells, it’s time to prepare the picture frame for the seashell embellishments. Follow these simple steps to get your frame ready:
- Remove any glass or backing – Take out the glass panel and any backing material from the frame. This will make it easier to work on the frame and prevent any damage to the glass during the seashell attachment process.
- Sand or paint the frame (optional) – If you want to modify the color or texture of the frame, consider sanding it down or applying a fresh coat of paint. Use sandpaper to create a slightly rough surface for better adhesion of the seashells. Opt for colors that complement the seashells or go for a natural wood finish to maintain the beachy aesthetic.
- Clean the frame – Before proceeding, make sure to wipe down the frame to remove any dust or debris. This will ensure a clean and smooth surface for attaching the seashells.
Preparing the picture frame sets the foundation for a successful seashell picture frame project. It allows you to customize the frame to your liking and creates the perfect canvas for showcasing your beautiful seashell collection.
Step 3: Clean and Dry the Seashells
Before you begin attaching the seashells to the picture frame, it’s crucial to clean and dry them thoroughly. This step ensures that your seashells are free from any dirt, debris, or lingering odors. Follow these simple steps to clean and prepare your seashells:
- Rinse the seashells – Start by rinsing the seashells under cool running water. Gently rub the shells to remove any sand, salt, or other particles that may be stuck on the surface. Rinse each shell individually to ensure a thorough cleaning.
- Soak the seashells (optional) – If your seashells seem particularly dirty or have stubborn residue, you can soak them in a solution of mild dish soap and water. This will help dissolve any grime or organic matter. Remember to rinse the shells again after soaking to remove any soapy residue.
- Inspect and discard damaged shells – While cleaning, take the time to inspect each shell and remove any that are damaged, cracked, or broken beyond repair. This will ensure that your finished seashell picture frame looks its best.
- Dry the seashells – Pat the seashells dry with a clean towel or leave them to air dry completely. Avoid using direct heat, as it can cause the shells to warp or crack. Ensure that the shells are completely dry before proceeding to the next steps of the project.
Cleaning and drying the seashells may seem like a simple step, but it plays a crucial role in enhancing the visual appeal and durability of your seashell picture frame. Take the time to clean each shell with care, and you will be rewarded with a stunning and pristine seashell display.
Step 4: Arrange and Glue the Seashells
Now that you have cleaned and dried the seashells, it’s time to arrange them on the picture frame and securely attach them using a hot glue gun. Follow these steps to achieve an aesthetically pleasing layout:
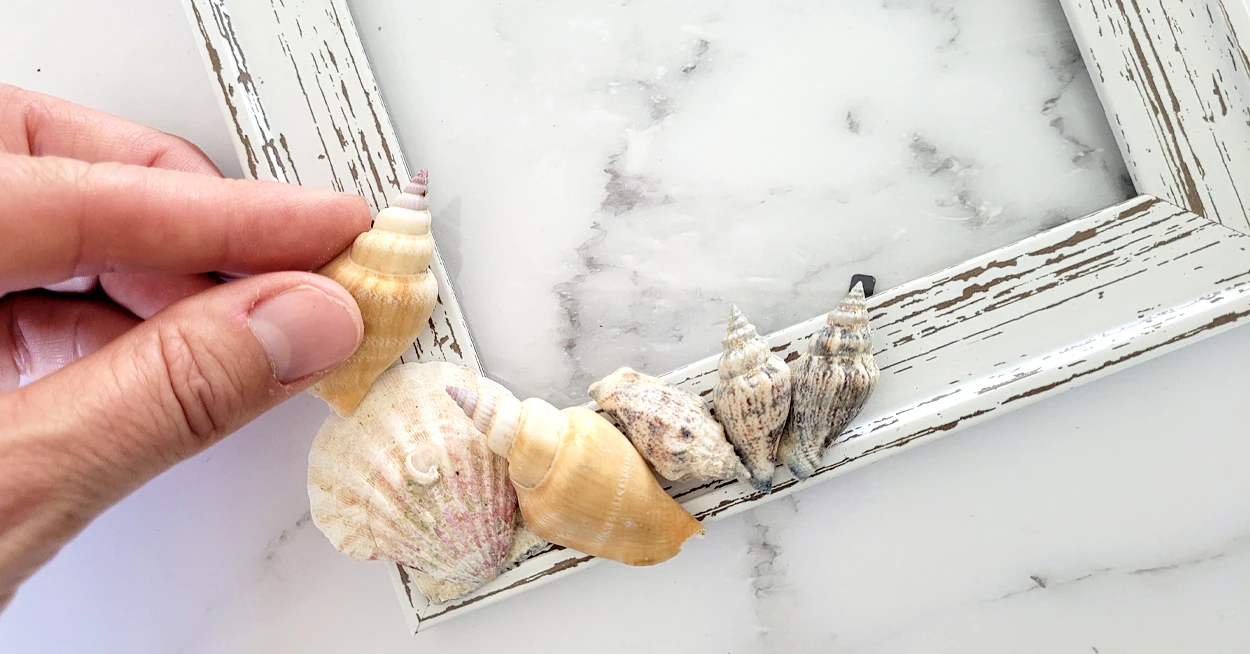
- Plan your design – Before gluing any seashells, take a moment to plan the arrangement. Lay out the seashells on the frame and experiment with different configurations until you find a layout that you love. Consider the size, shape, and color of each shell, and aim for a balanced and visually appealing composition.
- Start gluing – Once you are satisfied with the design, begin attaching the seashells to the frame using a hot glue gun. Apply a small amount of hot glue to the back of each shell and press it firmly onto the frame. Be cautious not to use too much glue, as it can seep out and create unsightly blobs.
- Work in sections – To make the process more manageable, work on attaching the seashells in small sections. Apply glue to a few shells at a time and place them on the frame before moving on to the next batch. This approach helps ensure that the glue doesn’t dry too quickly, allowing you to make adjustments if needed.
- Press and hold – After gluing each seashell, press it down firmly for a few seconds to allow the glue to adhere properly. This step helps ensure that the shells are securely attached and won’t come loose over time.
- Be creative – Don’t be afraid to get creative with your placement. Overlapping shells, creating patterns, or leaving small gaps between shells can add depth and visual interest to your frame. Allow your artistic intuition to guide you as you arrange and glue the seashells.
Take your time during this step to ensure that every seashell is securely attached and positioned exactly how you want it to be. Remember, the arrangement of the seashells will be the highlight of your seashell picture frame, so enjoy the process of creating a unique and stunning design.
Step 5: Allow the Glue to Set
Once you have successfully arranged and glued the seashells onto the picture frame, it’s important to allow the glue to fully set and dry. This will ensure that the seashells remain securely attached for a long-lasting result. Follow these steps to give the glue sufficient time to set:
- Set aside in a safe place – Find a safe and level surface to place the picture frame. Make sure it won’t be disturbed or accidentally bumped while the glue is drying.
- Give it time – The drying time may vary depending on the type and brand of glue used, as well as the environmental conditions. As a general guideline, allow the glue to set for at least 24 hours or follow the manufacturer’s instructions for the specific glue you used.
- Avoid touching or moving – It’s important to resist the temptation to touch or move the frame during the drying process. Any movement can disrupt the glued seashells and affect their adhesion.
- Test for stability – After the recommended drying time has passed, gently test the stability of the seashells by lightly pressing on them. If any shells feel loose or wobbly, apply a small amount of additional glue to secure them back into place.
Allowing the glue to fully set ensures that your seashell picture frame is strong and durable. It gives you peace of mind, knowing that the seashells will remain securely attached, even if the frame is accidentally bumped or jostled.
While waiting for the glue to dry, take the opportunity to explore other creative touches you can add to your seashell picture frame, such as additional embellishments or decorative accents. With a little patience and anticipation, you’re one step closer to displaying your unique and beautiful seashell creation.
Step 6: Add Decorative Touches
Now that the seashells are securely attached to the picture frame, it’s time to add some extra decorative touches to enhance its beauty and uniqueness. This step allows you to personalize your seashell picture frame and make it truly your own. Here are some ideas to consider:
- Paint or dye the seashells – If you want to add a pop of color or create a specific color scheme, you can paint or dye the seashells. Use acrylic paints or fabric dyes to achieve vibrant or subtle hues that complement your picture frame and overall design.
- Add small ornaments – Consider embellishing the seashell arrangement with small starfish, pearls, colored beads, or other beach-themed ornaments. These additions can add dimension and visual interest to your frame.
- Attach ribbon or twine – Wrap a ribbon or twine around the frame for a charming and rustic touch. You can tie a bow or knot at the top to create a hanger or simply wrap it around the corners or edges of the frame for decorative purposes.
- Create a collage – Combine seashells with other natural elements like bits of driftwood, sea glass, or dried seaweed to create a collage effect. Arrange these elements around the seashells to add depth and texture to your picture frame.
- Use shells of different sizes – Incorporate seashells of different sizes to create a visually dynamic composition. Layer larger shells at the bottom and smaller shells on top to create a sense of depth and dimension.
Remember, the goal is to infuse your personality and creativity into the seashell picture frame. Feel free to try out different ideas and experiment with various decorative elements until you achieve the desired look.
By adding these decorative touches, your seashell picture frame will become a true work of art that reflects your personal style and captures the beauty of the beach.
Step 7: Display your Seashell Picture Frame
After all the hard work and creativity poured into making your seashell picture frame, it’s time to display and showcase your beautiful creation. Here are some tips to help you find the perfect spot:
- Choose a prominent location – Look for a prominent spot in your home where the seashell picture frame can become a focal point. Consider areas like a mantelpiece, hallway wall, or a shelf that receives ample natural light.
- Coordinate with the surroundings – Take into account the existing decor and color scheme of the room. Choose a location where the seashell picture frame complements the surroundings and adds a touch of coastal charm.
- Hang it securely – If you decide to hang the frame on the wall, make sure to use appropriate hanging hardware and secure it properly. Use a level to ensure it hangs straight and centered.
- Position it at eye level – To make the seashell picture frame easily visible and appreciated, hang it at eye level or at a height where it can be admired without strain. This allows everyone to enjoy the beauty of the seashells.
- Create a gallery wall – If you have multiple seashell picture frames or other coastal-themed decor, consider creating a gallery wall. Arrange the frames in an aesthetically pleasing pattern to create a cohesive and visually striking display.
- Rotate with the seasons – Embrace the versatility of your seashell picture frame by rotating it with the seasons or on special occasions. Consider swapping out the picture inside the frame to match the season or display a cherished memory.
By thoughtfully selecting the display location and incorporating your seashell picture frame into your existing decor, you will create a stunning visual impact and evoke memories of the beach and the beauty of the seashore.
Remember to regularly clean and dust your seashell picture frame to ensure it stays in pristine condition. With proper care and proper placement, your seashell picture frame will become a treasured piece of art that brings the joy and serenity of the beach into your home.