
Choosing the Right Wax for Dyeing
When it comes to dyeing candle wax, selecting the right type of wax is essential to achieve vibrant and long-lasting colors. Different waxes have different properties, and understanding these differences will help you make an informed decision. Here are a few types of wax commonly used for dyeing candles:
- Paraffin Wax: Paraffin wax is a popular choice for candle making due to its affordability and easy color absorption. It can be dyed with various types of dyes, including liquid dyes and dye blocks.
- Soy Wax: Soy wax is a natural alternative to paraffin wax and is known for its eco-friendly properties. While soy wax can be dyed, it requires a more concentrated amount of dye to achieve vibrant colors compared to paraffin wax.
- Beeswax: Beeswax is a natural and high-quality wax that often has a light yellow color. While it can be dyed, the natural color of beeswax may affect the final color result. It is recommended to use lighter shades of dye if using beeswax.
- Gel Wax: Gel wax is a transparent and gel-like wax that creates the effect of a “glowing” candle. While gel wax cannot be dyed directly, you can incorporate color by using colored embeds, such as colored wax chunks or objects.
When choosing wax for dyeing your candles, consider factors such as the type of candle you want to make, the desired color intensity, and the method of dyeing you plan to use. Keep in mind that each wax type may require different dyeing techniques and dye quantities, so it’s important to follow specific instructions for your chosen wax.
Preparing the Work Area
Before you start dyeing your candle wax, it’s important to properly prepare your work area to ensure a safe and organized process. Here are some essential steps to follow when preparing your work area:
- Clean and Clear: Start by cleaning the area where you’ll be working. Remove any clutter or unnecessary items from your workspace to create a clear and organized space.
- Cover the Surface: Cover your work surface with a protective layer such as newspaper or a plastic tablecloth. This will help protect the surface from any potential spills or stains from the dye or wax.
- Gather Tools and Supplies: Gather all the necessary tools and supplies you’ll need for the dyeing process. This may include a double boiler or a melting pot, a thermometer, stirring utensils, molds, and of course, the dye and wax.
- Ensure Adequate Ventilation: Proper ventilation is crucial when working with heated wax and dyes. Open windows or doors to ensure good airflow and prevent any buildup of fumes. If you have a ventilation fan, turn it on to help dissipate any strong odors.
- Protective Clothing and Gear: Wear appropriate protective clothing such as an apron, gloves, and safety glasses to protect yourself from potential spills or splatters. This will also help in preventing any skin irritation or injuries.
- Keep Fire Safety Measures: It’s always important to prioritize safety when working with flammable materials. Have a fire extinguisher within reach and keep a watchful eye on the melting process to avoid any accidents.
By taking the time to prepare your work area, you’ll create a comfortable and safe environment for dyeing your candle wax. This will not only make the process more enjoyable but also help you achieve better results in your dyeing endeavors.
Gathering the Necessary Materials
Before you begin the process of dyeing your candle wax, it’s important to gather all the necessary materials to ensure a smooth and efficient process. Here are the essential materials you’ll need:
- Candle Wax: Choose the appropriate type of wax for your project, such as paraffin wax, soy wax, beeswax, or gel wax. Ensure that you have enough wax to make the desired number of candles.
- Dye: Select the type of dye that is suitable for the wax you are using. Liquid dyes, dye blocks, or dye chips are commonly used for candle dyeing. Choose a variety of colors to create your desired hues.
- Double Boiler or Melting Pot: You’ll need a heat-resistant container to melt the candle wax. A double boiler or a dedicated melting pot is ideal for this purpose. If you’re using a pour pot, ensure it has a spout for easy pouring.
- Thermometer: A thermometer is essential to monitor and maintain the temperature of the wax. This will ensure that your dye is added at the correct temperature, which is crucial for achieving optimal color saturation.
- Stirring Utensils: Use heat-resistant and non-reactive stirring utensils, such as silicone or stainless steel, to mix the dye into the melted wax. Avoid using wooden or plastic utensils as they can melt or contaminate the wax.
- Molds: Prepare your desired candle molds to pour the dyed wax into. You can choose from a variety of mold options, such as pillar molds, container molds, or novelty molds, depending on the type of candle you want to create.
- Protective Gear: Wear protective gear such as gloves and goggles to protect your hands and eyes from hot wax and potential splatters. Safety should always be a priority when working with heated materials.
- Newspaper or Plastic Tablecloth: Cover your work surface with newspaper or a plastic tablecloth to catch any spills or drips and protect your table from stains.
By gathering all these materials before you start, you’ll have everything you need within reach, allowing you to focus on the creative process of dyeing your candle wax without any interruptions.
Using Liquid Dye
Liquid dyes are a popular and convenient option for dyeing candle wax. They are easy to use and provide consistent and vibrant color results. Follow these steps to effectively use liquid dyes in your candle making process:
- Prepare the wax: Start by melting your candle wax in a double boiler or melting pot. Use a thermometer to ensure the wax reaches the recommended pouring temperature.
- Add the dye: Once the wax has reached the desired temperature, it’s time to add the liquid dye. Start by adding a small amount of dye to the melted wax. Remember, a little goes a long way, so start with a conservative amount and gradually add more if needed.
- Stir and mix: Use a heat-resistant stirring utensil to thoroughly mix the dye into the wax. Stir gently but consistently to ensure even distribution of color. Continue stirring until the dye is completely incorporated into the wax.
- Test the color: To check the color intensity, take a small amount of the dyed wax and let it cool slightly. This will give you an idea of how the color will look once the candle has solidified. Adjust the color by adding more dye if desired.
- Pour the dyed wax: Once you are satisfied with the color, carefully pour the dyed wax into your prepared candle molds. Be mindful of any specific pouring guidelines for your chosen mold type.
- Allow the candles to cool and solidify: Let the candles cool and solidify undisturbed. Follow the recommended cooling time for your wax type to ensure optimal results.
- Clean the utensils: After you have finished dyeing the wax, clean your stirring utensils and any other tools used in the process. Use hot, soapy water and thoroughly rinse off any residual dye.
Using liquid dyes gives you the flexibility to experiment with different color combinations and achieve vivid shades in your candles. Remember to start with small amounts of dye and gradually increase as needed to achieve the desired color. With practice, you’ll become more confident in using liquid dyes to create beautiful and customized candles.
Using Dye Blocks or Chunks
Dye blocks or chunks are another popular option for dyeing candle wax. They are easy to work with and offer a wide range of colors. Follow these steps to effectively use dye blocks or chunks in your candle making process:
- Melt the wax: Start by melting your candle wax in a double boiler or melting pot. Use a thermometer to ensure the wax reaches the recommended pouring temperature.
- Prepare the dye blocks or chunks: Cut or break the dye blocks or chunks into smaller pieces. This will help the dye melt and disperse evenly throughout the wax.
- Add the dye: Once the wax has reached the desired temperature, add the dye blocks or chunks to the melted wax. Start with a small amount and gradually add more as needed to achieve the desired color intensity.
- Stir and mix: Use a heat-resistant stirring utensil to blend the dye blocks or chunks into the melted wax. Stir gently but consistently to ensure thorough mixing and even distribution of color. Continue stirring until the dye is completely melted and incorporated.
- Test the color: To check the color, take a small amount of the dyed wax and let it cool slightly. This will give you an idea of how the color will look once the candle has solidified. Adjust the color by adding more dye blocks or chunks if desired.
- Pour the dyed wax: Carefully pour the dyed wax into your prepared candle molds. Be mindful of any specific pouring guidelines for your chosen mold type, ensuring a smooth and even pour.
- Allow the candles to cool and solidify: Let the candles cool and solidify undisturbed. Follow the recommended cooling time for your wax type to ensure optimal results.
- Clean the utensils: After you have finished dyeing the wax, clean your stirring utensils and any other tools used in the process. Use hot, soapy water and thoroughly rinse off any residual dye.
Using dye blocks or chunks allows you to easily create beautiful, vibrant colors in your candles. Remember to start with smaller amounts of dye and gradually add more until you achieve the desired color intensity. With practice, you’ll become more skilled at using dye blocks or chunks to create stunning and personalized candles.
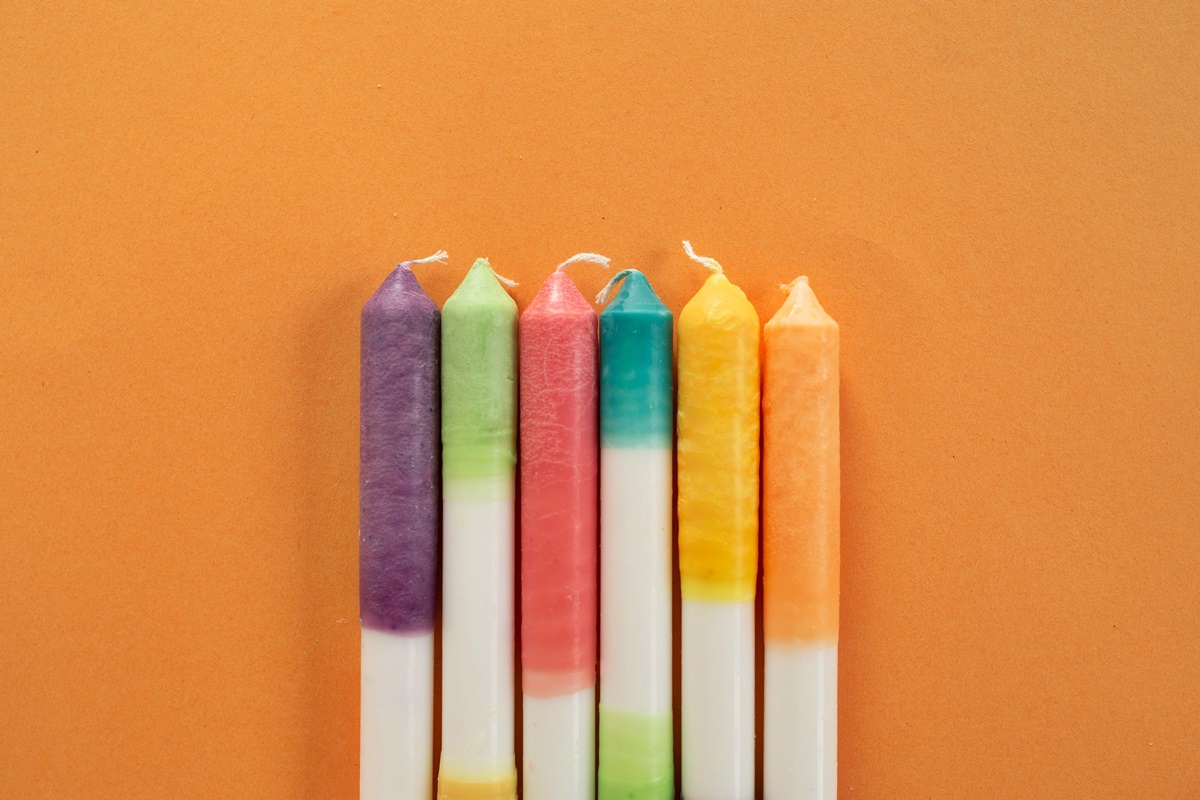
Mixing and Testing Colors
Mixing and testing colors is an important step in the candle dyeing process. It allows you to create unique hues and ensures that the color you desire is achieved. Here’s a step-by-step guide to effectively mix and test colors when dyeing candle wax:
- Start with a color palette: Before you begin mixing colors, gather a color palette or sample swatches to help guide your color choices. This could be a physical color wheel or digital color resources.
- Choose your primary colors: Select a set of primary colors in dye form. These include red, yellow, and blue. These primary colors will serve as the building blocks for creating a wide range of shades.
- Experiment with ratios: Begin by adding small amounts of dye to the melted wax. Start with the primary color that represents the tone you want to achieve, then gradually introduce other primary colors to create variations. Experiment with different ratios to find your desired color.
- Record your measurements: As you mix colors, keep track of the amounts used for each shade. This will help you recreate the same color in the future or adjust it for a different batch of candles.
- Test the colors: To ensure the color accuracy, take a small sample of the dyed wax and let it cool. This will allow you to see the final color result. Adjust the color by adding more dye if needed, and note down the final measurements.
- Create secondary colors: Use your mixed primary colors to create secondary colors like orange, green, and purple. Experiment with different ratios of the primary colors until you achieve your desired shades.
- Explore color combinations: Don’t shy away from experimenting with different color combinations. Mix complementary colors to create contrast or blend analogous colors for a harmonious look. Use your creativity to discover unique and captivating color combinations.
- Consider color intensity: Keep in mind that the intensity of the final color will vary depending on the amount of dye used and the type of wax being used. Be patient and take your time to achieve the exact color you desire.
By mixing and testing colors, you’ll be able to create an array of beautiful and custom hues for your candles. Use your color palette as a guide and let your creativity flow as you experiment with different ratios and combinations to achieve your desired shades.
Melting the Wax
Before you can dye your candle wax, you need to melt it down to a liquid state. Properly melting the wax is crucial for achieving consistent and smooth results. Here are the steps to effectively melt your wax:
- Choose a melting method: There are several methods you can use to melt your candle wax. The most common methods include using a double boiler or a dedicated melting pot designed for candle making. Follow the manufacturer’s instructions for your chosen method.
- Prepare your melting container: If using a double boiler, fill the lower pot with water and place it on the stove over medium heat. In the top pot, add the desired amount of wax chunks or blocks.
- Heat the wax: Gradually heat the wax until it begins to melt. Stir occasionally to ensure even melting. Use a thermometer to monitor the wax’s temperature and prevent it from overheating.
- Monitor the temperature: Different types of wax have different melting points. It’s important to know the recommended temperature range for your specific wax. Maintain the wax at the appropriate temperature to prevent discoloration or other undesirable effects.
- Be patient: Avoid rushing the melting process. It’s better to heat the wax slowly and evenly rather than applying high heat, which can scorch the wax. Melting the wax gradually will ensure a smoother and more manageable consistency.
- Stir the wax: As the wax melts, gently stir it to promote even heat distribution and prevent any potential hot spots. This will help ensure that the entire batch of wax melts consistently.
- Remove from heat: Once the wax has completely melted, remove it from the heat source. Be careful when handling the hot wax to avoid accidents or burns.
It’s important to exercise caution during the wax melting process. Never leave the melting wax unattended, and always have a fire extinguisher nearby in case of emergencies. By following these steps, your wax will be melted to perfection, ready to be dyed and transformed into beautiful candles.
Adding the Dye to the Wax
Once your candle wax is melted to a liquid state, it’s time to add the dye and bring vibrant color to your candles. Adding the dye requires a careful and calculated approach to achieve the desired color intensity. Follow these steps to effectively add the dye to the wax:
- Choose your dye: Select the type of dye that is suitable for your wax, such as liquid dyes, dye blocks, or dye chips. Ensure that the dye is specifically formulated for candle making to achieve the best results.
- Start with a small amount: Begin by adding a small amount of dye to the melted wax. It’s better to start with less dye and gradually increase the amount to reach the desired color. Remember, you can always add more, but it’s difficult to lighten the color once it’s too dark.
- Stir gently: Use a heat-resistant stirring utensil to gently stir and mix the dye into the melted wax. Stir in a slow and circular motion to ensure thorough and uniform distribution of the dye throughout the wax. This will help achieve an even color in your candles.
- Observe and adjust: As you stir, observe the color development. The dye may take some time to fully incorporate into the wax. If the color is too light, gradually add more dye and continue stirring until the desired color is achieved.
- Test the color: To ensure the final color result, take a small sample of the dyed wax and let it cool slightly. This will allow you to see the color more accurately. Adjust the color by adding more dye if needed, or introduce other colors to create unique shades.
- Mixing different colors: If you want to create custom colors, you can mix different dyes together. Experiment with different ratios and combinations to achieve your desired shades. Keep track of the measurements used, so you can replicate the color in future projects.
- Exercise patience: The color of your candles may slightly darken as the wax cools and solidifies. Be patient and wait until the wax has completely solidified before assessing the final color result. This will give you the most accurate representation of the dyed wax.
- Note down your measurements: It’s important to record the dye measurements and the mixing process if you have created a custom color. This will help you reproduce the color in the future and maintain consistency across batches.
By adding the dye to the melted wax with precision and care, you can achieve vibrant and eye-catching colors in your candles. Remember to start with a small amount of dye, gradually increase as needed, and always test the color before pouring into the molds. With practice, you’ll become skilled at creating beautiful and unique colored candles.
Stirring and Combining the Dye
Stirring and combining the dye is a crucial step in the candle dyeing process. Properly mixing the dye into the melted wax ensures even distribution and vibrant color throughout your candles. Follow these steps to effectively stir and combine the dye:
- Melt the wax: Start by melting your candle wax using a double boiler or a melting pot. Heat the wax until it reaches the recommended pouring temperature.
- Add the dye: Once the wax has melted, it’s time to add the dye. Depending on the type of dye you’re using, whether it’s liquid dye, dye blocks, or dye chips, carefully add it to the melted wax. Start with a small amount and gradually increase if needed.
- Stir gently but consistently: Use a heat-resistant stirring utensil to gently stir the dye into the wax. Stir in a slow and circular motion to ensure thorough mixing. It’s important to stir consistently and evenly to achieve uniform color dispersion.
- Scrape the sides and bottom: While stirring, pay attention to the sides and bottom of the melting pot or double boiler. Make sure to scrape any dye or wax that sticks to the sides or bottom to ensure complete incorporation of the dye into the wax.
- Mix thoroughly: Continue stirring until the dye is fully combined with the wax. Make sure there are no streaks or clumps of dye remaining. The wax should have a smooth and consistent color throughout.
- Test the color: To ensure the accuracy of the color, take a small sample of the dyed wax and allow it to cool slightly. This will give you an idea of how the color will appear once the candles have solidified. Adjust the color by adding more dye if desired.
- Mixing different dyes: If you want to create custom colors or unique shades, you can experiment by mixing different dyes together. Use a separate container to combine the dyes before adding them to the melted wax. Gradually add the mixed dye combination to achieve your desired color.
- Have patience: Stirring and combining the dye may take some time and patience. Take your time to ensure even distribution and the proper blending of colors. Avoid rushing the process, as it may result in uneven colors in your candles.
By following these steps, you can ensure that the dye is thoroughly mixed and combined with the wax, resulting in beautifully colored candles. Remember to stir gently but consistently, scrape the sides and bottom of the pot, and test the color before pouring the dyed wax into the molds. With practice, you’ll become adept at achieving consistent and vibrant colors in your candles.
Pouring the Dyed Wax into Molds
Once you have achieved the desired color for your candle wax, it’s time to pour it into the molds. The pouring process requires precision and careful handling to ensure the wax fills the molds evenly and without any spills. Follow these steps to effectively pour the dyed wax into molds:
- Prepare your molds: Make sure your chosen candle molds are clean and dry. If necessary, lightly coat the mold interiors with mold release spray or a thin layer of vegetable oil to facilitate easy removal of the cooled candles.
- Secure the wick: If using a wick, ensure it is secured in the center of the mold. Use a wick holder, pencil, or any other suitable device to keep the wick in place as you pour the wax.
- Heat stabilization: If you’re using a heat-sensitive mold, such as plastic, preheat it slightly to prevent the hot wax from cooling and solidifying too quickly upon contact.
- Pour in stages: Pour the dyed wax into the molds in stages to prevent air bubbles and uneven distribution. Start by filling the molds about halfway, then let the wax cool and solidify partially before pouring the remaining wax to the desired fill level.
- Control the pouring speed: Pour the wax slowly and steadily into the molds to avoid spills or splatters. Maintain a controlled pouring speed to ensure even filling without causing bubbles or overflow.
- Avoid overfilling: Be mindful not to overfill the molds, as the wax may expand and overflow upon solidification. Leave a small space at the top to accommodate this expansion, especially for container candles.
- Tap out air bubbles: After pouring the wax, gently tap the sides of the molds to dislodge any trapped air bubbles. This will help create a smooth, professional-looking surface on the finished candle.
- Allow the wax to cool and solidify: Once you have poured the dyed wax into the molds, let it cool and solidify undisturbed. Follow the recommended cooling time for your specific wax type to ensure optimal results.
Pouring the dyed wax into molds requires careful attention to detail to achieve well-formed and visually appealing candles. Remember to pour in stages, control the pouring speed, tap out air bubbles, and allow sufficient cooling time for the wax to solidify. With practice, you’ll master the art of pouring and create beautiful candles that showcase your dyed wax colors.
Solidifying and Cooling the Candles
After pouring the dyed wax into the molds, it’s important to allow sufficient time for the candles to solidify and cool. Proper solidification and cooling ensure that the candles set properly and maintain their shape. Follow these steps to effectively solidify and cool your candles:
- Minimize disturbance: Once you’ve poured the dyed wax into the molds, avoid moving or disturbing the candles until they have solidified and cooled completely. Any movement during this process may cause uneven surfaces or misshapen candles.
- Follow recommended cooling time: The cooling time for candles depends on the type of wax and the size of the candles. Follow the specific instructions and recommended cooling time provided by the manufacturer of your chosen wax type.
- Create a draft-free environment: Find a cool and draft-free area where the candles can set undisturbed. Air currents can affect the cooling process and may result in uneven surfaces or cracking.
- Avoid extreme temperature changes: Sudden temperature changes can cause the wax to shrink or expand, leading to potential cracking or other deformities in the candles. Avoid placing freshly poured candles in areas with fluctuating temperatures.
- Inspect for imperfections: Once the candles have solidified and cooled, inspect them for any imperfections such as air pockets, surface irregularities, or signs of cracking. If necessary, make note of any adjustments or improvements for future batches.
- Trim the wick: After the candles have completely cooled, trim the wicks to a suitable length, typically around ¼ inch (0.6 cm). This helps ensure optimal burning performance and minimizes excessive smoke and soot.
- Store the cooled candles: Once the candles are fully solidified and cooled, you can carefully remove them from the molds and store them in a cool, dry place. It’s advisable to wrap them in tissue paper or place them in suitable candle containers to protect them from dust and prevent color fading.
Properly solidifying and cooling your candles is essential to maintain their shape, appearance, and overall quality. Follow the recommended cooling time, create a draft-free environment, and inspect for any imperfections. With patience and care, you’ll achieve beautifully solidified and cooled candles ready for use or display.
Cleaning Up and Storing Leftover Wax and Dye
After you have finished dyeing your candles, it’s important to properly clean up and store any leftover wax and dye for future use. This will help maintain the quality of your materials and prevent any waste. Follow these steps to effectively clean up and store leftover wax and dye:
- Allow the wax to solidify: If you have leftover melted wax, allow it to cool and solidify completely. This will make it easier to handle and store.
- Remove any contaminants: Before storing the leftover wax, make sure to remove any wick debris, dye chips, or foreign objects. These can contaminate the wax and affect its quality when reused.
- Cut or break the wax into smaller pieces: If the leftover wax is in a large chunk, consider cutting or breaking it into smaller pieces. This will make it easier to melt when you’re ready to use it again.
- Label and store the wax: Place the cleaned and cut wax pieces in airtight containers or resealable bags. Label them with the type of wax and any relevant details, such as the color or scent used, for easier identification in the future.
- Clean your tools and utensils: Thoroughly clean any tools, utensils, or containers used in the dyeing process. Use hot, soapy water to remove any wax residue or dye stains. Rinse them well and allow them to dry completely before storing.
- Store the dye properly: Ensure that the dye is stored in a cool and dry place, away from direct sunlight, extreme temperatures, or moisture. This will help maintain its color, potency, and overall quality for future use.
- Review your dye’s shelf life: Check the expiration date or recommended shelf life of your dye. If it has expired or is past its recommended usage time, it’s advisable to dispose of it properly and acquire fresh dye for your next project.
- Organize and store your materials: Keep your leftover wax, dye, and other candle making supplies in a designated area or storage container. This will make it easier to locate and access them for future projects.
- Keep safety in mind: When storing wax and dye, ensure that they are stored out of reach of children and pets. Additionally, avoid storing them near flammable materials or heat sources.
Properly cleaning up and storing leftover wax and dye allows you to maximize their use and minimize waste. By following these steps, you can maintain the quality of your materials and have them readily available for your next candle-making adventure.
Troubleshooting Common Problems
While dyeing candle wax can be a rewarding process, it’s not uncommon to encounter some challenges along the way. Understanding how to troubleshoot these common problems will help you address them effectively. Here are some common issues you may encounter and their possible solutions:
- Fading or dull colors: If your dyed candles appear faded or dull, it could be due to insufficient dye concentration. Increase the amount of dye used in the next batch to achieve more vibrant colors.
- Uneven color distribution: Uneven color distribution may occur if the dye is not mixed thoroughly with the melted wax. Ensure thorough stirring and mix the dye evenly, giving extra attention to scraping the sides and bottom of the pot.
- Wax cooling too quickly: If your wax cools too quickly, it can result in uneven surfaces or cracking. Consider preheating your molds slightly or moving them to a warmer area to allow the wax to cool more slowly and evenly.
- Wet spots or air pockets: Wet spots or air pockets can form on the surface of your candles, often due to temperature fluctuations or improper pouring techniques. To prevent these issues, ensure your molds are at the proper temperature and pour the wax slowly, filling in stages to minimize air entrapment.
- Stained or discolored candle molds: Some dyes may leave stains or discoloration on your candle molds. To prevent this, ensure your molds are clean and dry before pouring the dyed wax. You can also consider using mold release spray or a thin layer of vegetable oil before pouring to facilitate easy removal.
- Excessive or insufficient color intensity: Achieving the desired color intensity can be a challenge. If your color is too intense, reduce the amount of dye used in the next batch. Conversely, if the color is not vibrant enough, increase the dye amount until the desired intensity is achieved.
- Color bleeding or migration: If you notice colors bleeding or blending together, it may be due to using incompatible dyes or overdyeing the wax. Avoid mixing incompatible dyes and test smaller batches before dyeing larger quantities to prevent color bleeding or migration.
- Cracking or uneven surfaces: Cracking or uneven surfaces in your candles can be caused by rapid or uneven cooling. Ensure that your candles cool in a draft-free environment and at a consistent temperature. Consider using heat-resistant molds to minimize cracking.
Remember, practice and experimentation are key to mastering the art of dyeing candle wax. By troubleshooting common problems as they arise, you’ll develop a deeper understanding of the dyeing process and be able to create stunning, vibrant candles.