
Materials Needed
Candle making can be a rewarding and creative hobby. To get started, you’ll need a few key materials. Here are the essential supplies you’ll need to make your own candles:
- Wax: The first thing you’ll need is wax. There are various types of wax available, such as soy wax, beeswax, and paraffin wax. Choose the one that suits your preferences and needs.
- Wicks: Selecting the right wick is crucial for a successful candle. Wicks come in different sizes and materials, so make sure to choose one that matches the size and type of your candle.
- Container: Consider the container or vessel you want to pour your candle into. It could be a glass jar, a tin, or any other heat-resistant container. Make sure it’s clean and free from any cracks.
- Fragrance: If you want scented candles, you’ll need fragrance oils or essential oils. These add a pleasant aroma to your candles and create a relaxing ambiance.
- Colorants: To give your candles a touch of color, you can use liquid or powdered candle dye. Experiment with different shades to achieve the desired effect.
- Double Boiler or Melting Pot: Having a double boiler or a melting pot dedicated to candle making is essential. This equipment enables you to melt the wax safely and efficiently.
- Thermometer: A thermometer will help you monitor the temperature of the melted wax. It’s important to maintain the right temperature for optimal results.
- Heat-Resistant Utensils: You’ll need heat-resistant utensils like a stir stick, spoon, or spatula to mix and pour the melted wax.
- Protective Gear: Candle making involves working with hot wax, so it’s important to protect yourself. Consider using heat-resistant gloves, goggles, and an apron to keep yourself safe.
- Optional Accessories: Depending on your creativity and style preferences, you might want to decorate your candles with ribbons, labels, or charms.
Having these materials at hand will make the candle making process smooth and enjoyable. Before you begin, ensure that your work area is clean and well-ventilated to ensure a safe and comfortable candle making experience.
Choosing the Right Wax
When it comes to candle making, choosing the right wax is essential. The type of wax you use will impact the appearance, burn time, and overall quality of your candles. Here are a few options to consider:
- Soy Wax: Soy wax is a popular choice among candle makers. Made from soybean oil, it is renewable, sustainable, and eco-friendly. Soy candles have a clean burn, produce less soot, and have a longer burn time compared to other waxes.
- Beeswax: Beeswax is a natural wax produced by bees. It has a delightful, sweet scent and a beautiful golden color. Beeswax candles are known for their long burn time and their ability to purify the air by releasing negative ions.
- Paraffin Wax: Paraffin wax is a widely used wax due to its affordability and ease of use. It has a high melting point, which makes it suitable for holding fragrances well. However, paraffin wax is derived from petroleum, so it is not as eco-friendly as other options.
- Blended Wax: Blended waxes are a combination of different types of wax. These blends offer the benefits of different waxes, such as the clean burn of soy wax and the scent throw of paraffin wax. Experimenting with blended waxes can help you achieve the desired qualities in your candles.
Consider factors like burn time, scent throw, and environmental impact when choosing the right wax for your candles. Each type of wax has its own unique characteristics, so it’s worth trying out different options to find the one that suits your preferences.
Additionally, make sure to select wax that is specifically designed for candle making. Candle-making wax has additives that improve its performance, such as UV stabilizers to prevent color fading and additives to enhance fragrance retention.
Remember, the quality of your candles depends on the quality of the wax you choose. So take your time to research and experiment with different waxes to find the perfect fit for your candle making endeavors.
Selecting a Wick
Choosing the right wick is crucial for a successful candle. The wick determines how evenly the candle will burn and how well it will release fragrance. Here are some factors to consider when selecting a wick:
- Wick Type: There are various types of wicks available, such as cotton wicks, wooden wicks, and braided wicks. Cotton wicks are the most common and versatile option, suitable for different types of candles. Wooden wicks provide a crackling sound and a unique aesthetic. Braided wicks are great for large or scented candles.
- Wick Size: The size of the wick determines the amount of fuel the wick can draw and the heat it produces. Choosing the right wick size depends on factors like the diameter of the candle and the type of wax. If the wick is too small, the candle may not burn properly, leading to tunneling. If the wick is too large, the candle may produce excessive soot or have a flickering flame. Consult wick size charts or conduct test burns to find the optimal size.
- Wick Coating: Some wicks come pre-coated with an appropriate amount of wax or other substances to facilitate ignition and control the burn rate. Pre-coated wicks make the candle-making process easier for beginners as they eliminate the need for priming.
- Candle Type: Consider the type of candle you’re making. Different candle sizes, shapes, and materials require specific wicks. For example, container candles usually require wicks with a metal tab at the base for easy attachment, while pillar candles need self-supporting wicks.
- Experimentation: Don’t be afraid to experiment with different wicks to find the perfect fit for your candles. Factors like fragrance load, wax type, and container size can affect wick performance. Conducting test burns with different wick options can help you determine the best wick for your specific candle-making project.
Remember that choosing the right wick is a crucial step in candle making. It’s worth taking the time to research and experiment to ensure that your candles burn evenly, have a steady flame, and release fragrance effectively. The right wick will contribute to a successful and enjoyable candle-making experience.
Adding Fragrance and Color
Adding fragrance and color to your candles can elevate their appearance and create an inviting atmosphere. Here’s how you can incorporate fragrance and color into your candle making:
- Fragrance Oils: Fragrance oils are specifically formulated to be used in candle making. They come in a wide variety of scents, from floral and fruity to warm and cozy. When adding fragrance oils, follow the recommended usage guidelines provided by the manufacturer. Too much fragrance oil can affect the burning performance of the candle, so it’s important to measure accurately.
- Essential Oils: If you prefer a natural scent, you can use essential oils in your candles. Essential oils are derived from plants and offer a wide range of aromatic options. Be aware that not all essential oils are suitable for candle making, as some may have a low flash point or could pose a fire hazard. Research the specific properties of essential oils and their usage in candle making before selecting and using them.
- Candle Dye: Candle dye is specially formulated to dissolve in hot wax and provide vibrant color. Whether you want bold and vibrant hues or subtle pastel shades, candle dye allows you to customize the appearance of your candles. Start with a small amount of dye and gradually add more until you achieve the desired color intensity.
- Color Blocks or Chips: An alternative to liquid candle dye is color blocks or chips. These are concentrated dye additives that can be melted and mixed with the wax. They offer precise control over the color saturation and can be combined to create unique color blends.
- Marbling: If you enjoy artistic designs, you can experiment with marbling techniques. Using different colored waxes, you can create marbled patterns within your candles. Simply melt the different colored waxes, pour them into the container in alternating layers, and use a skewer or toothpick to create swirls and patterns.
When adding fragrance and color to your candles, make sure to stir the wax gently and thoroughly to ensure even distribution. It’s also important to consider the type of wax you’re using, as some fragrances and dyes may perform differently with different wax types.
Experimentation is key when it comes to adding fragrance and color to your candles. Test different combinations, scents, and hues to create unique and personalized candles that reflect your style and preferences.
Preparing the Candle Container
Before pouring the melted wax into your candle container, it’s important to properly prepare it. Taking the time to prepare the candle container ensures that your candle will have a clean and professional finish. Here are some steps to follow:
- Clean the Container: Ensure that the container you’re using is clean and free from any dust, debris, or residue. Wash it with warm, soapy water and dry it thoroughly. This will help the wax adhere better to the container and prevent any unwanted particles from interfering with the appearance of your candle.
- Secure the Wick: Place the wick in the center of the container and secure it in place. There are multiple ways to do this, depending on the type of wick and container. You can use a wick sticker, glue dots, or a hot glue gun to hold the wick in place. Make sure the wick is straight and taut to ensure a centered burn.
- Optional Pre-Warming: If you’re working with a container that has a high temperature difference compared to the melted wax, you might want to pre-warm the container. This can prevent potential cracking or warping caused by the temperature shock when pouring the hot wax into a cold container. Simply place the container in a warm oven for a few minutes or use a heat gun to warm the surface gently.
- Choose Additional Decorations: If you want to add any decorative elements to your candles, now is the time to do so. You can attach ribbons, charms, or labels to enhance the aesthetic appeal of your candle. Make sure these decorations are heat-resistant and won’t interfere with the burning process or the safety of the candle.
- Position the Wick Guide: For container candles, consider using a wick guide or a wick centering tool to keep the wick centered during the pouring process. This ensures an even burn and prevents the wick from drifting to one side of the container.
By properly preparing the candle container, you’ll create a solid foundation for your candle-making process. This will help ensure that your finished candle has a professional look and performs optimally when burned.
Remember to pay attention to the size and shape of the container when choosing your wick and fragrance load. Take your time to carefully prepare the container, and you’ll be on your way to creating beautifully crafted candles.
Melt the Wax
Melting the wax is a crucial step in candle making that requires careful attention. Here’s a step-by-step guide to help you melt the wax effectively:
- Set Up the Double Boiler: Fill a large pot with a few inches of water and place it on the stove. Place a heat-resistant pouring pitcher or a smaller pot on top of the larger pot, creating a double boiler setup. This indirect heat method will help melt the wax gently and prevent it from scorching or overheating.
- Prepare the Wax: Measure out the desired amount of wax for your candle, according to your chosen recipe or container size. Cut the wax into smaller chunks or use pre-portioned wax beads for easier melting.
- Add Wax to the Pouring Pitcher: Place the measured wax into the pouring pitcher or the smaller pot of the double boiler setup. Ensure that the pouring pitcher is clean and dry before adding the wax.
- Heat the Water: Turn on the stove and heat the water in the larger pot over medium heat. The steam generated by the boiling water will gently melt the wax in the pouring pitcher. Avoid using high heat, as it can lead to the wax overheating, causing potential safety hazards.
- Melt the Wax: As the water heats up, the wax in the pouring pitcher will begin to melt. Stir the wax occasionally with a heat-resistant utensil, such as a wooden stick or a silicone spatula, to ensure even melting. Keep a close eye on the wax and monitor its temperature using a thermometer.
- Maintain the Proper Temperature: The melting temperature will depend on the type of wax you’re using. Different waxes have different melting points. Follow the specific temperature guidelines provided for your chosen wax type. Avoid overheating the wax, as this can lead to discoloration, scorched fragrance, or even fire hazards.
- Remove from Heat: Once the wax has melted completely, remove the pouring pitcher from the heat source. Wipe the bottom of the pouring pitcher to prevent any water droplets from entering the melted wax.
Remember to exercise caution while working with hot wax and heat sources. Be sure to protect your hands with heat-resistant gloves and follow proper safety measures to prevent accidents.
Melting the wax properly is essential for the overall success of your candle making. Take your time, follow the guidelines for your specific wax type, and monitor the temperature closely to achieve the best results.
Add Fragrance and Color to the Wax
Once the wax is melted and ready, it’s time to add fragrance and color to create beautifully scented and visually appealing candles. Follow these steps to incorporate fragrance and color into your melted wax:
- Fragrance: Carefully measure the desired amount of fragrance oil or essential oil according to the manufacturer’s recommended usage rate. Remember that different scents have different strengths, so adjust the amount accordingly for a pleasant scent without overwhelming the candle. Slowly pour the fragrance oil into the melted wax while stirring gently to ensure even distribution.
- Colorants: If you wish to add color to your candles, it’s time to introduce the colorants. Liquid or powdered candle dye can be used to achieve the desired hue. Begin by adding a small amount of dye and gradually increase until you achieve the desired color intensity. Stir the wax thoroughly but gently to ensure an even dispersion of color throughout the wax.
- Blending Colors: For more creative options, mix different dye colors to create unique shades. Create your own color combinations by adding small amounts of different color dyes and stirring until the desired shade is achieved. Remember to keep track of the proportions used so you can replicate the color in future projects.
- Marbling: To achieve a marbled effect, do not fully mix the colorant into the wax. Instead, quickly pour multiple colors directly into the container one after another, layering them in a random or patterned manner. Use a skewer, toothpick, or a stirring utensil to create swirls or patterns in the wax before it begins to cool and set.
- Test and Adjust: To ensure the desired scent and color results, it’s recommended to conduct small test batches before making a larger quantity of candles. This allows you to make any necessary adjustments to the fragrance or color before committing to a larger production.
When adding fragrance and color to the wax, avoid overloading the wax with excessive fragrance oil or dye. This can affect the burning performance and appearance of the candle. Remember to take notes of the fragrance and color combinations used, allowing you to recreate successful results in the future.
Adding fragrance and color to the wax is an exciting part of candle making that allows you to create unique candles that suit your preferences and style. Enjoy the process and let your creativity shine through!
Attach the Wick
Attaching the wick correctly is a crucial step in candle making to ensure proper burning and a well-centered flame. Follow these steps to securely attach the wick to your candle container:
- Prepare the Wick: Trim the wick to the desired length, leaving a few inches extra to work with. This will provide enough length for the wick to extend above the candle’s surface once it’s poured.
- Choose a Wick Sustainer or Tab: Depending on the type of wick you’re using, you may need a wick sustainer or tab. A metal sustainer or tab will help secure the wick at the bottom of the container and provides stability during pouring and burning.
- Attach the Sustainer or Tab: Attach the sustainer or tab to the end of the wick by threading it through the small hole or around the clip of the sustainer. Ensure it is centered and securely attached to prevent the wick from moving or falling while pouring the wax.
- Secure the Wick to the Container: Place a small amount of hot glue or a wick sticker at the bottom center of the container. Press the sustainer or tab firmly onto the glue or sticker, making sure it adheres well to the container’s surface. Make sure the wick is straight and taut, centered within the container.
- Use a Wick Centering Device: For larger or wider containers, consider using a wick centering device to ensure the wick stays centered as you pour the wax. These devices are placed on top of the container, with the wick passing through the center. They help keep the wick in position during the pouring process.
- Ensure Proper Wick Positioning: Double-check the positioning of the wick before pouring the wax. Ensure it is straight, centered, and properly attached to the container’s base. Any misalignment or loose attachment can affect the candle’s burn and overall appearance.
Properly attaching the wick ensures an even burn and consistent flame throughout the life of the candle. Taking the time to secure the wick correctly at the beginning will result in a more professional and enjoyable candle-making experience.
Remember to refer to specific guidelines for wick attachment provided by the manufacturer, as different wick types and containers may require slightly different techniques. Always prioritize safety and accuracy when working with hot glue or other adhesives.
Pour the Wax into the Container
Now that the wax is melted and the wick is securely attached, it’s time to pour the melted wax into the container. This step requires careful precision to ensure a clean and professional-looking candle. Follow these steps to pour the wax into the container:
- Prepare the Work Area: Place a heat-resistant surface, such as a baking sheet or a thick towel, to protect your work area from any potential spills or drips.
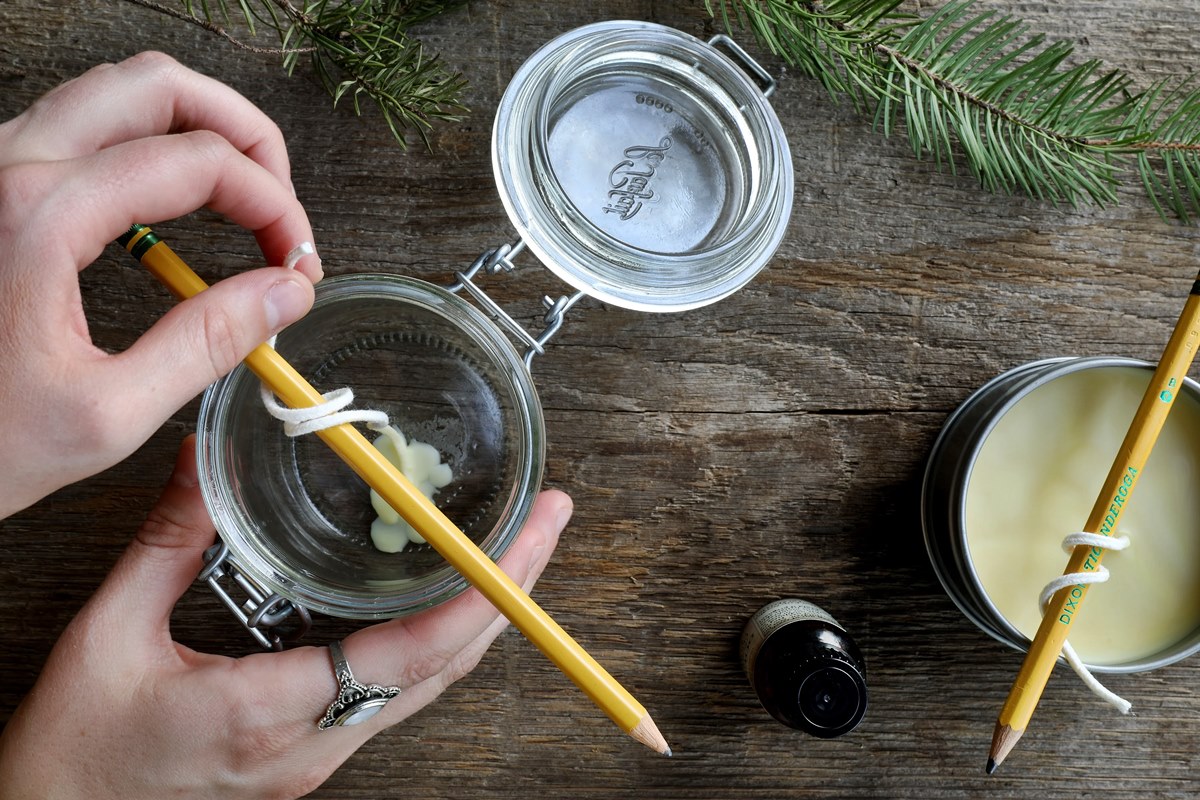
- Secure the Wick: Use a wick centering device or a pencil laid across the container’s opening to keep the wick centered and upright during the pouring process. This ensures an even burn and prevents the wick from shifting to one side.
- Pour the Wax Slowly: Slowly and steadily pour the melted wax into the container. Start pouring from a low height to minimize air bubbles and splashing. Aim to pour the wax down the side of the container rather than directly onto the wick to avoid disturbance.
- Maintain a Steady Hand: Keep a steady hand while pouring to control the flow of the wax. It’s important to pour the wax evenly without spilling or overfilling the container.
- Leave Space at the Top: To allow room for the candle to burn and prevent overflow, leave some space (about 1/2 to 1 inch) between the surface of the wax and the rim of the container.
- Avoid Moving the Candle: Once the wax is poured, avoid moving or disturbing the candle until it has completely cooled and solidified. This helps prevent any imperfections or uneven surfaces from forming.
- Optional Layers: If you’re planning to create layered or gradient candles, allow the first layer of wax to slightly cool and solidify before pouring the next layer. This ensures clean and distinct layers.
- Remove Air Bubbles: If you notice any air bubbles in the wax, gently tap the sides of the container or use a toothpick to stir the wax slightly to release the trapped air bubbles.
Take your time and pour the wax with precision, ensuring a smooth and even finish. If you accidentally overpour or spill wax, quickly clean it up using a paper towel or cotton swab before it solidifies.
Remember, practice makes perfect. Don’t be discouraged if your first attempts are not flawless. With time and experience, you’ll master the art of pouring the wax into the container and create stunning candles.
Allow the Candle to Cool and Set
After pouring the wax into the container, it’s crucial to allow the candle to cool and set properly. This step is essential for achieving a solid, even burn and preserving the overall quality of your candle. Follow these important guidelines:
- Patience is Key: Avoid the temptation to touch or move the candle while it’s cooling. Letting the candle cool at room temperature allows the wax to solidify evenly and prevent any potential cracks or deformities.
- Avoid Drafts: Place the candles in a draft-free area to prevent uneven cooling and potential issues with the burn. Drafts can cause the wax to solidify unevenly and affect the overall appearance of your candle.
- Expected Cooling Time: Depending on the size of the candle and the type of wax used, cooling times can vary. Generally, it takes several hours for the wax to completely cool and set. Be sure to consult the instructions provided by your wax manufacturer for specific guidance on cooling times.
- Check for Sinkholes: As the candle cools, sinkholes may form in the wax. If you notice any depressions or shrinkage, you can use a heat gun or a hairdryer to gently warm the surface of the candle and fill in any imperfections. This step helps achieve a smooth and even appearance.
- Prevent Frosting: Frosting, a natural crystalline pattern, may appear on the surface of your candle as it cools. While it doesn’t affect the performance of the candle, you may opt to remove frosting using a heat gun or a hairdryer to gently warm the surface.
- Trimming the Wick: After the candle has completely cooled and set, trim the wick to approximately 1/4 inch. A long wick can cause excessive flickering, smoking, and uneven burning. Trimming the wick promotes a clean and steady flame.
- Labeling and Decorating: Once the candle has cooled and set, you can add labels, tags, or other decorative elements to personalize your creation. Ensure that the candle’s surface is clean and dry before applying any additional decorations.
It’s important to exercise patience and resist the urge to use or gift the candle before it has fully set. Rushing this important step may result in a compromised burn quality and affect the longevity of your candle.
By allowing your candle to cool and set properly, you ensure that it is ready to deliver a delightful and consistent experience when it’s time to light it up.
Trim the Wick
Trimming the wick is a crucial step in maintaining the performance and overall safety of your candle. A properly trimmed wick ensures a clean burn and helps prevent issues such as excessive smoking, mushrooming, and uneven flames. Follow these steps to properly trim the wick:
- Cool the Candle: Ensure that the candle has completely cooled down before attempting to trim the wick. This will prevent any accidental burns or injuries.
- Remove Excess Debris: Check the top surface of the candle for any debris or wick trimmings. Use a soft brush or a lint-free cloth to gently remove any loose debris.
- Check the Wick Length: Evaluate the length of the wick and ensure it is approximately 1/4 inch (6 mm) above the candle surface. Ideally, the wick should be at a length that allows for a clean and steady flame.
- Trim the Wick: Using a pair of wick trimmers or sharp scissors, carefully trim the wick to the desired length. Be sure to remove any charred or excess wick material.
- Dispose of Wick Trimmings: After trimming the wick, dispose of the trimmed pieces in a safe manner. You can use tissue paper or a small receptacle to collect the wick trimmings and dispose of them in a waste bin.
- Keep the Wick Centered: While trimming the wick, make sure it remains centered within the candle. A well-centered wick promotes an even burn, prevents tunneling, and ensures efficient use of the wax.
- Trim Regularly: It’s important to trim the wick before each subsequent burning session. As the candle burns, the wick may become longer or develop a mushroom shape. Regularly trimming the wick helps maintain a consistent flame height and promotes an optimal burn.
- Monitor While Burning: Even with a properly trimmed wick, it’s essential to monitor the candle while it’s burning. Avoid leaving a burning candle unattended and keep it away from drafts, flammable materials, and reach of children or pets.
Regularly trimming the wick not only ensures a better burning experience but also helps extend the overall lifespan of your candle. It’s a small but important step that contributes to the longevity and safety of your candle enjoyment.
Remember to exercise caution while trimming the wick, ensuring that the candle is cool and stable before attempting to trim it. Taking the time to trim the wick properly will reward you with a well-maintained candle and a pleasant burning experience.
Tips and Tricks for Candle Making
Candle making is a rewarding and creative hobby that allows you to customize your own candles. Whether you’re a beginner or have experience in candle making, here are some helpful tips and tricks to enhance your candle making journey:
- Measure Accurately: Precise measurements are crucial to maintain consistency in your candle making. Use a kitchen scale or measuring cups designed for candle making to ensure accurate measurements of wax, fragrance, and color.
- Choose High-Quality Ingredients: Using high-quality wax, fragrance oils, and dyes will greatly impact the quality of your candles. Invest in reputable suppliers and opt for natural-based ingredients when possible.
- Experiment with Fragrance Ratios: Finding the right fragrance ratio can be a matter of personal preference. Experiment with different scent strengths by adjusting the amount of fragrance oil used to achieve the desired scent intensity.
- Keep an Eye on Temperature: Monitoring the temperature of your wax is crucial for successful candle making. Follow the recommended temperature ranges for melting, adding fragrance, and pouring to achieve optimal results.
- Use a Heat Gun: If you notice air bubbles or imperfections on the surface of your poured wax, a heat gun can be used to smooth out the surface. Gently apply heat to the affected area until the wax becomes fluid and the imperfections disappear.
- Utilize a Candle Making Journal: Keep a candle making journal to jot down your measurements, recipe variations, and observations. This helps you track your progress, replicate successful creations, and learn from any mistakes.
- Experiment with Color Layers: Get creative with color layering by pouring fully cooled and solidified colored wax layers on top of each other. This adds depth and visual interest to your candles.
- Consider Adding Textures: For a unique touch, consider adding textures to your candles. You can use various materials like dried flowers, herbs, or glitter to create visually appealing and textured candles.
- Choose Safe Candle Containers: When selecting candle containers, ensure they are heat-resistant and suitable for the type of wax you’re using. Avoid containers with cracks or flammable materials that could compromise safety.
- Practice Proper Candle Care: Educate yourself and others on safe burning practices. Always trim the wick, keep the candle away from flammable objects, and never leave a burning candle unattended.
- Embrace Creativity: Don’t be afraid to let your creativity flow. Experiment with different scents, colors, shapes, and techniques to create unique and individualized candles.
By following these tips and tricks, you can enhance your candle making skills and create beautiful, aromatic candles that you can enjoy or gift to others. Keep learning, exploring, and refining your techniques to perfect your candle making craft.
Frequently Asked Questions
Candle making may raise some questions along the way. Here are answers to a few commonly asked questions about candle making:
- What type of wax should I use?
- How do I prevent air bubbles in my candles?
- Why is my candle producing soot?
- How can I make my candles burn longer?
- Can I reuse old candle wax?
- How do I clean candle wax from containers?
- Can I add objects or embeds to my candles?
The type of wax you choose depends on your preferences and the desired characteristics of your candles. Soy wax, beeswax, and paraffin wax are popular options. Each has its own unique qualities and benefits.
To minimize air bubbles, pour the wax slowly and at a lower height. You can also gently tap the container or use a toothpick to stir the wax slightly to release trapped air bubbles. Preheating your containers can also help reduce the chances of air bubbles forming.
A candle can produce soot if the wick is too long or if you’re using a low-quality or improperly matched wick. It’s essential to trim the wick to the appropriate length and choose the right wick size for your candle. Properly formulated wax and fragrance choices also play a role in reducing soot.
To make your candles burn longer, ensure that you use the recommended wick size for the diameter of your candle. Avoid burning the candle for short periods, as it may cause tunneling and waste wax. Additionally, keep the candle away from drafts, which can cause uneven burning and shorten the burn time.
Yes, you can reuse leftover and old candle wax. Melt the wax down, remove any debris or wick remnants, and pour it into new containers or molds. You may need to add a little extra fragrance or color for optimal results.
To clean out old candle wax from containers, place the container in the freezer for a few hours. The frozen wax will shrink and become easier to remove. Use a butter knife or similar tool to gently pry the wax out. Wash the container with warm, soapy water to remove any remaining residue.
Yes, you can add objects or embeds to your candles. Make sure the objects are heat-resistant and won’t pose a fire hazard. Consider using dried flowers, small figurines, or decorative elements to enhance the aesthetic appeal of your candles.
These are just a few frequently asked questions about candle making, but there is much more to learn and discover. Don’t hesitate to explore further, experiment, and expand your knowledge as you embark on your candle-making journey.