
Gather the necessary materials
Before you begin changing the water filter in your Samsung refrigerator, it’s important to gather all the necessary materials. Having everything you need on hand will make the process much more efficient. Here’s a list of items you’ll need:
- Replacement water filter
- Clean cloth or towel
- Bucket or container (to catch any water spills)
- Latex gloves (optional, for those who prefer extra hygiene)
The replacement water filter is perhaps the most important item on the list. It’s crucial to choose a genuine Samsung water filter that is compatible with your refrigerator model. These filters are designed to ensure the highest water quality and maintain the overall performance of your appliance.
Once you have all the necessary materials ready, you can proceed with the filter replacement process. Remember to always refer to the user manual specific to your Samsung refrigerator model for detailed instructions, as the process may vary slightly depending on the model.
Now that you have everything prepared, let’s move on to the next step: locating and accessing the water filter in your Samsung refrigerator.
Locate and access the water filter
In order to change the water filter in your Samsung refrigerator, you’ll need to locate and access the filter compartment. The exact location of the filter can vary depending on the refrigerator model, but here are the general steps you can follow:
- Open the refrigerator door and locate the filter housing. It is usually located in the upper right or left corner of the refrigerator compartment.
- If there is a filter indicator light, check if it is illuminated or if it has turned red. This can indicate that it’s time to replace the filter.
- Some refrigerator models have a filter housing that is hidden behind a cover or panel. In such cases, gently remove the cover or panel to reveal the filter housing.
- Once you locate the filter housing, carefully examine the position of the filter. Take note of any locking mechanisms or tabs that are securing the filter in place.
It’s important to note that the process of locating and accessing the water filter may differ depending on your specific Samsung refrigerator model. Therefore, it’s recommended to consult the user manual provided with your refrigerator for accurate instructions tailored to your appliance.
Now that you have successfully located and accessed the water filter, you’re ready to move on to the next step: preparing the refrigerator for the filter replacement process.
Prepare the refrigerator
Before replacing the water filter in your Samsung refrigerator, it’s important to properly prepare the appliance to ensure a smooth and clean process. Follow these steps to prepare your refrigerator:
- Ensure that the ice maker and water dispenser are turned off. This will prevent any accidental dispensing or spilling of water during the filter replacement.
- If there is any food or items obstructing the filter compartment, remove them to create a clear workspace.
- Take a clean cloth or towel and wipe down the area surrounding the filter compartment. This will remove any dust or debris that might have collected over time.
- Place a bucket or container under the filter compartment to catch any water that may spill or drip during the replacement process.
- If desired, put on latex gloves to keep your hands clean and prevent any contamination.
By following these preparation steps, you’ll ensure a clean and organized workspace, making the filter replacement process easier and more efficient. Properly preparing your refrigerator will also help minimize the risk of any water spills or damage to your appliance.
Now that you have prepared your refrigerator, it’s time to move on to the next step: removing the old water filter.
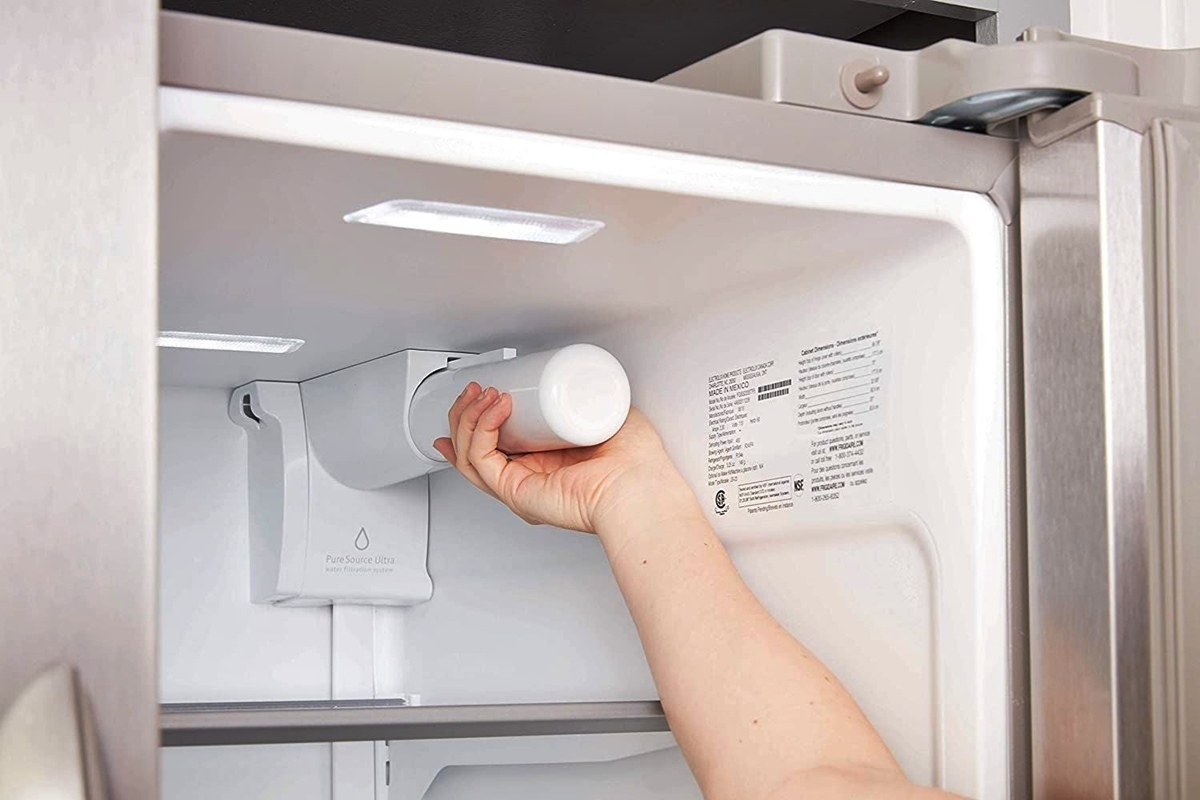
Remove the old water filter
Now that you have prepared your Samsung refrigerator, it’s time to remove the old water filter. Follow these steps to safely and properly remove the filter:
- Locate the locking mechanism or tabs that are holding the filter in place. Different Samsung refrigerator models may have varying types of locking mechanisms.
- Depending on the design, you may need to twist the filter counterclockwise, pull it downward, or press a release button to unlock it.
- Gently pull the old filter out of the filter compartment. Be cautious as some residual water may drip from the filter.
- Place the old filter in a plastic bag to prevent any potential water leakage or contamination.
- Inspect the filter for any signs of damage or clogging. If the old filter appears to be damaged or dirty, it’s definitely time for a replacement.
It’s important to make sure that the old filter is properly disposed of to prevent any environmental contamination or potential health risks. Check with your local waste management authorities for guidelines on how to dispose of the old filter responsibly.
Now that you have successfully removed the old water filter from your Samsung refrigerator, it’s time to move on to the next step: inserting the new water filter.
Insert the new water filter
With the old water filter removed, it’s time to insert the new filter into your Samsung refrigerator. Follow these steps to ensure a proper installation:
- Take the new replacement water filter out of its packaging. Make sure it is compatible with your specific Samsung refrigerator model.
- Inspect the new filter to ensure there are no visible damages or defects.
- Align the new filter with the filter compartment and insert it. The filter should fit snugly and securely into place.
- Depending on your refrigerator model, you may need to twist the new filter clockwise, push it upward, or engage a locking mechanism to install it properly.
- Ensure that the new filter is fully seated and locked into place. This will prevent any potential leaks or issues with water filtration.
It’s important to note that some models may require priming or flushing the new filter before use. Refer to your user manual for instructions specific to your Samsung refrigerator model.
By following these steps, you will have successfully inserted the new water filter into your Samsung refrigerator. Now, let’s move on to the next step: resetting the filter indicator light.
Reset the filter indicator light
After inserting the new water filter into your Samsung refrigerator, it’s important to reset the filter indicator light to ensure accurate monitoring of filter life. Follow these steps to reset the filter indicator light:
- Locate the filter indicator light on your refrigerator’s control panel. The exact location may vary depending on your specific Samsung refrigerator model.
- Press and hold the “Water Filter” button or the “Filter Reset” button on the control panel for a few seconds. Consult your user manual if you are unsure of which button to press.
- Once the filter indicator light changes or goes off, release the button. This indicates that the filter indicator light has been successfully reset.
- Double-check that the filter indicator light is no longer illuminated or displays a “Replace” or “Reset” message. This confirms the successful reset.
Resetting the filter indicator light is essential, as it ensures that you receive accurate notifications about when to replace the water filter in the future. This helps maintain a consistent flow of clean and filtered water from your Samsung refrigerator.
Now that you have reset the filter indicator light, it’s time to move on to the next step: running water through the new filter.
Run water through the new filter
After installing the new water filter in your Samsung refrigerator, it’s important to run water through the filter to flush out any air or impurities. Follow these steps to properly run water through the new filter:
- Open the refrigerator door and locate the water dispenser.
- Place a container, such as a glass or pitcher, under the water dispenser nozzle to catch the initial spurts of water.
- Press the water dispenser lever or button and allow water to flow through the new filter. Discard the first few batches of water to ensure any trapped air or particles are flushed out.
- Continue running water through the filter until the water runs clear and free of any debris.
- Inspect the water quality to ensure it meets your expectations in terms of clarity and taste.
It’s normal to experience a slight decrease in water pressure during the initial use of the new filter. However, this should improve over time as the filter settles and water flows freely through it.
By following these steps, you have successfully flushed the new water filter in your Samsung refrigerator. This ensures that you have fresh and filtered water ready for use.
Now that you have run water through the new filter, it’s time to move on to the next step: properly disposing of the old filter.
Properly dispose of the old filter
After replacing the water filter in your Samsung refrigerator, it’s important to properly dispose of the old filter. Follow these steps to ensure safe and responsible disposal:
- Remove the old water filter from the filter compartment.
- Place the old filter in a plastic bag to prevent any potential water leakage or contamination.
- Check with your local waste management authorities to determine the proper method of disposal for water filters. Some areas may have specific guidelines for disposing of filters.
- If your local waste management allows, you can dispose of the old filter in your regular trash. However, it’s important to seal it securely in a plastic bag to prevent any potential leaks.
- Alternatively, you may need to take the old filter to a designated recycling center or a drop-off location that accepts water filters.
Properly disposing of the old filter helps minimize environmental impact and ensures responsible waste management. By following the guidelines provided by your local authorities, you can contribute to a healthier and cleaner environment.
Now that you have properly disposed of the old water filter, it’s time to move on to the next step: testing the water quality.
Test the water quality
After replacing the water filter in your Samsung refrigerator, it’s important to test the water quality to ensure that it meets your expectations in terms of taste and clarity. Here’s how you can test the water quality:
- Dispense a glass of water from the refrigerator’s water dispenser or use the water for any other desired purpose.
- Observe the water’s appearance. It should be clear and free of any cloudiness or visible particles.
- Take a sip and assess the taste. The water should be fresh, clean, and devoid of any unusual or unpleasant flavors.
- If you notice any changes in the water quality, such as an odd taste or discoloration, it’s recommended to run additional water through the new filter to flush out any initial impurities or air pockets.
- If the water quality issues persist, double-check that the new filter is properly installed and seated securely. If necessary, consult the user manual or contact Samsung’s customer support for further assistance.
Regularly testing the water quality after replacing the filter ensures that your Samsung refrigerator is effectively filtering the water and providing you with clean and fresh drinking water.
By following these steps, you can be confident in the quality of water that is being dispensed from your Samsung refrigerator.
Now that you have tested the water quality, it’s important to understand the maintenance and replacing schedule for the water filter, which we will explore in the next section.
Maintenance and replacing schedule
To ensure your Samsung refrigerator continues to provide clean and filtered water, it’s important to follow a regular maintenance and replacing schedule for the water filter. Here are some general guidelines:
- Refer to the user manual or documentation that came with your Samsung refrigerator for the recommended filter replacement schedule. This can vary depending on the model and usage.
- Keep track of the filter replacement due date and set reminders if necessary, so you stay on top of regular maintenance.
- Monitor the filter indicator light on your refrigerator’s control panel. When it turns red or indicates that the filter needs replacement, it’s time to install a new one.
- Consider the quality of your water and your household’s water consumption. If you notice a decline in water quality or a decrease in flow rate, it may be an indication that the filter needs to be replaced sooner.
- Always use genuine Samsung replacement filters that are specifically designed for your refrigerator model. Generic or non-compatible filters may not provide the same level of filtration and can potentially damage your refrigerator.
Following a regular maintenance and replacing schedule ensures that your water filter continues to effectively remove impurities, providing you with clean and safe drinking water. It also helps protect the overall performance and longevity of your Samsung refrigerator.
Now that you understand the importance of maintenance and the replacing schedule for your water filter, let’s move on to some additional tips and precautions to keep in mind.
Tips and precautions
When changing the water filter in your Samsung refrigerator, it’s important to keep in mind the following tips and precautions to ensure a successful and problem-free process:
- Read and follow the instructions provided in the user manual specific to your Samsung refrigerator model. This will ensure that you are following the correct process and handling any unique features or mechanisms.
- Always ensure that the refrigerator’s power is turned off before replacing the water filter. This minimizes the risk of electrical shocks or damage to the appliance.
- Be careful when handling the old water filter, as it may still contain residual water. Always use gloves if desired, and place the old filter in a plastic bag for proper disposal.
- Take note of the date or filter replacement indicator when installing a new filter. This will help you keep track of when the next replacement is due and maintain optimal water filtration.
- Regularly check the water quality and flow rate after installing a new filter. This ensures that it is functioning properly and providing clean water for various purposes.
- If you experience any issues or concerns with your Samsung refrigerator or the water filter replacement process, consult the user manual or contact Samsung’s customer support for assistance.
- Consider purchasing and keeping a spare replacement water filter on hand. This way, you’ll be prepared when it’s time for the next filter replacement, and it helps prevent delays in getting clean water.
By following these tips and precautions, you can successfully change the water filter in your Samsung refrigerator and ensure a continuous supply of clean and filtered water for you and your family to enjoy.
Now that you’re equipped with these helpful tips and precautions, you’re ready to confidently maintain and replace the water filter in your Samsung refrigerator.