
Removing the Old Water Filter
When it comes to maintaining your Samsung appliance, changing the water filter is an essential task. Over time, the filter becomes less effective in purifying the water, and it is crucial to replace it to ensure the continued delivery of clean and fresh water. If you’re unsure how to remove the old water filter from your Samsung appliance, follow these simple steps to get the job done right.
Begin by locating the water filter. In most Samsung appliances, such as refrigerators or water dispensers, the filter is typically found in the upper right-hand corner or the back of the unit. Carefully examine your appliance’s user manual or look for a label indicating the filter’s location.
Before removing the filter, it’s important to turn off the water supply. This step prevents water from spilling out when you detach the filter. Look for the shut-off valve, usually located near the water source, and close it by turning it clockwise.
Once the water supply is turned off, you can proceed to remove the old filter. Some Samsung appliances have a push-and-release system, while others require a simple twist to unlock. Follow the manufacturer’s instructions or use gentle pressure to disengage the filter.
Once the filter is detached, be prepared for a small amount of water to drip out. Place a towel or absorbent cloth underneath the filter to catch any spills. It’s also advisable to have a container ready to catch any excess water that may come out during the removal process.
Dispose of the old filter properly, following your local recycling guidelines if applicable. Samsung also offers a mail-back program for recycling their water filters, so consider taking advantage of that option.
With the old filter safely removed, you’re now ready to install the new one. But before proceeding, take a moment to clean the filter housing. Use a soft cloth or sponge and mild detergent to wipe away any dirt or debris that may have accumulated in the area.
In the next section, we’ll guide you through the process of locating the water filter in your Samsung appliance.
Locating the Water Filter in Your Samsung Appliance
Before you can change the water filter in your Samsung appliance, it’s important to know where to find it. Different Samsung appliances may have the filter located in different areas, so let’s explore how to locate it in your specific appliance.
The first step is to consult your appliance’s user manual. The manual is a valuable resource that provides information on the location and replacement process of the water filter. If you no longer have the manual, don’t worry; there are other ways to find the filter.
For Samsung refrigerators, the water filter is commonly located in the upper right-hand corner of the fresh food compartment. Look for a small rectangular compartment with a handle or latch. This compartment houses the water filter and may have a label indicating its presence.
In some Samsung appliances, such as water dispensers or ice makers, the filter can be found at the back of the unit. Look for a panel or cover that can be removed to access the filter. The panel may have an icon or text indicating the presence of the filter.
If you’re still having trouble locating the water filter, examine the appliance itself for any labels or markings that point to the filter’s location. Some manufacturers place a sticker near the filter housing or provide a visual representation on the control panel to guide users.
Another option is to search online for specific information about your Samsung appliance model. Samsung’s official website or community forums often have helpful resources and discussions where users share their experiences and offer guidance on finding the water filter in different Samsung appliances.
Once you’ve located the water filter and familiarized yourself with its position, you can move on to the next step of the process. Remember to refer to the user manual or follow the manufacturer’s instructions for your specific model to ensure a successful and hassle-free filter replacement.
In the next section, we’ll learn how to turn off the water supply before removing the old water filter.
Turning off the Water Supply
Before attempting to remove the old water filter from your Samsung appliance, it is essential to turn off the water supply. Taking this precautionary step will prevent any water from spilling out when you detach the filter and help you avoid unnecessary mess or potential damage.
To turn off the water supply, start by locating the shut-off valve. This valve is typically situated near the water source or plumbing connection behind your appliance.
Once you have identified the shut-off valve, you can proceed to turn it off. To do this, grip the valve handle firmly and rotate it clockwise until it is fully closed. Keep in mind that the valve may require a few turns to completely shut off the water flow.
After closing the shut-off valve, it is a good idea to double-check that the water supply has indeed been turned off. You can do this by attempting to dispense water from your appliance’s dispenser or checking if the water flow has ceased at other water outlets in your home.
By turning off the water supply, you ensure that the filter can be safely removed without any water leakage. This step also prevents damage to the filter or filter housing and allows for a smoother and cleaner replacement process.
With the water supply successfully turned off, you can now proceed to the next step: preparing the replacement water filter. It’s essential to handle the new filter with care and ensure its readiness before inserting it into your Samsung appliance.
In the next section, we’ll guide you through the process of preparing the replacement water filter for installation.
Preparing the Replacement Water Filter
Before you can insert the new water filter into your Samsung appliance, it is crucial to properly prepare it for installation. Taking the time to prepare the replacement filter ensures that it functions effectively and provides you with clean and fresh water.
Start by inspecting the replacement water filter. Ensure that the packaging is intact and free from any damage. Check the filter for any visible defects or signs of wear. If you notice any issues with the filter, it is best to contact the manufacturer or supplier for assistance.
Next, familiarize yourself with the type and model of the replacement filter. Samsung appliances often require specific filters that are designed to fit and work seamlessly with their respective models. Refer to the user manual or consult the manufacturer’s website or customer support for the correct replacement filter information.
Once you have confirmed the compatibility of the replacement filter, it’s time to prepare it for installation. Most new filters come with a protective cap or cover on the inlet and outlet openings. Remove these protective covers before inserting the filter into your appliance.
To ensure a clean and efficient filtration process, it’s recommended to perform a quick rinse of the replacement filter. Hold the filter under running water for a few seconds, allowing water to flow through it. This helps to remove any residual particles or loose carbon from the filter media.
After rinsing the filter, give it a gentle shake to remove any excess water. Be mindful not to apply excessive force or handle the filter roughly, as this may cause damage.
It’s important to note that some replacement filters may require additional steps or activation procedures. Check the instructions provided with the filter or consult the manufacturer’s guidelines to ensure you follow the specific preparation requirements.
With the replacement water filter properly inspected, identified, and prepared, you are now ready to insert it into your Samsung appliance. In the next section, we will guide you through the process of inserting the new water filter and securing it in place.
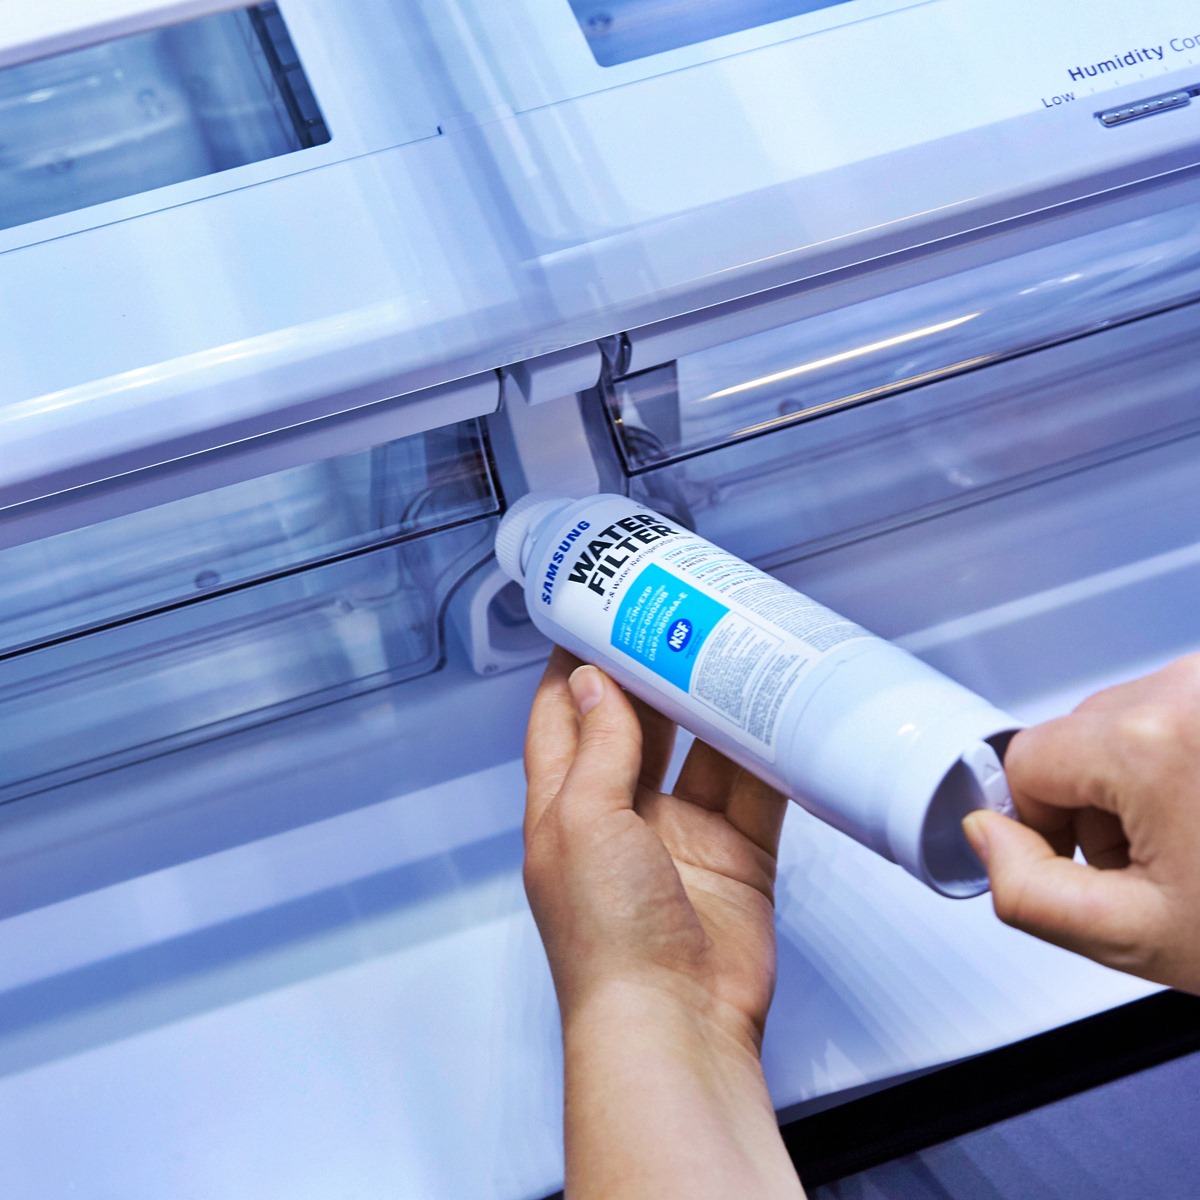
Inserting the New Water Filter
Now that you have prepared the replacement water filter for installation, it’s time to insert it into your Samsung appliance. Follow these steps to ensure a proper and secure installation of the new filter, allowing it to effectively purify your water.
Start by locating the filter housing in your Samsung appliance. Depending on the model, the housing can be found in various positions, such as in the upper right-hand corner of a refrigerator or at the back of a water dispenser. Refer to your appliance’s user manual or look for any labels indicating the filter housing.
With the filter housing identified, carefully align the replacement water filter with the opening. Take note of any indicators or arrows on the filter that point towards the correct direction for insertion. Ensure that the filter is oriented correctly to prevent any potential leaks or damage.
Slowly insert the replacement filter into the filter housing, applying gentle pressure. If your Samsung appliance requires a twist-to-lock mechanism, rotate the filter clockwise until it is firmly in place. For push-and-release systems, push the filter until you hear or feel a click, indicating that it is securely installed.
Once the new water filter is inserted, give it a slight tug or twist to confirm that it is properly locked and secured in the housing. This step ensures that the filter will not accidentally detach or become dislodged during operation.
If your Samsung appliance has a filter cover or panel, reattach it securely. Make sure that the cover is properly aligned and fastened, as this will help maintain the filter’s stability and protect it from any external elements.
Before proceeding, take a moment to ensure that there are no gaps or misalignments between the filter and the housing. This will help prevent any water leaks or pressure issues once the water supply is restored.
With the new water filter successfully inserted and secured, you are one step closer to enjoying clean and fresh water from your Samsung appliance. In the next section, we’ll discuss how to reset the water filter indicator light, if applicable, to maintain accurate tracking of filter usage.
Resetting the Water Filter Indicator Light
After installing a new water filter in your Samsung appliance, it is important to reset the water filter indicator light. Most Samsung appliances with built-in filters have a helpful indicator that alerts you when it’s time to replace the filter. Resetting the indicator ensures that it accurately tracks the usage of the new filter. Here’s how you can reset the water filter indicator light in your Samsung appliance:
Start by locating the control panel of your Samsung appliance. The control panel is usually located on the front of the appliance or inside the refrigerator, depending on the model.
Once you’ve found the control panel, look for the button or touchpad labeled “Filter Reset” or “Reset Filter.” This button is specifically designed to reset the water filter indicator light.
Press and hold the “Filter Reset” button for a few seconds until the indicator light on the control panel changes or goes off. The exact duration may vary depending on the model, so refer to your appliance’s user manual if you are unsure.
After releasing the “Filter Reset” button, check if the water filter indicator light is no longer illuminated or if it has been reset to its initial state. This indicates a successful reset of the indicator.
Some Samsung appliances may require a different method to reset the water filter indicator light. If you are unable to find a “Filter Reset” button on the control panel or if the above method doesn’t work, consult your appliance’s user manual or contact Samsung’s customer support for specific instructions.
By resetting the water filter indicator light, you ensure that your Samsung appliance accurately tracks the usage of the new filter. This allows you to stay informed and replace the filter at the recommended intervals, ensuring the continued delivery of clean and fresh water.
With the water filter indicator light successfully reset, we can now move on to the next step: checking for any leaks and ensuring that the filter is properly installed without any issues.
Checking for Leaks
After installing a new water filter in your Samsung appliance, it is essential to check for any leaks. Performing a thorough check ensures that the filter is properly installed and prevents potential water damage or inconvenience. Follow these steps to ensure that your new filter is free of leaks:
Start by inspecting the area around the filter housing. Look for any signs of water accumulation or moisture on the floor, walls, or inside the appliance. Pay close attention to the connections between the filter and the housing, as well as any seals or gaskets in the vicinity.
If you notice any leaks, carefully examine the filter and its installation. Check if the filter is securely locked and properly aligned within the housing. Ensure that there are no gaps or misalignments between the filter and the housing.
If you find a leak, try tightening the filter further by twisting it clockwise (if applicable). However, be cautious not to overtighten as it may damage the filter or its housing. If the leak persists, remove the filter and inspect it for any defects or damages. Consider replacing the filter if necessary.
In some cases, leaks may occur due to a faulty or damaged housing. If you suspect an issue with the housing, contact Samsung’s customer support or a certified technician for further assistance.
Another area to check for leaks is the water supply connection. Ensure that the water supply line is properly connected and secure. Tighten any loose connections or replace any damaged parts to prevent leaks.
After confirming that there are no leaks from the filter housing or the water supply connection, observe the filter in operation. Run the water dispenser or use the appliance as normal and pay attention to any signs of leakage or dripping. If you notice any unusual water flow or dripping, turn off the water supply and consult a professional for further help.
Performing a thorough check for leaks after installing a new water filter ensures the continued functionality and efficiency of your Samsung appliance. By addressing any leaks promptly, you can avoid water damage and maintain the quality of your appliance’s performance.
In the next section, we’ll discuss how to restore the water supply and complete the filter replacement process.
Restoring the Water Supply
Now that you have successfully checked for leaks and ensured that the new water filter is properly installed in your Samsung appliance, it’s time to restore the water supply. Restoring the water supply allows you to enjoy clean and fresh water once again. Follow these steps to safely restore the water supply:
Start by locating the shut-off valve that you previously closed to turn off the water supply. This valve is typically found near the water source or plumbing connection behind your appliance. Ensure that the valve is accessible and easy to operate.
Once you’ve located the shut-off valve, turn it counterclockwise to gradually open it. As you do this, listen carefully for any sounds of water flowing or check for any noticeable changes in the water pressure.
While opening the shut-off valve, closely monitor the area around the filter housing and the water supply connection for any leaks. If you notice any leaks, immediately turn off the water supply and inspect the affected area for any loose connections or damaged parts. Tighten or replace as necessary.
After confirming that there are no leaks and the water supply is restored, observe the water flow from your appliance’s dispenser or any other water outlets. Check if the water flow is steady and consistent, indicating that the new filter is functioning properly.
It’s important to note that after installing a new water filter, it may take a few moments for the water to flow smoothly and reach its optimal taste. This is normal and expected. Simply allow the water to run for a short period, and the fresh and clean taste will be restored.
With the water supply fully restored, you can now enjoy the benefits of a fresh and efficiently filtered water supply from your Samsung appliance. Be sure to regularly monitor the water quality and replace the filter according to the manufacturer’s recommended intervals, ensuring continued performance and clean water for you and your family.
In the next section, we’ll discuss the importance of flushing the water system after installing a new filter to eliminate any potential impurities or air pockets.
Flushing the Water System
After installing a new water filter in your Samsung appliance, it is essential to flush the water system. Flushing helps remove any impurities or air pockets that may be present in the system, ensuring the delivery of clean and fresh water. Follow these steps to properly flush the water system:
Begin by preparing a container or pitcher to collect the flushed water. Make sure it is clean and free from any contaminants.
Next, locate the dispenser or water outlet of your Samsung appliance. This could be a water dispenser on a refrigerator or a separate faucet connected to a water filtration system. Make sure the dispenser is empty and ready to collect the flushed water.
Open the dispenser or water outlet and allow the water to run at a moderate flow for a few minutes. This will help flush out any impurities or trapped air in the water system.
During the flushing process, you may notice a slight change in the water color or taste. This is normal and occurs as any leftover sediment or air is cleared from the system. Continue running the water until it appears clear and tastes fresh.
While flushing the water system, it is advisable to discard the flushed water into the container or pitcher prepared earlier. This prevents any potential impurities from entering your drinking water or other water outlets.
Once the water runs clear and fresh, close the dispenser or water outlet. Dispose of the flushed water, and you’re ready to enjoy the clean and filtered water from your Samsung appliance.
It’s important to note that the duration of the flushing process may vary depending on the model and specific water system of your Samsung appliance. Refer to the user manual or consult Samsung’s customer support for any specific guidelines or recommendations for your appliance.
By flushing the water system after installing a new filter, you ensure the removal of any potential impurities and the proper functioning of the filtration system. Regularly flushing the system, especially after filter replacements, helps maintain optimal water quality and prolongs the lifespan of your filter.
In the next section, we’ll provide a recap of the key steps involved in changing the water filter in your Samsung appliance.