
Choosing the Right Materials
When it comes to building a rug tufting frame, selecting the appropriate materials is essential for a sturdy and functional structure. Here are the key components you’ll need to consider:
- Wood: Start by choosing a high-quality, durable wood for the frame. Hardwoods like oak, maple, or birch are excellent options that can withstand the tension of the rug tufting process. Make sure the wood is at least 1 inch thick to provide the necessary stability.
- Fasteners: Select appropriate fasteners, such as screws or nails, to secure the frame pieces together. Opt for rust-resistant options to ensure the longevity of your frame.
- Measuring tools: Gather measuring tape, a carpenter’s square, and a pencil to accurately measure and mark the dimensions of the frame.
- Saw: Use a saw, whether it’s a circular saw or a handsaw, to cut the wood pieces to the desired length.
- Power drill: A power drill will come in handy when creating pilot holes and attaching the fasteners. Make sure you have the appropriate drill bits for your chosen fasteners.
- Tufting cloth: Choose a sturdy fabric for the frame that can support the weight of the tufting process. Heavy-duty upholstery fabric or hessian cloth are popular choices.
- Tufting gun: Invest in a high-quality tufting gun that suits your needs and budget. Look for a gun with adjustable pile depth and a comfortable grip for ease of use during the tufting process.
By selecting the right materials, you will lay a solid foundation for your rug tufting frame. Investing in high-quality wood and fasteners will ensure the frame’s stability and durability, while using the appropriate measuring tools and a reliable power drill will aid in accurate assembly. Additionally, choosing sturdy tufting cloth and a reliable tufting gun will contribute to the success of your rug tufting endeavors.
Measuring and Cutting the Frame Pieces
Once you have gathered the necessary materials, it’s time to measure and cut the frame pieces for your rug tufting frame. Follow these steps to ensure accurate measurements and precise cuts:
- Measurements: Take measurements of the space where you plan to set up your rug tufting frame. Consider the length and width of the rug you intend to create and add a few inches to the measurements for the frame’s dimensions. This extra allowance will provide a secure fit for your fabric and allow for any adjustments during the tufting process.
- Mark the wood: Use a carpenter’s square and a pencil to mark the dimensions on the wood pieces. Double-check your measurements to ensure accuracy.
- Cutting: With the marked measurements as a guide, use a saw to cut the wood pieces to the desired lengths. Take your time to make clean cuts and ensure that the pieces are straight and have square ends.
- Smooth the edges: Once the pieces are cut, use sandpaper to smooth the edges and remove any rough spots. This will prevent splinters and create a neat finish.
Accuracy is crucial at this stage to ensure that the frame pieces fit together properly. Taking precise measurements and making clean cuts will result in a well-constructed frame that will provide stability and support throughout the rug tufting process.
Remember to wear appropriate safety gear, such as goggles and gloves, while cutting and sanding the wood for your frame. Take your time, measure twice, and cut once to achieve the best results. With the frame pieces accurately measured and cut, you’re ready to move on to the next step: assembling the basic frame structure.
Assembling the Basic Frame Structure
Now that you have the frame pieces measured and cut, it’s time to assemble the basic structure of your rug tufting frame. Follow these steps for a solid and stable frame:
- Lay out the frame pieces: Start by laying out the cut wood pieces on a flat surface. Arrange them according to their corresponding positions in the frame.
- Align the corners: Take the first two pieces of the frame and align them at the corners. Use a carpenter’s square to ensure the corners are at perfect right angles.
- Attach the corners: Once the corners are aligned, use fasteners such as screws or nails to secure the pieces together. Make sure to drill pilot holes before inserting the fasteners to prevent the wood from splitting.
- Continue attaching the sides: Repeat the same process for the remaining sides of the frame, aligning the corners and securing the pieces with fasteners. Check for any gaps or unevenness and make adjustments as needed.
- Double-check the squareness: Before fully tightening the fasteners, double-check the squareness of the frame using a carpenter’s square. This step ensures that all sides are parallel and that the frame is perfectly square.
Assembling the basic frame structure requires precision and attention to detail. Take your time to align the corners accurately and secure the pieces tightly. A properly assembled frame will provide a stable base for your rug tufting project and ensure that the fabric remains taut throughout the process.
Once you have successfully assembled the basic frame structure, you can move on to the next step of attaching stabilizing braces to enhance the overall stability of your rug tufting frame.
Attaching Stabilizing Braces
Adding stabilizing braces to your rug tufting frame is crucial to enhance its overall stability and prevent any wobbling or shifting during the tufting process. Follow these steps to securely attach stabilizing braces:
- Measure and cut the braces: Using a measuring tape, determine the length needed for the stabilizing braces. Cut the wooden braces to the appropriate lengths using a saw.
- Position the braces: Place the braces diagonally between the corners of the frame. Position them in a way that forms an “X” shape across the frame.
- Mark and attach the braces: Mark the spots where the braces intersect with the frame. Pre-drill pilot holes and then attach the braces to the frame using screws or nails. Make sure to fasten them securely.
- Repeat for additional braces: Depending on the size of your frame, you may need to add additional stabilizing braces. Follow the same process for each brace to ensure an evenly supported frame.
- Check for stability: After attaching all the stabilizing braces, give the frame a gentle shake to test its stability. If there is any wobbling or movement, re-check the attachment points and tighten the braces as necessary.
By adding stabilizing braces, you significantly increase the stability of your rug tufting frame, allowing for a smoother and more controlled tufting process. The braces help distribute the tension evenly across the frame and minimize any potential warping or flexing.
Once the stabilizing braces are securely attached, you’re ready to move on to the next step: adding support bars for the fabric.
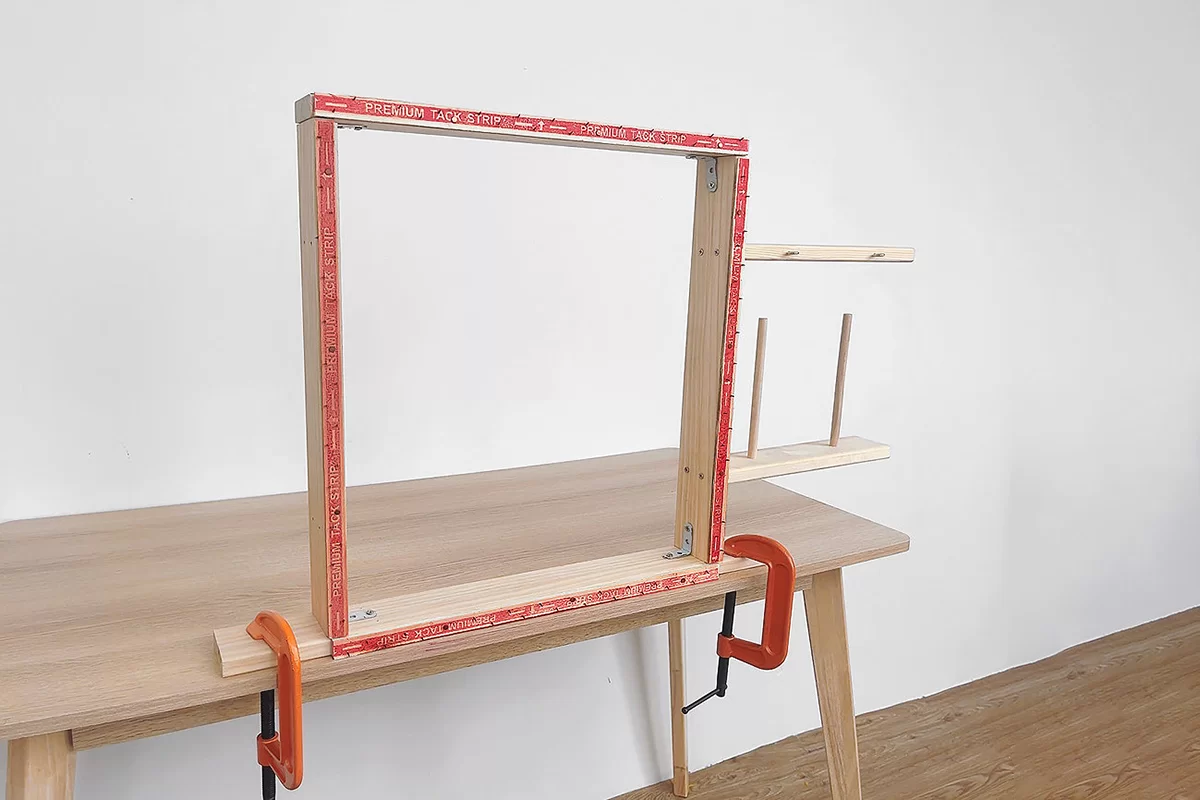
Adding Support Bars for the Fabric
Support bars are essential for keeping the tufting cloth taut and in place during the rug tufting process. Follow these steps to add support bars to your rug tufting frame:
- Measure and cut the support bars: Using a measuring tape, determine the length needed for the support bars. Cut the wooden bars to the appropriate lengths using a saw.
- Position the bars: Place the support bars parallel to each other, along the length or width of the frame, depending on your design. Make sure they are evenly spaced and positioned below the top surface of the frame.
- Mark and attach the bars: Mark the spots where the support bars will be attached to the frame. Pre-drill pilot holes and then attach the bars using screws or nails. Ensure they are securely fastened and level with the frame.
- Add additional support if needed: Depending on the size of your rug tufting frame, you may need to add multiple rows of support bars. Follow the same process for each row, ensuring they are evenly spaced and aligned.
- Check for stability: Once the support bars are attached, gently press down on the bars to ensure they are secure and stable. The bars should not bend or move easily.
The support bars play a vital role in maintaining the tension of the tufting cloth and preventing sagging or slackening during the tufting process. They provide a firm surface for the fabric to rest on, allowing for precise and consistent tufting.
With the support bars in place, your rug tufting frame is nearly complete. The next step is to attach the tufting cloth securely to the frame in preparation for the tufting process.
Attaching the Tufting Cloth
Attaching the tufting cloth to the frame is a crucial step in preparing your rug tufting frame for the tufting process. Follow these steps to securely attach the tufting cloth:
- Cut the tufting cloth: Measure and cut the tufting cloth to the appropriate size, ensuring it covers the entire frame with some extra allowance on each side for stapling.
- Position the tufting cloth: Lay the tufting cloth over the frame, ensuring it is centered and evenly distributed. Smooth out any wrinkles or folds to achieve a taut surface.
- Secure the corners: Start by stapling the tufting cloth at each of the corners, pulling it tightly and folding any excess fabric neatly. This will anchor the cloth to the frame.
- Staple along the sides: Working from the corners towards the middle of each side, use a staple gun to secure the tufting cloth to the frame. Space the staples evenly, approximately every few inches, to keep the cloth taut.
- Continue to secure remaining areas: Work your way around the entire frame, stapling the tufting cloth securely to ensure it remains taut and in place.
- Trim any excess fabric: Once the tufting cloth is fully attached, carefully trim any excess fabric, leaving a clean and neat edge along the frame.
Properly attaching the tufting cloth is essential for creating a stable and smooth surface for the tufting process. The fabric should be pulled tightly to prevent any sagging or unevenness, ensuring optimal results for your rug tufting project.
With the tufting cloth securely attached, your rug tufting frame is ready for the next step: preparing the tufting gun for the tufting process.
Preparing the Tufting Gun
Before you begin the tufting process, it’s essential to properly prepare your tufting gun. Follow these steps to ensure your tufting gun is ready for use:
- Read the instructions: Familiarize yourself with the specific instructions and guidelines provided by the manufacturer of your tufting gun. Different tufting guns may have slightly different preparation procedures.
- Load the tufting gun: Depending on your tufting gun model, load the appropriate type and color of yarn into the gun. Follow the manufacturer’s instructions on how to properly load the yarn into the gun’s needle and adjust the pile height or loop length settings as desired.
- Tension adjustment: Use any tension adjustment features provided with your tufting gun to ensure the yarn is fed smoothly and evenly, without tangles or snags.
- Create practice stitches: Practice making tufting stitches on a scrap piece of fabric or tufting cloth to get comfortable with the gun’s operation and to ensure that the yarn feeds properly.
- Check and maintain: Regularly inspect your tufting gun for any worn-out parts or loose connections. Keep it clean by removing any yarn remnants or debris that may affect its performance.
Properly preparing your tufting gun is crucial for achieving precise and consistent tufting results. Familiarize yourself with the gun’s features, load it with the appropriate yarn, and practice your stitches before starting your tufting project.
By taking the time to prepare your tufting gun, you’ll be ready to move onto the next step: setting up your tufting area and positioning your rug tufting frame.
Setting Up Your Tufting Area
Creating a suitable tufting area is crucial for a comfortable and efficient rug tufting process. Follow these steps to set up your tufting area:
- Choose a spacious and well-lit area: Select a room or space that provides enough room for your rug tufting frame and allows you to move freely around it. Ensure there is adequate lighting to help you see the details of your tufting work.
- Protect the floor: Lay down a protective covering on the floor, such as a tarp or drop cloth, to catch any yarn or debris that may fall during the tufting process. This will make cleanup easier and protect your flooring.
- Position the rug tufting frame: Set up your rug tufting frame in the designated area, ensuring it is stable and level. Adjust the height of the frame as needed to maintain a comfortable working position.
- Gather your tools: Have all the necessary tools and supplies within reach, such as scissors, yarn, a tufting gun, and any additional materials needed for your design or pattern.
- Organize your yarn: If using different colors or types of yarn, keep them organized and easily accessible. Use spools or containers to keep them from tangling or getting in the way of your tufting process.
- Ensure proper ventilation: If using adhesives or chemicals during the tufting process, make sure the area is properly ventilated to avoid inhaling any fumes.
- Comfort and ergonomics: Pay attention to your comfort while tufting. Use a cushioned mat or support to reduce strain on your knees or back if necessary.
By setting up a well-organized and comfortable tufting area, you can focus your attention on the tufting process itself and ensure an enjoyable and productive experience.
With your tufting area ready, it’s time to move on to the exciting part: starting the tufting process and bringing your rug design to life.
Starting the Tufting Process
Now that your tufting area is prepared and your rug tufting frame is set up, it’s time to begin the tufting process. Follow these steps to get started:
- Thread the tufting gun: Ensure that your tufting gun is properly loaded with the desired yarn color and type. Make sure the yarn is securely in place and ready to be tufted.
- Select a starting point: Decide where you want to begin tufting on the fabric. It could be the center or an edge, depending on your design. Mark the spot lightly with a pencil or tape if needed.
- Position the tufting gun: Hold the tufting gun with a firm grip and position it at a slight angle to the tufting cloth at your chosen starting point.
- Activate the tufting gun: Press the trigger or appropriate mechanism to release the yarn from the tufting gun’s needle. The yarn will be tufted into the fabric, creating loops or piles, depending on the gun’s settings.
- Move methodically: Move the tufting gun in a deliberate and controlled manner, following your desired design or pattern. Make sure to maintain an even speed and consistent pressure to achieve uniform tufting throughout the fabric.
- Experiment and explore: Feel free to experiment with different pile heights, loop lengths, and tufting techniques to create texture and variety in your design. This is an opportunity to let your creativity shine.
- Take breaks and evaluate: Pause intermittently to step back and assess your progress. This allows you to make any necessary adjustments or corrections as you go along.
- Work in sections: Divide your tufting process into manageable sections, moving from one area to another to ensure an even distribution of tufting across the fabric.
Starting the tufting process can be both exciting and challenging. Take your time, practice control, and enjoy the journey as you see your rug design gradually come to life through each tufted stitch.
Remember to refer to any reference images or patterns you may have, and don’t be afraid to make modifications or explore new ideas as you progress. The tufting process is an opportunity to express your creativity and create a unique and personalized rug.
Once you have completed tufting the design, it’s time to move on to the final step: finishing and securing the tufted rug.
Finishing and Securing the Tufting
As you near the completion of the tufting process, it’s crucial to properly finish and secure the tufted rug. Follow these steps to ensure your rug is durable and long-lasting:
- Trim excess yarn: Once you have finished tufting the entire design, carefully trim any excess yarn or loops using sharp scissors. Be mindful of maintaining the desired pile height and ensuring an even surface.
- Inspect for loose threads: Check the fabric for any loose threads that could unravel or compromise the tufted design. Secure any loose ends by weaving them back into the fabric using a needle or by applying a small amount of fabric glue.
- Apply a backing: To provide additional stability and protect the underside of the rug, consider applying a backing material. Options include non-slip rug pads, fabric, or latex backing. Trim the backing to match the size of your rug and attach it securely.
- Backing or binding: If desired, you can also finish the edges of the rug with binding tape or fabric. This provides a neat and professional-looking edge, preventing fraying and adding durability.
- Steam or block: If the rug’s pile appears uneven or compressed, you can steam or block it to restore its shape. Use a steam iron or a steamer to gently lift the yarn and allow it to regain its fluffy texture.
- Clean and maintain: Once the rug is finished, establish a regular cleaning routine to keep it looking its best. Vacuum gently with a brush or upholstery attachment to remove any dirt or debris. Spot clean any spills or stains promptly using mild soap and water.
Finishing and securing the tufted rug ensures its longevity and helps maintain the appearance of your beautiful creation. By trimming excess yarn, securing loose threads, applying a backing, and possibly adding edge binding, you enhance the rug’s overall durability and aesthetics.
With the rug properly finished and secured, you can now proudly display your tufted masterpiece and enjoy the satisfaction of a completed project.
Removing the Tufted Rug from the Frame
Once you have completed the tufting process and properly finished your rug, it’s time to remove it from the frame. Follow these steps to safely detach your tufted rug:
- Clear the work area: Before removing the rug from the frame, ensure the surrounding area is clear of any tools, materials, or obstructions that could potentially damage or impede the rug.
- Inspect the tufting: Take a moment to inspect the entire rug, paying attention to the tufting stitches, pile height, and overall appearance. Make any necessary adjustments or touch-ups if you notice any areas that need attention.
- Release the fabric: Carefully detach the tufting cloth or fabric from the frame. Gently remove any staples or fasteners from the fabric, taking care not to damage it or the tufted design in the process.
- Roll or fold the rug: Depending on the size of your rug, roll it up or fold it neatly. If rolling, start from one end and proceed to the opposite end, maintaining an even and tight roll. Folding is an alternative if the rug is small enough to be handled in this manner.
- Secure the rug: Once the rug is rolled or folded, use twine, cord, or straps to secure it. This will prevent it from unfurling or becoming damaged during storage or transportation.
- Store the rug: Find an appropriate storage location for your tufted rug. Ideally, choose a space that is clean, dry, and free from extreme temperature fluctuations. Avoid placing heavy objects on top of the rug or in a location where it may be exposed to excessive pressure or moisture.
- Display your rug: Alternatively, if you wish to showcase your tufted rug, find an appropriate area in your home where it can be prominently displayed. This can be on a wall, as a floor rug, or even as a decorative element on furniture.
Removing the tufted rug from the frame is the final step in the rug tufting process. Take your time to ensure a smooth and careful removal, preserving the integrity of the tufted design. Properly storing or displaying your rug will help maintain its beauty and allow you to enjoy the fruits of your creative labor for years to come.