
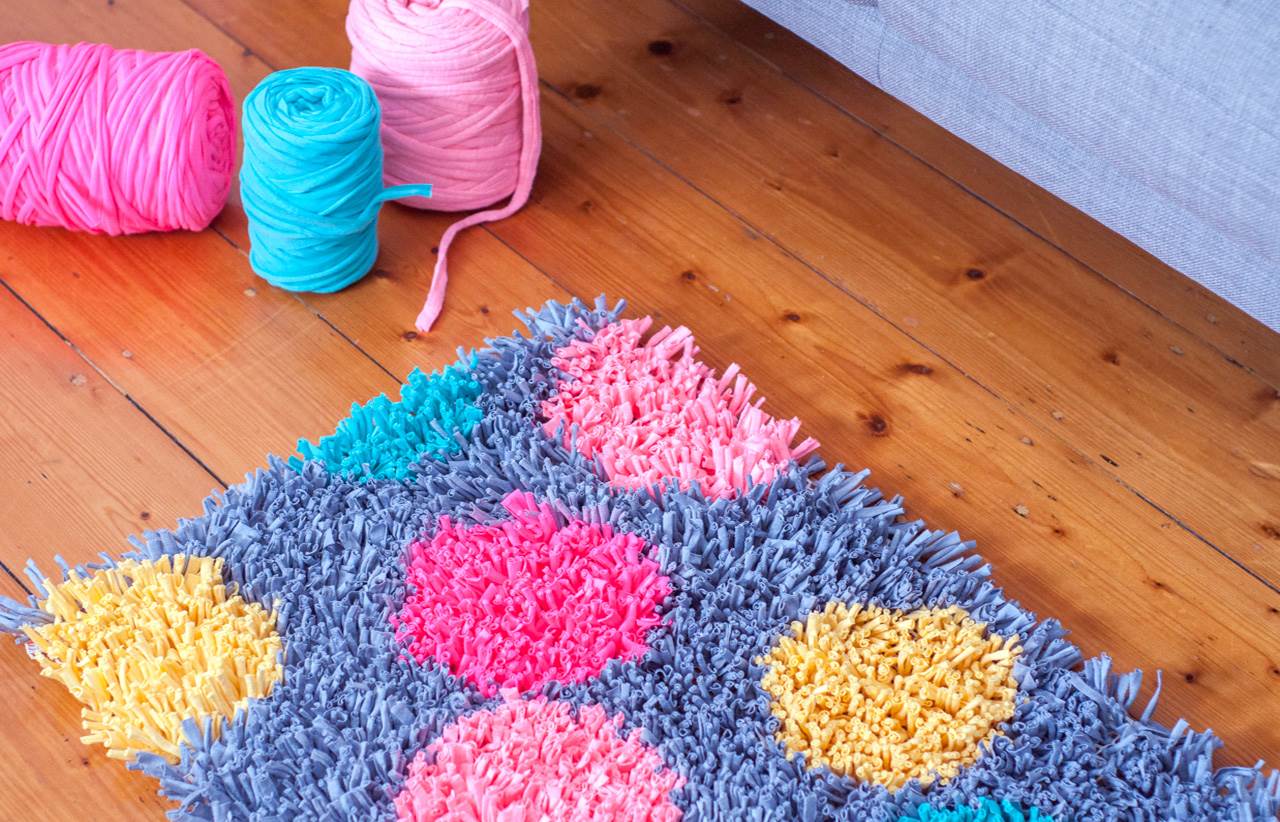
Choosing the Right Yarn for Your Rug
When it comes to making a rug out of yarn, choosing the right yarn is essential. The yarn you select will determine the durability, texture, and overall look of your rug. Here are some factors to consider when choosing yarn for your rug:
- Fiber Content: The first thing to consider is the fiber content of the yarn. There are various options available, such as wool, cotton, acrylic, and blends. Each fiber has its own characteristics, so think about the desired feel and durability of your rug.
- Thickness: The thickness of the yarn will affect the weight and texture of your rug. Thicker yarns can create a chunky, cozy look, while thinner yarns will result in a more delicate and lightweight rug. Consider the intended use and visual effect you want to achieve.
- Color and Pattern: Think about the color scheme and design of your rug. Yarn is available in a wide range of vibrant colors and patterns. Decide whether you want a solid color rug, a striped pattern, or even a multicolored design. Consider the overall aesthetic of your room or space where the rug will be placed.
- Ease of Maintenance: It’s important to consider the practical aspects of maintaining your rug. Some yarns are more stain-resistant and easier to clean than others. If you anticipate heavy foot traffic or the rug will be in a high-maintenance area, choose a yarn that is easy to care for.
These considerations will guide you in selecting the right yarn for your rug. To make an informed decision, visit your local yarn store or explore online resources to find a variety of options to suit your needs. Next, let’s move on to preparing the yarn for rug-making.
Preparing the Yarn for Rug Making
Before you can start weaving your rug, it’s important to properly prepare the yarn. This ensures that the yarn is in the best condition for weaving and helps create a more professional-looking finished product. Here are the steps to follow when preparing the yarn for rug making:
- Washing: If your yarn is not already pre-washed, it’s essential to wash it before use. This removes any dirt, oils, or sizing agents that may be present. Follow the manufacturer’s instructions for washing the yarn, whether it is machine washable or requires handwashing.
- Drying: After washing, allow the yarn to dry completely. You can hang it up to air dry or lay it flat on a clean surface. Make sure the yarn is completely dry before proceeding to the next step.
- Winding: To make the yarn more manageable during the weaving process, consider winding it into balls or cones. This will prevent tangling and make it easier to pull the yarn through the rug base as you weave.
- Testing: Before you begin weaving, it’s helpful to do a small test swatch with the prepared yarn. This allows you to gauge the tension and see how the yarn interacts with the rug base. Make any necessary adjustments before starting the actual rug.
By properly preparing the yarn, you ensure that it is clean, dry, and in the best condition for rug making. This extra step will contribute to the overall quality and longevity of your finished rug. Now that the yarn is prepared, let’s move on to creating the rug base.
Creating a Rug Base
The rug base serves as the foundation for your yarn rug, providing stability and structure. There are several options available for creating a rug base, depending on your preference and the materials you have on hand. Here are a few common methods:
- Rug Canvas: Rug canvas is a sturdy and durable material specifically designed for rug making. It is available in different sizes and can be cut to your desired dimensions. With rug canvas, you can easily create a grid-like pattern by using the holes to guide your weaving.
- Non-Slip Rug Pad: Another option is to use a non-slip rug pad as your rug base. These pads provide grip and prevent the rug from slipping or sliding on the floor. You can cut the rug pad to your desired size and shape, ensuring it fits well underneath your yarn rug.
- Recycled Materials: If you’re looking for a more eco-friendly approach, consider using recycled materials as your rug base. Old t-shirts, towels, or sheets can be cut into strips and woven together to create a sturdy foundation. This method allows for creativity and resourcefulness.
When creating your rug base, make sure it is large enough to accommodate the size of the rug you want to make. Secure the edges of the base to prevent it from fraying or unraveling during the weaving process. Additionally, consider the thickness and texture of your chosen base material, as it will impact the overall feel and look of your rug.
Now that you have your rug base prepared, you’re ready to begin weaving the yarn into the base. This is where the magic happens, as you bring your rug to life. Let’s dive into the weaving process in the next section!
Starting the Rug Weaving Process
With your yarn and rug base ready, it’s time to start the exciting process of weaving your yarn into the base to create your beautiful rug. Follow these steps to get started:
- Secure the Yarn: Choose a starting point on your rug base and secure the end of the yarn. You can use a knot or weave the end through the base to keep it in place. This will serve as the anchor for your weaving.
- Weaving Technique: Decide on the weaving technique you want to use for your rug. Common techniques include plain weave, twill weave, or looped pile. Each technique will produce a different texture and look, so choose one that aligns with your desired result.
- Weaving Direction: Determine the direction in which you want to weave the yarn. You can start weaving horizontally, vertically, or diagonally across the rug base, depending on the pattern or design you have in mind.
- Create Rows: Begin weaving the yarn through the openings of the rug base, following your chosen technique and direction. Pull the yarn snugly, but not too tight, to ensure an even and secure weave. Repeat this process to create rows of yarn across the entire rug base.
As you progress, you’ll start to see your rug take shape and the pattern or design emerging. Take your time to adjust the tension and ensure the yarn is evenly woven. If you want to change colors or incorporate different yarns, make sure to weave the ends in securely to maintain a neat appearance.
Starting the rug weaving process can be both exciting and meditative. Enjoy the rhythm of the weaving and let your creativity flow. Once you have completed the initial rows, you can continue adding more rows to expand the size of your rug. Let’s explore this in more detail in the next section.
Weaving the Yarn into the Rug Base
Now that you have started the rug weaving process, it’s time to dive deeper into weaving the yarn into the rug base. This step will bring your rug to life as you see the design and texture take shape. Here are some key points to consider:
- Tension and Evenness: As you weave the yarn, pay attention to the tension and evenness of your stitches. A consistent tension will ensure a well-woven rug, while even stitching will result in a smooth and professional appearance. Take your time and adjust as needed to maintain a uniform weave.
- Pattern and Design: Follow your chosen pattern or design as you continue weaving. If you are working with a specific pattern, refer to your instructions or reference material for guidance. If you are creating your own design, have a clear vision in mind and make deliberate decisions on color placement and yarn combination for the desired effect.
- Color Changes: If you want to change colors within your rug, plan ahead and weave the ends of the yarn securely to avoid loose threads. You can incorporate color changes in a specific area or create gradient effects by blending colors gradually. Be mindful of how the colors interact and ensure a smooth transition.
- Adding Texture: To add texture to your yarn rug, experiment with different weaving techniques. You can incorporate loops, knots, or additional yarn fibers to create interesting patterns or raised areas. This will give your rug a unique and tactile appeal.
Take your time with the weaving process, enjoying the rhythmic and meditative nature of each stitch. Step back occasionally to admire your progress and make any necessary adjustments. Remember that every rug is unique and a reflection of your creativity.
Once you have completed weaving the yarn into the rug base, you can move on to adding additional rows to expand the size of your rug. Let’s explore this in more detail in the next section.
Adding Additional Rows to Your Rug
After weaving the initial rows, you might want to increase the size of your rug by adding additional rows. This step allows you to create a larger and more substantial piece. Here’s how to add more rows to your yarn rug:
- Continue the Weaving Pattern: To maintain consistency in your design, continue weaving the yarn following the same pattern and technique as before. This will ensure that the new rows seamlessly blend with the existing ones.
- Blend Yarns: If you’re working with multiple colors or different types of yarn, make sure to blend the new yarn with the old yarn. You can overlap the ends of the yarn and weave them together for a smooth transition. This technique hides any abrupt color changes and creates a cohesive look.
- Maintain Tension: As you add more rows, pay attention to the tension of your stitches to ensure they match the previous rows. Consistency in tension will result in an even and professional-looking rug. Adjust the tension if needed to achieve the desired outcome.
- Lengthen Your Rug: To make your rug longer, continue weaving rows parallel to the previous ones. If you’re looking to widen the rug as well, adjust the weaving direction to incorporate new rows in a perpendicular or diagonal manner. This versatility allows you to create various shapes and sizes.
Adding additional rows to your yarn rug is an exciting process that allows you to see your creation grow and take on new dimensions. Take your time and enjoy the weaving journey, appreciating the progress you’re making with each new row.
Once you’ve achieved the desired size for your rug, it’s time to move on to the final step: finishing the edges. This ensures the longevity and professional appearance of your yarn rug. Let’s explore this step in detail next.
Finishing the Rug Edges
After completing the weaving process, it’s important to give attention to the edges of your yarn rug. Properly finishing the edges adds a polished and professional touch to your rug while ensuring its longevity. Here are some techniques for finishing the rug edges:
- Overcast Stitch: One common method is to use an overcast stitch to secure the edges of the rug. Thread a needle with yarn and insert it through the loops or openings along the edge of the rug. Continue stitching along the edge, making sure to secure the yarn with each stitch.
- Single Crochet Border: If you’re familiar with crochet, you can create a single crochet border around the edges of your rug. Insert your crochet hook into the rug base, yarn over, and pull through a loop. Repeat this process across the edge, creating a solid and sturdy border.
- Binding or Whip Stitch: For a more decorative edge, consider using a binding or whip stitch. Cut strips of fabric that complement your rug’s color scheme. Fold the fabric strip over the raw edge of the rug and sew it in place using a whip stitch or a sewing machine. This technique adds a finished and refined look to your rug.
- Fringe or Tassel Design: If you prefer a more bohemian or playful look, you can create a fringe or tassel design along the edges of your rug. Cut yarn into desired lengths and attach it to the edge of the rug by knotting or by making individual tassels. This adds a decorative element while keeping the edges secure.
Choose the finishing technique that best suits the overall style and aesthetic of your yarn rug. Consider the materials used, the intended purpose of your rug, and your personal preference. Take your time when finishing the edges to ensure a clean and professional result.
With the edges finished, your yarn rug is complete! Now it’s time to give it a good cleaning and learn how to properly care for it to keep it in pristine condition for years to come.
Cleaning and Caring for Your Yarn Rug
Proper cleaning and care are essential for maintaining the beauty and longevity of your yarn rug. Here are some tips to help you keep your rug looking its best:
- Vacuum Regularly: To prevent dirt and dust from settling into the fibers of your rug, vacuum it regularly. Use a handheld attachment or a vacuum cleaner with a gentle suction setting to avoid damaging the yarn or pulling out any loose threads.
- Spot Clean Spills: Accidents happen, so it’s important to address spills or stains as soon as possible. Blot the affected area with a clean cloth or paper towel to absorb as much of the liquid as you can. Avoid rubbing the stain, as it may spread or push the liquid further into the fibers. Use a mild detergent and warm water to gently clean the area, then blot it dry.
- Avoid Excessive Sunlight: Prolonged exposure to direct sunlight can cause fading and discoloration of your yarn rug. If possible, place the rug in an area where it won’t be exposed to direct sunlight for long periods. Alternatively, use curtains or blinds to filter the sunlight and protect the rug.
- Rotate and Flip: To ensure even wear, rotate and flip your rug periodically. This prevents specific areas from becoming more worn than others, particularly in high-traffic areas. This simple step will help maintain the overall appearance and prolong the lifespan of your rug.
- Professional Cleaning: Depending on the size and type of your yarn rug, professional cleaning may be necessary from time to time. Consult with a professional rug cleaner and follow their recommendations for deep cleaning or restoration, ensuring that the cleaning method is suitable for your specific rug material.
By following these cleaning and care guidelines, you can enjoy your yarn rug’s beauty and longevity for years to come. Remember to always treat your rug with care and address any issues promptly to prevent further damage. With proper maintenance, your yarn rug will continue to enhance your space with its warmth and charm.