
Overview
The bypass tray is a convenient feature found in many printers that allows users to manually feed special types of paper or envelopes, bypassing the standard paper trays. It provides a versatile printing solution for various printing needs, giving users the flexibility to handle different paper sizes, thicknesses, and types.
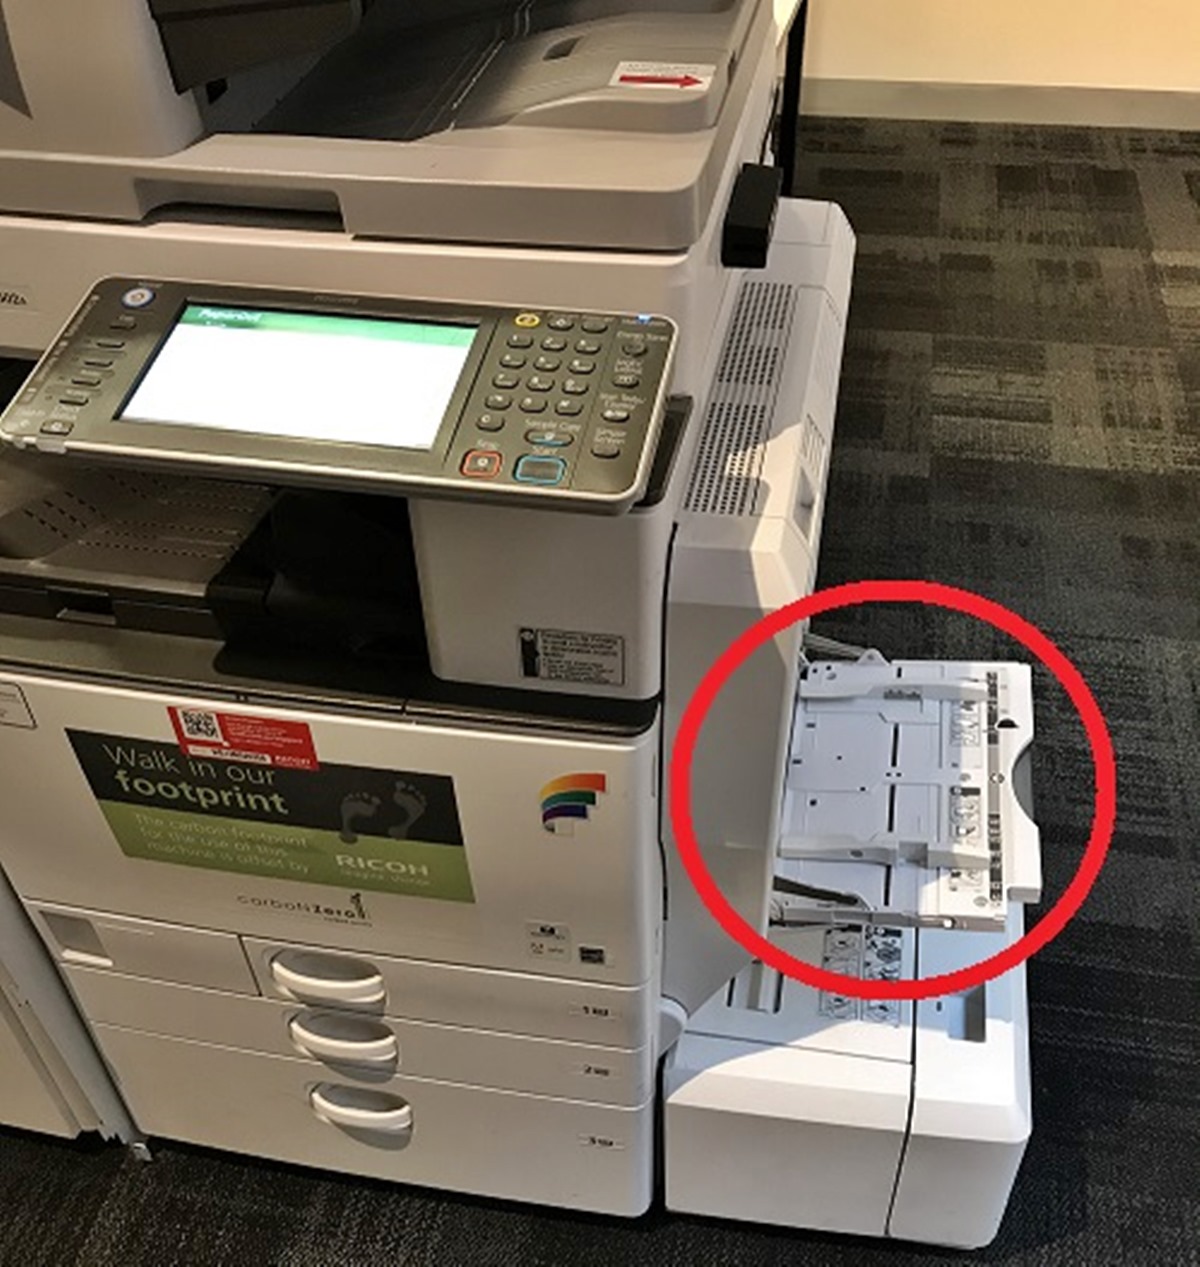
The bypass tray, also known as the multipurpose tray or manual feed tray, is typically located on the front or side of the printer. It is a separate tray that can be easily accessed when needed. This tray is designed to accommodate a limited number of sheets, typically ranging from 10 to 50, depending on the printer model.
When using the bypass tray, you can load specialized media, such as cardstock, labels, transparencies, envelopes, or other non-standard paper sizes. This feature comes in handy when you need to print on paper that doesn’t fit into the standard paper trays or requires special handling.
To use the bypass tray, you simply select it as the paper source in the print settings of your document. Once selected, the printer will automatically feed the paper from the bypass tray instead of the regular paper trays.
Using the bypass tray can be a time-saving option, especially if you frequently need to print on different types of paper or handle small print runs. Instead of having to empty and reconfigure the standard paper trays each time, you can quickly load the desired paper into the bypass tray and start printing immediately.
However, it is important to note that the bypass tray is not meant for high-volume or continuous printing tasks. Due to its limited capacity, it is best suited for small print jobs or occasional use. For large-scale printing needs, it is recommended to utilize the main paper trays of the printer.
In the next sections, we will explore how the bypass tray works, situations when it is beneficial to use, its advantages and limitations, and provide some useful tips to ensure optimum use of this versatile printing feature.
What is a Bypass Tray?
A bypass tray, also known as a multipurpose tray or manual feed tray, is a feature found in many printers that allows users to manually feed special types of paper or envelopes. Unlike the standard paper trays that are designed for specific paper sizes, the bypass tray provides a flexible printing solution. This tray is usually located on the front or side of the printer and can be easily accessed when needed.
The bypass tray is designed to handle a variety of media types, including cardstock, labels, transparencies, envelopes, and other non-standard paper sizes. It is especially useful when you need to print on paper that doesn’t fit into the standard paper trays or requires special handling.
Typically, the bypass tray can hold a limited number of sheets, ranging from 10 to 50, depending on the printer model. The exact capacity may vary, so it’s important to check the printer’s specifications. When using the bypass tray, you can manually load the desired paper or envelope into the tray, and the printer will automatically detect and use it for printing.
The bypass tray offers a convenient way to print on different types of media without the need to configure and empty the standard paper trays each time. This feature is particularly beneficial when you need to print small quantities or when you have a mix of different paper sizes or types within the same print job.
To use the bypass tray, you simply need to select it as the paper source in the print settings of your document or print job. Once selected, the printer will ignore the standard paper trays and automatically feed the paper from the bypass tray.
It’s important to note that not all printers have a bypass tray. Some entry-level and basic models may not include this feature. Therefore, if you have specific printing requirements that require the use of a bypass tray, make sure to check the printer’s specifications before purchasing.
In the next section, we will delve into how the bypass tray functions and explore its working mechanism in more detail.
How does a Bypass Tray work?
The bypass tray is a convenient feature in printers that allows users to manually feed special types of paper or envelopes, bypassing the standard paper trays. It offers flexibility and versatility for different printing needs.
Using the bypass tray is a straightforward process. When you need to print using the bypass tray, you simply select it as the paper source in the print settings of your document or print job. This tells the printer to ignore the standard paper trays and use the bypass tray instead.
To load paper into the bypass tray, follow these steps:
1. Locate the bypass tray. It is usually found on the front or side of the printer and is labeled as such.
2. Adjust the paper guides. Some bypass trays have adjustable paper guides that allow you to accommodate different paper sizes. Align the guides to match the width of the paper you are using.
3. Prepare the paper. If you are using specialty paper, such as cardstock or envelopes, make sure it is properly aligned and not creased or bent.
4. Load the paper. Place the paper into the bypass tray, ensuring that it is inserted as far as it will go. The printer may have markings or guides to indicate the proper orientation of the paper.
5. Adjust the paper settings. In the print settings, select the paper size and type that matches the paper loaded in the bypass tray. This ensures that the printer applies the correct settings for optimal print quality.
Once you have loaded the paper and adjusted the settings, you can proceed with printing. The printer will detect the paper in the bypass tray and use it for printing. It is important to note that the bypass tray has a limited capacity, so you may need to reload paper for longer print jobs.
When using the bypass tray, it is essential to follow the printer’s guidelines and recommendations. Using improper or unsupported paper types may result in paper jams or poor print quality. Consult the printer’s user manual or manufacturer’s website for specific guidelines regarding the use of the bypass tray.
Overall, the bypass tray provides a convenient way to handle different paper sizes, thicknesses, and types, making it a valuable feature for those who require versatility in their printing tasks.
In the next section, we will explore the situations where using the bypass tray can be beneficial.
When to use the Bypass Tray?
The bypass tray is a useful feature in printers that allows users to meet specific printing needs that cannot be accommodated by the standard paper trays. Here are some situations where using the bypass tray can be beneficial:
1. Printing on specialty paper: The bypass tray is ideal for printing on specialty paper such as cardstock, labels, transparencies, or envelopes. These types of paper may be thicker or have different dimensions than standard printer paper, making them unsuitable for the regular paper trays. By using the bypass tray, you can ensure that your prints on specialty media come out with the desired quality.
2. Handling non-standard paper sizes: If you frequently need to print on custom paper sizes that do not fit into the standard paper trays, the bypass tray is your solution. Whether you need to print on larger paper sizes like legal or tabloid, or smaller sizes like postcards or index cards, the bypass tray allows you to load and print on these non-standard paper sizes without any hassle.
3. Printing small quantities: When you need to print a small number of copies, using the bypass tray can be more efficient than loading the regular paper trays. Instead of having to empty and reconfigure the standard trays for a small print run, you can simply load the required number of sheets into the bypass tray and begin printing immediately.
4. Mixed media printing: The bypass tray is especially useful when you need to print documents containing a mix of different paper sizes or types. For example, if you have a document with letter-sized pages interspersed with envelopes or labels, loading the envelopes or labels into the bypass tray ensures that they are printed correctly without interrupting the print process.
5. Simplifying manual feed tasks: Some printers require manual feeding for certain paper types or print jobs. The bypass tray provides a convenient way to handle these manual feed tasks by ensuring that the printer always uses the paper loaded in the bypass tray when the media source is set to bypass.
By utilizing the bypass tray in these situations, you can optimize your printing experience and achieve better results for your specific needs. However, it is essential to adhere to the printer’s guidelines and limitations regarding the use of the bypass tray to avoid any potential issues.
Next, we will explore the benefits of using the bypass tray for your printing tasks.
Benefits of using the Bypass Tray
Using the bypass tray in your printer offers several benefits that enhance your printing experience. Here are some advantages of using the bypass tray:
1. Versatility: The bypass tray allows you to print on a wide range of media types and sizes that may not fit into the standard paper trays. Whether it’s printing on cardstock for invitations, labels for shipping, or envelopes for mailings, the bypass tray provides the versatility to handle different media and accomplish various printing tasks.
2. Convenience: With the bypass tray, you no longer need to empty and reconfigure the standard paper trays each time you want to print on specialty media or non-standard paper sizes. The bypass tray offers a simple manual feed option that saves time and effort, allowing you to quickly load the desired paper and start printing without any interruptions or delays.
3. Quick Setup: When you have a small print job or need to print a few copies, using the bypass tray eliminates the need to adjust settings for the standard paper trays. Instead, you can directly load the required number of sheets into the bypass tray, select it as the paper source, and initiate printing. This streamlines the setup process and enables immediate printing, making it ideal for time-sensitive tasks.
4. Specialized Printing: The bypass tray is specifically designed to handle different types of media, such as envelopes, transparencies, or cardstock. By using the bypass tray, you can ensure optimal print quality and avoid smudging or paper jams that may occur when using inappropriate paper paths.
5. Mixed Media Handling: If you have a document with multiple page sizes or media types, the bypass tray allows you to seamlessly print them without needing to separate and load them manually. Whether it’s inserting envelopes in between letter-sized pages or printing labels along with regular documents, the bypass tray makes mixed media printing more efficient and hassle-free.
6. Reduced Waste: By using the bypass tray for specialized or non-standard print jobs, you can minimize paper waste. Instead of having to load different paper sizes into the main trays and risk wasting unused sheets, the bypass tray enables you to load only the required number of sheets for each print job, reducing unnecessary paper consumption.
Overall, the bypass tray enhances your printing flexibility, convenience, and efficiency. It provides the freedom to print on various media types and sizes, simplifies setup, and reduces paper waste. By utilizing the bypass tray effectively, you can optimize your printing capabilities and achieve professional results.
Next, we will discuss some limitations of the bypass tray that you should be aware of.
Limitations of the Bypass Tray
While the bypass tray is a valuable feature for handling specialized printing needs, it is essential to be aware of its limitations. Here are some limitations of the bypass tray to consider:
1. Limited Capacity: The bypass tray has a smaller capacity compared to the standard paper trays. It can typically hold a smaller number of sheets, usually around 10 to 50, depending on the printer model. If you have large print jobs or high-volume printing needs, the bypass tray may not be suitable as it may require frequent reloading of paper.
2. Manual Feed Requirement: Unlike the standard paper trays that automatically feed paper, the bypass tray requires manual feeding. This means you need to physically load the desired paper into the tray each time you want to use it. Manual feeding can be time-consuming and may lead to occasional misfeeds or paper jams if not done properly.
3. Incompatibility with Automatic Duplexing: Some printers may not support automatic duplexing (double-sided printing) when using the bypass tray. This means that if you need to print double-sided documents, you may need to use the standard paper trays even if the paper size or type is compatible with the bypass tray.
4. Limited Paper Compatibility: While the bypass tray supports a wide range of media types and sizes, it is important to ensure that the paper you are using is compatible with the printer. Using paper that exceeds the recommended weight or thickness may cause paper jams or damage the internal components of the printer. Always refer to the printer’s manual or specifications to determine the supported paper types and weights for the bypass tray.
5. Inconvenience for Large Print Jobs: For large print jobs that require a significant amount of paper, it can be impractical to rely on the bypass tray. The limited capacity of the bypass tray may lead to frequent interruptions for paper reloading, resulting in reduced productivity and increased printing time.
6. Printer Model Dependent: Not all printers are equipped with a bypass tray. Some entry-level or basic models may not include this feature. Therefore, it is important to check the printer’s specifications before purchasing if you require the use of a bypass tray.
It is important to understand these limitations and consider them when deciding whether to use the bypass tray for your printing tasks. While it offers flexibility and versatility, it may not be suitable for all situations, particularly those requiring large volumes of printing or automatic duplexing.
In the next section, we will provide some tips to effectively use the bypass tray and optimize your printing experience.
Tips for using the Bypass Tray effectively
To make the most out of the bypass tray feature in your printer and ensure smooth and efficient printing, consider the following tips:
1. Select the appropriate paper type: Before loading paper into the bypass tray, make sure to select the correct paper type in the print settings. This ensures that the printer can apply the appropriate settings and optimize the print quality for the specific paper type you are using.
2. Align the paper properly: Proper alignment of the paper is crucial for avoiding misfeeds or paper jams. Make sure the paper is inserted all the way into the bypass tray and align it with the paper guides to prevent any skewing or misalignment during printing.
3. Use the recommended paper weight: Check the printer’s specifications or user manual to determine the recommended paper weight for the bypass tray. Using paper that is too heavy or too light may lead to paper jams or cause damage to the printer’s components.
4. Avoid overloading the bypass tray: The bypass tray has a limited capacity, so avoid overloading it with too many sheets. This can lead to paper jams or poor print quality. Refer to the printer’s specifications to determine the maximum number of sheets that the bypass tray can hold.
5. Keep the bypass tray clean: Regularly clean the bypass tray to remove any dust, debris, or paper particles that may accumulate over time. This helps ensure smooth paper feeding and prevents potential issues with print quality or paper jams.
6. Test and adjust settings: Before printing a large batch of documents, it’s a good practice to perform a test print using the bypass tray. This allows you to verify that the paper is feeding correctly and that the print quality meets your expectations. If needed, adjust the print settings or paper guides to achieve the desired results.
7. Consider printer limitations: Be aware of the limitations of your printer when using the bypass tray. For example, if your printer doesn’t support automatic duplexing when using the bypass tray, plan accordingly and set your print settings to accommodate for manual duplexing if needed.
By following these tips, you can effectively utilize the bypass tray feature and optimize your printing experience. With proper paper handling, correct print settings, and regular maintenance, you can ensure reliable and high-quality printing results.
In the final section, we will summarize the key points discussed in this article.