
Materials Needed
Creating a stunning mosaic mirror requires a few essential materials that you can easily find at your local craft store or online. Here’s a list of what you’ll need:
- Mirror base: Select a mirror that suits your desired size and style. It can be a new mirror or an old one that you want to revamp.
- Tiles or Glass: Choose a variety of tiles or glass pieces in different colors, shapes, and sizes. You can opt for ceramic tiles, stained glass, or even broken pieces of colorful china.
- Adhesive: Use a strong adhesive suitable for bonding tiles or glass to the mirror base. Epoxy adhesive or clear industrial-strength glue are popular options.
- Grout: Grout helps fill the gaps between the tiles or glass pieces and gives the mosaic a finished look. Select a color that complements your chosen tiles.
- Grout sealer: Sealing the grout helps protect it from dirt and moisture, ensuring your mosaic mirror stands the test of time.
- Safety equipment: Protect your hands with gloves and use safety glasses when cutting tiles or handling sharp objects. A dust mask may also be necessary when working with certain materials.
- Tile cutter: If you’re using tiles, a tile cutter will come in handy for precise cuts and shaping. You can also use nippers or a glass cutter for more intricate designs.
- Sponge or cloth: A sponge or a soft cloth is essential for cleaning excess grout and giving your mirror a polished finish.
- Masking tape: Use masking tape to create clean lines and protect the mirror edges during the grouting process.
- Marker or pencil: You’ll need a marker or pencil to sketch your design on the mirror base before applying the adhesive.
- Palette knife or spatula: A palette knife or spatula will aid in applying adhesive and spreading grout smoothly.
With these materials in hand, you’re ready to embark on your mosaic mirror-making adventure. Remember, creativity and attention to detail are key when crafting a unique and eye-catching piece of art that will add beauty and personality to any space.
Step 1: Prepare the Mirror Base
The first step in creating your mosaic mirror is to prepare the mirror base. Follow these instructions to ensure a clean and sturdy surface for your mosaic design:
- Clean the mirror: Thoroughly clean the mirror with a glass cleaner to remove any dust, dirt, or residue. Ensure the mirror is completely dry before proceeding.
- Protect the edges: To protect the edges of the mirror from accidental damage during the crafting process, cover them with masking tape. This will also create clean lines around the mirror when it’s time to apply the grout.
- Sketch your design: Use a marker or pencil to outline your desired design on the mirror. This will serve as a guideline when placing the tiles or glass pieces in later steps. Get creative and experiment with different shapes and patterns to achieve a unique look.
- Apply adhesive: Apply a thin, even layer of adhesive to a small section of the mirror base using a palette knife or spatula. Work in small areas to prevent the adhesive from drying too quickly.
- Spread the adhesive: Use the palette knife or spatula to spread the adhesive evenly on the marked section, making sure to cover the entire area. Make grooves in the adhesive with the edge of the tool to create a stronger bond with the tiles or glass.
- Let it dry: Allow the adhesive to dry according to the manufacturer’s instructions. This step is crucial to ensure the tiles or glass pieces adhere securely to the mirror base.
Preparing the mirror base sets the foundation for your mosaic masterpiece. Taking the time to clean the mirror, protect its edges, and outline your design will make the whole process smoother and more enjoyable. Stay tuned for the next steps as we dive deeper into the wonderful world of creating a mosaic mirror!
Step 2: Choose and Prepare the Tiles or Glass
Choosing the right tiles or glass for your mosaic mirror is an exciting part of the creative process. Follow these steps to select and prepare the materials for your unique design:
- Select your materials: Look for tiles or glass pieces that will complement the style and color scheme you have in mind. Consider the size, shape, texture, and color variations to create an interesting and visually appealing mosaic. You can choose from a wide range of options, including ceramic tiles, stained glass, or even repurposed items like broken china or colored beads.
- Prepare the tiles: If you’re using ceramic tiles or other materials that need to be cut or shaped, use a tile cutter, nippers, or a glass cutter to achieve the desired shapes and sizes. Take your time and work carefully to create the desired pieces for your mosaic design. Ensure the edges are smooth to avoid any injuries during the installation process.
- Clean the tiles or glass: Before applying them to the mirror base, make sure to clean the tiles or glass pieces to remove any dust, dirt, or adhesive residue. This will ensure a proper bond when they are placed on the mirror.
- Arrange the tiles or glass: Lay out the tiles or glass pieces near your work area and experiment with different arrangements. This will help you visualize how the mosaic will look and make any necessary adjustments before adhering them to the mirror base.
Choosing and preparing the tiles or glass is a crucial step in creating your mosaic mirror. Take your time to find the perfect materials and ensure they are clean and ready for installation. With your materials prepped and design ideas in mind, you’re ready to move on to the next exciting step: designing the mosaic pattern!
Step 3: Designing the Mosaic Pattern
The design you create for your mosaic mirror is what will make it truly unique and visually stunning. Follow these steps to unleash your creativity and design a beautiful pattern:
- Refer to your sketch: Look at the sketch you created on the mirror base during the preparation stage. This will serve as a guide as you plan your mosaic pattern.
- Consider color and texture: Take into account the different colors and textures of your tiles or glass pieces. Play with various combinations to create a visually appealing and harmonious design. Think about using contrasting colors for a bold statement or incorporating subtle gradients for a more delicate look.
- Experiment with placement: Start arranging the tiles or glass pieces on the mirror base, following your intended design. Play around with different positions and orientations to find the most pleasing arrangement. Don’t be afraid to make adjustments or try out new configurations until you achieve the desired pattern.
- Create visual interest: Add depth and dimension to your mosaic by incorporating different heights or angles. You can achieve this by using pieces of various thicknesses or overlapping certain tiles. This will give your mirror an engaging and dynamic appearance.
- Step back and assess: Once you’ve laid out the tiles or glass pieces according to your design, step back and take a look at the overall composition. Ensure that the pattern is balanced and visually appealing from a distance. Make any necessary changes or refinements before moving on to the next step.
The design process is a crucial stage in creating your mosaic mirror masterpiece. Let your imagination run wild and don’t be afraid to take risks. Remember, the pattern you create will be an expression of your personal style and creativity. With your design finalized, it’s time to move on to the next step: applying the adhesive.
Step 4: Applying the Adhesive
Now that you have your mosaic pattern designed, it’s time to secure the tiles or glass pieces to the mirror base. Follow these steps to apply the adhesive:
- Start in small sections: Work in small sections rather than applying adhesive to the entire mirror base at once. This will prevent the adhesive from drying out too quickly.
- Apply the adhesive: Using a palette knife or spatula, apply a thin layer of adhesive to the back of each tile or glass piece. Make sure to cover the entire surface to ensure a strong bond.
- Place the tiles or glass: Carefully place each piece onto the mirror base, following your designed pattern. Press gently but firmly to ensure it adheres well to the adhesive.
- Space the tiles or glass: Leave a small gap between each piece to allow room for grout. Use spacers or your judgment to achieve consistent spacing throughout the mosaic.
- Work in sections: Repeat the process, working in small sections, until you have covered the entire mirror base with tiles or glass pieces.
- Check for alignment: Occasionally step back and check the alignment of your tiles or glass pieces to ensure they line up properly. Make adjustments as needed to maintain the desired pattern.
Applying the adhesive requires patience and attention to detail. Take your time to ensure each tile or glass piece is securely adhered to the mirror base according to your design. Now that your mosaic is starting to take shape, it’s time to move on to the next step: grouting the mosaic.
Step 5: Placing the Tiles or Glass Pieces
With the adhesive applied, it’s time to carefully place the tiles or glass pieces onto the mirror base. Follow these steps to ensure a precise and visually appealing arrangement:
- Start from the center: Begin placing the tiles or glass pieces from the center of the design and work your way outwards. This will help maintain symmetry and balance in the overall composition.
- Press gently but firmly: As you place each tile or glass piece onto the adhesive, press it down gently but firmly to ensure it adheres well. This will help prevent any pieces from shifting or moving once the adhesive has dried.
- Follow your design: Refer back to your sketch and the intended design as you continue to place the tiles or glass pieces. Stay true to your pattern and be mindful of the spacing between each piece.
- Make adjustments as needed: Occasionally step back and assess the overall placement of the tiles or glass pieces. If any adjustments are necessary, gently reposition the pieces to achieve the desired look.
- Continue in sections: Work in small sections at a time, gradually covering the entire mirror base with the tiles or glass pieces. This will help you maintain control over the design and ensure consistency throughout.
- Check for levelness: As you progress, periodically check that the tiles or glass pieces are level and even. Adjust if needed to maintain a smooth and visually pleasing surface.
Placing the tiles or glass pieces requires attention to detail and a steady hand. Take your time and be mindful of the design you created. With each piece carefully placed, your mosaic mirror is starting to take shape. The next step will involve grouting the mosaic to fill in the gaps and add a polished finish.
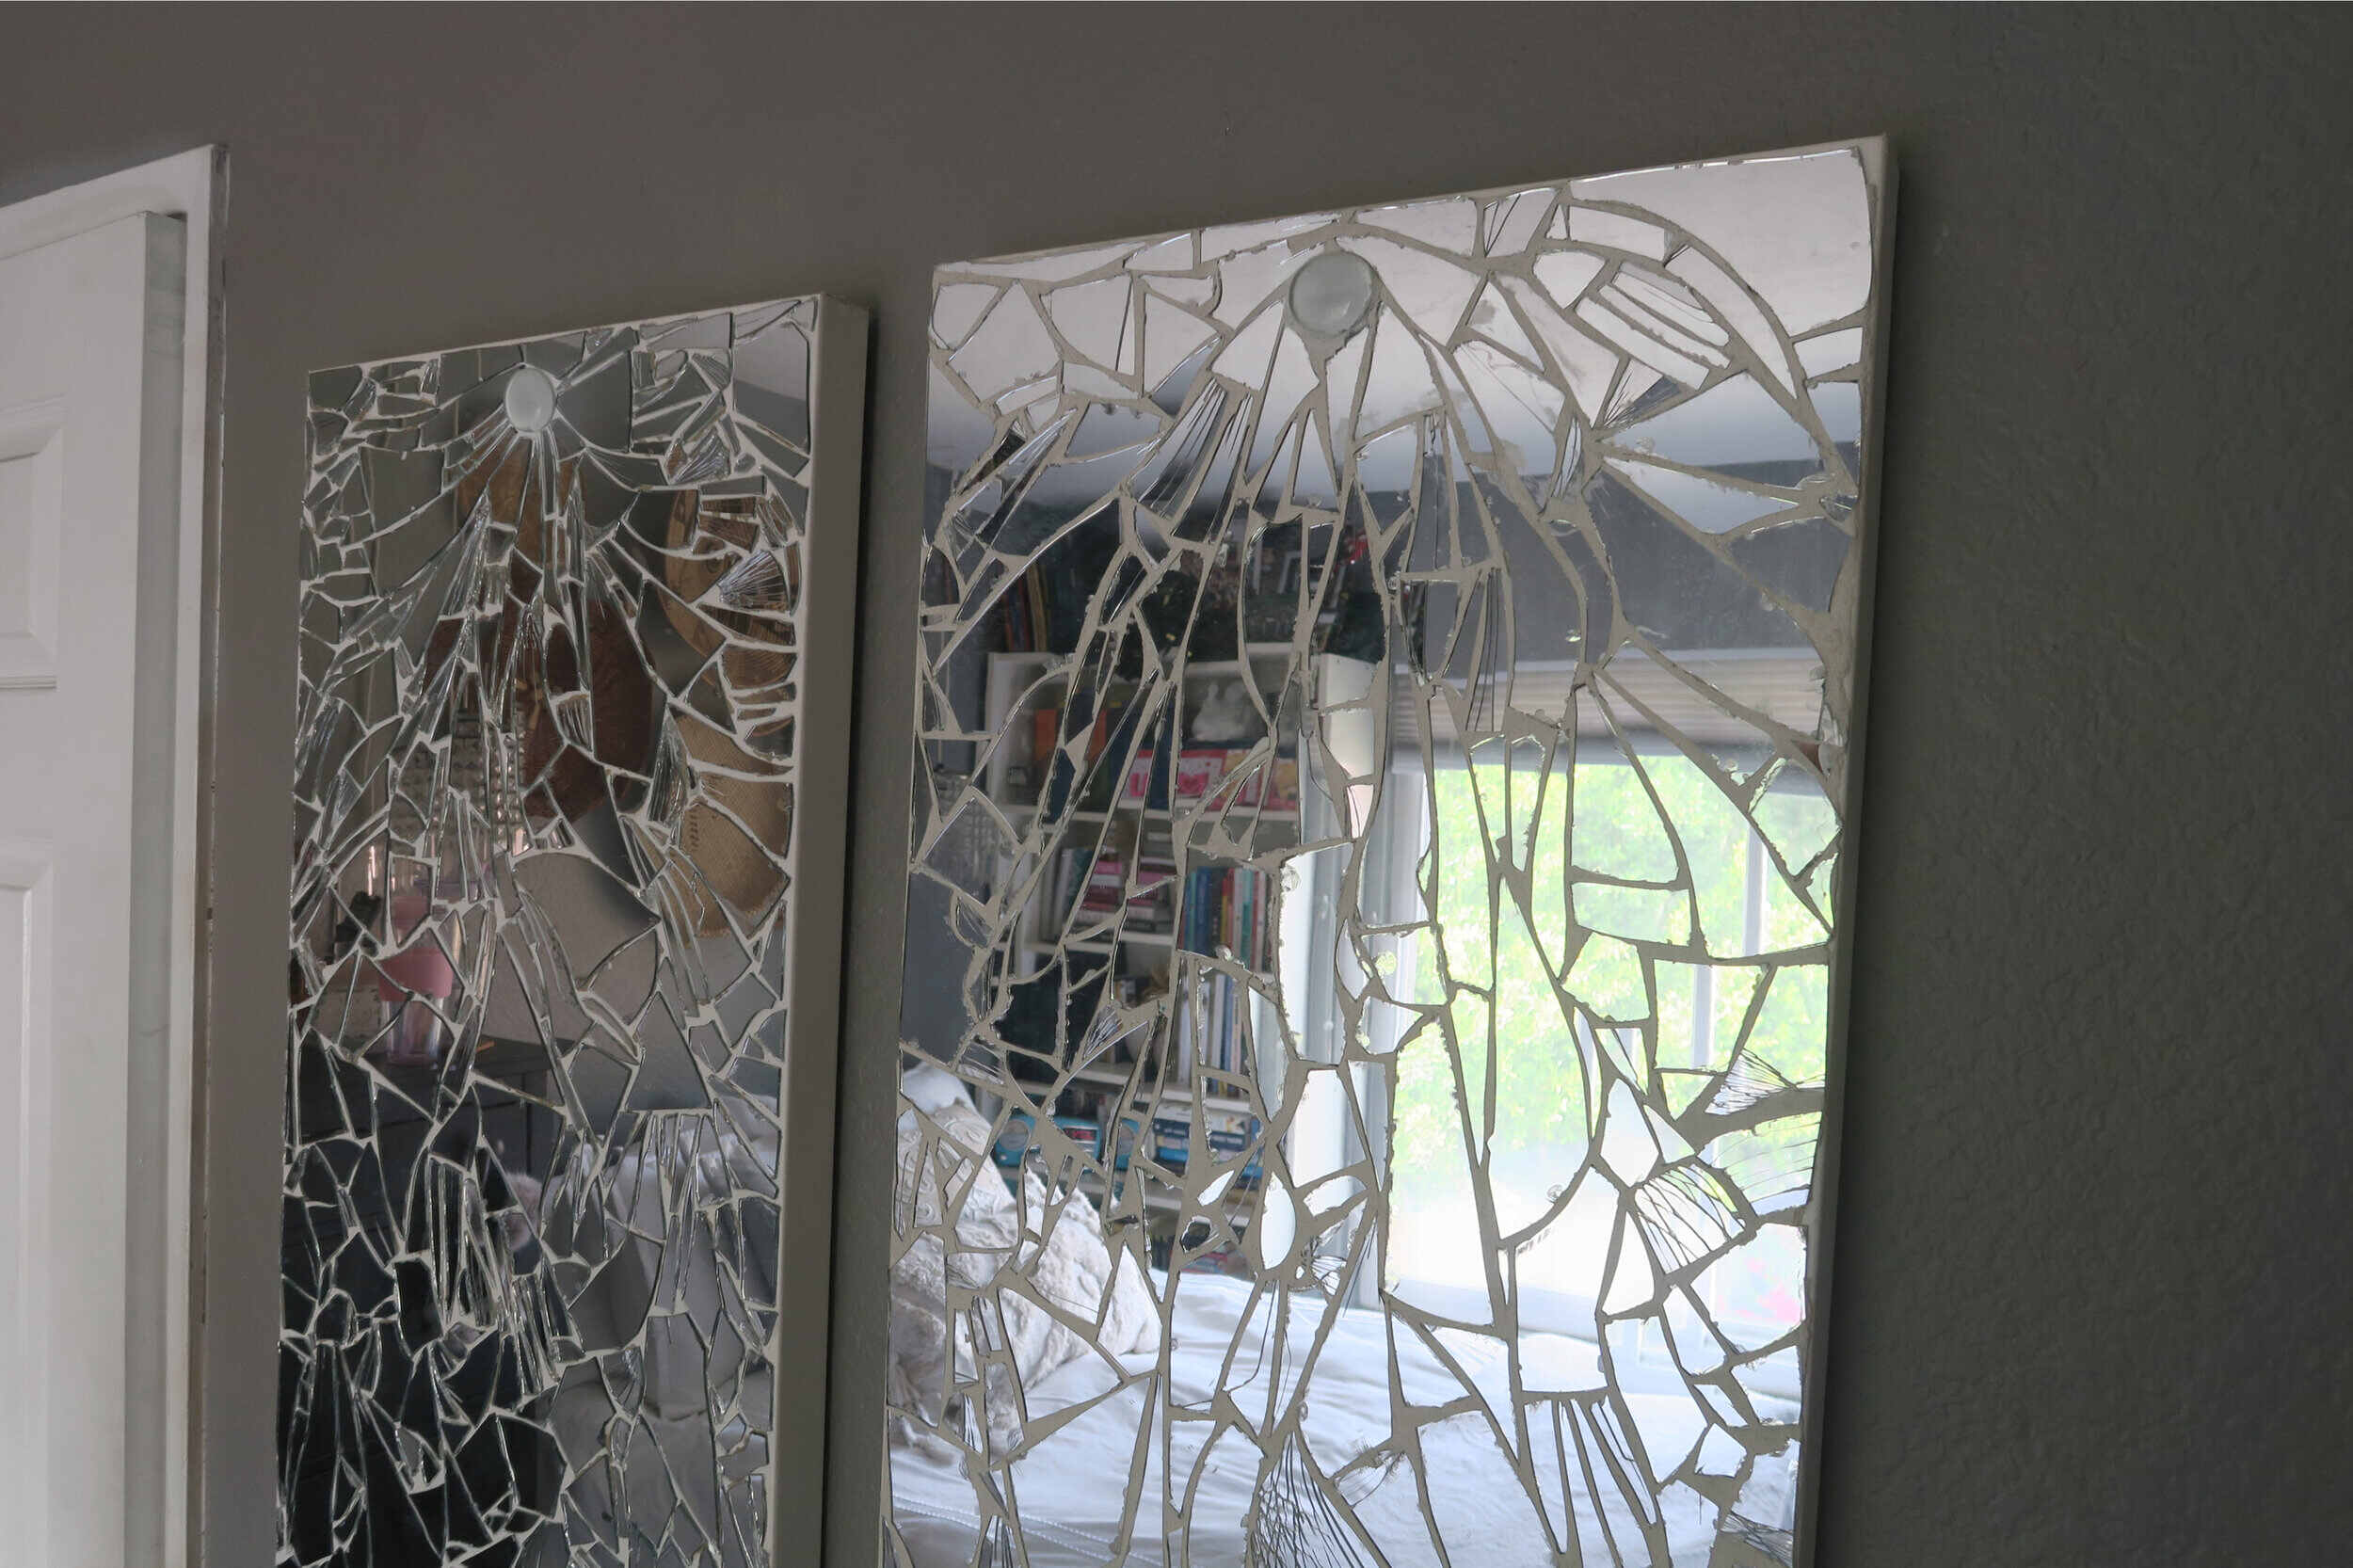
Step 6: Grouting the Mosaic
Grouting is a crucial step in the mosaic mirror-making process as it not only fills in the gaps between the tiles or glass pieces but also provides a cohesive and finished look. Follow these steps to grout your mosaic:
- Prepare the grout: Follow the manufacturer’s instructions to mix the grout to the desired consistency. Typically, you’ll need to combine the grout powder with water in a separate container until it forms a paste-like consistency.
- Apply the grout: Using a grout float or a rubber spatula, scoop a portion of the grout onto the mosaic surface. Gently spread the grout over the entire area, making sure to push it into the gaps between the tiles or glass pieces.
- Work in sections: Grout the mosaic in small sections at a time to prevent the grout from drying out before you can finish the entire mirror. This will also allow you to focus on fully covering each section and cleaning it up before moving on.
- Clean up excess grout: After applying the grout, use a damp sponge or cloth to carefully wipe away any excess grout on the surface of the tiles or glass pieces. Rinse the sponge frequently and gently swipe diagonally across the mosaic to avoid dislodging any tiles.
- Smooth the grout lines: Once you’ve removed the excess grout, use a damp finger or a grout shaping tool to smooth and shape the grout lines. This will ensure a neat and even finish.
- Allow the grout to cure: Follow the recommended curing time provided by the grout manufacturer. This will vary depending on the type of grout used. Avoid touching or disturbing the mosaic during this time.
Grouting your mosaic is an essential step that brings your design to life. Take your time during this process to ensure the grout is evenly applied and the lines are clean. With the grout in place, your mosaic mirror is almost complete. The next step will involve cleaning and finishing the mirror for that sparkling final touch.
Step 7: Cleaning and Finishing the Mirror
As you near the finish line with your mosaic mirror, it’s time to give it a final cleaning and add those finishing touches. Follow these steps to ensure your mirror shines and stands out as a true piece of art:
- Clean off any grout residue: Use a damp sponge or cloth to gently wipe away any remaining grout residue on the surface of the tiles or glass pieces. Be careful not to disturb the grout lines as you clean.
- Polish the mirror surface: Once the grout is dry, polish the mirror surface to remove any smudges or fingerprints. Use a non-abrasive glass cleaner or a mixture of water and vinegar and wipe the surface with a soft, lint-free cloth.
- Remove masking tape: Carefully peel off the masking tape from the edges of the mirror. This will reveal clean lines and prevent any grout from sticking to the tape.
- Inspect and make any final adjustments: Take a close look at your mosaic mirror and make any necessary adjustments. Check for any loose tiles or glass pieces and reattach them using adhesive if needed.
- Apply grout sealer: To protect the grout and keep it looking pristine, consider applying a grout sealer. Follow the manufacturer’s instructions for application and allow sufficient drying time.
- Frame or display your mirror: Consider framing your mosaic mirror to enhance its aesthetic appeal and protect the edges. A decorative frame will give it a finished look and add an extra touch of elegance. If you prefer to leave it frameless, find a suitable place to display it where it can be admired by all.
With the final steps completed, your mosaic mirror is now ready to be showcased. The hours of creativity, precision, and patience you invested in making this unique piece of art will surely pay off. Step back and bask in the beauty of your creation, and enjoy the sense of accomplishment that comes with crafting a stunning mosaic mirror.
Tips and Tricks for a Stunning Mosaic Mirror
Creating a mosaic mirror is a rewarding and artistic endeavor. Here are some tips and tricks to help you achieve a stunning result:
- Plan your design: Before you begin, take the time to sketch out your design and experiment with different patterns and color schemes. This will give you a clear vision of the final product.
- Use the right adhesive: Choose an adhesive that is specifically designed for mosaic projects. It should provide a strong and durable bond between the tiles or glass pieces and the mirror base.
- Work in good lighting: Adequate lighting will help you see the details and colors of your mosaic clearly, ensuring precision and accuracy in placement.
- Take breaks: Mosaic work can be intricate and time-consuming. Take regular breaks to rest your eyes and recharge your creativity.
- Experiment with tile placement: Play around with different angles and orientations of the tiles or glass pieces to add depth and visual interest to your design.
- Add embellishments: Consider incorporating additional decorative elements such as beads, jewelry, or small trinkets to enhance the visual appeal of your mosaic mirror.
- Clean as you go: Wipe away excess adhesive or grout as you work to keep your mosaic clean and avoid any unwanted buildup.
- Protect your workspace: Lay down a protective covering or work on a surface that can be easily cleaned, as mosaic work can get messy.
- Keep spare tiles: Keep a few spare tiles or glass pieces of each color and shape in case you need replacements or make any design changes.
- Seal your finished mosaic: Once the grout has fully cured, consider applying a sealant to protect the tiles and grout from moisture or stains.
Remember, creating a mosaic mirror is a labor of love and creativity. Enjoy the process, experiment with different techniques, and let your artistic vision guide your design choices. With these tips and tricks, you’ll be well on your way to creating a truly stunning mosaic mirror.