
Types of Curtain Rods
When it comes to hanging curtains without drilling, there are various types of curtain rods that you can consider. Each type offers a different method of installation and can provide a stylish and functional solution for your window treatments. Here are some of the most popular types of curtain rods that require no drilling:
- Tension Rods: Tension rods are spring-loaded rods that can be adjusted to fit snugly between two walls or window frames. These rods require no drilling and can be easily installed by twisting or extending them to the desired length. They are a versatile option for lightweight curtains or sheers.
- Magnetic Curtain Rods: Magnetic curtain rods are another excellent option for easy installation. These rods utilize powerful magnets to adhere to the metal surface of your window frame. They are a great choice for metal-framed windows or doors and can support lightweight to medium-weight curtains.
- Adhesive Curtain Rod Brackets: Adhesive curtain rod brackets are designed to be attached directly to the wall or window frame using strong adhesive strips. These brackets provide a sturdy and reliable support system for your curtain rod without the need for drilling. It’s important to ensure that the adhesive used is specifically designed for strong bonding with the surface material.
- Brackets with Command Hooks: Command hooks are versatile adhesive hooks that can be used in various applications, including hanging curtain rods. By attaching brackets with Command hooks to the wall, you can easily hang your curtain rod without drilling. Just make sure to follow the weight limit instructions provided by the manufacturer for the Command hooks to ensure a secure installation.
- Tension Wire: Tension wire is a flexible wire that can be stretched between two points, such as walls or window frames. By attaching curtain clips or rings to the wire, you can hang your curtains without drilling. Tension wire is a great option for lightweight curtains or sheer panels.
- Tension Rods with Velcro Strips: Velcro strips can be used in combination with tension rods to create a no-drill curtain hanging solution. By attaching the Velcro strips to the wall and the tension rod, you can secure the rod in place without the need for drilling. This method works well for lightweight curtains or sheer panels.
- Spring-Tension Curtain Rod: Spring-tension curtain rods work similarly to regular tension rods but feature a built-in spring mechanism. This allows for easy installation and removal without the need for drilling or twisting. Spring-tension rods are available in various lengths and can support lightweight to medium-weight curtains.
- Curtain Rail System: A curtain rail system is a track that is mounted to the ceiling or wall. The curtains are then attached to gliders or hooks that slide along the rail. This system eliminates the need for drilling into the walls and provides a sleek and modern look.
These are just a few options to consider when looking to install curtain rods without drilling. Each option offers its own advantages and limitations, so be sure to choose the one that best suits your needs and the weight of your curtains. With these alternative methods, you can effortlessly hang your curtains and enhance the beauty of your windows without the hassle of drilling.
Hanging Curtain Rods with Tension Rods
One of the simplest and most popular methods to hang curtains without drilling is by using tension rods. Tension rods are spring-loaded rods that can be easily adjusted to fit between two walls or window frames. Here’s a step-by-step guide on how to hang curtain rods with tension rods:
- Measure and choose your tension rod: Start by measuring the width of your window or the space where you want to hang the curtains. Choose a tension rod that extends to the desired length. Most tension rods come with an adjustable mechanism, allowing you to customize the fit.
- Prepare the area: Clean the surface of the walls or window frames where the tension rod will be installed. Make sure the area is free from dust and debris for better adhesion and to prevent any damage to the surface.
- Extend the tension rod: Twist or extend the tension rod to its maximum length, just slightly wider than the width of your window or space. This will ensure a tight and secure fit.
- Position the tension rod: Place one end of the tension rod against one wall or window frame, then hold the other end against the opposite wall or frame. Apply gentle pressure and twist the rod until it fits securely in place. The tension between the walls or frame will keep the rod in position.
- Test the fit: Once the tension rod is in place, give it a gentle tug to ensure it’s secured properly. It should remain stable and not easily move or slide.
- Hang your curtains: Now that the tension rod is securely installed, you can hang your curtains. Slide the curtain loops or rings onto the rod and adjust them to your desired position. Make sure the curtains are evenly distributed along the rod for a balanced and attractive look.
- Adjust and level: If needed, you can fine-tune the position of the tension rod by twisting it slightly. This will help level the rod and ensure that it’s straight and aligned with the window or space.
- Enjoy your curtains: Once everything is in place, step back and admire your beautifully hung curtains. You can now enjoy the privacy, light control, and aesthetic appeal they bring to your space.
Hanging curtain rods with tension rods provides a convenient and versatile solution, especially for lightweight curtains or sheers. It requires no drilling, making it ideal for those who prefer not to leave permanent marks on their walls or window frames. With just a few simple steps, you can achieve a professional-looking curtain installation without the need for special tools or complicated procedures.
Using Magnetic Curtain Rods
If you have metal-framed windows or doors, using magnetic curtain rods is a convenient and easy way to hang curtains without drilling any holes. Magnetic curtain rods utilize powerful magnets to securely attach to the metal surface, providing a simple and effective hanging solution. Here’s a step-by-step guide on how to use magnetic curtain rods:
- Measure and choose your magnetic rod: Start by measuring the width of the window or door where you want to hang the curtains. Choose a magnetic rod that extends to the desired length, ensuring it fits the width of the opening.
- Clean the metal surface: Before placing the magnetic rods, clean the metal surface where they will be attached. Use a clean cloth or sponge to remove any dirt, dust, or grease. This will ensure a secure grip and prevent any damage to the surface.
- Attach the magnetic rods: Place one end of the magnetic rod against the metal surface, aligning it with the desired position. Slowly slide the rod to the other end, allowing the magnets to attract and secure it in place. The magnets will create a strong bond, holding the rod firmly.
- Adjust and level: Once the rod is attached, you can adjust its position by sliding it along the metal surface. This will help align it perfectly with the window or door frame. Use a level to ensure the rod is straight and level.
- Hang your curtains: With the magnetic rod securely in place, you can now hang your curtains. Slide the curtain loops or rings onto the rod and arrange them evenly. Make sure the curtains are positioned to your desired height and length.
- Test the stability: Gently tug on the curtains to test the stability of the magnetic rods. They should remain securely attached to the metal surface, with no movement or slipping.
- Enjoy your curtains: Once the curtains are hung, step back and admire the transformed space. Enjoy the privacy, light control, and aesthetics brought by your newly hung curtains.
Using magnetic curtain rods is an excellent option for those who have metal-framed windows or doors, as it eliminates the need for drilling holes or using adhesive brackets. The strong magnetic attraction ensures a secure hold, even for heavier curtains. Plus, the rods can be easily repositioned or removed if desired, making it a flexible solution for changing curtains or moving to a new location.
Installing Adhesive Curtain Rod Brackets
For those who prefer a no-drill option but need a more permanent and sturdy solution, installing adhesive curtain rod brackets can be an excellent choice. These brackets use strong adhesive strips to securely attach to the wall or window frame, allowing you to hang your curtains without the need for drilling. Here’s a step-by-step guide on how to install adhesive curtain rod brackets:
- Measure and choose your brackets: Start by measuring the width of your window or the desired space for your curtains. Choose adhesive curtain rod brackets that are suitable for the weight and width of your curtains. Ensure they come with strong adhesive strips for a reliable hold.
- Clean the surface: Thoroughly clean the area where you plan to install the brackets. Remove any dirt, dust, or grease using a clean cloth or sponge. Ensuring a clean surface will help the adhesive bond effectively.
- Position the brackets: Place the adhesive strips onto the back of each bracket. Peel off the backing from the adhesive strips, then position the brackets on the wall or window frame according to your desired height and width. Press firmly to ensure a secure attachment.
- Hold and apply pressure: Hold and apply pressure to each bracket for the recommended duration as per the adhesive manufacturer’s instructions. This step is crucial for the adhesive to bond properly. Refer to the instructions for the specific time required for the adhesive to set.
- Test the stability: Once the brackets are installed, gently tug on them to ensure they are securely attached to the surface. They should not easily loosen or come off. If the brackets feel unstable, try repositioning them or consider using additional adhesive strips for added support.
- Attach the curtain rod: Once the adhesive has properly set and the brackets are stable, you can attach the curtain rod. Slide the rod through the brackets or attach it using the provided hardware, depending on the type of brackets you have. Make sure the rod is level and sturdy.
- Hang your curtains: Finally, hang your curtains by sliding the curtain loops or rings onto the rod. Adjust the curtains to your desired length and ensure they are evenly distributed along the rod.
- Enjoy your curtains: Step back and appreciate the beauty and functionality of your curtains. With adhesive curtain rod brackets, you can enjoy the privacy, light control, and aesthetics without the need for drilling holes.
Installing adhesive curtain rod brackets offers a secure and long-lasting solution for hanging curtains without drilling. However, it’s important to choose high-quality adhesive strips and ensure proper surface preparation for the best results. This method provides stability and the ability to handle heavier curtain weights while still remaining removable if needed in the future.
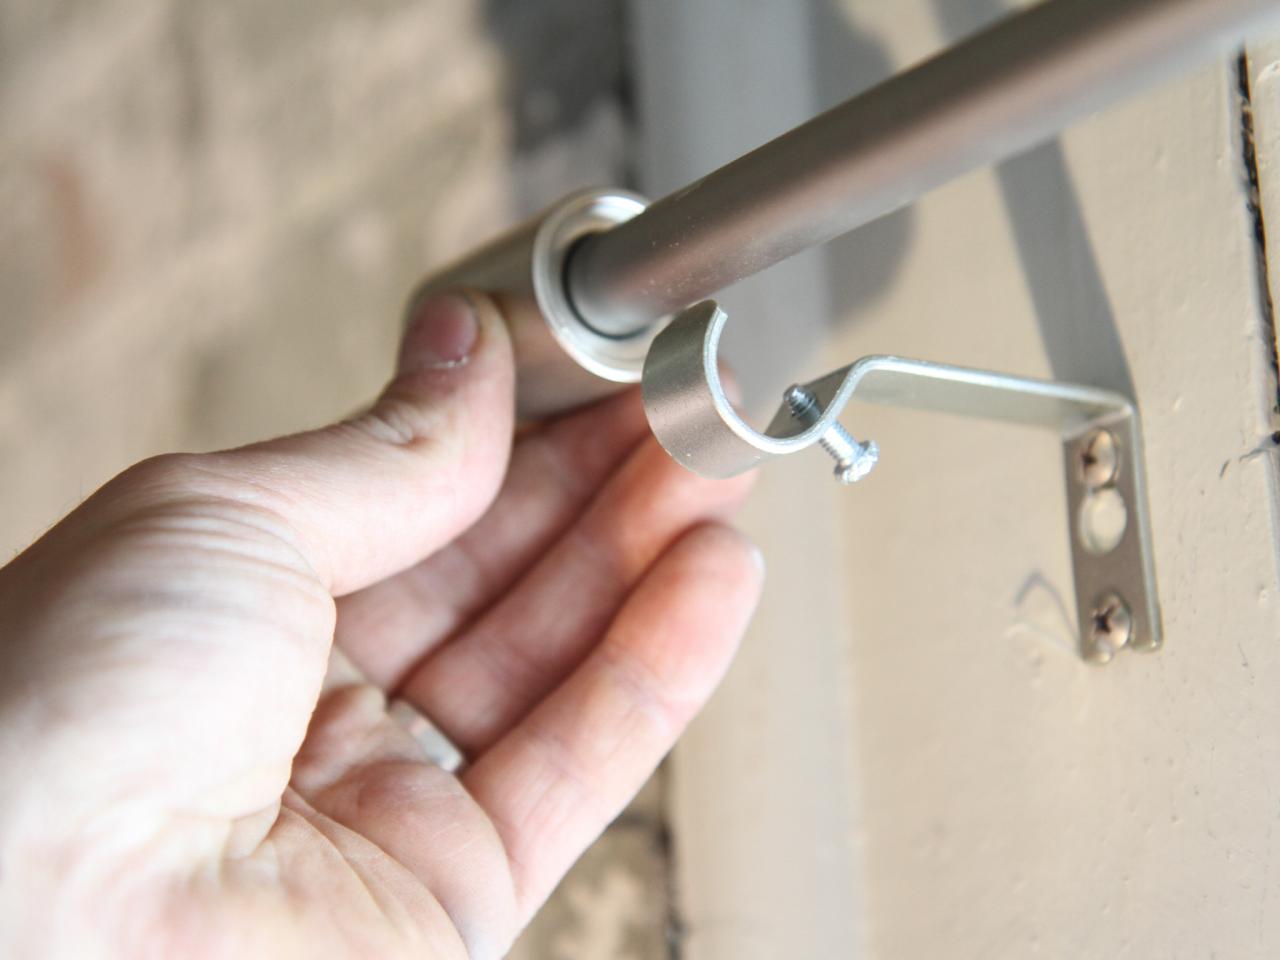
Utilizing Brackets with Command Hooks
If you want a versatile and damage-free way to hang curtains without drilling, utilizing brackets with Command hooks is an excellent option. Command hooks are adhesive hooks that can be easily attached and removed without leaving any residue or damaging the walls. By combining brackets with Command hooks, you can create a secure and adjustable curtain rod installation. Here’s a step-by-step guide on how to utilize brackets with Command hooks:
- Gather your materials: Gather the necessary components, including brackets, Command hooks, curtain rod, and curtain rings or clips. Choose brackets that are suitable for the weight and width of your curtains, as well as Command hooks that can accommodate the size of the brackets.
- Clean the surface: Prior to attaching the Command hooks, clean the wall or window frame where the brackets will be installed. Wipe away any dirt, dust, or grease using a clean cloth or sponge. This will ensure a secure adhesion for the Command hooks.
- Attach the Command hooks: Remove the backing from the adhesive strip of each Command hook. Press the hooks firmly onto the wall or window frame in the desired position. Follow the specific instructions provided by the Command hook manufacturer for optimal adhesion.
- Place the brackets: Slide the brackets onto the Command hooks, making sure they are properly seated and secure. Adjust the brackets to the desired height and width, ensuring they are evenly spaced and level.
- Test the stability: Give each bracket a gentle tug to check its stability. The Command hooks should hold the brackets securely in place. If any adjustments are needed, simply reposition the Command hooks or brackets accordingly.
- Insert the curtain rod: Once the brackets are securely attached, insert the curtain rod into the brackets. Make sure it sits snugly within the brackets and is level. Adjust the position of the curtains rings or clips on the rod as needed.
- Hang your curtains: Slide the curtains onto the rings or clips attached to the curtain rod. Adjust the curtains to your desired length and ensure they are evenly distributed along the rod.
- Enjoy your curtains: Step back and admire your handiwork. Your curtains are now hanging beautifully without the need for drilling any holes. Enjoy the privacy, light control, and aesthetics they bring to your space.
Utilizing brackets with Command hooks provides a flexible and temporary solution for hanging curtains without drilling. The adhesive properties of the Command hooks allow for easy installation and removal, making it a great choice for those who live in rental spaces or regularly change their curtains. Just be sure to follow the instructions provided by the Command hook manufacturer for optimal results.
Attaching Curtain Rods with Tension Wire
If you’re looking for a versatile and adjustable method to hang curtains without drilling, attaching curtain rods with tension wire can be a great option. Tension wire offers a flexible and secure support system for lightweight curtains or sheer panels. Here’s a step-by-step guide on how to attach curtain rods with tension wire:
- Gather your materials: Collect the necessary materials, including tension wire, curtain clips or rings, and a curtain rod that is compatible with the clips or rings.
- Measure and cut the tension wire: Measure the distance between the points where you want to attach the tension wire. Use wire cutters to trim the tension wire to the measured length, allowing for some flexibility when stretching it between the attachment points.
- Install hooks or eyelets: Attach hooks or eyelets to the walls or desired attachment points. Make sure they are secure and properly aligned. The number of hooks or eyelets will depend on the length of the tension wire and the weight of the curtains.
- Thread the tension wire through curtain clips or rings: Slide curtain clips or rings onto the tension wire, spacing them evenly along the length. Be sure to leave some empty space at the ends to attach the wire to the hooks or eyelets.
- Attach the tension wire: Hook or wrap the ends of the tension wire onto the hooks or eyelets. Pull the wire taut, ensuring it is securely fastened to the attachment points. Adjust the tension as needed to straighten the wire and ensure a level curtain rod installation.
- Hang the curtain rod: Place the curtain rod onto the clips or rings attached to the tension wire. Make sure the rod is evenly supported by the clips or rings, and adjust the positioning if necessary. Ensure the rod is level and secure within the curtain clips or rings.
- Hang your curtains: Slide the curtains onto the curtain rod through the clips or rings. Adjust the curtains to your desired length and evenly distribute them along the rod.
- Test the stability: Gently tug on the curtains and give the tension wire a slight push to test the stability. Ensure that the tension wire remains securely attached to the hooks or eyelets and can support the weight of the curtains without sagging or coming loose.
- Enjoy your curtains: Step back and enjoy your beautifully hung curtains. The tension wire provides a clean and minimalist look while allowing for easy adjustment and removal of the curtains when desired.
Attaching curtain rods with tension wire offers a flexible and temporary solution for hanging lightweight curtains or sheer panels without drilling. It provides a modern and unobtrusive support system that can be easily adjusted and removed when needed. Just be sure to choose a tension wire that is suitable for the weight of your curtains and properly secure the wire to the hooks or eyelets for optimal stability.
Using Tension Rods with Velcro Strips
If you’re searching for a no-drill solution that provides stability and adjustability, using tension rods with Velcro strips can be an excellent choice for hanging curtains. This method allows you to securely attach the tension rod to the wall or window frame without the need for drilling holes. Here’s a step-by-step guide on how to use tension rods with Velcro strips:
- Gather your materials: Collect the materials needed, including a tension rod that fits the desired width of your window or space, and Velcro strips suitable for the weight of your curtains.
- Measure and cut the Velcro strips: Measure the length of the tension rod and cut Velcro strips to the corresponding size. Cut both the hook side and loop side of the Velcro strips to the same length to ensure a secure attachment.
- Clean the surface: Clean the area on the wall or window frame where you plan to attach the Velcro strips. Wipe away any dust, dirt, or grease, ensuring a clean and smooth surface for the adhesive to adhere properly.
- Attach the hook side of the Velcro strips: Peel off the backing of the hook side of the Velcro strips and press them firmly onto the wall or window frame at the desired height and width. Make sure they are evenly spaced and properly aligned.
- Attach the loop side of the Velcro strips: Peel off the backing of the loop side of the Velcro strips and attach them onto the tension rod, aligning them with the corresponding hook strips on the wall or window frame.
- Extend and position the tension rod: Extend the tension rod to its maximum length and position it between the Velcro strips on the wall or window frame. Apply gentle pressure to secure the rod in place, ensuring a snug fit.
- Test the stability: Give the tension rod a gentle tug to ensure it is securely held in place by the Velcro strips. It should not easily dislodge or slip. If necessary, readjust the positioning of the Velcro strips or reapply them for a stronger grip.
- Hang your curtains: Slide the curtains directly onto the tension rod, adjusting their placement and length as desired. Ensure that the curtains are evenly distributed and not placing excessive strain on the tension rod.
- Enjoy your curtains: Step back and admire your curtains hanging securely without the need for drilling. The tension rod with Velcro strips provides a flexible and removable solution, allowing you to easily adjust or remove the curtains when desired.
Using tension rods with Velcro strips offers a simple and temporary method to hang curtains without drilling. The Velcro strips provide a strong adhesive bond, while the tension rod ensures stability and ease of adjustment. Whether you live in a rental space or prefer a non-permanent solution, this method allows you to enjoy the beauty and functionality of curtains without damaging your walls.
Installing a Spring-Tension Curtain Rod
Installing a spring-tension curtain rod is a simple and versatile method that requires no drilling or additional hardware. These rods feature a built-in spring mechanism that allows for easy installation and removal. Here’s a step-by-step guide on how to install a spring-tension curtain rod:
- Choose the right rod: Select a spring-tension curtain rod that fits the width of your window or desired space. Consider the weight of your curtains to ensure that the rod can support them adequately.
- Measure and adjust: Measure the width of your window or space, and adjust the rod to the desired length. Most spring-tension rods can be adjusted by twisting or extending them until they fit snugly between the walls or window frame.
- Position the rod: Hold the rod horizontally and position one end against the wall or window frame. Begin to twist or extend the rod to create tension and fit it securely in place. Make sure both ends of the rod are evenly and firmly in contact with the walls or frame.
- Test the stability: Gently tug on the rod to test its stability. It should remain firmly in place without slipping or moving. If the rod feels unstable, try adjusting the tension or repositioning it for a better fit.
- Hang your curtains: Once the rod is securely installed, you can hang your curtains. Slide the curtain loops, rings, or tabs onto the rod and adjust them to your desired position. Ensure that the curtains are evenly distributed along the rod for a balanced look.
- Adjust and level: If needed, you can make adjustments to the position and levelness of the rod by twisting it slightly. This will help align the rod with the window or desired height and ensure a straight and symmetrical appearance.
- Enjoy your curtains: Step back and enjoy your beautifully hung curtains. The spring-tension curtain rod provides a quick and easy solution for hanging curtains without the need for drilling or additional hardware. It’s a great option for those who want a non-permanent solution or for rented spaces.
Installing a spring-tension curtain rod is an ideal choice if you prefer a hassle-free and temporary method to hang curtains. These rods can be easily adjusted, removed, and reused in different spaces, making them versatile and convenient. With just a few simple steps, you can enjoy the privacy, light control, and aesthetic appeal that curtains bring to your living space.
Hanging a Curtain Rod with a Curtain Rail System
If you’re looking for a more sophisticated and modern approach to hanging curtains without drilling, a curtain rail system can be an excellent choice. A curtain rail system typically consists of a track that is attached to the ceiling or wall, allowing curtains to be hung from gliders or hooks that slide along the rail. Here’s a step-by-step guide on how to hang a curtain rod with a curtain rail system:
- Choose a curtain rail system: Select a curtain rail system that matches your desired style and functionality. There are various types available, including ceiling-mounted tracks, wall-mounted tracks, and combination tracks that offer flexibility in installation options.
- Measure and mark the installation points: Measure the width of the window or space where the curtains will be hung. Mark the installation points for the rail system, ensuring they are level and evenly spaced. Refer to the manufacturer’s instructions for the specific distance recommended between the brackets or fixation points.
- Install the brackets or fixation points: Install the brackets or fixation points according to the marked positions. Use screws, anchors, or other appropriate hardware provided by the manufacturer to firmly attach the brackets to the ceiling or wall. Make sure they are secure and capable of supporting the weight of the curtains.
- Attach the rail to the brackets: Mount the rail onto the brackets or fixation points. Depending on the type of rail system, it may involve sliding the rail into the brackets or using screws or clips to hold it in place.
- Hang the curtain hooks or gliders: Attach curtain hooks or gliders to the curtains. These will slide along the curtain rail, allowing for easy opening and closing of the curtains. Make sure to evenly distribute the hooks or gliders along the top edge of the curtains.
- Slide the hooks or gliders onto the rail: Slide the curtain hooks or gliders onto the rail, ensuring a smooth glide along the track. Make any necessary adjustments to evenly distribute the curtains along the rail.
- Test the movement: Test the movement of the curtains by gently sliding them back and forth along the rail. Ensure that they move smoothly and that the rail is securely attached to the brackets or fixation points.
- Adjust and level: If needed, make adjustments to the position and levelness of the rail by repositioning the brackets or fixation points. This will help ensure that the curtains hang evenly and create a visually pleasing display.
- Enjoy your curtains: Step back and enjoy the elegant and seamless look of your curtains hanging from a curtain rail system. The system not only provides functionality but also adds a touch of sophistication to your space.
Hanging a curtain rod with a curtain rail system offers a professional and sleek solution for hanging curtains without drilling. This method provides smooth and effortless movement of the curtains, allowing for easy opening and closing. With a variety of curtain rail systems available, you can choose the one that best suits your style and functional needs, transforming your space into a refined and stylish area.
Tips for Installing Curtain Rods Without Drilling
Installing curtain rods without drilling offers a convenient and flexible solution for hanging curtains, especially for those who prefer not to make permanent modifications to their walls or window frames. Here are some helpful tips to keep in mind when installing curtain rods without drilling:
- Choose the right method: Consider the weight of your curtains, the type of window or space, and your personal preferences when selecting the method for installing curtain rods. Options such as tension rods, magnetic rods, adhesive brackets, command hooks, tension wire, Velcro strips, spring-tension rods, and curtain rail systems all offer different advantages and suitability.
- Measure carefully: Accurate measurements are crucial for a successful installation. Measure the width of your window or space to ensure your curtain rod fits properly. Also, consider the height at which you want to hang your curtains for optimal coverage and aesthetic appeal.
- Clean the surface: Whether you’re using adhesive brackets, command hooks, Velcro strips, or any other adhesive-based installation method, it’s important to clean the surface before attaching them. Remove any dust, dirt, or grease to ensure a strong and long-lasting bond.
- Follow the instructions: Read and follow the instructions provided by the manufacturer for each specific installation method. Different products may have different requirements and guidelines for proper installation and weight limits. Taking the time to read the instructions will help ensure a successful and secure installation.
- Test the stability: After installing the curtain rods, give them a gentle tug or shake to test their stability. Make sure they are securely attached and can hold the weight of your curtains without slipping or sagging. If needed, make any necessary adjustments or reposition the rod to improve stability.
- Consider curtain weight: Take into consideration the weight of your curtains when choosing an installation method. Lighter curtains may work well with tension rods or adhesive-based options, while heavier curtains may require stronger support systems such as magnetic rods, tension wire, or curtain rail systems.
- Regularly check and maintain: Periodically check the stability of the curtain rods and their attachments. Over time, adhesive-based installations may need to be reinforced or replaced. Additionally, ensure that the curtains are properly hung and distributed along the rod for a balanced and pleasing look.
- Experiment and be creative: Don’t be afraid to experiment with different installation methods or combine multiple methods to achieve the desired result. Each space is unique, and what works for others may not work for you. Be creative and find the solution that best fits your needs while ensuring the safety and functionality of your curtain installation.
By following these tips, you can successfully install curtain rods without drilling, adding privacy, style, and functionality to your space. Remember to choose the appropriate method, measure accurately, clean the surface, read and follow instructions, test stability, consider curtain weight, maintain periodically, and let your creativity guide you. Enjoy your beautifully hung curtains without the hassle of drilling.