Determining the Curtain Rod Location
When installing curtain rods in concrete walls, it is crucial to determine the precise location where the rods will be mounted. This step plays a vital role in ensuring that the curtains hang properly and enhance the aesthetics of the room. Follow these steps to determine the ideal curtain rod location:
- Consider the Window Frame: Start by examining the window frame and deciding whether you want to mount the curtain rod within or outside the frame. Mounting the rod inside the frame provides a cleaner and more streamlined look, while mounting it outside allows the curtains to be drawn open wider.
- Measure the Window: Use a tape measure to determine the width and height of the window. This measurement will help you select a curtain rod that is the appropriate size for your window.
- Decide on Curtain Length: Consider the length of the curtains you plan to hang. If you want floor-length curtains, measure from the top of the window frame to the desired length. Take note of this measurement to ensure that the curtain rod will be positioned at the correct height.
- Account for Mounting Hardware: Take into account the length of the mounting hardware, such as brackets or finials, when determining the curtain rod location. These elements should not overlap the window frame or interfere with the curtains.
- Avoid Obstructions: Check for any obstructions near the window, such as light switches or outlets. You want to make sure that the curtain rod will not impede their use and that the curtains can be easily opened and closed without any obstructions.
- Consider Curtain Weight: If you plan to hang heavy curtains, it’s important to locate the curtain rod in a position where it can support the weight without sagging or becoming unstable. This may require additional reinforcement, such as extra brackets or anchors.
By carefully considering these factors, you can determine the ideal location for your curtain rods in concrete walls. Taking the time to plan and measure accurately will result in a professional and aesthetically pleasing curtain installation.
Preparing the Tools and Materials
To ensure a smooth and efficient installation process when mounting curtain rods in concrete walls, it is crucial to gather all the necessary tools and materials beforehand. By having everything you need at hand, you can avoid delays and complete the task more efficiently. Here’s a list of the tools and materials you’ll need:
- Electric Drill: An electric drill will be essential for drilling holes into the concrete.
- Masonry Drill Bit: Use a masonry drill bit suitable for drilling into concrete walls. The size will depend on the type of anchors you plan to use.
- Masking Tape: Use masking tape to mark the drilling locations on the wall. This will help prevent the drill bit from slipping and provide a guide for accurate hole placement.
- Anchors: Select the appropriate anchors for your concrete walls. Choose anchors that are designed to support the weight of your curtain rods and curtains.
- Screws: You’ll need screws to secure the mounting hardware to the wall. Make sure they are the correct size and type to fit the anchors you are using.
- Screwdriver or Screwdriver Bit: Use a screwdriver or screwdriver bit that matches the size and type of screws you are using.
- Tape Measure: A tape measure will be essential for accurately measuring the window and determining the curtain length and rod placement.
- Pencil: Use a pencil to mark the drilling locations and any measurements on the wall or window frame.
- Level: A level is crucial for ensuring that the curtain rods are installed straight and level on the wall.
- Step Stool or Ladder: Depending on the height of the window, you may need a step stool or ladder to reach the installation area safely.
By gathering these tools and materials ahead of time, you will be well-equipped to install curtain rods in concrete walls efficiently and effectively. Having everything ready will streamline the process and ensure that you have a successful installation experience.
Marking and Drilling the Holes
Once you have determined the curtain rod location and gathered all the necessary tools and materials, the next step is to mark and drill the holes in the concrete walls. Properly marking and drilling the holes is crucial for securely mounting the curtain rods. Follow these steps:
- Measure and Mark: Use a tape measure to measure the distance between the holes you need to drill for the curtain rod brackets. Mark the locations with a pencil or masking tape.
- Check Alignment: Use a level to ensure that the marks for the holes are level and straight. Adjust the marks if necessary.
- Start Drilling: Attach a masonry drill bit to your electric drill. Set the drill to the appropriate speed and begin drilling at the marked locations. Apply steady pressure and let the drill bit do the work.
- Drill Deep Enough: Drill the holes to a depth that allows the anchors to be inserted fully. Make sure the holes are deep enough to provide a secure hold for the curtain rods.
- Clean the Holes: After drilling, remove any debris or dust from the holes by using a brush or blowing into them. This will ensure that the anchors can fit properly.
- Double-Check Placement: Before proceeding, double-check that the holes are in the correct positions and aligned correctly. Adjust if needed.
Marking and drilling the holes accurately is essential for a successful installation of curtain rods in concrete walls. Take your time to measure precisely, align the marks correctly, and drill the holes to the right depth. Pay attention to detail to ensure that the curtain rods are securely mounted and ready for the next steps of the installation process.
Inserting Anchors into the Holes
Properly inserting anchors into the drilled holes is crucial for providing a strong and secure foundation to mount the curtain rods in concrete walls. Anchors help distribute the weight evenly and prevent the rods from pulling out or damaging the walls. Follow these steps to insert anchors:
- Select the Right Anchors: Choose anchors that are appropriate for the size and weight of your curtain rods. Check the packaging or consult a hardware specialist to ensure you have the correct type.
- Insert Anchors: Take an anchor and gently tap it into one of the drilled holes using a hammer. Ensure the anchor is flush with the wall surface.
- Repeat for Other Holes: Insert anchors into the remaining drilled holes, following the same process.
- Tap in Securely: Make sure the anchors are firmly seated in the holes. They should not move or wiggle when lightly pushed.
- Check for Flushness: Ensure all the anchors are flush with the wall surface. If any are protruding or not seated properly, remove and reinsert them.
- Inspect for Stability: Give the anchors a gentle tug to ensure they are securely in place. If any anchors feel loose or unstable, remove and replace them with new ones.
By properly inserting the anchors into the drilled holes, you provide a solid foundation for mounting the curtain rods in concrete walls. Taking the time to ensure the anchors are securely seated and flush with the wall surface will prevent any issues during the installation process and ensure the rods stay securely in place.
Securing the Mounting Hardware
Once the anchors are properly inserted into the drilled holes, the next step is to secure the mounting hardware for the curtain rods. Securing the hardware ensures that the rods are stable and securely attached to the concrete walls. Follow these steps to secure the mounting hardware:
- Position the Brackets: Place the brackets over the anchors, aligning them with the drilled holes. Ensure that the brackets are level and positioned according to your desired curtain rod location.
- Insert Screws: Take the screws provided with the mounting hardware and insert them through the bracket holes. Start by hand-screwing the screws into the anchors, ensuring they are aligned properly.
- Secure with a Screwdriver: Using a screwdriver or a screwdriver bit, tighten the screws fully. This will ensure that the brackets are securely fastened to the anchors and provide a stable foundation for the curtain rods.
- Check Stability: Once the brackets are secured, gently give them a tug to check for stability. The brackets should not move or feel loose. If any brackets feel unstable, double-check the anchor and screw placements.
- Repeat for Other Brackets: Follow the same process for securing the remaining brackets, ensuring that they are level and firmly attached to the anchors.
Securing the mounting hardware is a critical step in the installation process of curtain rods in concrete walls. It ensures that the brackets are stable and securely fastened, providing a reliable support for the curtains. Take the time to tighten the screws fully and check the stability of the brackets to ensure a successful installation.
Installing the Curtain Rods
With the mounting hardware securely in place, it’s time to install the curtain rods on the concrete walls. Proper installation ensures that the rods are level, stable, and ready to support your curtains. Follow these steps to install the curtain rods:
- Attach Rod to Brackets: Slide the curtain rod onto the brackets, making sure it fits snugly. Follow the instructions provided with your curtain rod for connecting it to the brackets.
- Check Level: Use a level to ensure that the curtain rod is level. If needed, make any adjustments to the rod by loosening the bracket screws and repositioning it.
- Tighten Bracket Screws: Once the rod is level, tighten the bracket screws securely to hold the rod in place. Ensure that the rod is stable and does not move when lightly tugged.
- Test Brackets: Give the curtain rod a gentle tug to ensure that the brackets are securely attached and can hold the weight of the curtains.
- Repeat for Other Rods: If you have multiple curtain rods to install, repeat the above steps for each one, ensuring that they are installed level and securely attached to the brackets.
By following these steps carefully, you can install the curtain rods on concrete walls with ease. Checking the levelness of the rods and ensuring secure attachment to the brackets will provide a sturdy foundation for your curtains.
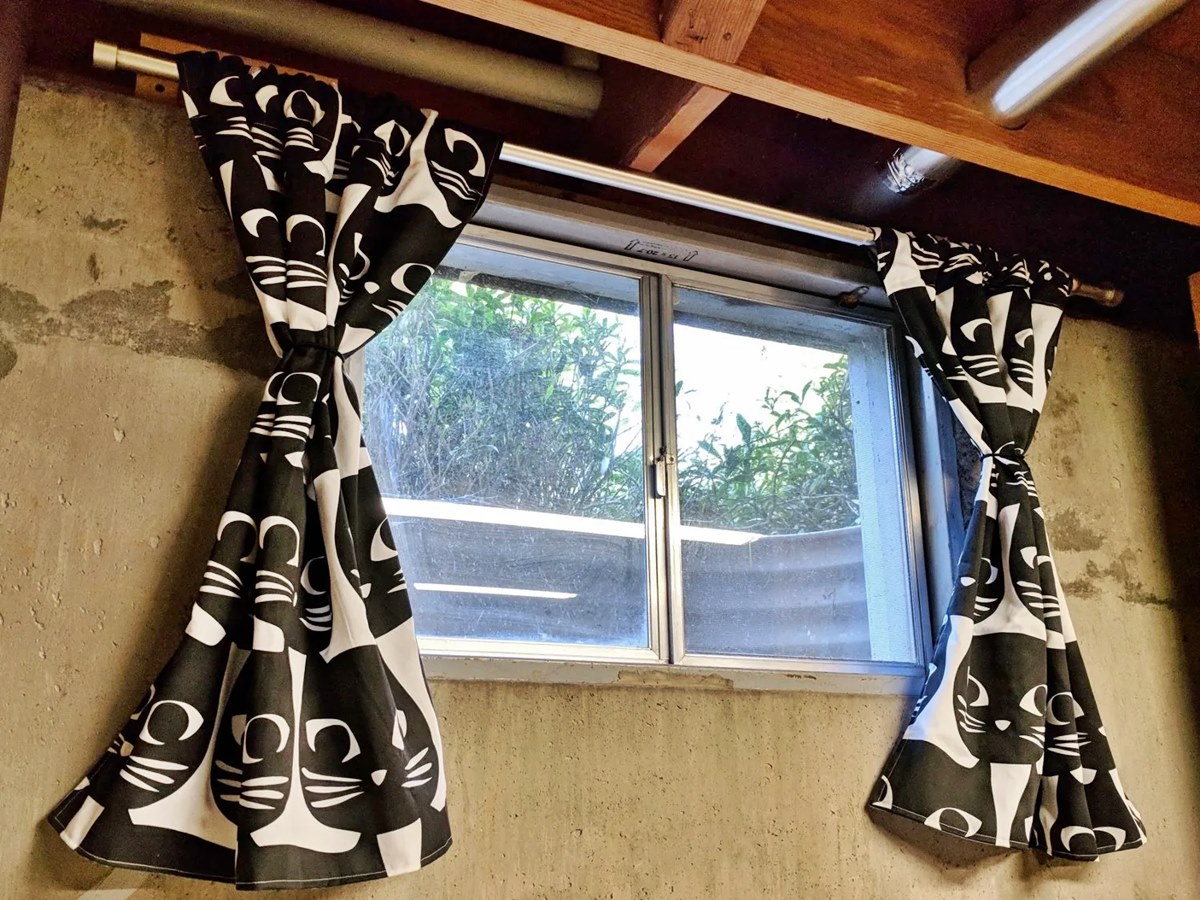
Hanging the Curtains
Now that the curtain rods are securely installed on the concrete walls, it’s time to hang the curtains and complete the installation process. Properly hanging the curtains ensures that they drape nicely and add the finishing touch to your windows. Follow these steps to hang the curtains:
- Prepare the Curtains: If your curtains have hooks or rings, attach them to the top of the curtains according to the manufacturer’s instructions. Make sure the curtains are ready to be hung.
- Open the Rods: Loosen the curtain rod brackets if necessary to create enough space to slide the curtains onto the rods.
- Slide the Curtains onto the Rod: Place the curtain rod through the curtain rod pocket or hooks. Slide the curtains along the rod until they are evenly distributed.
- Adjust the Curtains: Arrange the curtains so they hang evenly and have the desired drape. Make any necessary adjustments to ensure the curtains are even on both sides and are hanging at the desired height.
- Clean Up: Dispose of any packaging or material used during the installation process. Clean the area around the windows to give your newly hung curtains a polished look.
By following these steps, you can easily hang your curtains on the newly installed curtain rods. Take the time to arrange the curtains to your liking, ensuring they are even and have a seamless appearance. Once the curtains are hung, step back and enjoy the transformation they bring to your space.