
The Basics of Potato Clocks
Potato clocks are a fascinating example of how everyday items can be transformed into sources of electrical power. If you’ve ever wondered how these quirky devices work, look no further. In this article, we’ll delve into the basics of potato clocks and explore the science behind them.
The concept behind a potato clock is simple yet ingenious. By harnessing the electrical energy stored within a potato, you can power a clock or other small electronic devices. Although it may seem like magic, the actual process is rooted in chemistry and physics.
At the heart of a potato clock is the phenomenon called electrolysis. Electrolysis is the chemical decomposition of a substance by passing an electric current through it. In the case of a potato clock, the potato serves as an electrolyte solution. It contains a mixture of ions that allow the flow of electric current.
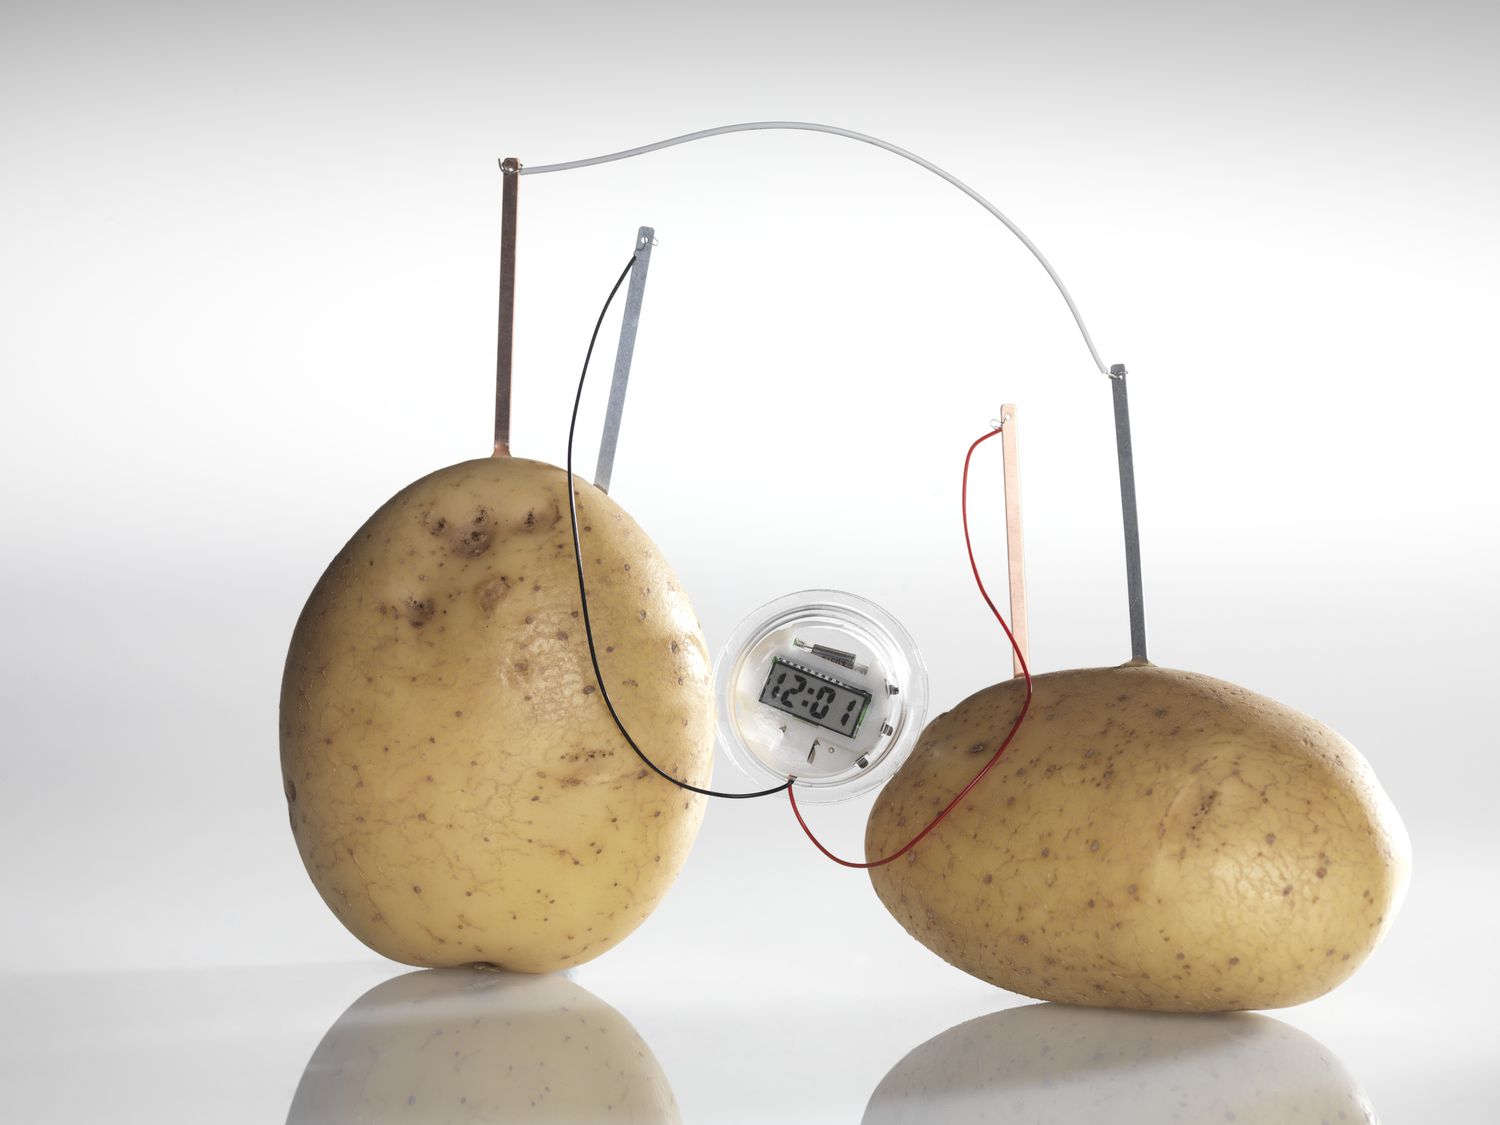
To create a working potato clock, you will need a few basic materials. First and foremost, you’ll need two different metallic electrodes, such as zinc-coated nails and copper wires. These act as the positive and negative terminals of the electrical circuit.
The next crucial component is the potato itself. The potato acts as a medium for transferring the ions and conducting electricity. You’ll also need connecting wires to complete the circuit and a small electronic device, such as a digital clock or an LED light, to demonstrate the electrical power generated by the potato clock.
Once you have gathered the necessary materials, it’s time to set up the potato clock circuit. Insert one zinc-coated nail and one copper wire into the potato, ensuring they are spaced apart. It’s essential to avoid them touching each other to prevent a short circuit.
Connect the other ends of the wires to your chosen electronic device. The zinc-coated nail should be connected to the positive terminal or the ‘+’, while the copper wire should be connected to the negative terminal or the ‘-‘. This configuration completes the circuit and allows electrical current to flow through the potato.
Now, brace yourself for the wow factor. When you connect the wires to the electronic device, you’ll notice that it powers up. The potato, through the process of electrolysis, is generating a small amount of electrical energy that is sufficient to run the device connected to it.
Although the voltage produced by a potato clock is relatively low, it serves as an excellent educational tool to demonstrate the principles of electrical circuits and the conversion of chemical energy into electrical energy.
Materials Needed for a Potato Clock
Building a potato clock requires a few simple materials that are easily accessible. By gathering these items, you’ll be well on your way to creating your very own potato-powered electrical device. So, let’s take a look at what you’ll need:
- A potato: The star of the show, your potato will serve as the electrolyte solution. Any type of potato will do, but it’s generally recommended to use a medium-sized one.
- Zinc-coated nails: These nails will act as the positive terminal of the electrical circuit. Look for nails with a zinc coating, as zinc is known to produce better results compared to other metals. You’ll need two nails.
- Copper wires: The copper wires will serve as the negative terminal of the circuit. Again, you’ll need two wires, each with a length of at least a few inches.
- A digital clock or LED light: To demonstrate the electrical power generated by the potato clock, you’ll need a small electronic device. A digital clock or an LED light is ideal, as they require relatively low voltage to operate.
- Connecting wires: These wires will be used to complete the circuit and connect the potato to the electronic device. Ensure that the wires are long enough to reach from the potato to the electronic device.
Now that you have all the necessary materials, it’s time to move on to the next step – understanding how a potato clock generates electricity and the chemical reaction that takes place within the potato.
How Does a Potato Clock Generate Electricity?
The process of how a potato clock generates electricity can be explained through the principles of electrolysis and the movement of ions within the potato. When the potato is set up in a specific configuration, it becomes a simple yet effective power source.
Inside the potato, there are naturally occurring ions, such as potassium and phosphate ions, present in the moisture and starch content. These ions act as electrolytes, allowing the flow of electric current within the potato.
When the zinc-coated nail is inserted into the potato, it releases zinc ions into the moisture of the potato. At the same time, the copper wire also releases copper ions. This release of ions creates a concentration gradient within the potato.
The concentration gradient is key to the generation of electricity in the potato clock. It creates a difference in electrical potential between the positive zinc electrode and the negative copper electrode. This difference in potential, known as voltage, is the driving force that enables the flow of electric current.
As the electric current moves through the potato, it encounters resistance, causing a buildup of electrons at the negative copper electrode and a deficiency of electrons at the positive zinc electrode. This creates a flow of electrons from the negative electrode to the positive electrode, completing the circuit.
Through this transfer of electrons, electrical energy is produced and can be harnessed to power a small electronic device, like a digital clock or an LED light. However, it’s important to note that the voltage output of a potato clock is relatively low, typically ranging from 0.5 to 1.5 volts.
Therefore, the potato clock’s ability to generate electricity is a result of the chemical reactions taking place within the potato, specifically the movement of ions and the transfer of electrons. It showcases the conversion of chemical energy stored in the potato into electrical energy that can be utilized for practical applications.
Now that we’ve explored how a potato clock generates electricity, let’s move on to understanding the chemical reaction that occurs within the potato and how it contributes to the functionality of the clock.
The Chemical Reaction in a Potato Clock
A potato clock operates based on a chemical reaction known as electrolysis. This process involves the movement of ions and the conversion of chemical energy into electrical energy. Understanding the chemical reaction taking place within the potato is crucial to grasp the inner workings of the potato clock.
Inside the potato, there is moisture and starch content that acts as an electrolyte, allowing the flow of ions. When the zinc-coated nail and copper wire are inserted into the potato, a chemical reaction begins.
The zinc-coated nail, also known as the anode, releases zinc ions (Zn2+) into the potato. These zinc ions dissolve in the moisture and move towards the copper wire, which acts as the cathode. At the same time, the copper wire releases copper ions (Cu2+).
As the zinc ions and copper ions move through the moisture in the potato, they create positive and negative charge imbalances. The zinc ions have a positive charge (due to the loss of electrons) and accumulate near the cathode (copper wire), while the copper ions have a negative charge (due to the gain of electrons) and accumulate near the anode (zinc-coated nail).
This charge imbalance creates a difference in electrical potential, known as voltage, between the anode and the cathode. It is this voltage that allows the flow of electric current in the potato clock. The movement of ions within the potato facilitates the transfer of electrons from the anode to the cathode.
The chemical reaction in the potato clock continues as long as there are sufficient ions and moisture in the potato. However, over time, the potato may dry out or the concentration of ions may decrease, resulting in a decline in the voltage output and the overall performance of the potato clock.
It is important to note that while a potato is commonly used in potato clocks, other fruits and vegetables can also be used, such as lemons, tomatoes, and apples. Each fruit or vegetable has different ion concentrations, which can affect the voltage output and the overall effectiveness of the potato clock.
Understanding the chemical reaction in a potato clock not only enables us to appreciate the scientific principles behind it but also allows us to explore different variations and applications of this intriguing electrical device.
Understanding the Potato Clock Circuit
The potato clock circuit is a fundamental part of the potato clock setup. It consists of the components that allow the flow of electric current and the conversion of chemical energy into electrical energy. Understanding the potato clock circuit is essential to comprehend how the device operates and how to build one.
The potato clock circuit is fairly straightforward and consists of four main components:
- Zinc-coated nail (anode): This nail serves as the positive terminal of the circuit. It is inserted into the potato and releases zinc ions into the moisture, causing a positive charge.
- Copper wire (cathode): The copper wire acts as the negative terminal of the circuit. It also releases copper ions into the potato, creating a negative charge.
- Connecting wires: These wires complete the circuit by connecting the anode (zinc-coated nail) and the cathode (copper wire) to the electronic device.
- Electronic device: The electronic device, such as a digital clock or an LED light, is powered by the electric current generated by the potato clock circuit.
When the zinc-coated nail and the copper wire are both inserted into the potato, they create a pathway for the flow of electric current. The zinc ions, released by the anode, move towards the cathode, while the copper ions move in the opposite direction.
The electrons, which are negatively charged, flow from the anode (zinc-coated nail) to the cathode (copper wire) through the external circuit. This movement of electrons generates the electric current that powers the connected electronic device.
It is important to note that the potato acts as the electrolyte, allowing the transfer of ions and facilitating the flow of electric current. The moisture and ions present in the potato play a crucial role in creating the concentration gradient necessary for the circuit to work.
By understanding the potato clock circuit, you can experiment and explore variations to create more complex circuits. For example, you can connect multiple potatoes in series or parallel to increase the voltage and power more demanding devices.
The potato clock circuit provides a hands-on way to explore the basics of electrical circuits and the conversion of chemical energy into electrical energy. It offers an engaging and educational experience that highlights the creative potential of using everyday items to generate electricity.
How to Build a Potato Clock
Building a potato clock is a fun and educational activity that allows you to witness the conversion of chemical energy into electrical energy. Follow these step-by-step instructions to build your very own potato clock:
- Gather the materials: You will need a potato, two zinc-coated nails, two copper wires, connecting wires, and a small electronic device like a digital clock or an LED light.
- Prepare the potato: Clean the potato and remove any dirt. Ensure that it is dry and free of moisture to prevent additional resistance in the circuit.
- Insert the electrodes: Take one zinc-coated nail and push it into the potato. Leave enough of the nail exposed so that it can connect to the external circuit. Repeat this step with the second zinc-coated nail.
- Place the copper wires: Take one copper wire and insert it into the potato, ensuring it does not touch the zinc-coated nails. Leave enough of the wire exposed to connect to the external circuit. Insert the second copper wire into the potato, making sure it is separated from the first wire.
- Connect the wires: Take the connecting wires and connect one end to the exposed part of the zinc-coated nail and the other end to the positive terminal of the electronic device. Connect the other connecting wire from the exposed part of the copper wire to the negative terminal of the electronic device. This completes the circuit.
- Observe and experiment: Once the circuit is complete, the electronic device should power on. Observe the functioning of the device and note the voltage output. You can also experiment by connecting multiple potatoes in series or parallel to increase voltage or try different electronic devices.
It’s important to remember that the potato clock relies on the presence of moisture and ions within the potato for the chemical reaction to occur. If the potato dries out, you may need to add some moisture, such as by soaking the potato in water before building the circuit.
Building a potato clock provides a hands-on opportunity to learn about electrical circuits and the principles of energy conversion. It’s a fantastic way to engage in a fun and educational science experiment using everyday items.
Tips for Maximizing the Voltage Output
When building a potato clock, maximizing the voltage output can enhance the performance and functionality of the device. Here are some tips to help you get the most out of your potato clock:
- Choose the right potato: Potatoes with a high moisture content are typically better conductors of electricity. Look for potatoes that feel moist and have a higher water content to maximize the voltage output.
- Use fresh potatoes: Fresh potatoes tend to have higher ion concentrations, which can contribute to a higher voltage output. Avoid using potatoes that have started to sprout or show signs of decay.
- Increase the surface area: Increasing the surface area of the electrodes can improve the interaction between the electrodes and the potato, leading to a better flow of ions and higher voltage output. You can try using multiple zinc-coated nails or copper wires to increase the overall surface area.
- Position the electrodes correctly: Properly positioning the electrodes in the potato is crucial for optimal voltage output. Ensure that the zinc-coated nails and copper wires are inserted deep enough into the potato while maintaining a safe distance from each other to prevent short circuits.
- Keep the circuit clean: Make sure the electrodes and connecting wires are clean and free from any rust, corrosion, or dirt. A clean circuit allows for better electrical conductivity and can help maximize the voltage output.
- Experiment with different metals: While zinc-coated nails and copper wires are commonly used, you can experiment with different metals to see if they yield higher voltage outputs. For example, try using iron nails or silver wire as alternatives to zinc and copper.
- Optimize the circuit configuration: The way you connect the electrodes and the electronic device can impact the voltage output. Experiment with different configurations, such as connecting multiple potatoes in series or connecting the electrodes to different parts of the electronic device, to find the optimal setup for a higher voltage output.
- Extend the circuit: If you need to power devices that require a higher voltage, consider connecting multiple potato cells in series. This increases the overall voltage output by adding up the individual voltages of each potato cell.
- Monitor and adjust: Keep an eye on the voltage output of your potato clock and make adjustments as needed. If the voltage output starts to decrease, try adding a little moisture to the potato or replacing it with a fresher one.
By following these tips, you can optimize your potato clock and achieve a higher voltage output, allowing you to power more demanding electronic devices or conduct more advanced experiments.
Troubleshooting Common Issues with Potato Clocks
Building a potato clock can be an exciting and educational experience, but sometimes issues may arise that prevent the clock from functioning optimally. Here are some tips for troubleshooting common issues with potato clocks:
- No power: If the electronic device connected to the potato clock does not power on, check the following:
- Ensure that the circuit is complete, with all wires securely connected to the electrodes and the electronic device.
- Confirm that the electrodes (zinc-coated nails and copper wires) are inserted deep enough into the potato and that they are not touching each other, which could cause a short circuit.
- Check the freshness and moisture content of the potato. If it is dried out, try adding a small amount of water to increase conductivity.
- Inspect the connecting wires for any loose connections or damage.
- Verify that the electronic device is functioning correctly.
- Low voltage output: If the voltage output of the potato clock is lower than expected, try the following:
- Use a fresh and moist potato to ensure a higher ion concentration.
- Check that the electrodes are positioned correctly within the potato for optimal interaction with the electrolyte.
- Clean the electrodes and wires to remove any corrosion or dirt that may be impeding the flow of electricity.
- Increase the surface area of the electrodes by using multiple zinc-coated nails or copper wires.
- Experiment with different metals for the electrodes, as different metals can have varying effects on the voltage output.
- Consider connecting multiple potato cells in series to increase the overall voltage output.
- Uneven voltage distribution: If you notice an uneven voltage distribution across the potato clock, try the following:
- Ensure that the electrodes are evenly inserted into the potato, maintaining a consistent depth and separation.
- Inspect the connecting wires to ensure they are of equal length and securely connected.
- Double-check that the electronic device is properly connected and that the terminals are not loose or damaged.
- Decreased voltage over time: If the voltage output of the potato clock diminishes over time, it could be due to the following reasons:
- The potato may be drying out. Adding a small amount of water to rehydrate the potato may help restore conductivity.
- Check for any signs of decay on the potato. If the potato is deteriorating, replace it with a fresh one.
- Other issues: If you encounter any other issues with your potato clock, consult troubleshooting guides or seek assistance from online resources or fellow builders who may have encountered similar challenges.
Remember that building and troubleshooting a potato clock is part of the learning process. By following these troubleshooting tips, you can overcome common issues and continue to explore the fascinating world of potato-powered electricity.
Alternative Power Sources for Potato Clocks
The potato clock is just one example of how unconventional materials can be used to generate electricity. While potatoes are commonly used, there are other alternative power sources that can be utilized in potato clocks, allowing for new and exciting experiments. Here are some alternative power sources you can explore:
- Fruits and vegetables: Just like potatoes, other fruits and vegetables can be used to create power in similar ways. Lemons, tomatoes, apples, and citrus fruits are popular choices due to their high acidity levels and ion concentrations. By inserting different metals into these fruits or vegetables, you can build a circuit and harness their electrical potential.
- Electrolyte solutions: Instead of relying solely on fruits and vegetables, you can experiment with different electrolyte solutions. Saltwater, for example, can be used as an electrolyte by immersing two different metals into the solution and connecting them to create a circuit. Saltwater is conductive due to the presence of sodium and chloride ions, enabling the flow of electric current.
- Chemical reactions: Apart from fruits, vegetables, and electrolyte solutions, you can explore chemical reactions to generate electricity. For instance, you can create a potato battery by combining zinc and copper electrodes with a salt bridge immersed in a solution of copper sulfate, creating a galvanic cell. This setup allows for a continuous chemical reaction that generates electricity.
- Renewable energy sources: While potato clocks are a fun and educational experiment, they typically generate low voltages and are not practical for powering high-demand devices. However, you can use potato clocks to learn about the principles of renewable energy sources, such as solar panels and wind turbines. Experiment with potato clock circuits connected to small solar panels or miniature wind turbines to understand their functionality and potential applications.
- Hydraulic power: Another interesting alternative power source is hydraulic power. By utilizing the movement of water or other liquids, you can generate electricity. Experiment with setups that involve water flowing through small turbines or using hydraulic pressure to power a hydraulic generator. This allows for a hands-on exploration of the principles behind hydroelectric power.
Exploring alternative power sources for potato clocks expands the possibilities and encourages further experimentation. Take the opportunity to delve into the realm of sustainable energy and understand how different materials and chemical reactions can generate electricity in unique ways.
Fun Experiments to Try with Potato Clocks
Potato clocks provide a fantastic platform for conducting fun and engaging experiments that explore the principles of electricity and energy conversion. Here are some exciting experiments you can try with your potato clock:
- Compare different potatoes: Gather various types of potatoes, such as russet, red, and sweet potatoes. Build separate potato clock circuits using each type and compare the voltage outputs. Observe any variations and discuss the possible reasons behind them, considering factors like moisture content and ion concentration.
- Multiple potato cells: Connect multiple potato cells in series or parallel to increase the voltage output. Experiment with different configurations and observe how the total voltage changes. Use this setup to power higher-demand electronic devices or light up multiple LED lights.
- Exploring conductivity: Investigate the conductivity of different fruits and vegetables. Build potato clock circuits using a variety of produce, such as lemons, tomatoes, and apples. Compare their voltage outputs to determine which ones are more conductive. Discuss the possible reasons for variations, such as the ion concentration and acidity of each fruit or vegetable.
- Longevity of the potato battery: Observe and record the voltage output of your potato clock over an extended period. Monitor how the voltage changes over time, noting any fluctuations or decreases. Discuss the factors that contribute to the decrease in voltage, such as the drying out of the potato or the depletion of the ions.
- Additives and conductivity: Experiment with adding substances to the potato or electrolyte solution to enhance conductivity. Try sprinkling salt or sugar onto the potato or mixing it into the electrolyte solution. Observe how these additives affect the voltage output and discuss the role they play in improving conductivity.
- Extend the circuit: Explore the concept of series and parallel circuits by connecting multiple potato clock circuits together. Connect the electrodes of one potato clock to the electrodes of another, either in series or parallel. Observe how this configuration affects the overall voltage output and discuss the advantages and disadvantages of each setup.
- Variation in electrode materials: Use different metals for the electrodes in your potato clock. Replace the zinc-coated nail with materials like steel, aluminum, or iron, and replace the copper wire with materials like silver or nickel. Compare the voltage outputs and make observations about the influence of different metals on the efficiency of the potato clock.
- Experiments with light: Use your potato clock to power LED lights of different colors or brightness levels. Observe how the voltage output affects the intensity or color of the light emitted. Explore the relationship between voltage and lighting effects in various LED devices.
- Testing alternative electrolytes: Investigate the conductivity of different electrolytes by using solutions other than potato. Try using vinegar, lemon juice, or even cola as the electrolyte solution in your potato clock. Compare the voltage outputs and discuss the effectiveness of these alternative electrolytes.
These experiments provide hands-on opportunities to learn about electricity, conductivity, and the factors influencing voltage output. Encourage creativity and critical thinking as you explore the fascinating world of potato clocks and discover the limitless possibilities for further experimentation.