
Choosing the Right Spot in Your Garden
When it comes to planting sweet potatoes, selecting the right spot in your garden is crucial for their overall growth and productivity. Sweet potatoes thrive in warm climates with ample sunlight, so finding an area that receives at least 6-8 hours of direct sunlight is essential. Additionally, the soil should be well-draining and rich in organic matter.
Before choosing a spot, observe your garden throughout the day to determine which areas receive the most sunlight. Avoid areas shaded by trees or buildings as they can hinder the sweet potatoes’ growth and development. It’s also beneficial to position the sweet potato bed in an east-west direction to maximize exposure to the sun.
Consider the soil quality as well. Sweet potatoes prefer loose, loamy soil that is slightly acidic with a pH level between 5.8 and 6.2. Conduct a soil test to assess its composition and make necessary amendments if needed. Adding organic matter, such as compost or well-rotted manure, can improve soil fertility and structure.
Furthermore, ensure that the chosen spot is free from any obstructions, such as large rocks, tree roots, or other plants that may compete for nutrients. Sweet potatoes require space to spread their vines and grow tubers, so it’s important to provide enough room for their expansion.
By carefully selecting the right spot in your garden, you are setting the foundation for a successful sweet potato harvest. Adequate sunlight, well-draining soil, and sufficient space will promote healthy growth and yield tasty tubers that you can enjoy throughout the season.
Preparing the Soil for Planting
Before planting sweet potatoes, it’s essential to prepare the soil properly to provide optimal growing conditions for these delicious tubers. Proper soil preparation ensures that the plants have access to the necessary nutrients and allows for better root development.
Start by clearing the area of any weeds or debris to create a clean planting bed. Weeds can compete with sweet potatoes for nutrients and water, so it’s crucial to eliminate them before planting. Use a garden fork or hoe to loosen the soil and remove any rocks or large clumps.
Next, incorporate organic matter into the soil to improve its texture and fertility. Compost, aged manure, or leaf mold are excellent additions that add nutrients to the soil and promote moisture retention. Spread a layer of organic matter on top of the soil and use a garden fork or tiller to mix it in thoroughly.
Ensure that the soil is well-draining as sweet potatoes don’t tolerate standing water. If you have heavy clay soil, consider amending it with sand or perlite to improve drainage. On the other hand, if you have sandy soil that drains too quickly, adding organic matter will help retain moisture.
It’s also recommended to conduct a soil test to determine its pH level and nutrient content. Sweet potatoes prefer slightly acidic soil with a pH range of 5.8 to 6.2. Adjust the pH levels by adding lime to raise it or sulfur to lower it, as necessary. Following the recommendations from the soil test will ensure that the soil is properly balanced and provides the ideal environment for the sweet potatoes to thrive.
Finally, rake the soil surface to create a level and smooth bed for planting. Remove any remaining large clumps or rocks that may hinder the growth of the sweet potato roots. The soil is now prepared and ready for planting the sweet potato slips.
By dedicating some time to preparing the soil, you are creating a healthy foundation for your sweet potatoes. The incorporation of organic matter, proper drainage, and soil pH adjustment will all contribute to robust plant growth and a bountiful harvest.
Selecting and Preparing Sweet Potato Slips
Sweet potato slips are young plants that are grown from sweet potato tubers and used for propagation. Selecting and preparing high-quality slips is crucial for successful sweet potato cultivation.
One way to obtain sweet potato slips is to purchase them from a reputable nursery or garden center. Look for certified slips or varieties that are known to perform well in your region. Choose slips that have healthy green leaves and strong stems. Avoid slips that show any signs of disease or damage.
If you prefer to grow your own slips, you can start by selecting sweet potatoes from a previous harvest or purchasing disease-free sweet potatoes from a local market. Choose medium-sized sweet potatoes that are free from blemishes and sprouting eyes.
To prepare the sweet potato slips, follow these steps:
- Place the sweet potatoes in a warm and humid environment, such as a tray covered with damp paper towels or in a container with water.
- Keep them in a location with a temperature around 75°F (24°C) to encourage sprouting. Avoid exposing the sweet potatoes to direct sunlight.
- Within a couple of weeks, you will notice small sprouts emerging from the sweet potatoes.
- Once the sprouts reach about 4-6 inches in length, gently twist them off the sweet potatoes, ensuring that they have a small section of the tuber attached. These are the sweet potato slips that you will be planting.
- Place the slips in a container of water to allow them to develop a stronger root system. Change the water regularly to prevent stagnation and the growth of harmful bacteria.
It’s important to note that sweet potato slips are sensitive to cold temperatures, so it’s best to wait until the danger of frost has passed before planting them in the garden. Transplanting healthy and well-prepared slips will give your sweet potatoes a head start and increase their chances of thriving in the garden.
Determining the Proper Spacing for Planting
Proper spacing between sweet potato plants is essential to ensure optimal growth and maximize the yield of your crop. Giving the plants enough room allows for proper airflow, sunlight penetration, and access to nutrients, preventing overcrowding and competition.
The spacing requirements for sweet potatoes can vary depending on the variety and the type of growing technique used. Here are some general guidelines to help you determine the proper spacing for planting:
- In-row spacing: Space sweet potato plants approximately 12-18 inches apart within a row. This spacing allows the plants to have enough space for their vines and foliage to spread out comfortably. Rows should be spaced 3-4 feet apart to provide ample walking space and allow for easy maintenance.
- Mound or hill spacing: Another popular method is to grow sweet potatoes in mounds or hills. In this technique, create raised mounds of soil that are about 8-12 inches high and 2-3 feet wide. Space sweet potato plants around 12-18 inches apart within each mound. Maintain a distance of 3-4 feet between each mound.
By providing adequate spacing, you allow the sweet potato plants to grow and develop without being crowded or intertwined with neighboring plants. This facilitates better airflow, which reduces the risk of disease and promotes even growth and tuber development.
Additionally, spacing sweet potatoes properly ensures that each plant receives sufficient sunlight. Adequate exposure to sunlight is crucial for the production of carbohydrates through photosynthesis, which ultimately leads to the formation of healthy and robust tubers.
Keep in mind that overcrowding can not only lead to reduced yields but also make it challenging to weed and care for the plants. Proper spacing allows for easier access and maintenance, making it more efficient to manage pests, diseases, and weeds throughout the growing season.
By following the recommended spacing guidelines, you can create an optimal growing environment for your sweet potato plants, resulting in healthier plants and a bountiful harvest at the end of the season.
Digging Holes for Transplanting
Before transplanting sweet potato slips into the garden, it’s crucial to prepare the holes where the plants will be placed. Digging proper holes ensures that the transplants are properly seated, have adequate space to grow, and are positioned at the correct depth. Follow these steps to dig holes for transplanting:
- Using a garden fork or shovel, dig holes that are approximately 6-8 inches deep. The depth should allow for the roots of the sweet potato slips to be fully covered without burying the entire stem.
- Space the holes according to the recommended spacing guidelines for the variety and growing technique you are using. Typically, space the holes 12-18 inches apart within the rows or mounds, with 3-4 feet between rows.
- Ensure that the holes are wide enough to accommodate the root system of the sweet potato slips without crowding or bending the roots.
- As you dig the holes, set aside the loosened soil in a wheelbarrow or nearby pile. This soil will be used later to backfill around the transplants.
While digging the holes, take the opportunity to incorporate organic matter into the soil. Add compost, well-rotted manure, or other organic amendments to the bottom of each hole. This will provide additional nutrients and improve the soil structure, promoting healthy and vigorous growth.
Before transplanting, it’s a good practice to moisten the holes slightly. This helps prevent the transplants from drying out during the transplantation process and ensures a good start for the growth of the sweet potato slips.
Once the holes are ready, it’s time to transplant the sweet potato slips. Gently place each slip into a hole, ensuring that the roots are spread out and the stem is above the soil surface. Avoid burying the foliage or any part of the slip below the soil level, as this can hinder growth and potentially lead to rotting.
After placing the slips in the holes, carefully backfill the soil around them, firming it gently to eliminate air pockets. Ensure that the transplants are securely positioned and supported in the soil.
By properly digging and preparing holes for transplanting, you provide a favorable environment for the root development and growth of your sweet potato plants. This sets the stage for strong, healthy plants that can thrive and yield a successful harvest.
Planting Sweet Potato Slips
Planting sweet potato slips is a crucial step in establishing healthy plants that will eventually yield a bountiful harvest. Follow these steps to ensure successful planting:
- Wait until all danger of frost has passed before transplanting sweet potato slips into the garden. Transplanting too early can lead to damage or even death of the young plants.
- Make sure the soil is moist but not waterlogged. This will help the slips to establish roots and adapt to their new environment more effectively.
- Using a trowel or your hands, create a small hole in the prepared soil. The hole should be deep enough to accommodate the root system of the sweet potato slip.
- Distribute the slips evenly throughout the designated planting area, following the recommended spacing guidelines. Place one slip per hole, positioning it carefully to avoid bending or damaging the roots.
- Gently backfill the soil around the slip, ensuring that the roots are adequately covered while the stem remains above the soil surface. Press the soil lightly to eliminate any air pockets.
- Water the newly planted slips thoroughly to provide them with moisture and promote root establishment. Aim to keep the soil consistently moist throughout the initial growth phase.
It’s important to note that sweet potato slips are delicate, and their foliage can be susceptible to damage from strong winds or intense sunlight. Consider using protective coverings, such as row covers or shade cloth, during the first few weeks to shield the young plants from adverse weather conditions.
Continue to monitor the transplants regularly and ensure that they are receiving adequate sunlight, water, and nutrients. As the sweet potato plants grow, their vines will lengthen and spread. Proper support, such as trellising or stakes, may be necessary to prevent the vines from sprawling on the ground and to maximize space in the garden.
By following the proper planting techniques, you give your sweet potato slips the best chance of thriving and growing into robust and productive plants. With careful attention and proper care, you’ll soon be on your way to a successful sweet potato harvest.
Watering and Mulching the Newly Planted Slips
Proper watering and mulching are essential for the successful establishment and growth of newly planted sweet potato slips. Adequate moisture and mulch help retain soil moisture, control weed growth, and promote overall plant health. Follow these guidelines to ensure optimal watering and mulching:
After planting the sweet potato slips, provide them with a thorough watering. This initial watering helps settle the soil around the roots and ensures that the transplants receive the moisture they need to establish themselves. Water the newly planted slips until the soil is moist, but not waterlogged.
Throughout the growing season, it’s crucial to maintain consistent moisture levels in the soil. Sweet potatoes require regular irrigation, especially during hot and dry periods. Aim to keep the soil evenly moist but not saturated, as overly wet conditions can lead to root rot.
Monitor the moisture levels in the soil by checking the top few inches with your finger. If it feels dry, it’s time to water. Provide deep, thorough waterings rather than frequent shallow ones. This encourages the roots to grow deeper and helps the plants become more resilient to drought conditions.
Mulching is a beneficial practice for sweet potato plants. Apply a layer of organic mulch, such as straw, wood chips, or chopped leaves, around the base of the plants. The mulch helps retain soil moisture by reducing evaporation and suppressing weed growth, which can compete with the sweet potatoes for nutrients and water.
Spread the mulch around the plants, ensuring that it does not touch the stems directly. This prevents moisture accumulation and potential rotting. Aim for a thickness of 2-3 inches to effectively insulate the soil and maintain a more stable soil temperature.
Regularly monitor the moisture levels under the mulch and adjust your watering as needed. In hot or windy conditions, the mulch can help prevent excessive evaporation and maintain a more constant soil moisture level.
Remember to periodically check the soil moisture beneath the mulch by gently lifting it and feeling the soil. If it feels dry, water the plants thoroughly, ensuring that the moisture reaches the root zone.
By providing adequate water and mulching, you create a favorable environment for the newly planted sweet potato slips. Consistent moisture levels and the use of organic mulch help the plants establish strong roots, reduce weed competition, and promote overall plant vigor throughout the growing season.
Providing Adequate Sunlight and Temperature
Adequate sunlight and optimal temperature play a vital role in the growth and productivity of sweet potato plants. By providing the right conditions, you can ensure healthy foliage growth, tuber development, and a successful harvest. Here’s what you need to know:
Sweet potatoes thrive in full sun, which means they require at least 6-8 hours of direct sunlight per day. It’s essential to select a planting location that receives ample sunlight throughout the day. Observe your garden to identify the sunniest spots and choose those for planting your sweet potato slips.
Sunlight is vital for photosynthesis, the process that allows plants to convert sunlight into energy and produce carbohydrates. The energy derived from sunlight fuels the growth of sweet potato vines and aids in the formation and enlargement of tubers.
Additionally, the temperature is a crucial factor for sweet potatoes. These warm-season crops require an average temperature between 75-85°F (24-29°C) during the growing season to thrive. They are sensitive to cold temperatures and cannot tolerate frost.
Plant sweet potato slips when the soil temperature reaches around 60°F (15°C) or higher. Cooler temperatures can stunt their growth and delay tuber development. Use a soil thermometer to gauge the temperature and make sure it is suitable for planting.
If you live in a region with shorter growing seasons or cooler climates, you can use various techniques to extend the growing season for sweet potatoes. This includes starting slips indoors or using protective covers, such as row covers or hoop houses, to provide additional warmth.
Keep in mind that sweet potato plants are vigorous growers and their vines can spread extensively. It’s essential to provide ample space for the vines to grow and receive sufficient sunlight. Proper spacing between the plants and regular pruning of excess foliage can help prevent overcrowding and promote better airflow and sunlight penetration.
By ensuring that your sweet potatoes receive adequate sunlight and are grown in the optimal temperature range, you are setting the stage for healthy plants and a successful harvest. The combination of sunlight and warmth plays a crucial role in the growth, development, and overall productivity of sweet potato plants.
Fertilizing Sweet Potato Plants
Fertilizing sweet potato plants is an important aspect of their care, as it provides the necessary nutrients for healthy growth and ensures optimal tuber development. While sweet potatoes are relatively low-maintenance, they do benefit from regular fertilization. Here are some guidelines for fertilizing sweet potato plants:
Before planting, it’s beneficial to amend the soil with organic matter, such as compost or well-rotted manure. This improves soil fertility and enhances nutrient availability for the plants.
Once the sweet potato slips are planted and have started to grow, you can begin a regular fertilization schedule. Apply a balanced slow-release fertilizer, such as a 10-10-10 or a 14-14-14 formula, around the base of the plants, following the manufacturer’s instructions.
Timing is crucial when it comes to fertilizing sweet potatoes. Apply the first round of fertilizer when the plants have established a strong root system and show active growth. Typically, this is about four weeks after planting.
For subsequent applications, make sure to follow the recommended intervals on the fertilizer package. Generally, fertilize sweet potatoes every 4-6 weeks throughout the growing season. However, always consider the specific fertilizer’s instructions as well as the soil conditions and plant growth.
When applying the fertilizer, spread it evenly around the base of the plants, keeping it at least a few inches away from the stem. Avoid excessive concentrations of fertilizer in one area, as it can burn the plants’ roots.
After applying the fertilizer, lightly scratch it into the soil surface with a garden rake or cultivator. This helps to incorporate the nutrients into the soil and prevents them from being washed away by rainfall or irrigation.
While fertilizing is important, be cautious not to over-fertilize sweet potatoes. Excessive use of nitrogen-rich fertilizers can promote excessive foliage growth at the expense of tuber development.
It’s worth noting that the nutrient requirements of sweet potatoes can vary depending on the soil conditions and fertility. Conducting a soil test is a valuable tool in determining the specific nutrient needs of your sweet potato plants. This allows you to make informed decisions about the type and amount of fertilizer to apply.
By providing regular and balanced fertilization, you ensure that your sweet potato plants have the necessary nutrients for optimal growth and development. This promotes vigorous foliage, strong root development, and abundant tuber production, leading to a successful harvest.
Regularly Checking and Controlling Weeds
Weed control is crucial for the health and productivity of sweet potato plants. Weeds compete with sweet potatoes for essential nutrients, water, and sunlight, and can hinder their growth. Regularly checking for and controlling weeds is an important aspect of sweet potato cultivation. Here are some strategies to effectively manage weeds:
1. Mulching: Apply a layer of organic mulch, such as straw, wood chips, or leaves, around the base of the sweet potato plants. The mulch acts as a physical barrier that suppresses weed growth by blocking sunlight and preventing weed seeds from germinating. Additionally, mulch helps retain moisture in the soil and regulates soil temperature.
2. Hand pulling or hoeing: Regularly inspect the sweet potato bed for emerging weeds and remove them by hand pulling or using a garden hoe. Be careful not to disturb the shallow roots of the sweet potato plants while removing the weeds. This method is effective for small-scale weed control and helps to prevent competition for resources.
3. Weed barriers: Consider using weed barriers, such as landscape fabric or black plastic, to suppress weed growth in larger areas. Lay the barrier down before planting the sweet potato slips and cut holes to accommodate the plants. This method helps to create a weed-free environment while allowing for easy access to the sweet potato plants.
4. Cultivation: Use a garden hoe or cultivator to shallowly cultivate the soil around the sweet potato plants. This disturbs weed seedlings and prevents them from establishing deep roots, making it easier to remove them. Cultivation should be done carefully to avoid damaging the sweet potato roots.
5. Herbicides: If necessary, herbicides labeled for sweet potato use can be used as a last resort for weed control. It’s important to carefully read and follow the label instructions to ensure safe and effective application. Always choose herbicides that specifically target the weeds without causing harm to the sweet potato plants.
Remember, timing is essential when it comes to weed control. Addressing weeds early in their growth stages prevents them from spreading and reduces the overall weed population. Regularly monitor the sweet potato bed and implement weed control measures as soon as weeds are detected.
By regularly checking for and controlling weeds, you create an environment where sweet potato plants can thrive without the competition for resources. Effective weed management ensures healthier plants, better nutrient uptake, and ultimately, a more successful sweet potato harvest.
Monitoring and Managing Pests and Diseases
Like any other crop, sweet potatoes can be susceptible to pests and diseases that can affect their growth and yield. Regular monitoring and proactive management are crucial to prevent and control these issues. Here are some strategies for monitoring and managing pests and diseases in sweet potato plants:
1. Monitoring: Regularly inspect your sweet potato plants for signs of pests and diseases. Look for chewed leaves, holes, discoloration, wilting, or any unusual growth patterns. Monitor both the foliage and the tubers for any visible damage or abnormalities.
2. Identification: Properly identifying the pests and diseases affecting your sweet potato plants is essential for effective management. Consult with local agricultural extension services or experienced gardeners to accurately diagnose the issues. Online resources and gardening forums can also provide valuable information for identification.
3. Prevention: Implement preventive measures to reduce the risk of pests and diseases. Start by planting disease-resistant sweet potato varieties if available. Keep your garden clean by removing any plant debris or fallen leaves that can harbor pests or diseases. Practice crop rotation, as it helps break the life cycle of pests and reduces disease buildup in the soil.
4. Cultural Practices: Good cultural practices can help prevent and manage pest and disease issues. Ensure proper spacing between plants to allow for proper air circulation and sunlight penetration, as this helps prevent the development of fungal diseases. Water the plants at ground level and avoid wetting the foliage excessively, as wet conditions can promote the growth of foliar diseases.
5. Natural Predators and Beneficial Insects: Encourage beneficial insects, such as ladybugs, lacewings, and predatory wasps, to inhabit your garden. These natural predators can help control common pests like aphids or caterpillars. Planting companion plants that attract beneficial insects, such as marigolds or yarrow, can also aid in pest management.
6. Organic Pest Control: If pest populations become problematic, use organic pest control methods. Beneficial insect releases, insecticidal soaps, neem oil, or homemade remedies like garlic or chili pepper sprays can help manage certain pests. Follow the instructions carefully and apply treatments when pest populations are low to minimize impact on beneficial insects.
7. Chemical Control: If necessary, chemical control options such as insecticides or fungicides can be used as a last resort. Always follow the instructions on the product labels and practice caution to protect yourself, pollinators, and the environment. Consider organic-certified options to minimize the use of synthetic chemicals.
Remember, early detection and prompt action are crucial in the management of pests and diseases. Regular monitoring, proper identification, prevention, and appropriate management techniques together contribute to maintaining healthy sweet potato plants and maximizing your yield.
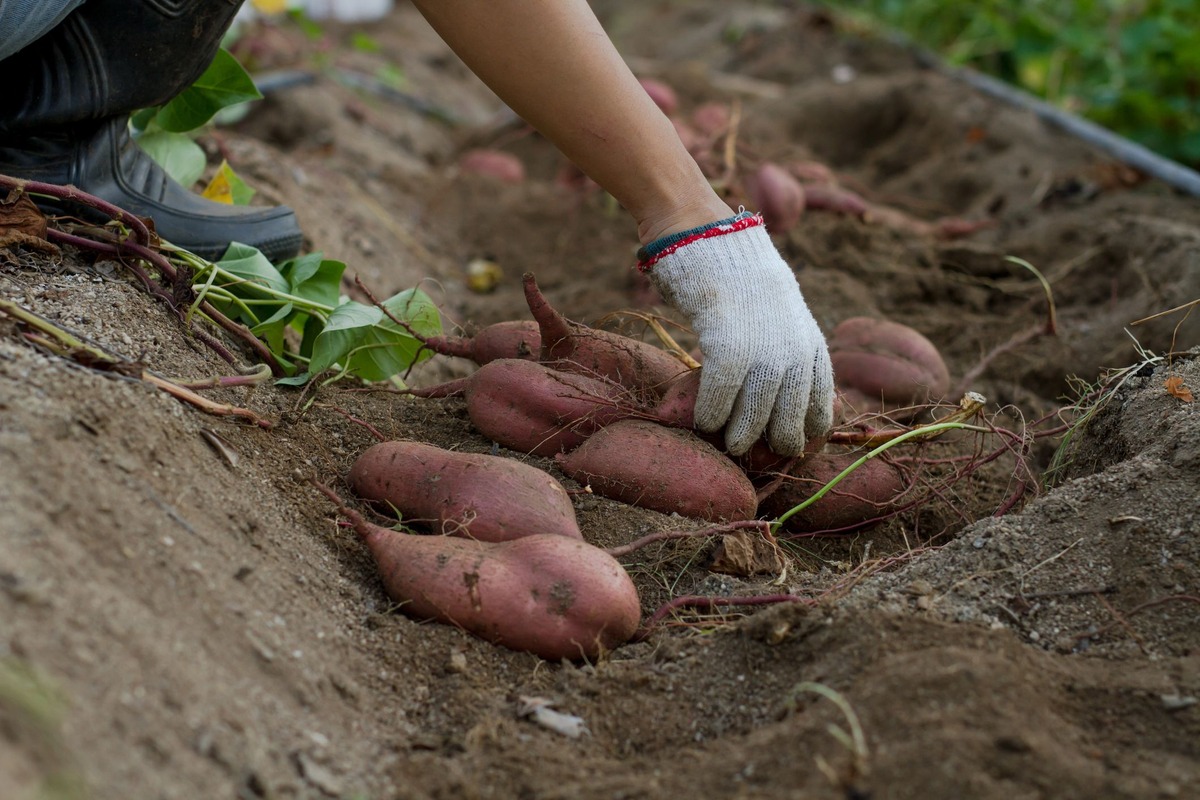
Harvesting Sweet Potatoes and Storing Them
Knowing when and how to harvest sweet potatoes is essential to ensure that you harvest mature tubers with maximum flavor and quality. Here are the steps to follow for harvesting and storing your sweet potato crop:
1. Harvesting Time: Sweet potatoes are typically ready for harvest when the foliage begins to yellow and die back. This usually occurs around 90-120 days after planting, depending on the variety and growing conditions. Check the specific days to maturity for your chosen variety to determine when they are likely to be ready.
2. Loosening the Soil: Before harvesting, gently loosen the soil around the sweet potato plants using a garden fork or shovel. Be careful not to damage the tubers during this process.
3. Digging the Tubers: Start digging a few inches away from the plant to avoid accidentally slicing into the tubers. Carefully lift the sweet potato vines and foliage away to reveal the tubers beneath the soil. Use your hands or a garden fork to gently lift the tubers out of the ground.
4. Handling the Harvested Tubers: Handle the harvested tubers with care to avoid bruising or cuts. Damaged sweet potatoes are more prone to rotting. Be gentle and avoid dropping or throwing them onto hard surfaces.
5. Curing: Do not wash the sweet potatoes immediately after harvesting. Instead, allow them to cure for about 10-14 days in a warm and humid environment with good airflow. Ideal curing conditions are around 80-85°F (27-29°C) and 85-90% humidity. Curing helps toughen the skin, increase sugar content, and heal any minor wounds or scratches on the tubers.
6. Cleaning and Storing: After curing, gently brush off excess soil from the sweet potatoes. Do not wash them unless they are overly dirty. Store only sound and undamaged tubers, as any damaged or rotting ones can impact the quality of the entire batch. Store the sweet potatoes in a cool, dry, and well-ventilated area, such as a basement or pantry. The temperature should be around 55-60°F (13-16°C), with a humidity level of around 60-75%.
7. Storage Containers: Use well-ventilated containers, such as mesh bags or crates, to store the sweet potatoes. Avoid closed or plastic bags that can trap moisture and lead to rotting.
8. Regular Checking: Periodically check the stored sweet potatoes for any signs of rot or decay. Remove any spoiled ones immediately to prevent the spread of rot to the rest of the batch.
Following proper harvesting and storage techniques will help you enjoy the fresh and flavorful sweet potatoes you worked hard to cultivate. With careful handling and optimal storage conditions, your harvested sweet potatoes can stay in good condition for several months, providing you with nutritious and delicious tubers throughout the year.