
Why Change Your Watch Band?
One of the most important parts of a watch is its band. Not only does it hold the watch securely on your wrist, but it also adds style and personality to your timepiece. Over time, watch bands can wear out, become damaged, or simply no longer complement your evolving tastes. That’s when it’s time to change your watch band.
There are several reasons why you might consider changing your watch band. Firstly, if your current band is worn out or damaged, it may not provide the necessary support and comfort. A broken or frayed band can compromise the integrity of your watch and make it uncomfortable to wear. By replacing it with a new band, you can ensure a secure fit and enjoy the full functionality of your timepiece.
Secondly, changing your watch band allows you to update its appearance. If your current band is outdated or no longer matches your style, replacing it with a new band can give your watch a fresh and modern look. Whether you prefer a classic leather band, a sleek metal bracelet, or a trendy NATO strap, changing the band allows you to express your personal style and keep up with current fashion trends.
Additionally, changing your watch band can be a practical choice. Depending on the occasion or your outfit, you may want to switch to a different type of band. For example, a stainless steel band might be perfect for a formal event, while a silicone or rubber band is more suitable for sports and outdoor activities. By having multiple watch bands on hand, you can easily adapt your timepiece to different situations and ensure that it always complements your attire.
Lastly, changing your watch band gives you the opportunity to customize your watch. Many watch bands come in various colors, materials, and patterns, allowing you to create a unique and personalized look. Whether you want a vibrant color for a pop of personality or a premium material for a luxurious touch, changing the band allows you to make your watch truly one-of-a-kind.
As you can see, there are several compelling reasons to change your watch band. Whether it’s to enhance comfort, update style, increase versatility, or add a personal touch, replacing the band is a simple yet effective way to breathe new life into your timepiece. So, why wait? Start exploring the wide range of watch bands available and give your watch the makeover it deserves.
What You’ll Need
Before you begin the process of changing your watch band, it’s important to gather the necessary tools. Having the right tools on hand will make the process smoother and ensure that you can complete the task properly. Here are the essential tools you’ll need:
- Spring bar tool: This tool is specifically designed to remove and insert spring bars, which hold the watch band in place. It typically has a pointed end for removing the old band and a forked end for inserting the new one.
- Replacement watch band: Choose a new watch band that suits your style and fits your watch’s lug width. There are various options available, such as leather, metal, rubber, or nylon straps.
- Tweezers: Tweezers can be handy for handling small parts, such as spring bars, especially if they are difficult to grip with your fingers.
- Cloth or soft surface: Place a soft cloth or surface, like a watch repair mat or towel, on a table to protect both your watch and the surface from scratches or damage during the band changing process.
- Extra tool for specific watch types: Some watches might require additional tools, such as a screwdriver for watches with screw-in pins, a pushpin for watches with push-pin pins, or a link removal tool for watches with metal bracelets that require resizing.
Having these tools ready before you start will ensure that you can efficiently remove the old band, measure and insert the new one, and make any necessary adjustments to ensure a proper fit. It’s always a good idea to double-check your watch’s specifications and consult the manufacturer’s instructions or a professional if you’re unsure about any specific tools required for your particular watch.
Now that you have an understanding of the tools you’ll need, let’s move on to the step-by-step process of changing your watch band.
Step 1: Gather Your Tools
Before you begin the process of changing your watch band, it’s essential to gather all the necessary tools. Having the right tools at your disposal will ensure that you can complete the task seamlessly. Here’s a checklist of the tools you’ll need:
- Spring bar tool: This specialized tool is designed to remove and insert spring bars—the small metal rods that secure the watch band to the watch lugs. The spring bar tool typically features a pointed end for removing the old band and a forked end for inserting the new one.
- Replacement watch band: Select a watch band that matches your style and fits the lug width of your watch. Whether you prefer a classic leather strap, a sleek metal bracelet, a rugged rubber band, or a trendy NATO strap, ensure that the replacement band is compatible with your watch.
- Tweezers: Tweezers come in handy for handling tiny components, such as spring bars, especially if they are difficult to grasp with your fingers. They provide precision and ensure a secure grip during the band replacement process.
- Cloth or soft surface: Place a soft cloth or watch repair mat on a stable surface. This will cushion your watch and prevent scratches or damage while you work on changing the band.
- Additional tools: Depending on your watch type, you may require extra tools. For watches with screw-in pins, a screwdriver is necessary. For watches with push-pin pins, a small pushpin or thumbtack is useful. Metal bracelets that require resizing may necessitate a link removal tool.
By ensuring that you have these tools readily available, you’ll be well-prepared to remove the old band, insert the new one, and make any necessary adjustments. It’s always helpful to consult your watch’s specifications and the manufacturer’s instructions, or seek guidance from a professional, if you’re unsure about any specific tools required for your watch model.
With your tools gathered, you’re ready to proceed to the next step: removing the existing watch band.
Step 2: Remove the Existing Band
Now that you have gathered your tools, it’s time to remove the existing watch band. Follow these steps to remove the band safely and efficiently:
- Place your watch on a soft cloth or watch repair mat to protect it from scratches.
- Locate the spring bars on the watch lugs. These are small metal pins that secure the watch band to the lugs.
- Using the pointed end of the spring bar tool, insert it into the small gap between the watch lug and the end of the spring bar.
- Apply gentle pressure towards the center of the watch lug to compress the spring bar.
- While maintaining pressure on the spring bar, carefully slide the old watch band out of the lug.
- Repeat the process on the other side of the watch to fully remove the old band.
- Set aside the old watch band, as you may need it for reference when selecting the correct size or style for the new band.
It’s important to handle the spring bars with care during removal, as they can be delicate. Take your time and ensure a steady grip to prevent any accidental damage to your watch or injury to yourself.
In some cases, your watch may have a different mechanism for securing the band, such as screw-in or push-pin pins. Refer to your watch’s manual or manufacturer instructions for specific steps on removing the band if it does not use spring bars.
With the old band successfully removed, you’re now ready to move on to the next step: measuring the new band.
Step 3: Measure the New Band
After removing the old watch band, the next step is to measure the new band to ensure a proper fit. Follow these steps to measure the new band accurately:
- Place the new watch band next to the old band to compare their lengths. It’s important to ensure that the new band is of sufficient length to comfortably fit your wrist.
- If the new band is longer than desired, you may need to remove some links or trim the excess material. Conversely, if the new band is too short, you may need to seek a longer replacement band.
- Take note of the lug width of your watch. This is the distance between the lugs where the watch band attaches. Ensure that the replacement band you’ve selected matches this lug width precisely to ensure a proper fit.
- If you’re unsure about the correct lug width or how to measure it accurately, consult your watch’s specifications or refer to the manufacturer’s instructions for guidance.
Measuring the new watch band ensures that it fits comfortably and securely on your wrist. A properly fitting watch band prevents the watch from sliding around or feeling too tight, enhancing both comfort and functionality.
Remember to handle the new watch band with care during the measurement process. If adjustments are necessary, such as removing links or resizing metal bracelets, there are specific tools available to help you accomplish this task accurately and safely.
Once you have measured the new band and confirmed its proper fit, you’re ready to move on to the next step: inserting the new band’s pins.
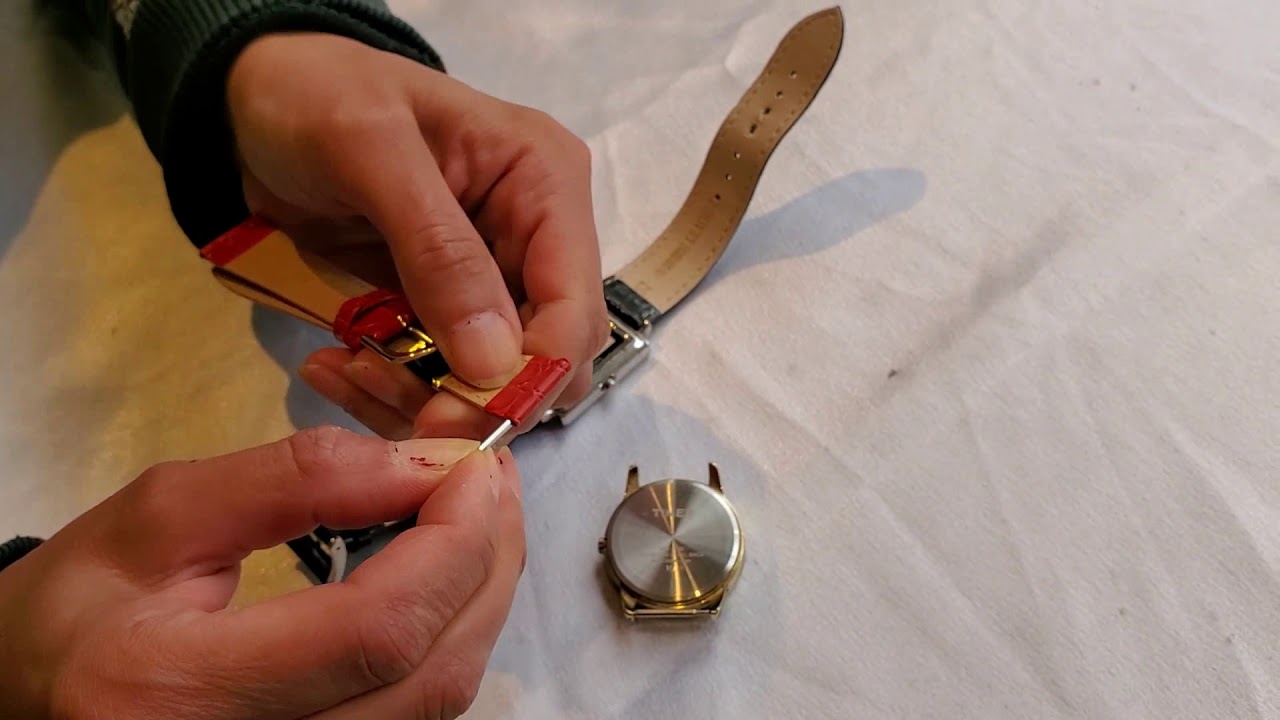
Step 4: Insert the New Band’s Pins
With the new watch band properly measured, it’s time to insert the new band’s pins into the watch lugs. Follow these steps to securely attach the new band:
- Hold the watch case firmly to prevent any accidental damage or slipping during the pin insertion process.
- Take one end of the new watch band and locate the corresponding lug on the watch.
- Align the holes in the watch band with the holes in the lugs.
- Insert one end of the spring bar, or the appropriate pin mechanism for your watch, into the hole in the lug.
- Using the forked end of the spring bar tool, carefully push the spring bar inward while aligning it with the hole on the other side of the lug.
- Ensure that the spring bar is fully inserted and properly seated in the lug by giving it a gentle tug. It should feel secure and not easily dislodged.
- Repeat the process on the other side of the watch to attach the other end of the new watch band.
During this step, it’s crucial to handle the new band and the watch with care to prevent any accidental scratches or damage. Take your time to ensure that the pins are inserted correctly and securely.
If your watch uses a different pin mechanism, such as screws or push-pins, follow the manufacturer’s instructions or consult a professional for guidance on how to properly insert the new band.
Once you have successfully inserted the new band’s pins, it’s time to move on to the next step: attaching the new band to the watch.
Step 5: Attach the New Band
After securely inserting the new band’s pins into the watch lugs, the next step is to attach the new band to the watch itself. Follow these steps to properly secure the new band:
- Hold the watch case firmly to ensure stability during the band attachment process.
- Take one end of the new watch band and thread it through the spring bars or pin mechanism on one side of the watch.
- Slide the end of the band into the gap between the spring bar or pin and the watch lug.
- Adjust the position of the band until it is centered and aligned with the lug.
- Repeat the process on the other side of the watch by attaching the other end of the new band to the corresponding spring bars or pin mechanism.
- Ensure that both ends of the new band are securely fastened to the spring bars or pin mechanism.
Take your time during this step to ensure that the new band is attached snugly and aligned properly with the watch lugs. The band should sit comfortably on your wrist without any gaps or misalignments.
If your watch has a unique attachment mechanism, refer to the manufacturer’s instructions or consult a professional to ensure that you correctly attach the new band.
With the new band successfully attached, it’s time to proceed to the next step: adjusting the fit to ensure maximum comfort.
Step 6: Adjust the Fit
Once you have attached the new watch band, the next step is to adjust the fit to ensure optimal comfort on your wrist. Follow these steps to achieve the perfect fit:
- Put the watch on your wrist and determine if the band feels too loose or too tight.
- If the band is too loose, you may need to remove a link or adjust the buckle or clasp, depending on the type of band you have.
- For metal bracelets with links, use a link removal tool or consult a professional to resize the band by removing or adding links as required.
- If the band is too tight, you can add a link or adjust the buckle or clasp accordingly.
- For leather or fabric bands with multiple holes, adjust the band to a hole that provides a snug but comfortable fit.
- Make gradual adjustments, testing the fit after each alteration, to ensure you achieve the desired comfort level.
It’s important to take your time during this step to find the right fit. A well-fitting watch band should be comfortable and not too tight or too loose. It should also allow sufficient room for movement without sliding or shifting excessively on your wrist.
If you are unsure about making adjustments yourself or if your watch band requires specialized resizing techniques, it is recommended to seek the assistance of a professional watchmaker or jeweler to ensure precise and accurate adjustments.
With the fit adjusted to your preference, you’re now ready for the next step: securing the pins to ensure the band stays in place.
Step 7: Secure the Pins
After adjusting the fit of your new watch band, the next crucial step is to secure the pins to ensure the band stays firmly in place. Follow these steps to properly secure the pins:
- Hold the spring bar tool firmly and align the pointed end with the hole on one side of the spring bar.
- Apply gentle pressure to the spring bar, pushing it towards the center of the watch lug.
- While maintaining pressure on the spring bar, position the forked end of the tool over the hole on the other side of the lug.
- Simultaneously push the spring bar further into the lug while using the forked end of the tool to guide it into place.
- Repeat the process on the other side of the watch to secure the pins on both ends of the band.
- Give the watch band a slight tug to confirm that the pins are securely fastened and the band is properly attached to the watch.
Take your time during this step to ensure that the pins are securely in place. Double-check the alignment of the pins with the corresponding holes on the lugs, as proper alignment is crucial for a secure and stable attachment.
If you encounter any difficulty while securing the pins or if the band feels loose or unstable, double-check the positioning and alignment of the spring bars or consult a professional for assistance.
With the pins securely in place, your watch band is now properly attached and ready to be worn. However, before you put it on your wrist, there are a few final checks and tips to consider, which we’ll explore in the next step.
Step 8: Final Checks and Tips
Before you proudly wear your newly changed watch band, there are a few final checks and tips to ensure everything is in order. Follow these steps to complete the process:
- Inspect the attachment points of the new band, ensuring that the pins are securely in place and properly aligned with the lugs.
- Check the overall appearance of the watch band, ensuring that it is properly centered, aligned, and sitting comfortably on your wrist.
- Gently move your wrist to ensure that the band does not slide or shift excessively. It should stay securely in place during normal movement.
- Adjust the buckle or clasp of the band, if applicable, to ensure a secure and comfortable fit.
- Clean your new watch band regularly following the manufacturer’s instructions to maintain its appearance and longevity.
- Consider purchasing a storage case or watch roll to protect your watch band when not in use.
- If you encounter any issues or concerns with your watch band, consult a professional or the manufacturer for assistance.
By performing these final checks and following these tips, you can ensure that your new watch band is properly attached, comfortable, and ready for use. Regular maintenance and care will help prolong the life of your watch band and keep it looking its best.
Now that you have successfully changed your watch band, enjoy wearing your refreshed timepiece with confidence and style!