
Why would you want your Mac to say hello?
Imagine this: you sit down at your desk, ready to start your workday, and your trusty Mac computer greets you with a cheerful “Hello!” It may seem like a small gesture, but it can make a big difference in setting a positive tone for your day. Having your Mac say hello to you can be both practical and fun, and here are a few reasons why you might want to enable this feature:
1. Personalization: Your Mac is a key tool in your daily life, and adding a personal touch can make it feel more like an extension of yourself. Having your Mac greet you with a custom message or a simple hello can give it a unique personality that reflects your style and preferences.
2. Positive reinforcement: Starting your day with a warm greeting can boost your mood and motivation. Hearing a friendly voice from your Mac can be a gentle reminder that you’re ready to tackle the tasks ahead and approach them with a positive mindset.
3. Accessibility: For individuals with visual impairments or reading difficulties, having your Mac speak out greetings can enhance the accessibility and usability of the device. By enabling text-to-speech, your Mac can provide verbal confirmation that it’s ready for use.
4. Entertainment purposes: Let’s face it, sometimes we just want our technology to bring a smile to our face. Having your Mac say hello can be a fun and quirky feature that adds a touch of amusement to your computing experience.
5. Customization for specific events: Enabling your Mac to say hello can be particularly handy when you’re hosting a gathering or event. You can program your Mac to greet your guests with a special message or provide them with important information.
These are just a few of the reasons why having your Mac say hello can be beneficial. It adds a personal touch, enhances accessibility, boosts your mood, and provides a sense of fun and entertainment to your computing experience. Now let’s explore how you can enable this feature on your Mac.
Enabling the text-to-speech feature on your Mac
Enabling the text-to-speech feature on your Mac is a straightforward process that allows your computer to convert written text into spoken words. Follow these steps to activate this feature:
1. Open System Preferences: Click on the Apple menu in the top-left corner of your screen, then select “System Preferences” from the dropdown menu.
2. Select “Accessibility”: In the System Preferences window, locate and click on the “Accessibility” icon. This will open the Accessibility preferences.
3. Navigate to the “Speech” tab: Within the Accessibility preferences, find the “Speech” option in the left-hand sidebar and click on it. This will display the settings related to text-to-speech.
4. Enable “Speak selected text when the key is pressed”: In the Speech tab, check the box next to “Speak selected text when the key is pressed”. This will assign a keyboard shortcut (by default, Option + Esc) to activate the text-to-speech feature.
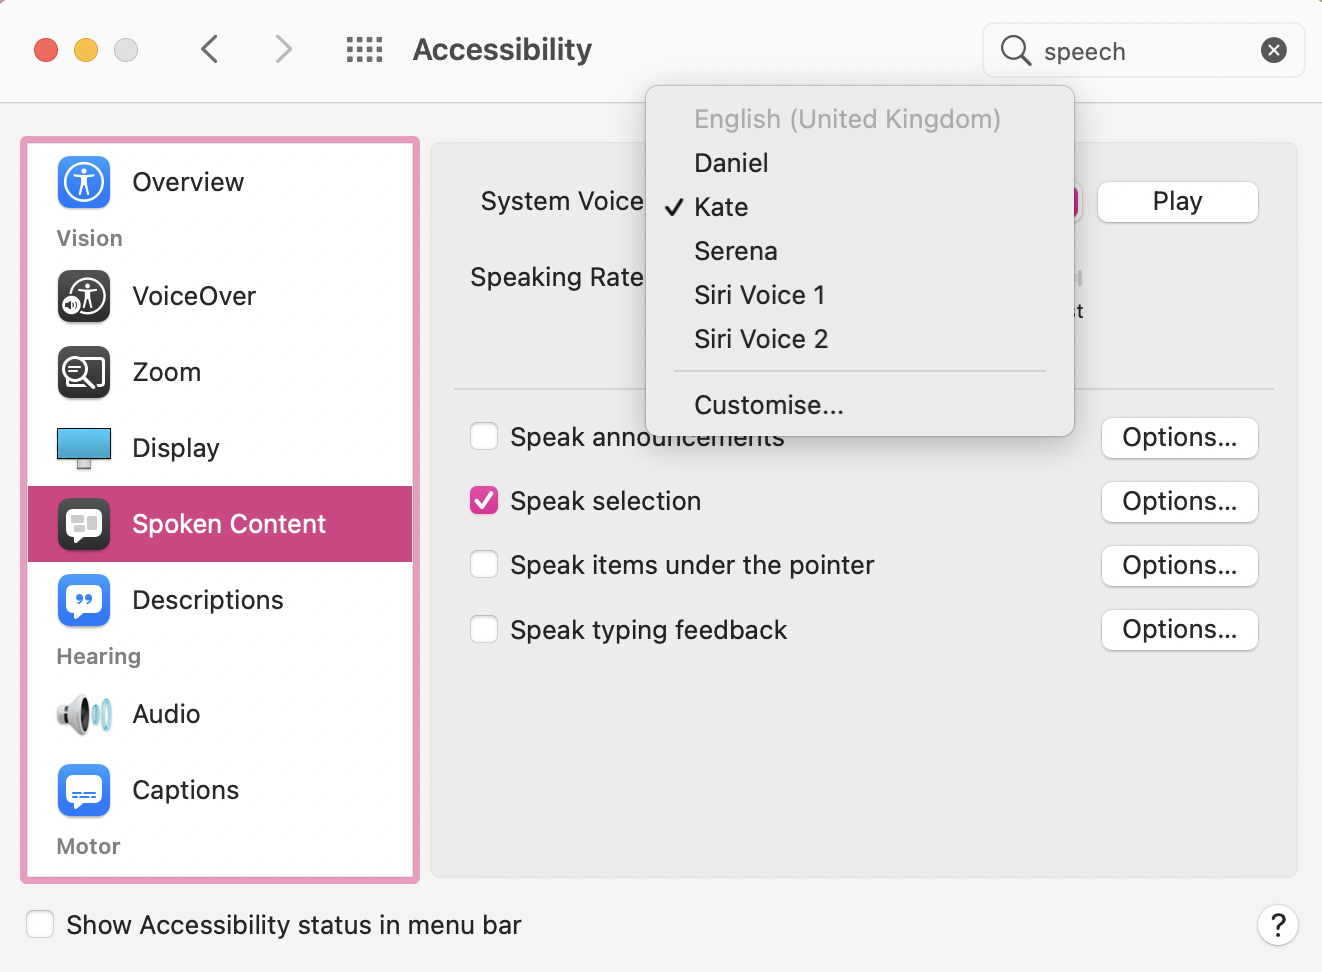
5. Customize voice settings: To further personalize the voice that your Mac will use, click on the “System Voice” dropdown menu. You can choose from a variety of voices, accents, and languages. Select the preferred option to set the voice that will greet you.
6. Adjust the speaking rate: If you find the default speaking rate too slow or too fast, you can fine-tune it by using the “Speaking Rate” slider. Move it to the left for slower speech or to the right for faster speech.
7. Test the text-to-speech feature: To ensure that everything is working correctly, select any text on your screen and press the assigned key combination (by default, Option + Esc). Your Mac will read the selected text using the chosen voice and desired speaking rate.
Once you have completed these steps, your Mac will be ready to greet you and read text whenever you press the assigned key combination. This feature opens up a world of possibilities for accessibility, personalization, and convenience. Now that you have enabled text-to-speech, let’s explore how you can customize the greeting that your Mac will say.
Choosing the voice that your Mac will use
One of the great advantages of enabling the text-to-speech feature on your Mac is the ability to choose from a wide range of voices to greet you. The voice you select can add a personal touch and enhance your overall experience. Here’s how you can choose the voice that your Mac will use:
1. Open System Preferences: Click on the Apple menu in the top-left corner of your screen and select “System Preferences” from the dropdown menu.
2. Access the Speech preferences: In the System Preferences window, locate and click on the “Accessibility” icon. Then, click on the “Speech” option in the left-hand sidebar. This will open the Speech preferences.
3. Customize the voice: In the Speech tab, you will see a dropdown menu labeled “System Voice.” Click on the dropdown menu to see the available voice options. These voices include various accents and languages to suit your preferences.
4. Preview the voices: To get an idea of what each voice sounds like, select a voice from the dropdown menu and click on the “Play” button next to it. Your Mac will play a brief sample of the voice, allowing you to assess its quality and suitability.
5. Select your preferred voice: Once you have previewed the available voices, choose the one that you find most pleasing and suitable for your needs. You can experiment with different voices until you find the one that resonates with you.
6. Adjust the speaking rate: If desired, you can also adjust the speaking rate using the “Speaking Rate” slider. This allows you to customize the pace at which your Mac will speak.
7. Test the selected voice: To ensure that the chosen voice meets your expectations, select some text on your screen and press the assigned key combination (by default, Option + Esc). Your Mac will speak the selected text using the voice you have selected.
With the ability to choose from various voices, you can find the perfect sound for your Mac’s greetings. Whether you prefer a friendly, professional, or whimsical tone, there is a voice to suit your preferences. Now that you have selected the voice, let’s explore how you can adjust the speaking rate to your liking.
Adjusting the speaking rate to your preference
When your Mac says hello to you, you might find that the default speaking rate is either too fast or too slow for your liking. The good news is that you can easily adjust the speaking rate to ensure a comfortable and pleasant experience. Here’s how you can customize the speaking rate on your Mac:
1. Open System Preferences: Begin by clicking on the Apple menu in the top-left corner of your screen. From the dropdown menu, select “System Preferences” to open the preferences window.
2. Access the Speech preferences: In the System Preferences window, click on the “Accessibility” icon and then select the “Speech” option in the left-hand sidebar. The Speech preferences will now be displayed.
3. Locate the speaking rate slider: Within the Speech tab, you will see a slider labeled “Speaking Rate.” This slider allows you to adjust how fast or slow your Mac will speak.
4. Adjust the speaking rate: Move the speaking rate slider to the left to slow down the speech or to the right to speed it up. You can experiment with different settings to find the speaking rate that feels most comfortable and natural to you.
5. Text-to-speech feedback: To gauge the effect of your adjustments, select a piece of text on your screen and press the assigned key combination (typically, Option + Esc). Your Mac will read the selected text using the newly adjusted speaking rate.
6. Fine-tune the speaking rate: If you find that the available range on the slider is not sufficient, you can make finer adjustments by holding down the Option key while dragging the slider. This provides more control over the speaking rate and allows for precise customization.
7. Test different speaking rates: Play around with various speaking rate settings to determine which feels most comfortable to you. Keep in mind that what may be ideal for one person may not be the same for another, so it’s important to find what suits your preferences best.
By adjusting the speaking rate, you can ensure that your Mac’s greetings are delivered at a pace that is easy to understand and pleasant to listen to. With this level of customization, you can fully personalize your Mac’s speech output. Now that you have adjusted the speaking rate, let’s explore how to make your Mac greet you when you log in.
Making your Mac greet you when you log in
Wouldn’t it be nice to be welcomed by your Mac when you log in? With the text-to-speech feature on your Mac, you can set it up to greet you with a personalized message upon logging in. Here’s how you can make your Mac greet you when you log in:
1. Open System Preferences: Begin by clicking on the Apple menu in the top-left corner of your screen. From the dropdown menu, select “System Preferences” to open the preferences window.
2. Navigate to the Users & Groups preferences: Within the System Preferences window, click on the “Users & Groups” icon. This will open the preferences pertaining to user accounts on your Mac.
3. Unlock the preferences: If the padlock icon in the bottom-left corner of the Users & Groups preferences window is locked, click on it and enter your administrator password to unlock the preferences.
4. Select your user account: In the sidebar on the left, click on your user account. This will display the settings specific to your account.
5. Open the Login Items tab: At the top of the Users & Groups preferences window, click on the “Login Items” tab. This tab contains the list of items that will launch automatically when you log in.
6. Add the Text-to-Speech application: To make your Mac greet you when you log in, click on the “+” button below the list of login items. In the file browser that appears, navigate to the “Applications” folder, select “Utilities,” and then choose “Text to Speech” from the list.
7. Customize the greeting: With the Text to Speech application added to the login items, you can now customize the greeting it will say. To do this, select the added item from the login items list and click on the “Options” button. In the “Option” window, type in your desired greeting message.
8. Test the greeting: To ensure that your Mac will greet you when you log in, simply log out of your account and then log back in. Your Mac will launch the Text to Speech application and say the personalized greeting you specified.
By setting up your Mac to greet you when you log in, you can start your computing experience on a positive note. It adds a personal touch and makes your Mac feel more welcoming and friendly. Now that your Mac is ready to greet you, let’s explore how you can add custom greetings or messages for specific events.
Adding custom greetings or messages for specific events
While having your Mac greet you when you log in is great, you can take it a step further by adding custom greetings or messages for specific events. This feature allows your Mac to go beyond a simple hello and provide tailored messages based on different scenarios. Here’s how you can add custom greetings or messages for specific events:
1. Open the Text to Speech preferences: Click on the Apple menu in the top-left corner of your screen, select “System Preferences,” and then click on the “Accessibility” icon. From there, choose the “Speech” option in the left-hand sidebar to open the Speech preferences.
2. Access the system-wide speaking options: Within the Speech preferences, click on the dropdown menu labeled “System Voice” and choose “Customize…” at the bottom of the list. This will open the customization options for the system-wide speaking options.
3. Create a new speech item: In the customization window, click on the “+” (plus) button below the list of speech items. A new speech item will be added, and you can provide a name for it to easily identify its purpose.
4. Customize the new speech item: With the new speech item selected, you can now configure it to have a specific message for the desired event. Type in the custom greeting or message in the “Text” field. You can also select a different voice and adjust the speaking rate specifically for this speech item if desired.
5. Assign the speech item to an event: To associate the custom greeting with a specific event, click on the dropdown menu labeled “Set Key…” and choose “Event” at the top. Select the event from the list or create a new event by clicking on the “+” (plus) button and giving it a name.
6. Test the custom greeting: To ensure that your Mac will say the custom greeting for the specific event, trigger the event. For example, if you assigned the greeting to a certain time, wait until that time and see if your Mac speaks the custom message.
7. Repeat for other events: If you want to add custom greetings or messages for different events, repeat the process by creating new speech items and assigning them to the respective events.
By adding custom greetings or messages for specific events, you can personalize your Mac’s responses to different situations. Whether it’s a reminder for an important meeting or a celebratory message for a special occasion, your Mac can assist you with tailored speech. Now that you know how to add custom greetings, let’s explore how you can automate spoken notifications on your Mac.
Automating spoken notifications on your Mac
Your Mac is not just a silent companion; it can also keep you informed through spoken notifications. By automating these notifications, you can receive important updates or reminders without having to constantly check your screen. Here’s how you can automate spoken notifications on your Mac:
1. Open System Preferences: Click on the Apple menu in the top-left corner of your screen and select “System Preferences” from the dropdown menu. This will open the preferences window.
2. Access the Notifications preferences: In the System Preferences window, click on the “Notifications” icon. This will open the preferences relating to notifications on your Mac.
3. Customize notification settings: Within the Notifications preferences, you’ll see a list of applications on the left-hand side. Choose an application that you want to receive spoken notifications from, and click on it to modify its settings.
4. Enable spoken notifications: In the application’s notification settings, make sure the “Play sound for notifications” option is checked. This ensures that your Mac will speak out the notifications for that specific application.
5. Configure other options: Depending on the application, you may have additional customization options for the notifications. You can choose whether notifications appear as banners or alerts, their placement, and other preferences specific to the application.
6. Test the spoken notifications: To ensure that the spoken notifications are working properly, have the application generate a notification. Your Mac will play a sound and speak out the notification, keeping you informed without the need to check the screen.
7. Repeat for other applications: If you want to automate spoken notifications for other applications, go through the same process for each application. Enable the “Play sound for notifications” option and adjust other settings as desired.
By automating spoken notifications on your Mac, you can stay updated on important information or reminders without constantly monitoring your screen. It enhances your productivity by allowing you to focus on your tasks while still receiving timely information audibly. Now that you know how to automate spoken notifications, let’s delve into troubleshooting common issues with text-to-speech on your Mac.
Troubleshooting common issues with text-to-speech on Mac
While the text-to-speech feature on your Mac is generally reliable, you may encounter some issues from time to time. Here are some common problems that users encounter with text-to-speech on Mac, along with troubleshooting steps:
1. No sound or speech output: If your Mac is not producing any sound or speech output, first check your volume settings to ensure they are not muted or turned down too low. You can also verify that the correct output device is selected in the Sound preferences. If the issue persists, restarting your Mac or resetting the System Management Controller (SMC) may help resolve the problem.
2. Unintelligible or distorted speech: If the speech output is unclear or distorted, adjusting the speaking rate may improve the clarity. Move the speaking rate slider towards the middle to achieve a more balanced speech delivery. Additionally, ensuring that your Mac is running the latest version of macOS and has up-to-date voice downloads can help resolve any speech quality issues.
3. Inconsistent voice selection: Sometimes, your Mac may revert to a default voice or not recognize your selected voice preference. In such cases, reopen the Speech preferences and re-select your desired voice from the System Voice dropdown menu. If the issue persists, try deleting and re-downloading the voice files from the Manage Voices section of the Speech preferences.
4. Incorrect pronunciation: If you find that certain words or phrases are consistently mispronounced by the text-to-speech feature, you can manually modify the pronunciation. Open the TextEdit application, type the word or phrase, highlight it, right-click, select Speech, and then click on “Add to Pronunciation.” Enter the correct pronunciation and save the changes.
5. Application-specific speech issues: Some applications may have unique settings or configurations that affect text-to-speech speech output. Check the application’s preferences or settings menu to ensure that it supports text-to-speech and that the necessary options are enabled. If the issue persists, reinstalling the application or contacting the application’s support team for assistance may be necessary.
6. System-wide speech issues: If text-to-speech is not working across your entire Mac, it may indicate a deeper system issue. Restarting your Mac, running software updates, or performing a system diagnosis using the built-in macOS utilities can help identify and resolve any underlying problems.
By troubleshooting common issues with text-to-speech on your Mac, you can ensure a smooth and reliable experience. Most issues can be resolved with simple adjustments or system maintenance. If you encounter persistent problems, reaching out to Apple Support or visiting their online forums can provide further assistance. Now, let’s explore advanced options for text-to-speech on your Mac.
Exploring advanced options for text-to-speech on Mac
If you want to take your text-to-speech experience on your Mac to the next level, there are advanced options that allow for greater customization and control. Here are some advanced features and settings you can explore:
1. Speech commands: macOS offers speech recognition capabilities, which means you can use your voice to control certain functions on your Mac. Open the System Preferences, click on “Accessibility,” and select “Dictation” in the left-hand sidebar. From there, you can enable dictation and customize the speech commands to perform actions like opening applications, navigating menus, or executing specific commands.
2. Automator actions: The Automator app on your Mac allows you to create custom workflows and actions. You can utilize the “Text to Audio File” action to convert written text into an audio file using the text-to-speech feature. This gives you the flexibility to save spoken content for future reference or even create podcasts or voiceovers.
3. Terminal commands: For those comfortable with using Terminal, you can leverage commands to interact with the text-to-speech engine directly. This allows for precise control over various parameters such as voice selection, speaking rate, volume, and pitch. Refer to Apple’s documentation for a list of available commands and their usage.
4. Custom scripts and applications: If you have coding knowledge or are willing to learn, you can create custom scripts or applications that leverage the text-to-speech capabilities of your Mac. This enables you to integrate spoken notifications, greetings, or other speech functions into your own applications or workflows.
5. Third-party text-to-speech software: While macOS includes built-in text-to-speech functionality, there are also third-party applications available that offer additional features and voices. These applications can provide a wider range of voices, enhanced customization options, and advanced speech synthesis algorithms. Explore the App Store or trusted software providers to find text-to-speech applications that meet your specific needs.
By exploring these advanced options, you can further tailor the text-to-speech experience on your Mac to your preferences and requirements. Whether it’s automating tasks, customizing voices, or integrating speech into your own applications, these advanced features unleash the full potential of text-to-speech on your Mac. Now that you’re familiar with these advanced options, you can start leveraging them to enhance your text-to-speech capabilities on your Mac.