
What is Xcopy Command?
The Xcopy command is a powerful command-line tool in Windows that allows users to copy files and directories from one location to another. It is a versatile tool that offers various options and switches to customize the copying process according to specific needs.
With Xcopy, users can copy files and directories from local drives, network paths, or even across different devices. It provides a convenient and efficient way to transfer data, especially when dealing with large files or complex directory structures.
The Xcopy command supports recursive copying, meaning it can copy not only the selected files but also any subdirectories and their contents. This feature makes it ideal for backup operations or when it is necessary to duplicate an entire folder hierarchy.
Moreover, Xcopy enables users to exclude specific files or subdirectories from the copying process. This can be useful when dealing with sensitive or temporary files that should not be included in the destination.
One of the notable characteristics of Xcopy is its ability to preserve file attributes, permissions, and timestamps during the copying process. This ensures that the copied files retain their original settings, providing a seamless transition between the source and destination.
Another useful feature of Xcopy is the option to verify the integrity of files after copying. By using the “/v” switch, users can compare the file size and checksum of the source and destination files to ensure there are no errors in the copied data.
Overall, the Xcopy command offers a wide range of options and switches that empower users to have granular control over the copying process. Whether it is a simple file duplication or a complex backup operation, Xcopy provides a reliable and efficient solution for managing files and directories in a Windows environment.
Syntax and Basic Usage
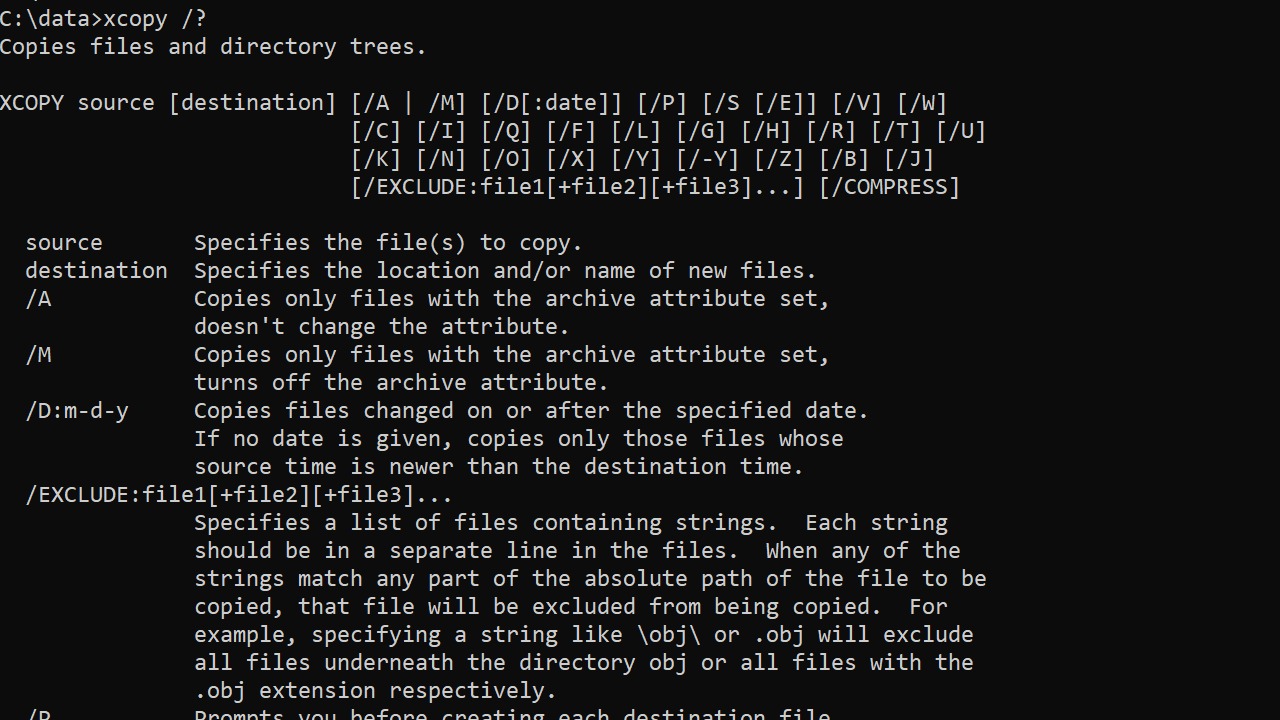
To use the Xcopy command efficiently, it is essential to understand its syntax and basic usage. The general syntax of the Xcopy command is as follows:
xcopy [source] [destination] [options]
The “source” parameter specifies the files or directories to be copied, while the “destination” parameter indicates the target location where the files will be copied to. Here are some examples of how to use the Xcopy command:
1. Basic file copy:
xcopy C:\Path\to\file.txt D:\Destination\Folder
This command copies the file.txt from the source directory to the destination folder.
2. Copying directories:
xcopy /e C:\Path\to\folder D:\Destination\Folder
Using the “/e” switch instructs Xcopy to include all subdirectories and files within the source directory in the copy operation.
3. Overwriting files:
xcopy /y C:\Path\to\file.txt D:\Destination\Folder
The “/y” switch tells Xcopy to overwrite any existing files in the destination folder without prompting for confirmation.
4. Verifying file integrity:
xcopy /v C:\Path\to\file.txt D:\Destination\Folder
By appending the “/v” switch, Xcopy verifies the integrity of the copied file by comparing its size and checksum against the original file.
5. Excluding specific files:
xcopy C:\Path\to\folder D:\Destination\Folder /exclude:C:\Path\to\exclude.txt
Using the “/exclude” option, you can specify a text file containing a list of files or directories to exclude from the copy operation.
These examples demonstrate some of the basic usage scenarios of the Xcopy command. Remember to adjust the paths and options according to your specific requirements and modify any switches to suit your needs.
By mastering the syntax and basic usage of the Xcopy command, you can harness its full potential to efficiently copy files and directories in Windows, saving time and effort in various file management tasks.
Examples of Xcopy Command
To better understand the versatility and practical applications of the Xcopy command, let’s explore some examples of how it can be used in different scenarios:
1. Copying a file to a different location:
xcopy C:\Path\to\file.txt D:\Destination\Folder
In this example, the Xcopy command copies the file.txt from the source directory to the destination folder specified. If the destination folder doesn’t exist, Xcopy will create it.
2. Copying a directory and all its contents:
xcopy /E C:\Path\to\folder D:\Destination\Folder
By using the “/E” switch, Xcopy recursively copies the specified directory and all its files and subdirectories to the destination folder. This is useful when you need to duplicate an entire folder hierarchy.
3. Overwriting files without confirmation:
xcopy /Y C:\Path\to\file.txt D:\Destination\Folder
In situations where you want to overwrite existing files in the destination folder without being prompted for confirmation, the “/Y” switch comes in handy. It allows Xcopy to automatically overwrite any files with the same name.
4. Copying files from a network location:
xcopy \\Server\Share\Path\to\file.txt D:\Destination\Folder
Xcopy is not limited to copying files from local drives. It can also copy files from network paths. In this example, files are copied from the specified network location to the destination folder.
5. Excluding specific files or directories:
xcopy C:\Path\to\folder D:\Destination\Folder /exclude:C:\Path\to\exclude.txt
By using the “/exclude” option, you can specify a text file containing a list of files or directories to exclude from the copy operation. This is useful when you want to skip certain files or directories during the copying process.
Each of these examples showcases the flexibility and power of the Xcopy command. By tailoring the command with the appropriate switches and arguments, you can perform a wide range of file copying tasks efficiently and effectively.
Remember to adapt the examples to your specific paths and requirements, making use of the various options and switches available to achieve the desired results.
Xcopy Options
The Xcopy command offers a variety of options to customize the copying process. These options can be used in combination with the basic syntax to tailor the behavior of the command according to specific needs. Here are some commonly used Xcopy options:
/D: This option allows you to copy only those files that are newer in the source directory than in the destination. It ensures that only updated files are copied, saving time and bandwidth.
/S: The “/S” option instructs Xcopy to include subdirectories during the copying process. This is useful when you need to copy all files and folders within a directory hierarchy.
/E: Similar to the “/S” option, the “/E” option copies directories and subdirectories, including any empty ones. This ensures that the entire directory structure is duplicated in the destination.
/C: With the “/C” option, Xcopy continues copying even if errors occur. It allows the command to proceed without interruption, copying as many files as possible.
/H: The “/H” option copies system and hidden files in addition to normal files. This is useful when you need to duplicate files with these attributes intact.
/K: By default, the read-only attribute of files is not preserved during the copying process. However, with the “/K” option, Xcopy retains the read-only attribute for copied files.
/R: The “/R” option allows you to overwrite read-only files during the copying operation. It eliminates the need to manually change the attributes of files in the destination.
/Y: Using the “/Y” option suppresses the prompt that asks for confirmation when overwriting existing files. It enables automatic overwriting without user intervention.
/Q: The “/Q” option reduces the amount of output displayed during the copying process. It suppresses the file list and only displays the final summary.
These options provide additional control and flexibility when using the Xcopy command. By combining them strategically, you can fine-tune the copying process to suit your specific requirements. Experimenting with different options will help you discover the most efficient way to achieve your desired outcomes.
Xcopy Switches
In addition to the options, the Xcopy command offers several switches that further enhance its functionality. These switches can be appended to the command to perform specific actions or modify the behavior of the copying process. Here are some commonly used Xcopy switches:
/L: The “/L” switch lists the files that would be copied without actually performing the copy operation. It is useful for previewing the files that will be copied before executing the command.
/P: Using the “/P” switch prompts for confirmation before creating each destination file. This allows you to verify and control the copying of individual files manually.
/V: With the “/V” switch, Xcopy verifies the integrity of each file after it is copied by comparing its size and checksum with the original file. It ensures that the copied files are identical to the source files.
/I: The “/I” switch assumes that the destination is a directory instead of a file. It creates a new directory in the destination using the same name as the source file.
/N: The “/N” switch causes Xcopy to consider filename collisions as an error. It stops the copying process if a file with the same name already exists in the destination.
/U: Using the “/U” switch copies only files that already exist in the destination and have a timestamp newer than the source file. It allows for more efficient synchronization between source and destination.
/Z: The “/Z” switch enables Xcopy to support network resumable copies. If the copy process is interrupted, it can be resumed from the point of interruption, saving time and bandwidth.
/A: With the “/A” switch, Xcopy copies only files with the archive attribute set, and it clears the attribute of the copied files. This is useful when you want to perform incremental backups.
/Q: The “/Q” switch suppresses the display of Xcopy messages, except for error messages. It reduces the output and provides a cleaner view during the copy operation.
These switches expand the capabilities of the Xcopy command, allowing for greater control and customization. Experiment with different switches to optimize the copying process based on specific requirements and preferences.
Copying Files and Directories
The Xcopy command is highly effective in copying both individual files and entire directories. It offers several features and options to facilitate the copying process and maintain the integrity of the copied data.
When it comes to copying files, you can simply specify the path and filename of the source file, followed by the destination directory.
For example:
xcopy C:\Path\to\file.txt D:\Destination\Folder
This command will copy the file.txt from the source location to the specified destination folder. If the destination folder does not exist, Xcopy will create it.
For copying directories, Xcopy provides the option to include subdirectories. By using the /E or /S switch, you can instruct Xcopy to copy all files and subdirectories within the specified directory to the destination.
The /E switch copies all directories and subdirectories, including empty ones, while the /S switch copies directories and subdirectories but excludes empty directories.
Here are a couple of examples:
xcopy /E C:\Path\to\folder D:\Destination\Folder
xcopy /S C:\Path\to\folder D:\Destination\Folder
In both cases, Xcopy will duplicate the specified folder along with all the files and subdirectories it contains to the destination. The difference lies in whether or not empty directories are included.
Additionally, Xcopy allows you to exclude specific files or directories from the copying process. By using the /exclude option followed by the path to a text file containing a list of files or directories to exclude, you can selectively choose which items to skip during the copy.
For example:
xcopy C:\Path\to\folder D:\Destination\Folder /exclude:C:\Path\to\exclude.txt
In this case, Xcopy will copy all files and directories from the source folder to the destination folder except those listed in the exclude.txt file.
With these capabilities, copying files and directories using the Xcopy command becomes a flexible and efficient process. Whether you need to duplicate files, back up data, or synchronize folders, Xcopy provides the necessary tools to accomplish your goals effortlessly.
Excluding Files
The Xcopy command offers a convenient way to exclude specific files during the copying process. This feature is especially useful when you want to copy a directory along with its contents, but exclude certain files from being transferred to the destination.
To exclude files, you can create a text file that contains a list of files or directories to exclude, and then use the /exclude option followed by the path to the exclusion file.
Here’s an example:
xcopy C:\Path\to\source D:\Destination\Folder /exclude:C:\Path\to\exclude.txt
In this command, Xcopy will copy all files and directories from the source folder to the destination folder, except for the files specified in the exclude.txt file.
The exclude.txt file should be a plain text file where each line represents a file or directory to be excluded. You can specify a full path or use wildcards to match multiple files or directories.
For instance, suppose you want to exclude all files with the “.tmp” extension and a specific directory named “SecretFiles” from the copy operation. Your exclude.txt file might look like this:
*.tmp
SecretFiles\
By using the /exclude option, Xcopy will omit any files matching the specified patterns or directories listed in the exclusion file.
It’s important to note that the exclude.txt file must be created and maintained separately. You can modify the contents of the file anytime to include or exclude different files and directories as per your requirements.
Excluding files with Xcopy provides the flexibility to fine-tune the copying process and avoid unnecessary files or sensitive information being transferred to the destination. This feature is particularly useful when you need to perform backups, synchronize folders, or perform custom data transfers while ignoring specific files or directories.
Verifying File Integrity
Ensuring the integrity of copied files is crucial to guarantee data accuracy and reliability. The Xcopy command provides a built-in option that allows you to verify the integrity of copied files – the /v switch.
By appending the /v switch to the Xcopy command, you enable the verification process. Xcopy compares the size and checksum of the source and destination files to ensure that the copied files are identical to the original ones.
Here’s an example:
xcopy /v C:\Path\to\file.txt D:\Destination\Folder
In this command, Xcopy copies the file.txt from the source directory to the destination folder and verifies its integrity after the copy operation is complete.
During the verification process, Xcopy displays a message indicating whether each file passed or failed the verification. If a file fails the verification, it suggests that an error occurred during the copy operation, and the copied file may be corrupted.
By verifying the integrity of copied files, you can confidently determine that the data has been accurately transferred and ensure its usability. This is especially useful when performing critical operations such as backups or transferring important files where data integrity is of utmost importance.
It’s worth noting that the verification process does introduce a slight overhead in terms of time and system resources, as Xcopy needs to perform additional calculations to verify each file. However, this extra step provides peace of mind by confirming that the copied files are identical to the originals.
Using the /v switch is particularly beneficial in scenarios where the copied files are critical, such as when transferring important documents, media files, or software installations.
By combining the power of Xcopy with the verification feature, you can confidently perform file transfers, knowing that the copied data is accurate and ready for use.
Updating Files
The Xcopy command provides a useful feature for updating files during the copying process. This functionality allows you to copy only the files that are newer in the source directory compared to the destination directory. By doing so, you can efficiently synchronize and update files without copying unnecessary data.
To update files, you can use the /D switch followed by a specific date or the /D:m-d-y switch to specify a range of dates.
For example:
xcopy /D:12-31-2021 C:\Path\to\source D:\Destination\Folder
In this command, Xcopy copies the files from the source directory to the destination folder, but only if the source files have a modified date on or after December 31, 2021. This ensures that only the files that have been updated recently are copied.
Alternatively, you can use the /D switch without specifying a date to copy files that are newer in the source directory compared to the destination directory. The command will determine the date of the newest file in the destination directory and only copy files from the source directory that are newer than that.
By updating files instead of copying all files indiscriminately, you can save time and reduce the amount of data transferred. This is particularly useful when dealing with large file systems or when performing frequent updates or backups.
Moreover, using the /D switch allows you to maintain a synchronized copy of your files without overwriting any existing files on the destination that are already up to date. This feature is especially valuable when working with projects where you want to ensure that only the modified or new files are transferred.
Overall, the ability to update files using the Xcopy command provides a convenient and efficient method to keep your files in sync. By selectively copying only the necessary files, you can streamline your file management and avoid unnecessary data duplication.
Copying Hidden and System Files
The Xcopy command offers the ability to copy hidden and system files, enabling you to preserve the attributes of these files during the copying process. This can be useful when transferring files that are marked as hidden or system files and ensuring that their attributes are maintained in the destination.
By default, Xcopy does not copy hidden or system files. However, you can include these files in the copy operation by using the /H switch.
For example:
xcopy /H C:\Path\to\source D:\Destination\Folder
Using the /H switch tells Xcopy to include hidden and system files during the copying process. This ensures that these files are transferred to the destination with their original attributes intact.
Copying hidden and system files can be particularly important in situations where certain files in the source directory are marked as hidden or system files, and you want to maintain their attributes in the destination. This is especially relevant when dealing with configuration files, operating system files, or files that are critical to the functioning of certain applications.
By preserving the hidden and system attributes during the copy process, you can ensure that the copied files behave the same way in the destination as they do in the source. This is essential for maintaining the integrity and functionality of the files, especially in cases where their attributes play a crucial role in their operation.
The ability to copy hidden and system files with Xcopy provides a comprehensive solution for transferring files that are not visible or typically excluded from standard file operations. By including these files in the copy process, you can ensure that all relevant data is accurately reproduced in the destination, maintaining a consistent and reliable file system.
Copying Subdirectories
The Xcopy command allows you to copy not only individual files but also entire subdirectories and their contents, providing a convenient way to duplicate directory structures or perform comprehensive backups.
To copy subdirectories, you can use the /E or /S switch along with the Xcopy command.
The /E switch ensures that all directories and subdirectories, including empty ones, are copied. With this switch, Xcopy creates an exact duplicate of the entire directory structure in the destination.
For example:
xcopy /E C:\Path\to\source D:\Destination\Folder
In this command, Xcopy copies the source directory along with all its subdirectories and files to the destination. If any directories are empty, they are created in the destination as well.
On the other hand, the /S switch copies directories and subdirectories but excludes empty directories. When using this switch, Xcopy preserves the directory structure but does not create empty directories in the destination.
For example:
xcopy /S C:\Path\to\source D:\Destination\Folder
In this command, Xcopy copies the source directory and its subdirectories to the destination, but any empty directories are not created in the destination.
Copying subdirectories with Xcopy is particularly useful when you need to duplicate an entire directory hierarchy, including all nested folders and their contents. This feature simplifies tasks such as creating replicas of folder structures or performing backups of entire directory trees.
By preserving the subdirectory structure during the copy process, Xcopy ensures that the destination mirrors the source directory accurately. This allows for seamless navigation and access to files within the copied directories, maintaining the original organization and accessibility of the data.
Whether you need to duplicate complex directory structures, transfer multiple subdirectories and files, or create backup copies of entire folders, the Xcopy command, combined with the /E or /S switch, offers a straightforward and efficient solution for copying subdirectories and their contents.
Overriding Destination File Prompts
The Xcopy command provides an option to override destination file prompts, allowing for automated file copying processes without user intervention. This feature is useful when you want to replicate or update files in the destination without being prompted for confirmation each time.
By default, when the Xcopy command encounters files with the same name in the destination directory, it prompts the user with a confirmation message asking whether to overwrite the existing file. However, you can use the /Y switch to suppress these prompts and automatically overwrite the files.
For example:
xcopy /Y C:\Path\to\source D:\Destination\Folder
In this command, Xcopy copies the files from the source directory to the destination folder, automatically overwriting any existing files in the destination without displaying prompts.
Using the /Y switch is especially convenient when performing repetitive or automated tasks where user interaction is not desired or feasible. It allows for smooth and uninterrupted file copying operations.
This override feature is particularly useful for scripts, scheduled tasks, or batch operations that involve frequent copying of files. With the prompt suppression, you can ensure that the copying process continues without interruptions, saving time and effort.
It’s important to note that when using the /Y switch, Xcopy automatically assumes that the answer is “Yes” to any prompt asking for file overwrite confirmation. Therefore, it’s crucial to double-check the command and ensure that you are copying the intended files to the desired destination.
By using the /Y switch, you can streamline your file copying processes, eliminating the need for manual confirmation when overwriting destination files. This provides greater efficiency when performing repetitive or automated tasks and allows for hassle-free management of files in the destination directory.
Displaying Progress Information
The Xcopy command allows you to display progress information during the file copying process, keeping you informed about the status and progress of the operation. By default, Xcopy provides a detailed list of the files being copied, along with their source and destination paths. However, if you prefer a more concise view, you can use the /D switch to display only a summary of the copying process.
The /D switch reduces the output and provides a cleaner view by suppressing the display of individual file details. Instead, it shows a summary of the number of files and directories copied.
For example:
xcopy /D C:\Path\to\source D:\Destination\Folder
In this command, Xcopy copies the files from the source directory to the destination folder and displays a summary of the total number of files and directories copied.
Displaying progress information during the copying process can be particularly useful when dealing with large file sets or lengthy operations. It lets you monitor the progress and provides an estimate of the remaining time or number of files yet to be copied.
By staying informed about the progress, you can assess the speed and efficiency of the copying operation and anticipate the completion time. This is especially important when performing time-sensitive tasks or when you need to plan subsequent actions based on the copying progress.
Furthermore, the ability to display progress information enhances the transparency and accountability of the copying process. It allows you to verify that the files are being copied as expected and provides confidence that the operation is proceeding smoothly.
Although the default output of Xcopy already provides detailed information, using the /D switch enables a more concise and focused view. This can be beneficial when you want to track the overall progress without being overwhelmed by individual file details.
By utilizing progress information display options, such as the /D switch in Xcopy, you can effectively monitor the copying process, make informed decisions, and ensure the smooth and successful completion of file copying operations.
Logging Copy Results
When performing file copying operations using the Xcopy command, it can be beneficial to keep a record of the copy results for future reference or troubleshooting purposes. Xcopy provides functionality to log the results of the copy operation, allowing you to generate a log file that captures important information about the copying process.
To enable logging, you can use the /L switch followed by a path to specify the location and filename of the log file.
For example:
xcopy C:\Path\to\source D:\Destination\Folder /L:C:\Path\to\log.txt
In this command, Xcopy copies the files from the source directory to the destination folder while logging the results to the specified log file, log.txt, located at C:\Path\to\log.txt.
The log file captures details such as the source and destination paths, file names, the number of files copied, and any error messages encountered during the operation. This information can be useful for auditing purposes, verifying successful copy completion, or troubleshooting any issues that may arise.
By reviewing the log file, you can easily identify any files that were not successfully copied or any possible errors encountered during the copy operation. This helps to ensure the accuracy and completeness of the copying process and allows for prompt action if any issues are identified.
In addition to the /L switch, Xcopy also offers the /F switch. When used together with the /L switch, it additionally logs the names of the files in the source directory, even if they are not copied. This can be useful for obtaining a comprehensive list of files present in the source directory, regardless of whether they were copied.
Logging copy results with Xcopy provides a valuable record of the copying process, allowing for traceability and a means to review and troubleshoot any issues that may arise. It offers transparency and accountability in file copying operations, enabling you to maintain accurate records and ensure the successful completion of tasks.
Copying Network Paths
The Xcopy command is not limited to copying files and directories within the local machine. It also has the capability to copy files from and to network paths, providing a convenient solution for transferring data across networked computers.
When copying files from a network path, you can specify the source location using the Universal Naming Convention (UNC) format, which consists of the server name and the shared folder path.
For example:
xcopy \\Server\Share\Path\to\file.txt D:\Destination\Folder
In this command, Xcopy copies the file.txt from the network path “\\Server\Share\Path\to” to the specified destination folder, D:\Destination\Folder.
Similarly, you can copy files to a network location by specifying the destination path using the UNC format.
It’s important to ensure that the appropriate network permissions are in place to access the shared folders and files across the network. You must have the necessary read and write permissions on both the source and destination locations to perform the copying operation successfully.
Copying files over a network with Xcopy offers a flexible solution for file transfer between networked machines. It can be useful in various scenarios, such as backing up files from remote servers, synchronizing files between different computers, or simply moving files between network locations.
With its ability to handle network paths, Xcopy provides a consistent and straightforward method to manage file transfers across a network. It simplifies the process and removes the need for manual file transfers or complex network file sharing configurations.
By leveraging Xcopy’s network capabilities, you can efficiently copy files between network locations and streamline your data management tasks, ensuring that files are readily accessible where they are needed.
Xcopy vs Copy Command
When it comes to copying files and directories in Windows, two popular commands are often used: Xcopy and Copy. While both commands serve the same purpose, there are some notable differences between them in terms of features and functionalities. Understanding these differences can help you choose the appropriate command for your specific copying needs.
The Xcopy command is a more powerful and versatile tool compared to the Copy command. Xcopy offers a wide range of options and switches that allow for more granular control over the copying process. It supports features such as recursive copying of directories and their contents, exclusion of specific files or directories, verification of file integrity, and display of progress information.
On the other hand, the Copy command is a simpler and more basic command that lacks the extensive features and options provided by Xcopy. It is primarily used for straightforward file copying operations without any advanced functionalities or customization options.
One key difference between Xcopy and Copy is their ability to copy directories. Xcopy can copy entire directory structures, including subdirectories and empty directories, while the Copy command can only copy individual files or groups of files specified by wildcard characters. This makes Xcopy a more suitable option for tasks that involve copying complex directory hierarchies.
Additionally, Xcopy preserves important attributes of files, such as timestamps, permissions, and file attributes, during the copying process. The Copy command, by default, does not retain these attributes and applies the default attributes of the destination location to the copied files.
Another difference lies in the interactive nature of the commands. Xcopy requires user interaction when encountering file overwrite prompts, unless the /Y switch is used to automatically overwrite without confirmation. In contrast, the Copy command does not provide prompts and automatically overwrites files in the destination.
It’s also worth mentioning that Xcopy is a command-line tool, while Copy can be executed directly from within the File Explorer interface by right-clicking on a file or folder and selecting the Copy option.
In summary, Xcopy offers a wider range of features and customization options for copying files and directories, making it a more flexible and powerful choice. On the other hand, the Copy command provides a simpler and more streamlined approach when only basic file copying is required. Depending on your specific copying needs, you can choose the command that best aligns with your requirements.