
Centering the Sensors
When setting up your Oculus Rift sensors, one crucial aspect to consider is their placement and positioning. Proper sensor placement is essential for accurate tracking and an optimal VR experience. Whether you’re playing games or immersing yourself in virtual reality experiences, the placement of your sensors is key. Here, we will discuss some tips on how to center your sensors effectively.
First and foremost, you should aim to have the sensors placed symmetrically in relation to your VR play area. This means positioning them equidistant from each other and centered within the space where you’ll be moving around. Having the sensors centered ensures that your movements are accurately tracked from different angles, providing a more immersive and seamless experience.
When it comes to positioning the sensors, a common approach is to place them above or below your monitor. This allows for a wide field of view, capturing your movements in a more comprehensive manner. Mounting the sensors on your monitor ensures they are at an optimal height for tracking, avoiding any obstructions that may impede the tracking capabilities.
Another popular option for sensor placement is mounting them on tripods. This gives you the flexibility to adjust the height and angle of the sensors as needed. Tripod-mounted sensors are particularly useful if you have a larger play area or want to ensure accurate tracking from different positions and angles.
If you prefer a more permanent and streamlined setup, wall mounts are a great solution. Wall mounts can be securely attached to your walls, providing a stable base for the sensors. This option is ideal for those who have a dedicated VR space and want to avoid any clutter on their desks or tripods.
Not everyone has the luxury of extra space or the ability to mount sensors on walls or tripods. In such cases, placing the sensors directly on your desk is a practical solution. Make sure to position them in a way that they have a clear line of sight to your VR headset, avoiding any obstructions that could hinder tracking.
When positioning the sensors, it’s crucial to take into account the angle at which they are pointing. Aim to have the sensors angled downward slightly, as this helps capture the full range of your movements. Adjusting the angles can enhance the accuracy of the tracking, ensuring a more immersive VR experience.
Remember, for optimal tracking, the sensors need to establish a clear line of sight with your VR headset. Ensure that there aren’t any objects or obstacles blocking the sensors’ view. Eliminating potential obstructions allows for seamless tracking, preventing any glitches or errors in your VR experience.
Lastly, the spacing between the sensors is crucial. The ideal distance between the sensors is around 6 to 10 feet, depending on the size of your play area. Maintaining this distance enables the sensors to accurately track your movements, resulting in a smooth and immersive VR experience.
Installing the Sensors on Your Monitor
Installing your Oculus Rift sensors on your monitor is a popular and convenient option for sensor placement. It allows for a wide field of view and ensures optimal tracking for your virtual reality experiences. Here are some tips on how to install the sensors on your monitor effectively.
To begin, make sure you have a sturdy and properly-sized monitor. Different monitors come in various sizes, so ensure that the sensors can be securely attached without covering any vital areas of the screen. Check the compatibility of the sensors with your monitor before proceeding.
Most sensors come with a mount or clip attachment that can be easily affixed to the top or bottom of your monitor. These mounts are specifically designed to hold the sensors firmly in place while minimizing any movement or vibrations that could affect tracking accuracy.
When installing the sensors, position them symmetrically on either side of your monitor, ideally at equal distances. This helps ensure uniform tracking coverage and prevents any bias toward one side of your VR play area.
Before attaching the sensors, clean the surface of your monitor to remove any dust or debris that could affect the adhesive. Use a microfiber cloth or a screen cleaning solution to gently wipe down the area where the sensors will be mounted.
Once the surface is clean, carefully attach the sensors to the designated mounting areas. Make sure they are securely fastened and aligned properly. Gently press down on the sensors to ensure they adhere firmly to the surface of your monitor.
It’s important to note that some monitors may have smooth or glossy surfaces, which might affect the adhesive’s strength. In such cases, consider using alternative mounting solutions, such as double-sided adhesive tapes or adhesive hooks, to ensure the sensors remain securely attached.
After installing the sensors on your monitor, test them by launching your VR games or experiences. Move around within your play area to ensure that the tracking is accurate and smooth. If you notice any issues, such as jittery movements or tracking glitches, double-check the sensor placement and make any necessary adjustments.
Regularly inspect the sensor mounts to ensure they remain secure and haven’t loosened over time. If you need to readjust or reposition the sensors, carefully remove them from the monitor and reapply them in the desired positions.
Mounting the Sensors on a Tripod
If you prefer a flexible and adjustable sensor placement option for your Oculus Rift, mounting the sensors on a tripod is an excellent choice. Using tripods allows you to easily position and fine-tune the sensors’ height and angle for optimal tracking during your virtual reality experiences. Here are some tips on how to mount the sensors on a tripod effectively.
Firstly, ensure that you have a sturdy and adjustable tripod that can securely hold the weight of the sensors. Choose a tripod with extendable legs and a reliable locking mechanism to provide stability during gameplay and prevent any accidental movement or vibrations.
Attach the sensors to the tripod’s mounting plate or head, depending on the tripod model. Most sensors come with a standard 1/4-inch thread, which is compatible with most tripod mounts. Insert the sensor’s mount into the tripod’s head and tighten the locking mechanism to secure it in place.
When mounting the sensors on the tripod, consider the height and angle of the tripod’s positioning. Set the tripod at a height that aligns with your VR play area and provides a clear line of sight between the sensors and your VR headset. Aim for a height that allows the sensors to capture your movements accurately without any obstructions.
Adjust the tripod’s legs and center column to fine-tune the height and stability as needed. Ensure that the tripod is level and secure before proceeding. This helps maintain stability and prevents any unintended movement or wobbling during gameplay.
To ensure optimal tracking, angle the sensors slightly downward when mounting them. This angle helps capture your movements more effectively, enhancing the accuracy of the tracking. Adjust the tilt of the tripod’s head or use an adjustable mount to achieve the desired angle.
After positioning and angling the sensors, tighten the tripod’s locking mechanisms to secure them in place. Check that the sensors are securely attached and won’t shift or rotate during your VR experiences. Give the sensors a gentle tug to ensure they are firmly mounted.
Once the sensors are mounted, perform tests in your virtual reality games or experiences to ensure accurate tracking. Move around within your play area and check for any tracking issues or glitches. If you encounter any problems, make necessary adjustments to the sensor positioning or angle to improve tracking accuracy.
Regularly check the tripod’s stability and the tightness of the sensor mounts. Tripods can occasionally loosen over time or with repeated use. If you notice any instability or movement, tighten the tripod’s locking mechanisms or consider using additional securing mechanisms, such as Velcro straps or cable ties, for added stability.
Mounting the sensors on a tripod provides flexibility and adjustability, allowing you to adapt the sensor placement to different play areas or gameplay scenarios. Experiment with different heights and angles to find the setup that works best for your VR experiences.
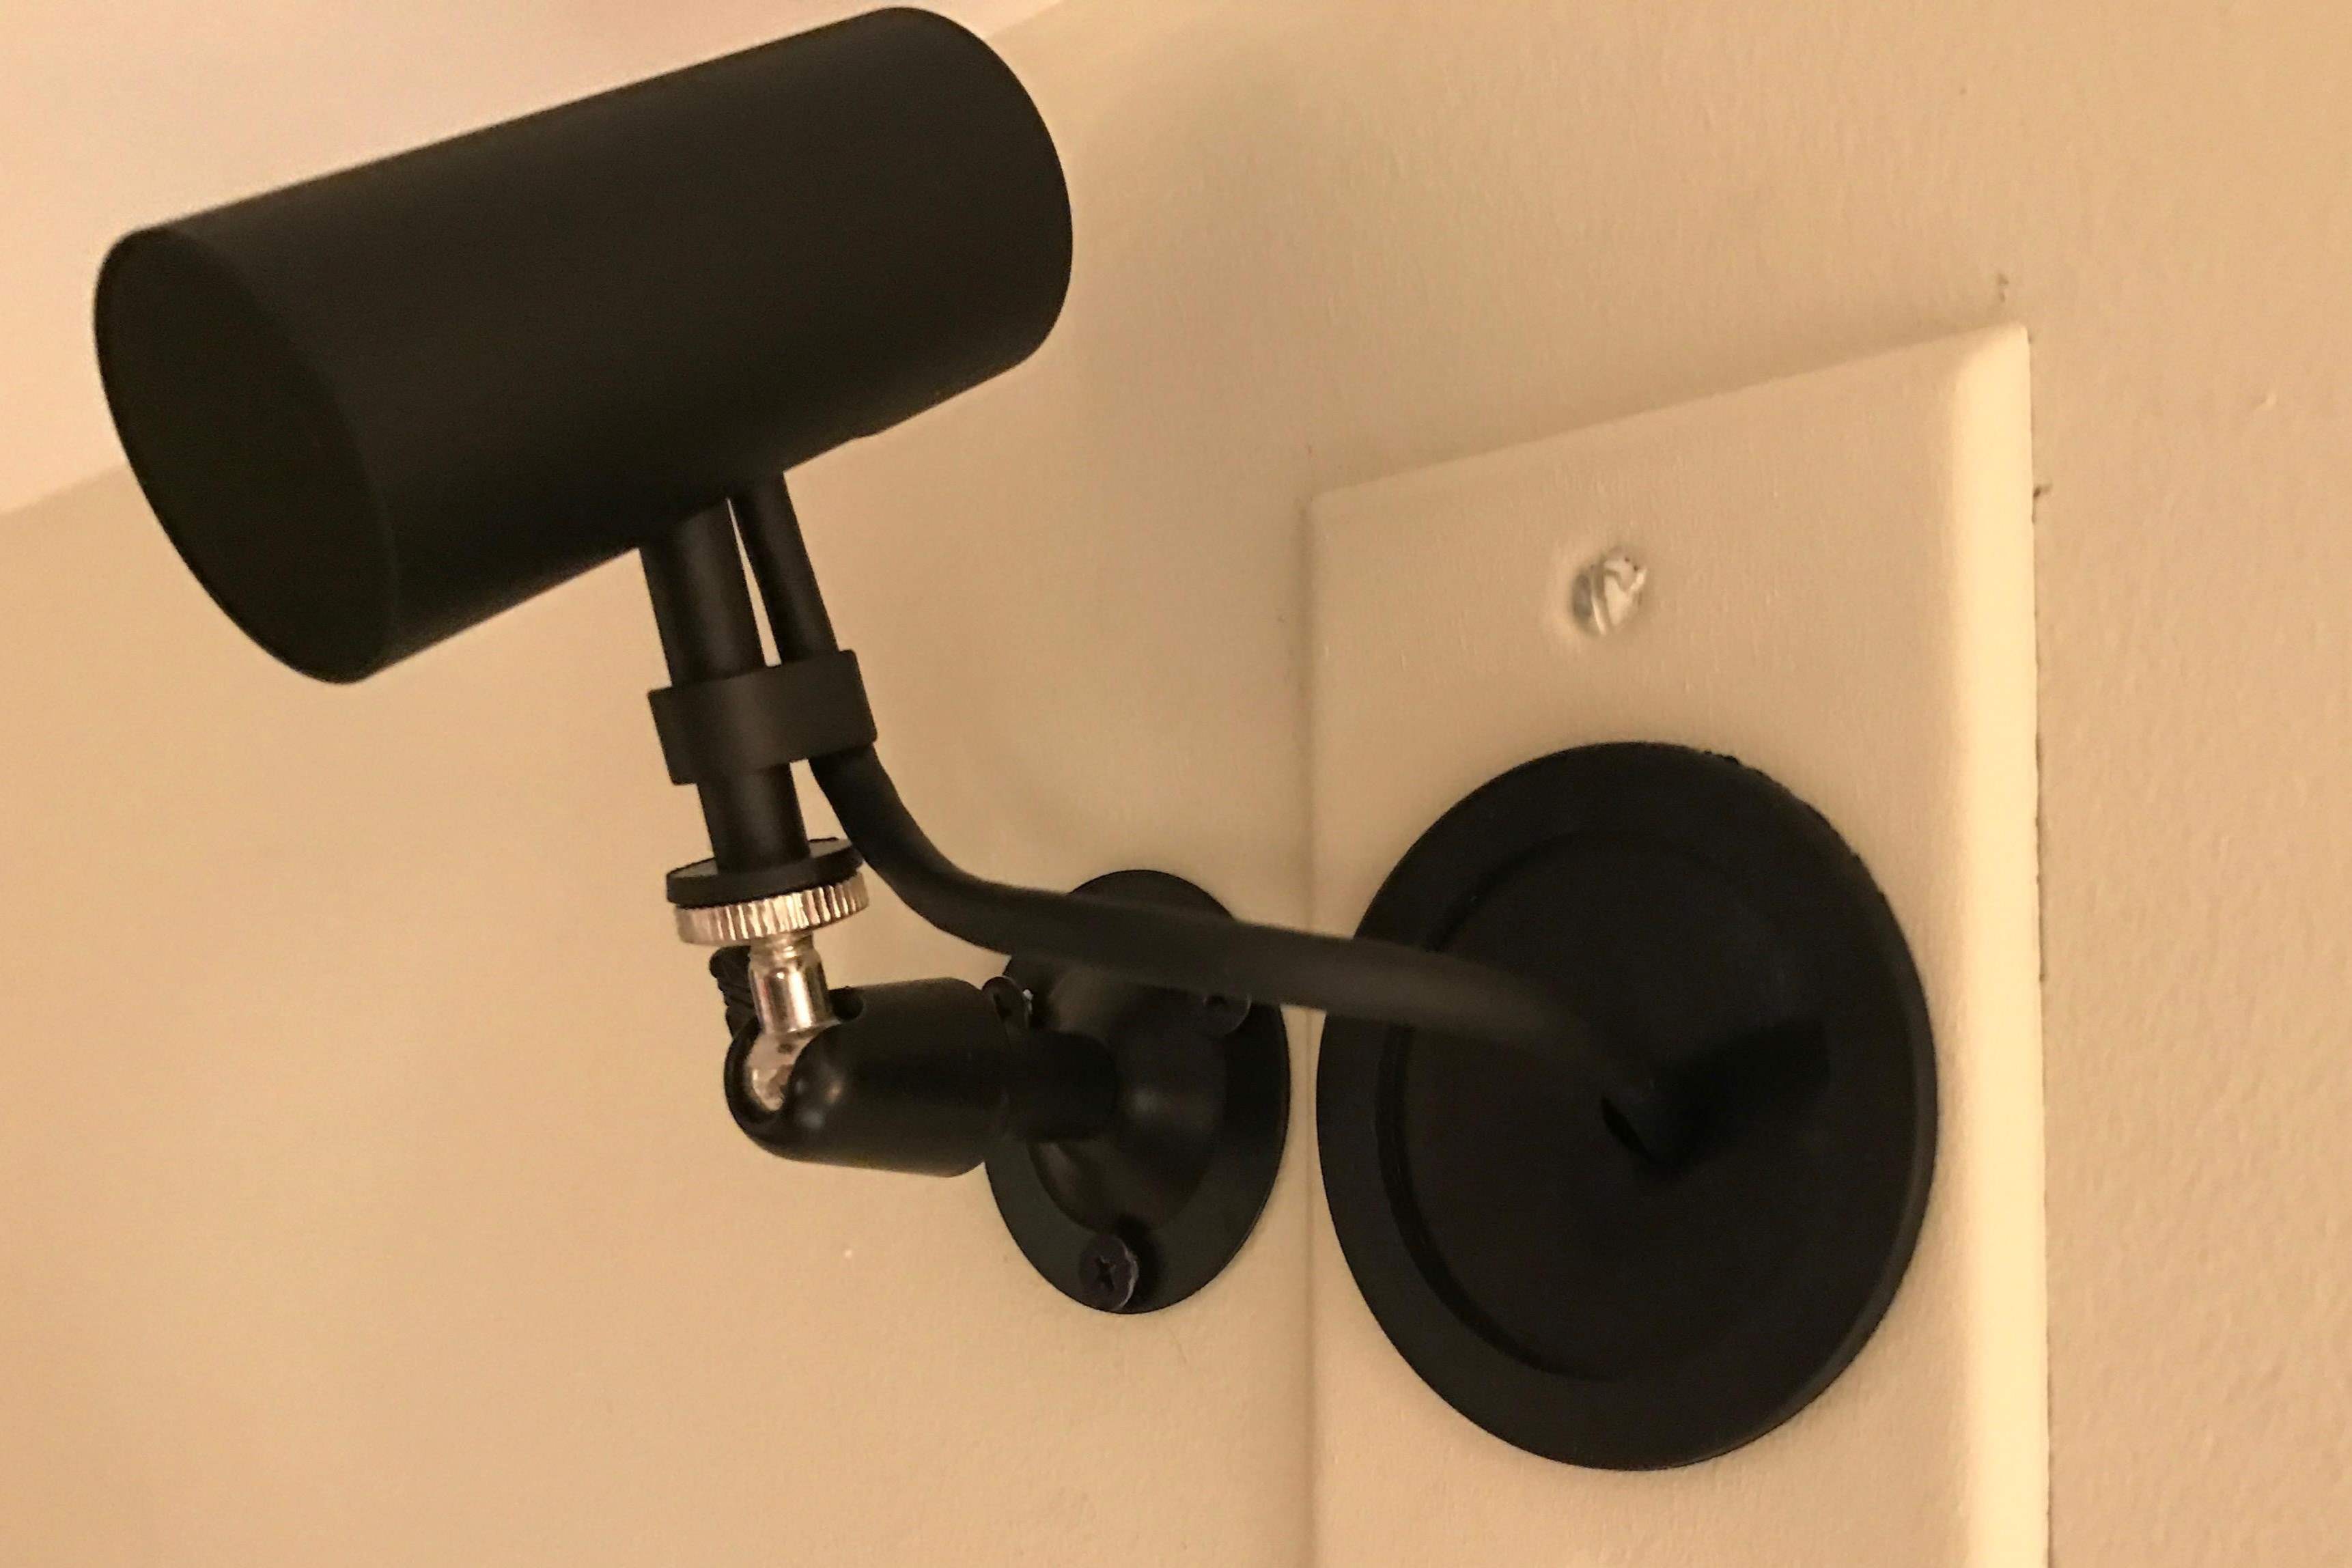
Using Wall Mounts for the Sensors
One of the most convenient and space-efficient options for sensor placement is using wall mounts. Wall mounts provide a secure and permanent solution for positioning your Oculus Rift sensors, maximizing their functionality and optimizing tracking for your virtual reality experiences. Here are some tips on how to effectively use wall mounts for your sensors.
Before installing the wall mounts, determine the ideal placement for your sensors. Consider the size of your play area and ensure that the wall mounts will allow for a wide field of view and clear line of sight between the sensors and your VR headset.
When selecting wall mounts, ensure that they are compatible with your Oculus Rift sensors and can securely hold their weight. Look for mounts with adjustable angles, allowing you to position the sensors at the optimal angle for tracking accuracy.
Use a stud finder to locate the studs in your wall. Mounting the sensors on studs provides the strongest and most secure installation. If you don’t have access to studs, use wall anchors or toggle bolts for additional support.
Before drilling any holes, carefully measure and mark the positions where you want to install the wall mounts. Make sure the measurements are accurate and aligned with your desired sensor placement. Double-check the height and distance between the sensors to ensure symmetrical positioning.
Drill pilot holes at the marked locations to prevent the wall from splitting or cracking. Use an appropriate drill bit size for the mounting hardware you will be using. Be cautious when drilling and follow safety precautions.
Attach the wall mounts using the provided screws or mounting hardware. Ensure that the mounts are securely fastened to the wall, with no wobbling or movement. Test the stability of the mounts by giving them a slight tug to verify their durability.
Place the sensors onto the wall mounts, aligning them with the mounting plates or adapters. Make sure the sensors are securely attached and properly positioned. Adjust the angle of the sensors using the adjustable mounts for optimal tracking coverage.
Once the sensors are mounted, carefully route the cables along the wall to minimize clutter and trip hazards. Use cable clips or ties to secure the cables to the wall and prevent them from hanging loosely.
After the installation, test the sensors by launching your VR games or experiences. Move around within your play area to ensure that the tracking is accurate and smooth. If you encounter any issues, such as tracking glitches or reduced tracking range, readjust the sensor angles or positions as needed.
Regularly check the wall mounts to ensure they remain secure and haven’t loosened over time. Periodically inspect the screws and tighten them if necessary. If you need to remove the sensors or reposition them, carefully remove them from the wall mounts without damaging the mounts or the wall.
Using wall mounts for your Oculus Rift sensors provides a clean and efficient solution for sensor placement. They help declutter your play area and keep the sensors securely in place, enhancing tracking accuracy and overall VR experience.
Placing the Sensors on Your Desk
If you don’t have the option of mounting your Oculus Rift sensors on the wall or a tripod, placing them directly on your desk is a practical alternative. Placing the sensors on your desk allows for convenient and adjustable sensor positioning, ensuring accurate tracking for your virtual reality experiences. Here are some tips on how to effectively place the sensors on your desk.
Firstly, clear a space on your desk where you can position the sensors. Remove any unnecessary objects or clutter that could obstruct the sensors’ view or interfere with tracking. Clearing the area helps ensure unobstructed and accurate tracking.
Set up your sensors symmetrically on the desk, aligning them equidistant from each other. Placing them symmetrically provides balanced tracking coverage and eliminates any bias toward one side of your play area.
When positioning the sensors, ensure that they have a clear line of sight with your VR headset. Avoid placing them behind any obstacles such as monitors, speakers, or other large objects that may block the sensors’ view.
Consider using small desk mounts or stands specifically designed for holding the sensors. These mounts often come with adjustable arms or clamps, allowing you to position the sensors at the desired angle and height for optimal tracking.
If you don’t have access to dedicated mounts, you can use other items to elevate and position the sensors. For example, books or small containers can provide stable platforms for the sensors, allowing you to adjust their height and angle as needed.
Experiment with different sensor positions and angles to find the setup that works best for you. Try angling the sensors slightly downward to capture a wider range of motion. Fine-tune their positions to achieve optimal tracking coverage.
Ensure that the sensors are securely placed on the desk and won’t easily move or shift during gameplay. You can use adhesive strips, putty, or non-slip pads to help secure the sensors in place and prevent any accidental movement.
After placing the sensors on your desk, test them by launching your VR games or experiences. Move around within your play area and assess the tracking accuracy. If you notice any issues, such as jitters or tracking glitches, make necessary adjustments to the sensor positions or angles to optimize tracking performance.
Regularly check the stability of the sensor placement on your desk. Ensure that they remain secure and haven’t shifted or moved over time. As you use your VR system, periodically readjust the sensor positions to maintain accurate tracking.
Placing the sensors on your desk offers a flexible and convenient option for sensor positioning. It allows for easy adjustment and ensures accurate tracking for an immersive virtual reality experience.
Positioning the Sensors for Optimal Tracking
Positioning your Oculus Rift sensors correctly is crucial for achieving optimal tracking performance in your virtual reality experiences. Proper sensor placement ensures accurate and seamless tracking of your movements, enhancing immersion and gameplay. Here, we will discuss some tips for positioning the sensors to achieve optimal tracking.
Firstly, consider the layout and size of your VR play area. The recommended distance between the sensors is around 6 to 10 feet, depending on the size of your play area. Placing the sensors too close together may result in limited tracking coverage, while placing them too far apart can lead to tracking inconsistencies.
Aim to have the sensors positioned at an equal distance from each other and centered within your play area. This symmetrical placement helps achieve balanced tracking coverage and avoids any bias towards one side of the play area.
When positioning the sensors, it’s important to ensure they have an unobstructed line of sight with your VR headset. Avoid placing the sensors behind objects or obstacles that may interfere with tracking, such as monitors, large furniture, or plants. Clearing the sensors’ line of sight helps prevent tracking glitches and ensures an uninterrupted VR experience.
Consider the height at which you place the sensors. Ideally, the sensors should be positioned at a height that matches the height of your play area. This helps optimize the tracking of your head and hand movements, providing accurate feedback as you interact with the virtual environment.
Angle the sensors downward slightly to capture a wider range of motion. Angling the sensors helps track movements more effectively and minimizes the chances of losing tracking when reaching overhead or towards the ground.
Experiment with different sensor positions and angles to find the setup that works best for your VR experiences. Fine-tune their placement based on the specific requirements of the game or experience you’re engaging with. Some games may require more precision and accuracy, while others prioritize full-body movement and may benefit from a wider sensor coverage.
Test the tracking performance after positioning the sensors by launching your VR games or experiences. Move around within your play area and perform different actions to ensure that the tracking is accurate and consistent. If you notice any issues, such as jitters or tracking glitches, make necessary adjustments to the sensor positions or angles to optimize the tracking performance.
Regularly inspect the sensor placement to ensure they remain secure and in the desired positions. Over time, sensors or mounts may shift or loosen, affecting the tracking accuracy. Make any necessary adjustments or reposition them if needed to maintain optimal tracking.
By following these tips and guidelines for positioning your Oculus Rift sensors, you can achieve optimal tracking performance and enjoy a more immersive and seamless virtual reality experience.
Adjusting the Angle of the Sensors
Adjusting the angle of your Oculus Rift sensors is an important step in optimizing tracking accuracy and improving your virtual reality experience. Properly angling the sensors ensures that your movements are captured precisely, resulting in more immersive and responsive gameplay. Here, we will discuss the significance of adjusting the angle of the sensors and provide some tips on how to do it effectively.
When positioning the sensors, it’s crucial to have them angled downward slightly. This downward angle helps capture a wider range of motion and minimizes the risk of losing tracking when reaching overhead or towards the ground. Ideally, the sensors should be angled at around 30 to 45 degrees downward.
To adjust the angle of the sensors, you may need to use adjustable mounts or mounting brackets specifically designed for sensor positioning. These accessories allow you to easily modify the angle to achieve the desired position for optimal tracking coverage in your play area.
Begin by loosening the bolts or screws that secure the sensors to their mounts or brackets. Gently tilt the sensors downward, adjusting the angle according to your preference. Take care not to apply too much force or over-tighten the mounts to avoid damaging the sensors or mounting hardware.
As you adjust the angle, pay attention to the field of view and line of sight of the sensors. Ensure that the sensors have a clear and unobstructed view of your VR headset and the play area. Avoid obstructing the sensors’ line of sight with objects or other components of your VR setup that may interfere with tracking accuracy.
Experiment with different angles to find the optimal positioning for your specific gameplay needs and play area layout. Test the tracking performance by moving around within your play area and performing different actions. If you notice any tracking issues or inconsistencies, readjust the angle of the sensors to improve their tracking accuracy.
It’s important to note that the optimal angle may vary depending on the game or experience you’re engaging with. Some games may require more precise tracking, while others may prioritize full-body movement. Adjust the angle of the sensors accordingly to meet the requirements of each game or experience to ensure the best possible tracking results.
Regularly inspect the angle of the sensors to ensure they remain in the desired position. Over time, the sensors or mounts may shift or loosen, affecting the angle and tracking accuracy. If necessary, make any adjustments or reposition the sensors to maintain the optimal angle and tracking performance.
By adjusting the angle of your Oculus Rift sensors, you can enhance the accuracy and responsiveness of the tracking, immersing yourself more deeply in virtual reality experiences and enjoying a smoother gameplay experience.
Ensuring Line of Sight for the Sensors
One of the key factors in achieving accurate tracking with your Oculus Rift sensors is ensuring a clear line of sight between the sensors and your VR headset. Line of sight refers to the unobstructed path between the sensors and the objects they are tracking, allowing for seamless tracking and a more immersive virtual reality experience. In this section, we will discuss the importance of ensuring line of sight for the sensors and provide some tips on how to achieve it.
First and foremost, clear any obstructions that may hinder the line of sight between the sensors and your VR headset. Remove any objects, furniture, or decorations that may block the sensors’ view of your movements. Ensuring a clear and unobstructed path allows for accurate tracking and prevents any tracking glitches or inaccuracies.
Position the sensors in a way that provides an unrestricted line of sight to your VR headset. Avoid placing the sensors behind monitors, curtains, or other large objects that may obstruct their view. Placing the sensors on a higher surface or mounting them on tripods or wall mounts can help achieve a better line of sight by elevating them above potential obstacles.
Consider the height and angle at which the sensors are positioned. Make sure they are aligned with the height of your VR play area to ensure proper tracking coverage. Adjust the angle of the sensors to aim them downward slightly, capturing a wider range of motion and minimizing the risk of losing tracking when reaching overhead or towards the ground.
If you have multiple sensors, ensure that they have a clear line of sight with each other as well. The sensors communicate with each other to provide a seamless and accurate tracking experience. Avoid placing objects or obstacles between the sensors that may interfere with this communication, such as walls, large furniture, or reflective surfaces.
Lighting conditions can also impact the line of sight for the sensors. Ensure that the play area is well-lit, but avoid direct sunlight or bright, direct light sources that may interfere with the sensors’ tracking capabilities. Harsh lighting can create shadows and reflections that may disrupt the line of sight and affect tracking accuracy.
Regularly check the line of sight for the sensors as you set up your VR system or make adjustments to your play area. Double-check that there are no new obstructions or changes in lighting conditions that could impact the sensors’ performance. Periodically inspect the sensors’ positions to ensure they remain aligned with the proper line of sight.
By ensuring a clear and unobstructed line of sight for your Oculus Rift sensors, you can maximize tracking accuracy, eliminate tracking glitches, and create a more immersive virtual reality experience. Taking the time to optimize the line of sight will greatly enhance the overall performance and enjoyment of your VR system.
Spacing the Sensors Apart Correctly
Properly spacing the sensors of your Oculus Rift is crucial for achieving accurate tracking and an optimal virtual reality experience. The spacing between the sensors determines the coverage area and the accuracy of tracking your movements within that space. In this section, we will discuss the importance of spacing the sensors apart correctly and provide some tips on how to do so effectively.
The recommended spacing between the sensors is around 6 to 10 feet, depending on the size of your play area. This distance allows the sensors to capture your movements from different angles and provides a more comprehensive tracking coverage.
When positioning the sensors, aim for an equidistant spacing between them. Placing the sensors at equal distances from each other helps ensure balanced tracking coverage and prevents any bias toward one side of the play area.
The spacing between the sensors may depend on the specific requirements of the game or experience you’re engaging with. Some games may require more precise tracking and may benefit from closer sensor spacing, while others may prioritize larger play areas and may require wider sensor spacing to capture full-body movements accurately. Adjust the spacing based on the specific needs of each game or experience.
Consider the size and layout of your play area when determining the sensor spacing. If you have limited space, you may need to optimize the sensor placement and spacing to achieve the best tracking coverage within that space. Experiment with different sensor positions and spacing to find the setup that works best for your particular play area dimensions.
Regularly test the tracking performance by moving around within your play area and performing different actions. Pay attention to any tracking inconsistencies or glitches that may indicate incorrect sensor spacing. If you notice any issues, readjust the sensor positions or spacing to improve the tracking accuracy.
Ensure that the spacing between the sensors allows for clear line of sight from each sensor to your VR headset. Avoid placing objects or obstacles between the sensors that may disrupt the line of sight and affect tracking accuracy. If necessary, adjust the sensor positions to guarantee an unobstructed line of sight.
As you adjust the sensor spacing, be mindful of any potential interference between the sensors. Make sure that the sensors are adequately spaced apart to avoid any signal interference or tracking errors caused by their proximity to one another.
During the setup process, refer to the Oculus setup guidelines and instructions to ensure proper sensor spacing and alignment. The manufacturer’s recommendations should be followed to achieve the best possible tracking performance.
By spacing the sensors apart correctly, you can optimize the tracking accuracy and create a more immersive virtual reality experience. Regularly check and adjust the sensor spacing as needed to maintain accurate tracking and enjoy a seamless VR experience.
Troubleshooting Sensor Placement Issues
While setting up your Oculus Rift sensors, you may encounter various issues that can affect the tracking accuracy and overall performance of your virtual reality experience. Fortunately, many of these issues can be resolved by troubleshooting your sensor placement. In this section, we will discuss common sensor placement issues and provide tips on how to troubleshoot and resolve them effectively.
1. Poor Tracking Accuracy: If you’re experiencing poor tracking accuracy, double-check the positioning and alignment of your sensors. Ensure that they are symmetrically placed and centered within your play area. Clear any obstructions that may hinder the line of sight between the sensors and your VR headset. Adjust the angle of the sensors, aiming them slightly downward to capture a wider range of motion. Additionally, make sure that the sensors are securely mounted and avoid any excessive movement or vibrations that may affect tracking accuracy.
2. Jittery or Inconsistent Tracking: Jittery or inconsistent tracking can be caused by various factors. Check for any sources of interference, such as reflective surfaces or bright lights, that may disrupt the sensors’ tracking capabilities. Surrounding lighting conditions can also affect tracking accuracy. Make sure the play area is well-lit but avoid direct sunlight or excessively bright lights. Adjust the angle and positioning of the sensors to optimize their line of sight and improve tracking performance. Additionally, ensure that your sensors are at an appropriate height and properly spaced apart as per the recommended guidelines.
3. Tracking Loss or Drift: If you’re experiencing tracking loss or drift, check for any sources of magnetic or wireless interference in the vicinity of the sensors. These sources can disrupt the tracking signals. Move any electronic devices or strong magnetic objects away from the sensors. Ensure that the sensors are securely mounted and not experiencing any movement or vibrations. Also, ensure that there are no Wi-Fi routers or other wireless devices near the sensors that could interfere with the tracking signals.
4. Limited Tracking Coverage: If the tracking coverage feels limited or inconsistent, reposition the sensors or adjust their angles to expand the coverage area. Consider mounting the sensors on tripods or using wall mounts to achieve a higher position and wider field of view. Experiment with different sensor placements and angles to find the setup that provides the best coverage for your play area.
5. Wobbling or Loose Sensor Mounts: If your sensor mounts are wobbling or becoming loose over time, tighten the mounting hardware or consider using additional methods to stabilize them. For wall-mounted sensors, double-check that they are securely fastened to the wall and that the screws or mounts are tight. For tripod-mounted sensors, ensure that the tripod’s locking mechanisms are properly tightened. Consider using additional securing mechanisms, such as Velcro straps or cable ties, to reinforce and stabilize the sensor mounts if needed.
6. Tracking Issues with Multiple Sensors: If you’re using multiple sensors, ensure that they are properly synchronized and communicating with each other. Check that the USB connections are secure and that the sensors are detected by the system. In the Oculus software, run the sensor tracking setup and follow the instructions to properly configure and sync the multiple sensors for accurate tracking.
Remember to consult the Oculus support documentation and troubleshoot any specific issues you encounter. Regularly check and adjust the sensor placement as needed to maintain optimal tracking performance and ensure a seamless virtual reality experience.