
Can you take the Nest thermostat with you when you move?
One of the many advantages of the Nest thermostat is its portability. If you’re moving to a new home and want to take your Nest thermostat with you, you’re in luck. The Nest thermostat can be easily removed from the wall and installed in your new home without any hassle.
When moving, it’s important to consider whether you own the Nest thermostat or if it is a rented device. If you own the thermostat, you have the freedom to take it with you and enjoy its benefits in your new home. However, if the thermostat is part of a rental agreement, you may need to leave it behind and check with your landlord or rental company.
To determine if you can take the Nest thermostat with you, it’s always best to refer to the terms and conditions of your purchase or rental agreement. If there are no restrictions mentioned, you should be able to take it along when you move.
The Nest thermostat is designed to be easily removable without causing any damage to the wall. With a few simple steps, you can safely detach it and reinstall it in your new home.
Keep in mind that moving the Nest thermostat may require some additional steps, such as resetting it to factory settings and disconnecting it from your Wi-Fi network. These steps ensure that your thermostat is ready for installation in its new location. Additionally, you may need to uninstall the Nest app from your phone and reinstall it once you reach your new home.
By taking the necessary precautions and following the correct procedures, you can successfully relocate your Nest thermostat and continue enjoying its energy-saving features in your new living space.
How to remove the Nest thermostat from the wall
Removing a Nest thermostat from the wall is a straightforward process that requires just a few steps. Follow these instructions to safely detach your Nest thermostat:
- Start by turning off the power to your heating and cooling system. You can usually do this by switching off the circuit breaker that controls your HVAC system.
- Next, locate the Nest thermostat on the wall. Gently pull it away from the wall to reveal the mounting plate.
- The mounting plate is held in place by a few small screws. Use a screwdriver to remove these screws and release the mounting plate.
- Once the mounting plate is detached, carefully unplug the wires from the back of the Nest thermostat. Take note of the wire labels to ensure proper reinstallation in the future.
- After disconnecting the wires, gently pull the mounting plate away from the wall. The Nest thermostat is now completely removed from the wall.
It’s important to handle the Nest thermostat with care during the removal process to avoid any damage. Keep the thermostat and wires in a safe place as you prepare to install it in your new home.
Remember to always follow safety precautions and consult the Nest thermostat’s user manual if you encounter any difficulties during the removal process. Taking these precautions will ensure a smooth transition when relocating your Nest thermostat to a new environment.
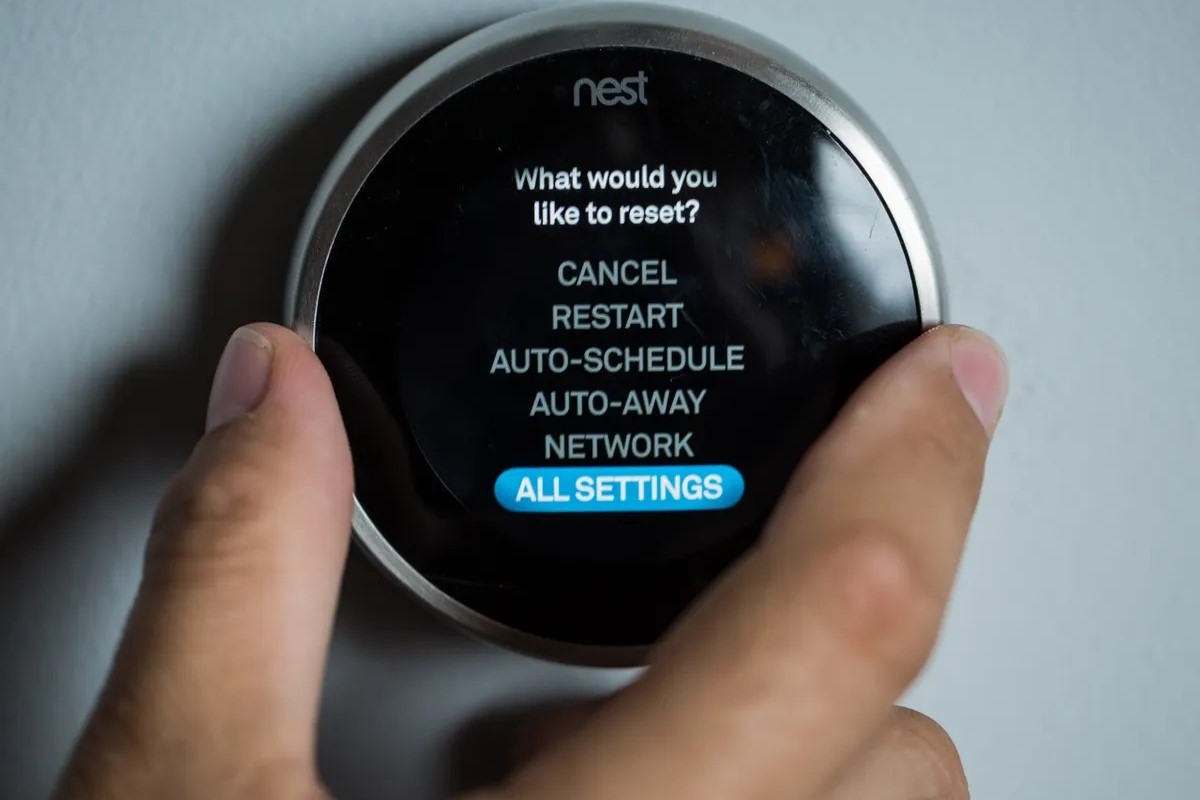
How to reset the Nest thermostat to factory settings
If you are moving your Nest thermostat to a new home, it’s important to reset it to factory settings before reinstalling it. This will ensure that any previous settings or Wi-Fi information are cleared, allowing you to start fresh in your new location. Follow these steps to reset your Nest thermostat:
- Start by pressing the thermostat display to bring up the menu.
- Scroll to the “Settings” option and select it.
- In the settings menu, scroll down and select “Reset.”
- You will be prompted to confirm the reset. Select “Reset” again.
- Wait for the Nest thermostat to reset to its factory settings. This may take a few minutes.
- Once the reset is complete, the Nest thermostat will reboot and display the initial setup screen.
By following these steps, your Nest thermostat will be returned to its original factory settings, ready for installation in your new home. Keep in mind that resetting the thermostat will remove any previous configurations, including saved schedules and connected devices. You will need to set up your preferences and connect the thermostat to your Wi-Fi network again after the reset.
If you encounter any difficulties during the reset process or have any questions, consult the Nest thermostat’s user manual or contact Nest customer support for assistance. Ensuring a proper reset will help you make a smooth transition when moving your Nest thermostat to a new location.
How to disconnect your Nest thermostat from your Wi-Fi network
Before moving your Nest thermostat to a new location, it’s important to disconnect it from your current Wi-Fi network. This will allow you to connect it to a new network once you’ve settled in your new home. Follow these steps to disconnect your Nest thermostat from your Wi-Fi network:
- Start by pressing the thermostat display to bring up the menu.
- Scroll to the “Settings” option and select it.
- In the settings menu, scroll down and select “Network.”
- Select “Disconnect” or “Remove network.”
- Confirm the disconnection by selecting “Yes” or “Confirm.”
- Your Nest thermostat will now be disconnected from your Wi-Fi network.
Once you have successfully disconnected your Nest thermostat from your Wi-Fi network, it will no longer be able to communicate with your devices or make any changes to your HVAC system remotely. This ensures a smooth transition when moving the thermostat to a new location.
Keep in mind that after disconnecting from Wi-Fi, you will need to connect your Nest thermostat to a new network once you’ve installed it in your new home. Follow the installation and setup process, which typically involves connecting to a new Wi-Fi network through the Nest app or using the thermostat’s menu options.
If you have any questions or encounter any issues during the disconnection process, refer to the Nest thermostat’s user manual or reach out to Nest customer support for assistance. Ensuring a proper disconnection from your Wi-Fi network will help you seamlessly relocate your Nest thermostat to a new environment.
How to uninstall the Nest app from your phone
If you’re moving and no longer need to control your Nest thermostat through the Nest app on your phone, it’s a good idea to uninstall the app. This will remove any unnecessary clutter from your device and ensure a fresh start in your new home. Follow these steps to uninstall the Nest app:
- Locate the Nest app on your phone’s home screen or app drawer.
- Press and hold the app icon until a menu appears.
- From the menu, select the “Uninstall” option.
- You may be prompted to confirm the uninstallation. Select “OK” or “Confirm” to proceed.
- The Nest app will be uninstalled from your phone.
If you’re using an iOS device, the uninstall process may vary slightly. Instead of pressing and holding the app icon, you can press and hold any app icon until they start to jiggle. Then, tap the “x” icon on the Nest app to uninstall it.
By uninstalling the Nest app from your phone, you will remove any saved preferences and account information associated with the app. If you plan on using the Nest app again in the future or have multiple Nest devices, you can simply reinstall the app and log in with your account details.
If you have any questions about the uninstallation process or need further assistance, you can refer to the support documentation provided by your device’s manufacturer or reach out to Nest customer support for guidance.
Removing the Nest app from your phone will help streamline your devices and ensure a clean slate for your Nest thermostat in your new home.
What to do with the Nest thermostat after removing it from the wall
After successfully removing your Nest thermostat from the wall, it’s important to take proper care of it until you’re ready to reinstall it in your new home. Here are some steps you can take:
- Keep the Nest thermostat in a safe and secure location during the move. Ensure it is protected from any potential damage or accidental drops.
- If you have the original packaging for the Nest thermostat, consider storing it in the box along with any accompanying accessories. This will help keep everything organized and protected.
- Avoid exposing the Nest thermostat to extreme temperatures, moisture, or direct sunlight. These conditions can potentially harm the device and affect its functionality.
- Label and organize the wires that were connected to the thermostat’s mounting plate. This will make it easier to reinstall the thermostat with the correct wiring in your new home.
- Consider using cable ties or twist ties to secure the wires together and prevent them from tangling or getting misplaced during the move.
- Take note of any manual or user guides that came with the Nest thermostat. It’s always helpful to have these resources on hand for reference when reinstalling the thermostat in your new location.
By taking these precautions, you can ensure that your Nest thermostat remains in good condition and is ready for installation in your new home. It’s important to handle the device with care throughout the moving process to avoid any unnecessary damage.
If you have any concerns or questions about storing or transporting your Nest thermostat, consult the device’s user manual or reach out to Nest customer support for guidance. They will be able to provide you with specific instructions to ensure the optimal care and protection of your thermostat.
Remember, properly storing and handling your Nest thermostat between moves will help ensure a smooth transition and allow you to continue enjoying its energy-saving features in your new living space.
Tips for reinstalling the Nest thermostat in your new home
Once you’ve moved to your new home, you’ll need to reinstall your Nest thermostat to start enjoying its energy-saving features again. Here are some helpful tips to ensure a successful reinstallation:
- Before reinstalling the thermostat, check the compatibility of your HVAC system with the Nest thermostat. Ensure that the wiring and voltage requirements are compatible to avoid any issues.
- Refer to the labels you previously placed on the wires to properly reconnect them to the corresponding terminals on the thermostat’s mounting plate.
- If the wires don’t reach the new thermostat location, you may need to purchase and install wire extensions or call a professional for assistance.
- Make sure the mounting plate is securely attached to the wall using the appropriate screws. Check for any loose connections or gaps.
- Power on your heating and cooling system by flipping the circuit breaker switch back to the “on” position.
- Follow the on-screen prompts on the thermostat display to complete the initial setup process. This usually involves connecting the thermostat to your Wi-Fi network and customizing your preferences.
- Download and install the Nest app on your phone if you haven’t already. This will allow you to control and monitor your thermostat remotely.
- Take advantage of the additional features and settings offered by the Nest thermostat, such as creating customized schedules and monitoring your energy usage.
- If you encounter any difficulties during the reinstallation process, refer to the Nest thermostat’s user manual or reach out to Nest customer support for assistance.
Following these tips will help ensure a smooth and successful reinstallation of your Nest thermostat in your new home. Enjoy the convenience and energy efficiency that the Nest thermostat provides.
How to set up the Nest thermostat in a new location
After reinstalling your Nest thermostat in your new home, you’ll need to go through the setup process to ensure it is properly configured for your specific environment. Follow these steps to set up the Nest thermostat in a new location:
- Ensure that your Wi-Fi network is active and accessible in your new home before starting the setup.
- Power on your Nest thermostat by flipping the circuit breaker switch to the “on” position.
- The Nest thermostat will display a welcome screen. Select your preferred language and continue.
- Next, choose your country or region from the list provided on the thermostat’s display.
- Follow the on-screen prompts to connect the thermostat to your Wi-Fi network. You will be prompted to enter your network’s password, so have it handy.
- Once connected, the Nest thermostat will update its software if needed. This may take a few minutes.
- Setup completion will be indicated when the thermostat displays a message that it is “Ready to use” or a similar confirmation.
- Configure the initial settings, such as setting the date, time, temperature preferences, and desired display mode.
- If desired, download and install the Nest app on your phone to control and monitor your thermostat remotely.
- Take some time to explore the additional features and settings offered by the Nest thermostat, such as creating schedules, adjusting temperature thresholds, and personalized energy-saving recommendations.
Following these steps will help you successfully set up your Nest thermostat in its new location. Enjoy the convenience and energy efficiency that the Nest thermostat provides in your new home.
If you encounter any difficulties during the setup process or have any questions, refer to the Nest thermostat’s user manual or reach out to Nest customer support for assistance. They will be happy to guide you through any setup-related issues you may encounter.
How to connect the Nest thermostat to a new Wi-Fi network
If you’ve moved to a new home or changed your Wi-Fi network, you’ll need to connect your Nest thermostat to the new network to ensure it can communicate and function properly. Follow these steps to connect the Nest thermostat to a new Wi-Fi network:
- Power on your Nest thermostat by flipping the circuit breaker switch to the “on” position.
- On the thermostat display, go to the main menu by pressing the thermostat once.
- Scroll to “Settings” and select it.
- In the settings menu, scroll down and select “Network.”
- Choose the “Connect to Wi-Fi” option.
- Follow the on-screen prompts to select your new Wi-Fi network from the list of available networks.
- If your new network requires a password, enter it when prompted and select “Connect.”
- Once the Nest thermostat is successfully connected to the new Wi-Fi network, it will display a confirmation message.
- Test the connection by checking if the thermostat can access the internet and communicate with other devices in your home.
- If desired, download and install the Nest app on your phone to control and monitor your thermostat remotely via the new Wi-Fi network.
By following these steps, you can easily connect your Nest thermostat to a new Wi-Fi network in your new home or after changing your network. This will ensure that you can control and monitor the thermostat’s settings and energy-saving features with ease.
If you encounter any difficulties during the connection process or have any questions, refer to the Nest thermostat’s user manual or reach out to Nest customer support for assistance. They will be happy to guide you through any Wi-Fi network connection issues you may encounter.
How to install the Nest app on your new phone
If you’ve upgraded to a new phone or need to install the Nest app on a different device, follow these steps to ensure you can control and monitor your Nest thermostat seamlessly:
- Open your phone’s app store. For iOS devices, use the App Store, and for Android devices, use the Google Play Store.
- In the search bar, type “Nest” and search for the official Nest app developed by Nest Labs, Inc.
- Once you’ve located the Nest app, tap on it to open the app’s information page.
- Check the app’s compatibility with your phone to ensure it’s compatible with your device’s operating system version.
- If your phone meets the compatibility requirements, tap the “Install” or “Get” button to download and install the Nest app.
- Wait for the app to download and install on your phone. The installation process may take a few minutes.
- Once the installation is complete, locate the Nest app on your phone’s home screen or app drawer.
- Tap on the Nest app to open it.
- Follow the on-screen prompts to sign in to your Nest account or create a new account if you don’t already have one.
- Once signed in, the app will guide you through the setup and configuration process to connect your Nest thermostat to the app.
By following these steps, you can easily install the Nest app on your new phone and gain control over your Nest thermostat. The app allows you to adjust the temperature, create schedules, and monitor energy usage from the convenience of your phone, no matter where you are.
If you encounter any difficulties during the installation process or have any questions, refer to the app store’s support documentation or reach out to Nest customer support for assistance. They will be happy to guide you through any installation-related issues you may encounter.
FAQs about moving the Nest thermostat
Here are some frequently asked questions about moving the Nest thermostat and their answers to help you with the relocation process:
- Can I take the Nest thermostat with me when I move?
- Do I need to reset the Nest thermostat before moving?
- How do I disconnect the Nest thermostat from my Wi-Fi network?
- What should I do with the Nest thermostat after removing it from the wall?
- How do I reinstall the Nest thermostat in my new home?
- How do I connect the Nest thermostat to a new Wi-Fi network?
- Do I need to reinstall the Nest app on my phone after moving?
- Can I still use the Nest thermostat without the Nest app?
If you own the Nest thermostat, you have the freedom to take it with you when you move. However, if the thermostat is part of a rental agreement, you may need to leave it behind. Check your purchase or rental agreement terms for more information.
It is recommended to reset the Nest thermostat to factory settings before moving to ensure a clean start in your new location. This will clear any previous settings and Wi-Fi information.
To disconnect the Nest thermostat from your Wi-Fi network, go to the thermostat’s settings menu, select “Network,” and choose the “Disconnect” or “Remove network” option.
After removing the Nest thermostat from the wall, keep it in a safe place, protected from any damage or extreme temperatures. If you still have the original packaging, storing it in the box can provide added protection.
To reinstall the Nest thermostat in your new home, ensure that the wiring is compatible, securely attach the mounting plate to the wall, connect the wires to their respective terminals, and go through the setup process to configure the thermostat for your new environment.
To connect the Nest thermostat to a new Wi-Fi network, go to the thermostat’s settings, select “Network,” and follow the on-screen prompts to choose your new network and enter the network password, if required.
If you’ve moved to a new phone, you’ll need to reinstall the Nest app on the new device. If you’re using the same phone, you may need to sign in to the app again.
Yes, you can still use the Nest thermostat without the Nest app. The thermostat has an intuitive interface that allows you to adjust settings and temperature directly on the device.
If you have any additional questions or concerns about moving your Nest thermostat, refer to the Nest thermostat’s user manual or reach out to Nest customer support. They will be happy to assist you with any inquiries you may have.