
Check your internet connection
When your Xbox One won’t update, the first and most important step is to check your internet connection. A stable and reliable internet connection is crucial for downloading and installing updates on your console. Here are some steps to ensure your internet connection is working properly:
- Make sure your Wi-Fi or Ethernet connection is active. Check the network settings on your Xbox One to verify that you are connected to the internet.
- If you are using Wi-Fi, try moving closer to your router or access point to improve the signal strength.
- Restart your modem and router by unplugging them from the power source, waiting for a few seconds, and then plugging them back in. This can help resolve any temporary issues with your network equipment.
- If you are using a wireless connection, try using a wired Ethernet connection instead. This can help eliminate any potential interference or signal loss.
- Test your internet speed by using a device other than your Xbox One. Visit a website or use a speed testing tool to check if you are getting the expected download and upload speeds.
If your internet connection is unstable or slow, it may be the cause of the update issue. Consider contacting your internet service provider for assistance or troubleshooting any network problems that may be affecting your Xbox One’s ability to update.
Remember, a reliable internet connection is crucial for successful updates on your Xbox One. By checking and optimizing your connection, you can improve the chances of resolving the update problem and enjoy the latest features and improvements on your console.
Restart your Xbox One console
One of the simplest yet effective troubleshooting steps when your Xbox One won’t update is to restart your console. Restarting can help resolve minor software glitches and refresh the system. Here’s how you can do it:
- Press and hold the power button on the front of your Xbox One console for about 10 seconds.
- The console will power down completely. Wait for a few seconds.
- Press the power button again to turn on your Xbox One.
After restarting your console, try checking for updates again. Sometimes, a simple reboot can refresh the system and fix any temporary issues that were preventing the update from installing.
If restarting your console doesn’t resolve the update problem, you can try a “hard reset” by following these steps:
- Turn off your Xbox One console by pressing and holding the power button on the front of the console for about 10 seconds.
- Unplug the power cord from the back of the console.
- Wait for at least 10 seconds before plugging the power cord back in.
- Press the power button to turn on your Xbox One.
A hard reset can help clear any lingering software issues and provide a fresh start for the console. Once your console is back on, try checking for updates again to see if the issue has been resolved.
Restarting your Xbox One console is a simple yet crucial troubleshooting step when you encounter update issues. It helps refresh the system and can often resolve minor software glitches that may be causing the update problem.
Clear the cache on your console
If your Xbox One won’t update, clearing the cache can be a helpful step in resolving the issue. The cache is a temporary storage location for various data on your console, and clearing it can remove any corrupt or outdated files that may be causing the update problem. Here’s how you can clear the cache on your console:
- Turn off your Xbox One console.
- Once the console is off, unplug the power cord from the back of the console as well as the power outlet.
- Wait for at least 10 to 15 seconds.
- Plug the power cord back into the console and the power outlet.
- Press and hold the power button on the front of the console for about 10 seconds.
- Release the power button and wait for the console to fully boot up.
Clearing the cache on your Xbox One can help eliminate any temporary data issues that may be hindering the update process. It essentially gives your console a fresh start by removing potentially problematic files.
After clearing the cache, try checking for updates again. If the cache was the cause of the update problem, this step should help resolve it. However, if the issue persists, you can move on to other troubleshooting steps to further diagnose and fix the problem.
Remember, clearing the cache is a safe process that doesn’t delete any of your personal data, games, or apps. It simply removes temporary files that may be causing issues with the update process.
Check for available storage space
If your Xbox One won’t update, it’s possible that insufficient storage space is causing the issue. Updates require enough free space on your console’s storage to be successfully installed. Here’s how you can check for available storage space:
- Go to the Home screen on your Xbox One console.
- Navigate to “My games & apps.”
- Select “See all” to view all your installed games and apps.
- Look for any games or apps that have a notification indicating they need an update.
- Highlight the game or app and press the “Menu” button on your controller.
- Select “Manage game & add-ons.”
- Under the “Ready to install” tab, check for any pending updates.
- If you have limited storage space, consider uninstalling some games or apps that you no longer use to free up space.
By freeing up storage space on your console, you make room for the necessary updates to be installed. If you’re running low on storage, you can either uninstall games or apps or consider expanding your storage capacity with an external hard drive.
Once you have enough storage space available, try checking for updates again. If the lack of storage was the cause of the update problem, you should be able to download and install the updates successfully. However, if the issue persists, further troubleshooting steps may be required.
Remember, maintaining sufficient storage space on your Xbox One is essential for smooth updates and optimal performance. Regularly checking for available space and managing your installed games and apps can help prevent update issues in the future.
Reset your network connection
If your Xbox One won’t update, resetting your network connection can help resolve any network-related issues that may be interfering with the update process. Here’s how you can reset your network connection on your Xbox One:
- Press the “Xbox” button on your controller to open the guide.
- Scroll to the right and select “Settings.”
- Choose “Network Settings.”
- Select “Go offline.”
- Wait for a few seconds and then select “Go online.”
By going offline and then back online, you force your Xbox One to establish a new network connection. This can help resolve any temporary network issues that were preventing the update from being downloaded or installed.
If resetting the network connection on your Xbox One doesn’t resolve the update problem, you can also try power cycling your network equipment. Here’s how:
- Turn off your Xbox One console.
- Unplug your modem and router from the power source.
- Wait for at least 30 seconds before plugging them back in.
- Once your modem and router have fully restarted, turn on your Xbox One console and check for updates again.
Power cycling your network equipment can help refresh the connection and resolve any issues on the network side that may be causing the update problem.
If the network reset and power cycling methods didn’t fix the issue, consider contacting your internet service provider for further assistance or troubleshooting.
Keep in mind that a stable network connection is crucial for successful updates on your Xbox One. By resetting your network connection, you can often resolve network-related issues that may be preventing the update from being downloaded or installed.
Use a wired connection
If you’re experiencing issues with updating your Xbox One, using a wired connection instead of Wi-Fi can often help resolve network-related problems. While Wi-Fi is convenient, a wired connection typically provides a more stable and reliable connection for downloading and installing updates. Here’s how you can switch to a wired connection:
- Connect an Ethernet cable from your modem or router to the Ethernet port on the back of your Xbox One.
- On your Xbox One console, press the Xbox button to open the guide.
- Scroll right and select “Settings.”
- Choose “Network Settings.”
- Select “Set up wireless network” and then select “Use wired network.”
- Follow the on-screen prompts to complete the network setup.
By using a wired connection, you reduce the chances of experiencing signal interference or fluctuations, which can hinder the update process. This method ensures a more stable and consistent network connection for optimal download and installation speeds.
After switching to a wired connection, try checking for updates again to see if the issue has been resolved. If the update process now proceeds smoothly, it is likely that the original problem was related to the Wi-Fi connection.
If you’re unable to use a wired connection or if the issue persists even after switching, you may need to explore other troubleshooting steps or consider contacting Xbox support for further assistance.
Remember, using a wired connection can provide a more stable network connection when updating your Xbox One. This can help resolve network-related issues and ensure a smoother update process overall.
Check Xbox Live service status
If you’re unable to update your Xbox One, it’s essential to check the Xbox Live service status. Xbox Live is the online gaming and digital media service provided by Microsoft for Xbox consoles, and any disruptions to this service can impact your ability to download updates. Here’s how you can check the Xbox Live service status:
- Visit the Xbox Live status page on a web browser or use the Xbox Live Status page on your console.
- Check the status of each service, including Xbox Live Core Services, Purchase and Content Usage, Social and Gaming, and more.
- If any of the services are marked as “Limited” or “Outage,” it could indicate that there is a known issue impacting the update process.
- Wait for the status to be resolved if there is an ongoing issue on Xbox Live’s end.
By checking the Xbox Live service status, you can determine whether the update problem is due to an issue with Xbox Live itself or if it is specific to your console. If the problem lies with Xbox Live, you may need to wait until the service is fully restored before attempting to update your Xbox One again.
It’s important to note that Xbox Live service disruptions can happen from time to time, and they are usually addressed promptly by Microsoft’s technical teams. During such disruptions, it’s best to be patient and wait for service restoration before taking any further troubleshooting steps.
If the Xbox Live service status appears normal, and there are no reported disruptions, the issue may be specific to your console or network. In this case, you can proceed with other troubleshooting steps to further diagnose and fix the problem.
Remember to periodically check the Xbox Live service status to stay informed about any known issues that may be affecting your ability to update your Xbox One. By staying informed, you can ensure a smooth and hassle-free update process.
Update your console manually
If your Xbox One won’t update automatically, you can try updating it manually to ensure you have the latest software version. Manually updating your console can help resolve any issues related to the automatic update process. Here’s how you can update your Xbox One manually:
- Press the Xbox button on your controller to open the guide.
- Scroll right and select “Settings.”
- Choose “System.”
- Select “Updates & downloads.”
- If an update is available, you will see it listed under “Console update available.”
- Select “Continue” to start the update process.
- Follow the on-screen prompts to download and install the update.
During the update process, it’s important to keep your console connected to a stable internet connection and ensure it has sufficient power to complete the update. Do not turn off your console or disconnect it from the power source while the update is in progress.
If the manual update process encounters any issues or errors, you can try the following additional steps:
- Restart your console and attempt the manual update again.
- Check for available storage space on your console and ensure there is enough free space for the update.
- If using a wired connection, verify that the Ethernet cable is securely connected to both your console and the modem/router.
- If using a wireless connection, try moving closer to the Wi-Fi router or access point to improve the signal strength.
If the manual update process still doesn’t work, you can consider contacting Xbox support for further assistance. They can provide you with specific troubleshooting steps based on your console’s situation.
Remember, manually updating your Xbox One can help ensure that you have the latest software version and resolve any issues related to the automatic update process. By following the steps outlined above, you can keep your console up to date and enjoy the latest features and enhancements.
Factory reset your Xbox One console
If all other troubleshooting steps have failed and your Xbox One won’t update, you may need to consider performing a factory reset. This option resets your console to its original settings, removing all personal data, games, and apps. Before proceeding with a factory reset, be aware that this process is irreversible and will delete all your data, so ensure you have backed up any important information. Here’s how you can factory reset your Xbox One console:
- Press the Xbox button on your controller to open the guide.
- Scroll right and select “Settings.”
- Choose “System.”
- Select “Console info.”
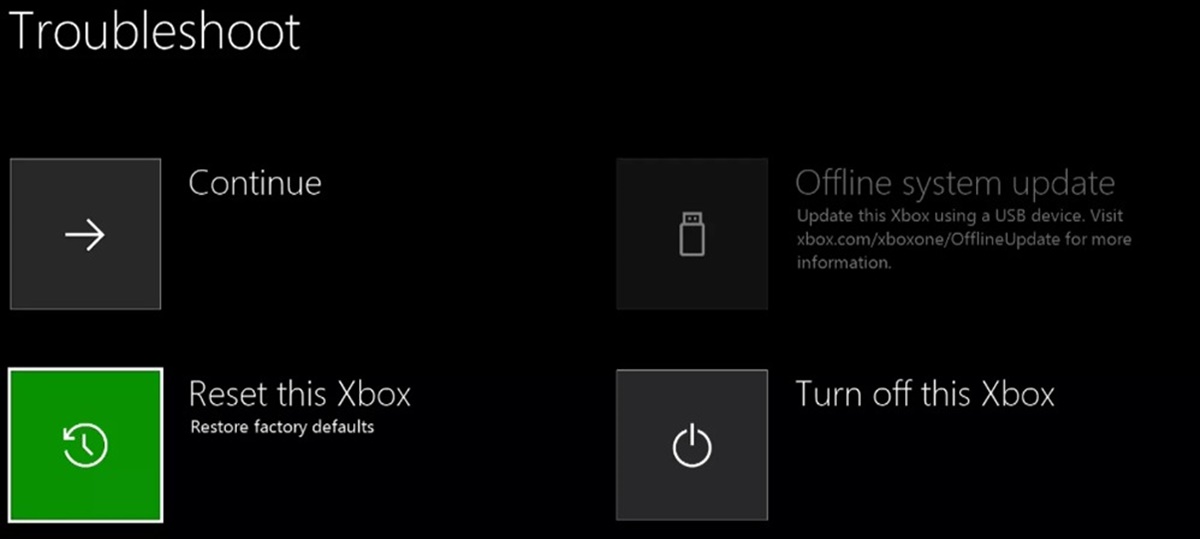
- Scroll down and select “Reset console.”
- Choose either “Reset and remove everything” or “Reset and keep my games & apps” based on your preference. It’s recommended to choose “Reset and remove everything” to ensure a clean reset.
- Follow the on-screen prompts to confirm the factory reset.
After the factory reset, your Xbox One console will restart and guide you through the initial setup process. Once the setup is complete, you can reinstall your games and apps and sign in to your Xbox Live account.
Performing a factory reset can often resolve severe software issues and give your console a fresh start. However, it should be considered as a last resort when all other troubleshooting steps have failed.
If the update problem persists even after a factory reset, it may indicate a hardware issue with your console. In such cases, it’s recommended to contact Xbox support or seek professional repair services.
Remember to back up any important data before performing a factory reset. This ensures that you don’t lose any important files or progress in games. Additionally, be prepared to reinstall your games and apps once the factory reset is complete.
Contact Xbox support
If you have tried all the troubleshooting steps mentioned above and your Xbox One still won’t update, it’s time to reach out to Xbox support. They have a dedicated team of experts who can provide personalized assistance and guidance to help you resolve the issue. Here’s how you can contact Xbox support:
- Visit the Xbox Support website on a web browser.
- Choose the “Contact Us” option or look for a “Support” section on the website.
- Select the appropriate category for your issue, such as “Xbox One” or “Updates & System.
- Choose the option to contact Xbox support through live chat, phone, or email, based on your preference.
- Provide all the necessary details about your issue, including any error codes or specific symptoms you have encountered.
- Follow the instructions provided by the support representative to troubleshoot and resolve the update problem.
When contacting Xbox support, be prepared to provide them with relevant information about your console, such as the serial number or Xbox Live account details. This will help them identify and understand your specific situation better.
Support agents are highly knowledgeable and experienced in resolving Xbox-related issues, including update problems. They will guide you through advanced troubleshooting steps specific to your console and provide solutions based on your circumstances.
Before reaching out to Xbox support, it is recommended to have already attempted the previous troubleshooting steps mentioned earlier in this article. This will help streamline the support process and ensure that you have thoroughly attempted to resolve the update issue on your own.
Remember, Xbox support is there to assist you and provide solutions, so don’t hesitate to reach out to them for help when you’re facing challenges with updating your Xbox One. They are dedicated to ensuring your gaming experience is as smooth and enjoyable as possible.