
How to Set Up the Apple Home App
The Apple Home App is a powerful tool that allows you to control and manage your smart home devices seamlessly. Whether you want to turn on your lights, adjust the thermostat, or lock your doors, the Home App provides a centralized hub for all your smart home needs. Setting up the Apple Home App is a straightforward process. Let’s dive into the steps:
- Ensure compatibility: First, make sure that your smart home devices are compatible with the Apple Home App. Check the packaging or consult the manufacturer’s website for compatibility information.
- Update your iOS: To ensure smooth integration with the Home App, make sure your iOS device is running the latest software update. Go to “Settings,” tap on “General,” and then select “Software Update” to check for any available updates.
- Open the Home App: Locate the Home App on your iOS device’s home screen and tap on it to open it. If you don’t have the app installed, you can download it from the App Store.
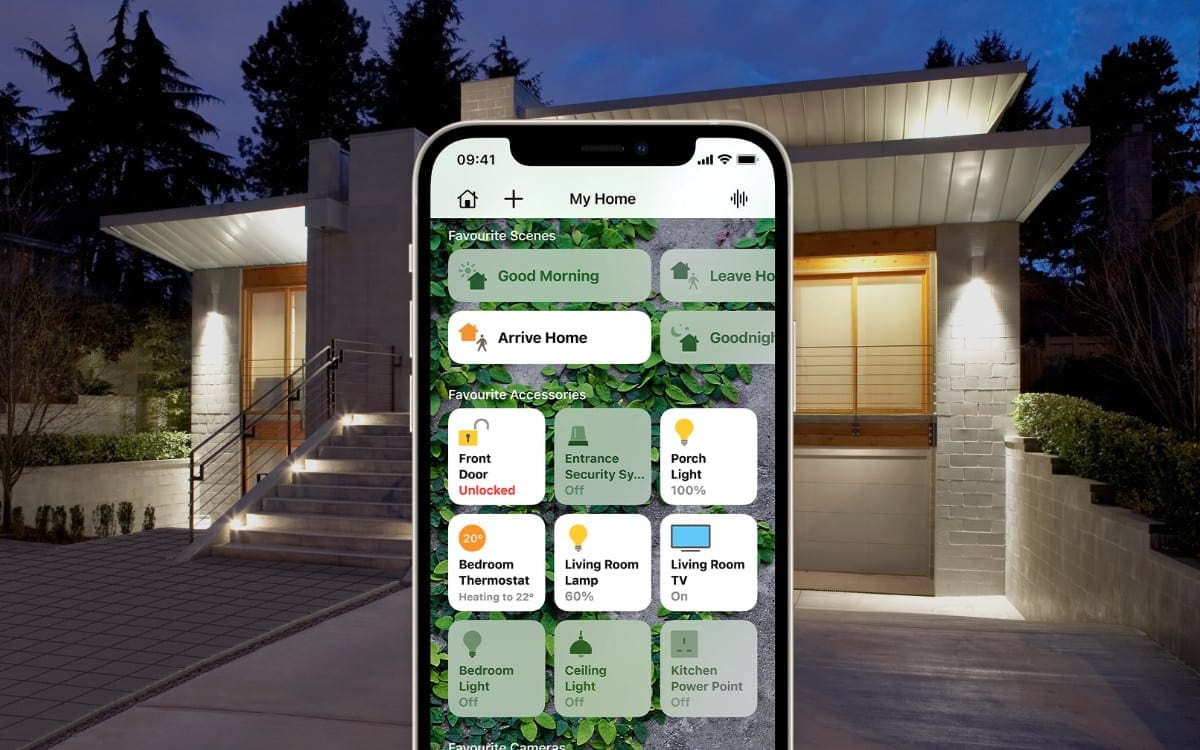
- Add your home: When you open the Home App for the first time, you’ll be prompted to add your home. Tap on “Add Home” and enter a name for your home, such as “My Home” or “Smart Home.”
- Add accessories: After adding your home, tap on the “Add Accessory” button. The app will begin searching for nearby smart home devices. Follow the manufacturer’s instructions to put your devices into pairing mode and then select them when they appear in the app.
- Customize your home: Once you’ve added your accessories, you can customize your home by creating rooms and zones. Tap on the “Rooms” tab and then click on the “Add Room” button. You can assign devices to specific rooms to easily control them later.
- Create scenes and automations: With the Home App, you can create scenes and automations to make your smart home even smarter. Scenes allow you to control multiple devices with a single command, while automations enable your devices to perform certain actions based on triggers or schedules.
- Enjoy Siri integration: The Apple Home App seamlessly integrates with Siri. This means you can control your smart home devices using voice commands. Just say, “Hey Siri, turn off the lights in the living room,” and Siri will do the rest.
Once you’ve completed these steps, you’ll be all set to enjoy the convenience and control offered by the Apple Home App. You can manage and control your smart home devices from anywhere using your iOS device, Apple Watch, or even your Mac. So, go ahead and set up your Apple Home App to transform your living space into a smarter, more connected home.
Adding and Managing Accessories
The Apple Home App allows you to easily add and manage your smart home accessories, giving you full control over their functionality. Whether you have smart lights, thermostats, door locks, or cameras, here’s how you can add and manage accessories in the Apple Home App:
- Add accessories: To begin, open the Home App and tap on the “+” icon in the top-right corner of the screen. This will take you to the “Add Accessory” screen. Follow the manufacturer’s instructions to put your accessory into pairing mode. Once in pairing mode, your accessory should appear in the Home App. Simply tap on it to add it to your home.
- Organize accessories: After adding accessories, you can organize them into rooms or zones to better manage and control them. To do this, navigate to the “Rooms” tab in the Home App and tap on the “Edit” button. From there, you can create new rooms and assign accessories to them. You can also create zones to control multiple rooms simultaneously.
- Customize accessory details: The Home App allows you to customize various details for each accessory. Tap on an accessory and then select “Details” to access its settings. Here, you can change its name, adjust its settings, and even assign it to specific users if you have multiple people managing your smart home.
- Group accessories: If you have multiple accessories in the same category, such as smart lights or speakers, you can group them together for easier control. To create a group, tap on the “Rooms” tab, select a room, and then tap on the “Edit” button. From there, tap on “Group Accessories” and select the accessories you want to include in the group.
- Control accessories: Once you’ve added and organized your accessories, you can control them individually or collectively. In the Home App, you can turn accessories on or off, adjust their settings, or set them to specific levels or temperatures. You can also create scenes to control multiple accessories with a single command.
- Manage accessory permissions: The Home App allows you to manage permissions for each accessory. This is especially useful if you have multiple users in your home who need different levels of access. By selecting an accessory and navigating to its “Details” page, you can control who can control the accessory and whether they need your permission or not.
- Remove accessories: If you no longer need an accessory or want to replace it, you can remove it from the Home App. Simply tap on the accessory in the Home App, select “Details,” scroll down to find the “Remove Accessory” option, and confirm your decision.
With the Apple Home App, adding and managing accessories in your smart home is a breeze. You can effortlessly control and customize your devices, create groups and scenes, and grant permission to other users. So take advantage of the Home App’s features and enhance your smart home experience.
Creating Rooms and Zones
Creating rooms and zones in the Apple Home App allows you to organize your smart home accessories and easily control them based on their location. By grouping your devices together, you can streamline your smart home experience. Here’s how you can create rooms and zones in the Apple Home App:
- Create a Room: To create a room, open the Home App and navigate to the “Rooms” tab. Tap on the “+” icon and enter a name for the room, such as “Living Room” or “Bedroom”. Once created, you can assign your accessories to the appropriate rooms.
- Assign Accessories to Rooms: After creating rooms, you can assign accessories to them. Tap on an accessory in the Home App, select “Details,” and then choose the desired room from the “Room” dropdown menu. This will help you control and manage your devices more effectively.
- Create a Zone: If you have multiple rooms that belong to a specific area or floor, you can create a zone to control them collectively. To create a zone, go to the “Rooms” tab and tap on the “Edit” button. From there, tap on “Add Zone” and give it a name, such as “Downstairs” or “Second Floor”.
- Add Rooms to Zones: Once you’ve created a zone, you can add rooms to it. Tap on the zone, then tap on the “Edit” button, and select the rooms you want to include in the zone. This allows you to control all the accessories in those rooms simultaneously.
- Control Accessories by Rooms or Zones: With rooms and zones set up, you can easily control your accessories. In the Home App, you can select a specific room or zone and control all the devices within it. For example, you can turn off the lights in the “Living Room” or lower the temperature in the “Upstairs” zone.
- Customize Room and Zone Icons: If you want to visually distinguish your rooms and zones, you can customize their icons. Tap on a room or zone in the Home App, select “Details,” and tap on the current icon. You can choose from a wide range of icons or even use a photo from your iOS device’s library.
- Remove Rooms and Zones: If you no longer need a room or zone, you can easily remove it from the Home App. To do this, go to the “Rooms” tab, tap on “Edit,” swipe left on the room or zone you wish to delete, and tap on the “Delete” button.
By creating rooms and zones in the Apple Home App, you can organize your smart home accessories and control them effortlessly. Whether you want to control devices in a specific room or manage multiple rooms collectively, rooms and zones provide a convenient way to streamline your smart home experience. So, take a few moments to create your ideal rooms and zones and enjoy the power of organization with the Apple Home App.
Configuring Automations and Scenes
With the Apple Home App, you can create automations and scenes to enhance the functionality and convenience of your smart home. Automations allow you to set up triggers and actions for your devices, while scenes enable you to control multiple devices simultaneously with a single command. Here’s how you can configure automations and scenes in the Apple Home App:
- Create an Automation: To create an automation, open the Home App and go to the “Automation” tab. Tap on the “+” icon and choose either “When Something Happens” or “At a Certain Time”. When selecting a trigger, you can choose from various options like time, location, accessory status, or even the action of another accessory.
- Set up Actions: After setting the trigger, you can define the actions that will occur when the automation is triggered. This can include turning on or off specific devices, adjusting their settings, or executing predefined scenes. You can also add additional conditions to refine the automation’s behavior.
- Create a Scene: Scenes allow you to control multiple accessories with a single command. To create a scene, tap on the “+” icon in the “Scenes” tab. Choose a name for the scene, select the accessories you want to include, and set their desired states (on/off, brightness level, temperature, etc.). You can also adjust the scene’s settings, such as fading duration or color options for smart lights.
- Activate Scenes and Automations: Once you’ve created your scenes and automations, you can activate them manually or set them to trigger automatically. Manual activation involves tapping on the scene or automation, while automatic activation can be based on triggers like time, location, accessory status, or even user presence.
- Edit or Delete Scenes and Automations: If you need to make changes to your scenes or automations, you can easily edit or delete them in the Home App. Simply go to the respective tab (Scenes or Automations), find the scene or automation you want to modify, and tap on it. From there, you can make the necessary adjustments or delete the scene or automation entirely.
- Sync Scenes and Automations across Devices: If you have multiple iOS devices or even a HomePod or Apple TV, you can ensure that your scenes and automations are synced across all devices. This way, you can activate them from any device and ensure consistent control of your smart home.
Configuring automations and scenes in the Apple Home App provides you with endless possibilities to personalize and automate your smart home devices. Whether you want to set up specific actions based on triggers or create scenes for different scenarios, the Apple Home App’s automation features empower you to create a smart home tailored to your needs. So, unleash the full potential of your smart home by exploring and configuring automations and scenes in the Apple Home App.
Controlling Devices using Siri
One of the most convenient features of the Apple Home App is its seamless integration with Siri, Apple’s voice-activated assistant. With Siri, you can control your smart home devices using simple voice commands, making it easier than ever to manage your smart home. Here’s how you can control your devices using Siri:
- Enable Siri: Before you can start controlling your devices with Siri, make sure Siri is enabled on your iOS device. Go to “Settings,” select “Siri & Search,” and toggle Siri on if it’s not already enabled. Also, ensure that your device is connected to the internet for Siri functionality.
- Link HomeKit to Siri: To allow Siri to control your smart home devices, link your HomeKit accessories to Siri. Open the Home App, tap on the “Home” icon in the top-left corner, select “Home Settings,” and then tap on “Siri.” From there, follow the on-screen instructions to link your devices to Siri.
- Control Individual Devices: With Siri enabled and your devices linked, you can control individual devices using voice commands. Simply activate Siri by saying “Hey Siri” or pressing the Siri button on your iOS device, then provide the command. For example, say “Hey Siri, turn on the living room lights” or “Hey Siri, lock the front door.”
- Create Custom Siri Shortcuts: To simplify the control of multiple devices or execute more complex actions, you can create custom Siri shortcuts. This allows you to define specific phrases that trigger a sequence of actions. For instance, you can create a shortcut that sets the scene for movie night, dimming the lights and adjusting the temperature all at once.
- Integrate Siri with Scenes and Automations: You can also use Siri to activate scenes and automations in the Apple Home App. For example, you can say “Hey Siri, activate the ‘Morning Routine’ scene” to turn on the lights, adjust the thermostat, and start playing your favorite morning playlist.
- Control Devices Remotely: With Siri and the Apple Home App, you can control your devices even when you’re away from home. As long as your iOS device is connected to the internet and your HomePod or Apple TV is set up as a home hub, you can use Siri voice commands to control your devices remotely.
- Manage Security and Privacy: It’s important to note that Siri commands for controlling your devices may be recorded and analyzed by Apple to improve Siri’s performance. However, you have control over your privacy settings. You can manage your Siri recordings and control what data is shared with Apple.
By harnessing the power of Siri, you can effortlessly control your smart home devices with simple voice commands. From turning on lights to adjusting the thermostat or locking doors, Siri makes managing your smart home a breeze. So, take advantage of Siri’s integration with the Apple Home App and bring a new level of convenience and control to your smart home experience.
Adding and Managing Users in the Home App
The Apple Home App allows you to conveniently add and manage users, giving them access to control and manage your smart home devices. This feature is especially useful for households with multiple residents or for granting temporary access to guests or service providers. Here’s how you can add and manage users in the Home App:
- Add Users: To add a user, open the Home App and go to the “Home Settings” by tapping on the “Home” icon in the top-left corner. From there, select “Invite” and enter the person’s Apple ID or email address. You can also choose whether to allow them to control your home remotely or limit their access to home automation.
- Accept Invitations: Once you’ve sent an invitation, the recipient will receive a notification on their iOS device. They can accept the invitation by tapping on the notification or going to the Home App’s “Home Settings” and selecting “Accept.” They will then be added as a user with access to control the smart home devices.
- Remove Users: If you want to remove a user’s access to your home, go to the Home App’s “Home Settings” and select “Users.” Tap on the user’s name and choose “Remove User.” Confirm your decision, and their access will be revoked.
- Assign User Permissions: The Apple Home App allows you to customize the level of control each user has over your smart home devices. By selecting a user in the “Home Settings,” you can define whether they have full control, can only view and receive notifications, or can control devices with your permission.
- Create HomeKit Secure Video Permissions: If you have HomeKit-compatible cameras and want to grant users access to view the camera feeds, you can customize their permissions. Open the Home App, select the camera, and go to the camera’s “Settings.” From there, choose “Recognized Faces” or “All People” to allow or restrict user access to the camera’s recordings.
- Control Your Home as a User: If someone invites you as a user to their Home App, you can easily control their smart home devices. Accept the invitation and open the Home App on your device. You will have access to the devices and scenes they have shared with you, allowing you to control and manage their smart home like they can.
- Manage User Notifications: As a user, you can receive notifications from the Home App about various events or automation triggers. To manage your notification preferences, go to the Home App’s “Home Settings,” select “Users,” and tap on your user profile. From there, you can toggle specific notifications on or off.
Adding and managing users in the Apple Home App allows you to share the control and management of your smart home devices with others. Whether it’s giving access to family members, friends, or service providers, or controlling someone else’s smart home as a user, this feature enhances the flexibility and convenience of managing your smart home. So, take advantage of the user management features in the Home App to create a connected and collaborative smart home environment.
Troubleshooting Common Issues
While using the Apple Home App, you may encounter some common issues that can disrupt the functionality of your smart home devices. However, with a few troubleshooting steps, you can often resolve these issues and get your smart home back on track. Here are some common problems you might face and how to troubleshoot them:
- Device Unresponsive: If a smart home device appears unresponsive in the Home App, try resetting it by unplugging it from the power source, waiting a few seconds, and plugging it back in. You can also check if the device is properly connected to your Wi-Fi network and ensure it has an active internet connection.
- App Crashes: If the Home App keeps crashing or becomes unresponsive, try force-closing the app and relaunching it. On an iPhone or iPad with a home button, double-press the home button to open the app switcher, then swipe up on the Home App to close it. On an iPhone or iPad without a home button, swipe up from the bottom edge and pause in the middle of the screen to access the app switcher, then swipe up on the Home App to close it. You can then reopen the app to see if the issue is resolved.
- Connection Issues: If you’re experiencing connectivity issues with your smart home devices, check your Wi-Fi router and ensure that it’s working properly. Restart the router and ensure that it’s broadcasting a strong and stable Wi-Fi signal. You can also try moving your devices closer to the router to improve the connection quality.
- Devices Disappeared: If your smart home devices have disappeared from the Home App, check if they’re connected to a stable power source and that they’re within range of your Wi-Fi network. Make sure that your iOS devices and accessories are running the latest software updates. If the devices still don’t appear, try resetting them and adding them back to the Home App.
- Unreliable Automations: If your automations are not triggering consistently or as expected, double-check the conditions or triggers you’ve set for the automation. Ensure that your devices are working properly, that they’re connected to the network, and that the necessary permissions are enabled. If needed, recreate the automation or edit the existing one to troubleshoot the issue.
- Interference Problems: Some smart home devices may encounter interference from other electronic devices or obstacles. Try moving devices closer to the Wi-Fi router or use Wi-Fi extenders to improve coverage. Avoid placing devices near other wireless devices or near thick walls that may obstruct the wireless signals.
- HomeKit Issues: If you’re encountering issues specific to the HomeKit framework, ensure that all of your HomeKit-compatible devices are updated with the latest firmware or software. If you’re using a HomePod or Apple TV as a home hub, check if it’s connected to the same iCloud account and within range of your devices.
By troubleshooting these common issues, you can overcome the obstacles that may arise when using the Apple Home App. Be patient and methodical in your approach, and don’t hesitate to consult manufacturer documentation or reach out to customer support if needed. With these troubleshooting tips, you’ll be able to maintain a smoothly functioning smart home and get the most out of the Apple Home App.
Connecting the Home App with HomePod or Apple TV for Remote Access
Connecting the Apple Home App with a HomePod or Apple TV as a home hub allows you to access and control your smart home devices remotely, even when you’re away from home. This remote access feature adds an extra layer of convenience and flexibility to managing your smart home. Here’s how you can connect the Home App with a HomePod or Apple TV for remote access:
- Ensure Compatibility: To use a HomePod or Apple TV as a home hub, make sure it meets the compatibility requirements. The HomePod must be running iOS 11.3 or later, and the Apple TV must be a fourth-generation model or later with tvOS 11 or later.
- Set Up a Home Hub: To use a HomePod or Apple TV as a home hub, make sure it’s signed in to the same iCloud account as the iOS device you’re using with the Home App. For HomePod, this is done during the initial setup process. For Apple TV, go to “Settings,” select your account, and ensure that “Home” is turned on.
- Enable Remote Access: To enable remote access, open the Home App on your iOS device and go to the “Home Settings” by tapping on the “Home” icon in the top-left corner. From there, select your home, and under “Remote Access,” toggle the option to allow remote access.
- Check Network and Connectivity: Ensure that your HomePod or Apple TV is connected to your home Wi-Fi network. It should be within range of your smart home devices for seamless communications. Check the network settings on the home hub device to address any connectivity issues.
- Test Remote Access: Once you’ve set up your home hub and enabled remote access, you can test if it’s working properly. Turn off Wi-Fi and cellular data on your iOS device to simulate being away from home. Launch the Home App and see if you can still control your smart home devices. If successful, you have established remote access.
- Ensure Hub Reliability: Regularly update the software on your HomePod or Apple TV to ensure the latest security and performance improvements. Additionally, keep your iOS device and accessories up to date for the best compatibility and stability.
- Enable Two-Factor Authentication: To enhance the security of your remote access setup, consider enabling two-factor authentication for your Apple ID. This provides an extra layer of protection when accessing your smart home remotely.
- Troubleshoot Connection Issues: If you experience connection issues or are unable to establish remote access, check the network settings on your home hub device and ensure that it’s connected to the internet. Restart the device if necessary or consult the manufacturer’s support resources for further troubleshooting steps.
By connecting the Apple Home App with a HomePod or Apple TV as a home hub, you can enjoy the convenience of accessing and controlling your smart home devices remotely. Whether you’re away on vacation or simply want to adjust your home’s settings while on the go, remote access adds flexibility and peace of mind. Simply follow the steps outlined above to establish the connection and ensure your smart home is always within reach.
Integrating Third-Party Devices with the Home App
The Apple Home App offers seamless integration with a wide range of third-party smart home devices. This allows you to have a unified control experience for all your smart devices, regardless of the manufacturer. Integrating third-party devices with the Home App is a straightforward process. Here’s how you can do it:
- Check Compatibility: Before purchasing a third-party device, ensure that it is compatible with the Apple Home App. Check the device’s specifications or the manufacturer’s website to confirm compatibility with HomeKit, Apple’s smart home framework.
- Add the Device to the Home App: To add a third-party device to the Home App, follow the manufacturer’s instructions to put it into pairing mode. Open the Home App and tap on the “+” icon. The app will automatically detect nearby devices in pairing mode. Select the device and follow the on-screen prompts to add it to your home.
- Configure the Device: Once the device is added to the Home App, you may need to configure its settings. This can include naming the device, assigning it to a room, or adjusting specific features and settings. Consult the device’s user manual or the manufacturer’s app for instructions on how to configure the device within the Home App.
- Create Automations and Scenes: After adding the third-party device, you can incorporate it into your automations and scenes. Use the Home App’s automation and scene features to control the third-party device alongside your existing smart home devices. For example, you could create a scene that turns on the lights, adjusts the temperature, and starts playing music when you arrive home.
- Use Siri Voice Commands: Once the third-party device is successfully integrated with the Home App, you can control it using Siri voice commands. Simply activate Siri and issue a command related to the action you want to perform on the device. For example, say “Hey Siri, lock the door” or “Hey Siri, turn on the coffee maker.”
- Check for Updates: It’s important to keep your third-party devices up to date with the latest firmware or software releases. Check the manufacturer’s website or their app for any available updates. Regularly updating your devices ensures they have the latest features and improvements, as well as compatibility with the Apple Home App.
- Explore Additional Integration Options: Some third-party devices may have their own dedicated apps or platforms. Explore any additional integration options provided by the device manufacturer. This may include integration with other smart home platforms or the ability to control the device through their app and the Apple Home App simultaneously.
- Consider HomeKit Certification: For optimal compatibility and integration, consider choosing third-party devices that are HomeKit-certified. HomeKit certification ensures that the device meets Apple’s stringent standards for security, interoperability, and seamless integration with the Apple Home App.
Integrating third-party devices with the Apple Home App allows you to create a unified and cohesive smart home experience. By following the steps above, you can add and control third-party devices alongside your existing smart home devices easily. Enjoy the convenience and flexibility of managing your entire smart home ecosystem within the Apple Home App!
Maximizing Home Security with the Apple Home App
Home security is a top priority for many homeowners, and the Apple Home App offers powerful features to help you maximize the security of your smart home. By utilizing the various security features and integrations available, you can enhance the protection of your home and have peace of mind. Here’s how you can maximize home security with the Apple Home App:
- Secure Device Access: Set up two-factor authentication for your Apple ID to add an extra layer of security to your Home App and prevent unauthorized access to your smart home devices.
- Secure Your Home Network: Ensure that your home Wi-Fi network is secure by setting a strong password and enabling encryption. Regularly update your router’s firmware to ensure the latest security patches are applied.
- Use Secure Accessories: When adding new devices to your smart home, choose accessories that are HomeKit-certified, as they undergo rigorous security testing to protect against vulnerabilities.
- Enable Notifications: Set up notifications in the Home App to receive alerts when certain events occur, such as a door being unlocked or motion detected. This allows you to stay informed about the activities in your home.
- Monitor Home with Cameras: Integrate HomeKit-compatible cameras into your smart home for enhanced security. Use the Home App to access live video feeds and recorded footage, providing you with visual evidence if any security issues arise.
- Set Up Automation Triggers: Create automations that trigger security-related actions, such as turning on lights, closing blinds, and locking doors when you leave home. This creates the illusion of an occupied house and deters potential intruders.
- Utilize Motion Sensors: Place motion sensors strategically around your home to detect any movement. In the Home App, create automations that trigger an alarm, send notifications, or activate lights if motion is detected in certain areas.
- Enhance Door Security: Integrate smart door locks into your smart home system. With the Home App, you can lock or unlock your doors remotely and grant temporary access to guests or service providers.
- Integrate Security Systems: Connect your existing security systems, such as alarms and security cameras, to the Apple Home App. This allows for centralized control and monitoring of your entire security ecosystem.
- Integrate Smoke and Carbon Monoxide Detectors: Link smoke and carbon monoxide detectors to your smart home system. Receive instant notifications on your iOS devices if any alarms are triggered, helping you respond quickly in case of emergencies.
- Consider Geofencing: Utilize geofencing capabilities in the Home App to automatically arm your security system and activate certain security measures when you leave the house, and disarm them when you return.
- Monitor Access with Activity Log: Access the Home App’s activity log to review the history of events and actions that have occurred in your smart home. This allows you to monitor and identify any suspicious or unexpected activity.
- Regularly Update Devices: Stay up to date with firmware and software updates for your smart home devices. Manufacturers often release patches and security updates to address potential vulnerabilities and enhance the security of the devices.
- Secure Your Physical Devices: Take physical security measures such as securing your iOS devices with strong passcodes or biometric authentication, and keeping them updated with the latest operating system updates.
By leveraging the security features provided by the Apple Home App, you can maximize the safety and protection of your smart home. Implementing these measures ensures that your smart home ecosystem remains secure, giving you peace of mind and allowing you to fully enjoy the convenience and benefits of a connected home.