
History of Ethernet
Ethernet, one of the most widely used networking technologies today, has a rich history that dates back to the 1970s. It was developed primarily by Robert Metcalfe and his team at Xerox Corporation’s Palo Alto Research Center (PARC).
The origins of Ethernet can be traced back to the need for a reliable and efficient method of connecting computers and other devices together to share resources and data. In the early days of computing, networks relied on serial connections and coaxial cables, which were slow and cumbersome.
The breakthrough came in 1973 when Robert Metcalfe and his team proposed the concept of Ethernet, a local area network (LAN) technology that used a shared communication medium called a coaxial cable to connect multiple devices. The idea was to allow computers to communicate with each other at high speeds, enabling fast and efficient data transfer.
In 1976, the first Ethernet specification, known as Ethernet Version 1.0, was published. It outlined the basic principles of Ethernet, including the use of a carrier sense multiple access with collision detection (CSMA/CD) protocol. This protocol allowed multiple devices to share the same communication medium without causing conflicts or data loss.
Over the years, Ethernet evolved and improved, leading to the development of new standards and technologies. In the 1980s, twisted pair cables and hubs were introduced, providing a more cost-effective and flexible solution for Ethernet networks. This gave rise to the popular 10Base-T standard, which allowed Ethernet to be deployed over commonly available copper cables.
Throughout the 1990s and 2000s, Ethernet continued to evolve, with the introduction of faster data transfer rates and the adoption of fiber optic cables. This enabled Ethernet networks to achieve even higher speeds, making it suitable for demanding applications such as data centers and high-performance computing.
Today, Ethernet has become the de facto standard for wired networking and is widely used in homes, businesses, and data centers around the world. It has seen many advancements, including the introduction of Gigabit Ethernet, 10 Gigabit Ethernet, and even faster technologies like 40 Gigabit Ethernet and 100 Gigabit Ethernet.
In summary, the history of Ethernet is a testament to the ingenuity and innovation of the early pioneers in computer networking. From its humble beginnings to its current ubiquity, Ethernet has revolutionized the way we connect and share information.
What is an Ethernet Port?
An Ethernet port is a physical interface on a device, such as a computer, router, or switch, that allows it to connect to an Ethernet network. It is also known as an Ethernet jack or Ethernet socket. The Ethernet port serves as a gateway for data transfer between the device and the network, enabling communication and connectivity.
The Ethernet port is designed to accommodate an Ethernet cable, which carries the data signals. It provides a secure and reliable connection for data transmission, ensuring efficient and high-speed communication between devices.
When a device is connected to an Ethernet port, it becomes part of a local area network (LAN) and can communicate with other devices on the network. This allows for the sharing of resources, such as files, printers, and internet connectivity.
Ethernet ports can support different speeds and standards, such as 10/100 Mbps (megabits per second) or Gigabit Ethernet (1000 Mbps). The speed and capabilities of an Ethernet port depend on the device and its network adapter.
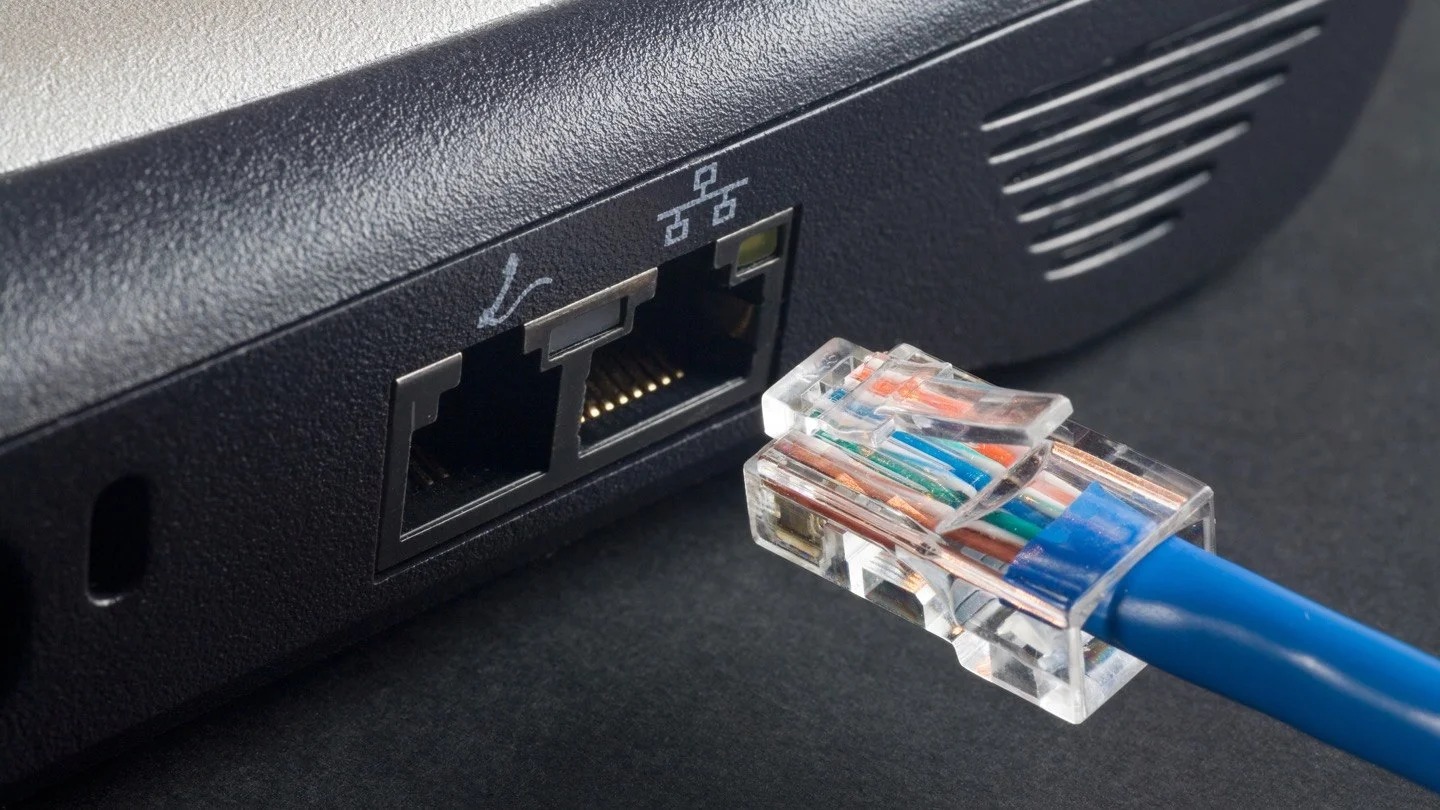
Typically, an Ethernet port uses an RJ-45 connector, which is a standard connector for Ethernet cables. The RJ-45 connector has eight pins that align with corresponding pins in the Ethernet port. When the cable is inserted into the port, these pins establish a physical and electrical connection, allowing data to flow between the device and the network.
With the advent of wireless networking technologies, such as Wi-Fi, Ethernet ports may seem less relevant. However, Ethernet ports still play a crucial role in many scenarios. They provide a reliable and stable connection, making them ideal for devices that require high-speed and uninterrupted data transfer, such as gaming consoles, desktop computers, and network servers.
In addition to providing connectivity, Ethernet ports can also power devices through Power over Ethernet (PoE) technology. PoE-enabled Ethernet ports supply electrical power to connected devices, eliminating the need for separate power cables.
In summary, an Ethernet port is a crucial component of a device that enables it to connect to an Ethernet network. It provides a secure and reliable data connection, facilitating seamless communication and network access.
Types of Ethernet Ports
Ethernet technology has evolved over the years, resulting in different types of Ethernet ports with varying capabilities and speeds. Understanding the different types of Ethernet ports can help you choose the right equipment for your networking needs. Here are some commonly used Ethernet port types:
1. 10BASE-T Ethernet Port: This is the earliest and slowest type of Ethernet port, capable of supporting data transfer speeds of up to 10 Mbps. It uses unshielded twisted pair (UTP) cables and is often found in older devices and legacy networks.
2. 100BASE-T Ethernet Port: Also known as Fast Ethernet, this type of Ethernet port supports data transfer speeds of up to 100 Mbps. It uses UTP cables and is commonly found in home networks, small businesses, and older devices.
3. 1000BASE-T Ethernet Port: This is the standard Gigabit Ethernet port, capable of supporting data transfer speeds of up to 1 Gbps (1000 Mbps). It uses UTP cables and is widely used in modern networking equipment, including routers, switches, and network adapters.
4. 10GBASE-T Ethernet Port: This type of Ethernet port is designed for high-speed connections and can support data transfer speeds of up to 10 Gbps. It uses thicker and more expensive cabling, such as Cat6a or Cat7, to achieve these speeds. 10GBASE-T ports are commonly found in data centers and enterprise networks.
5. 40GBASE-T and 100GBASE-T Ethernet Ports: These are the latest Ethernet port types, designed for ultra-high-speed connections. 40GBASE-T supports data transfer speeds of up to 40 Gbps, while 100GBASE-T can achieve speeds of up to 100 Gbps. These ports require specialized cabling, such as Cat8, and are primarily used in data centers and other high-performance networking environments.
It’s important to note that the compatibility between different types of Ethernet ports may vary. While newer ports are designed to be backward compatible with older ones, it’s essential to ensure that your networking equipment supports the required port type for seamless connectivity.
In summary, the various types of Ethernet ports offer different speeds and capabilities, catering to diverse networking requirements. Whether you need a basic 10 Mbps connection or a high-speed 10 Gbps or higher, choosing the right Ethernet port type is crucial for building a reliable and efficient network infrastructure.
Physical Features of an Ethernet Port
An Ethernet port, also known as an Ethernet jack or socket, has distinctive physical features that enable it to connect to an Ethernet network. Understanding the physical aspects of an Ethernet port can help in identifying and utilizing it effectively. Here are the key physical features of an Ethernet port:
1. Connector: An Ethernet port typically uses an RJ-45 connector, which is a rectangular plastic plug with eight pins. The connector securely attaches to the port and allows for the transfer of data signals between the device and the network.
2. LED Indicators: Many Ethernet ports have built-in LED indicators that provide visual feedback about the port’s status and activity. Common indicators include link/activity, indicating whether a connection is established and if there is data transfer, and speed indicators, showing the current speed of the connection (e.g., 10/100/1000 Mbps).
3. Physical Orientation: Ethernet ports are usually located on the back or side of devices, such as computers, routers, switches, and network adapters. The physical orientation can vary, but the most common alignment is with the port opening facing downwards or towards the edge of the device.
4. Design and Labeling: While the general appearance of Ethernet ports may be similar, specific devices may have their own design and labeling conventions. The labeling can include indicators such as “LAN,” “Ethernet,” or specific port numbers (e.g., “Ethernet Port 1” or “Port 2”). This labeling helps identify and differentiate multiple Ethernet ports on a device.
5. Port Cover or Flap: Some Ethernet ports may come with a cover or flap to protect the connector when not in use. This cover helps prevent dust accumulation and physical damage to the port. It can be flipped open to access the port when needed and closed to keep it protected when unused.
6. Mounting Options: Ethernet ports can be found in different types of devices with various mounting options. For example, they may be integrated into the motherboard of a computer or installed on the backplate of a network switch. The mounting method can vary, depending on the device and its intended use.
It’s important to handle Ethernet ports with care to avoid any damage to the connectors or the device itself. Proper insertion and removal of Ethernet cables, avoiding excessive force, and keeping the ports clean can help maintain their integrity and ensure reliable connectivity.
In summary, Ethernet ports have distinct physical features that make them easily identifiable and functional. From the connector and LED indicators to the port orientation and labeling, understanding these features enables users to effectively connect their devices to Ethernet networks for seamless data transfer and communication.
How Ethernet Ports Work
Ethernet ports play a crucial role in facilitating communication and data transfer within an Ethernet network. Understanding how Ethernet ports work can shed light on how devices connect and exchange information. Here is an overview of how Ethernet ports function:
1. Carrier Sense Multiple Access/Collision Detection (CSMA/CD): Ethernet ports use a protocol called CSMA/CD to regulate the transmission of data. Before sending data, the port senses the carrier, which refers to the presence of signals on the network. If there is no signal indicating ongoing transmission, the port sends its data. However, if the port detects another transmission, a collision occurs, and the data is automatically retransmitted after a random time delay.
2. MAC Addresses: Each Ethernet port has a unique identifier known as a Media Access Control (MAC) address. The MAC address consists of six sets of hexadecimal numbers (e.g., 00:1A:2B:3C:4D:5E) and is hard-coded into the network interface card (NIC) of the device. MAC addresses are used to distinguish devices within the network and ensure the data reaches the intended recipient.
3. Frame Structure: Data transmitted through Ethernet ports is encapsulated in frames. Each frame consists of various components, including the preamble, destination MAC address, source MAC address, type/length field, data payload, and cyclic redundancy check (CRC) for error detection. These components help ensure the integrity of the data and allow devices to decipher and process the information accurately.
4. Switching: Ethernet ports are often connected to Ethernet switches, which allow for efficient interconnectivity within the network. Switches utilize MAC address tables to store information about the MAC addresses of connected devices. When data is sent to a specific MAC address, the switch uses the table to determine the port to which the device is connected, ensuring the data reaches its intended destination.
5. Data Transmission: Ethernet ports transmit data in the form of electrical signals over copper cables or as light signals through fiber optic cables. These signals encode the data in binary format, using variations in voltage or light intensity to represent ones and zeros. The receiving Ethernet port decodes the signals back into meaningful data.
6. Full-Duplex and Half-Duplex: Ethernet ports can operate in either full-duplex or half-duplex mode. In full-duplex mode, data can be transmitted and received simultaneously, allowing for faster and more efficient communication. In half-duplex mode, data transmission and reception occur alternately, which can lead to increased latency and reduced throughput.
In summary, Ethernet ports utilize CSMA/CD, MAC addresses, frame structures, switching, and data transmission mechanisms to enable devices to communicate within an Ethernet network. By understanding how Ethernet ports work, users can make informed decisions when setting up and troubleshooting their network connections.
Connecting Devices to an Ethernet Port
Connecting devices to an Ethernet port is a straightforward process that ensures reliable and high-speed network connectivity. Whether you’re setting up a new device or expanding an existing network, here’s a step-by-step guide on how to connect devices to an Ethernet port:
1. Ensure Proper Equipment: Make sure you have the necessary equipment, including an Ethernet cable and a device with an Ethernet port, such as a computer, gaming console, or network device like a router or switch.
2. Locate the Ethernet Port: Identify the Ethernet port on your device. It is usually labeled “Ethernet” or depicted with an icon resembling horizontal bars or a network plug. The port is typically located on the back or side of the device.
3. Prepare the Ethernet Cable: Take one end of the Ethernet cable and inspect it. Ensure that it is free from any bends or damage. If necessary, straighten the cable to avoid any signal interference.
4. Insert the Ethernet Cable: Take the prepared Ethernet cable and insert one end into the Ethernet port on the device. Line up the connector with the port and gently push it in until it clicks into place. Be careful not to force it or bend the pins.
5. Connect the Other End: Take the other end of the Ethernet cable and insert it into the corresponding Ethernet port on the network device, such as a router or switch. Again, ensure the connector aligns correctly with the port and push it in until it locks into place.
6. Verify Connection: Once both ends of the Ethernet cable are securely connected, verify the connection by checking for LED indicators on the Ethernet port. The LED indicators should light up, indicating a successful connection.
7. Configure Network Settings: In some cases, you may need to configure network settings on your device. This can involve assigning an IP address, gateway, and DNS server settings either manually or through automatic configuration via Dynamic Host Configuration Protocol (DHCP).
8. Test Connectivity: To ensure successful connectivity, test the connection by accessing the internet or communicating with other devices on the network. Open a web browser, send a ping command, or access shared resources to verify network access.
By following these steps, you can connect devices to an Ethernet port and enjoy reliable, high-speed network connectivity. Ethernet connections are typically more stable and offer higher bandwidth compared to wireless connections, making them ideal for devices that require fast and uninterrupted data transfer, such as gaming consoles, desktop computers, and network devices.
Setting Up an Ethernet Network
Setting up an Ethernet network allows you to create a reliable and high-speed wired network infrastructure. Whether you’re establishing a small home network or deploying a larger network in a business or educational setting, here are the key steps to set up an Ethernet network:
1. Plan your Network: Determine the scope of your network and identify the devices that need to be connected. Consider factors such as the number of devices, their locations, and the desired network topology.
2. Acquire Networking Equipment: Purchase the necessary equipment, including a modem (if connecting to the internet), a router, Ethernet switches, and Ethernet cables. Ensure the equipment matches your network requirements, such as the number of ports and the desired network speed.
3. Connect the Modem: If you want to connect your network to the internet, connect the modem to your internet service provider’s (ISP) network outlet using an Ethernet cable. Connect the other end of the cable to the WAN or Internet port on your router.
4. Connect the Router: Connect the router to a power source and use an Ethernet cable to connect one of its LAN ports to the Ethernet switch. This will serve as the central hub for your network. Some routers have built-in switches, eliminating the need for an additional external switch.
5. Connect Devices to the Switch: Use Ethernet cables to connect devices, such as computers, printers, and servers, to the Ethernet switch. Plug one end of the cable into the Ethernet port on each device and the other end into an available port on the switch.
6. Verify Network Connectivity: Power on the devices and check for network connectivity. Ensure that the devices receive IP addresses and can communicate with each other. You should also verify internet connectivity by accessing websites or performing network tests.
7. Configure Network Settings: Access the router’s administration interface through a web browser and configure network settings. This may include setting up wireless access, creating network passwords, enabling security features, and configuring port forwarding if needed.
8. Expand and Manage the Network: If you need to expand your network, you can connect additional Ethernet switches to available ports on the router or existing switch. Use Ethernet cables to connect devices to the new switch. Additionally, consider implementing network management tools to monitor and manage your network effectively.
By following these steps, you can successfully set up an Ethernet network. Ethernet networks offer reliable and high-speed connectivity, making them suitable for various applications, including home networks, small businesses, large enterprises, and educational institutions.
Troubleshooting Ethernet Port Issues
While Ethernet connections are generally reliable, there may be instances where you encounter issues with your Ethernet port. Troubleshooting these issues can help you identify and resolve any problems effectively. Here are some common Ethernet port issues and troubleshooting steps:
1. No Connection or Limited Connectivity: If there is no connection or limited connectivity, first check the Ethernet cable connections. Ensure that the cables are securely plugged into both the Ethernet port and the connected device or switch. Try swapping the cable with a known-working one to rule out a faulty cable.
2. Link or Activity LED Not Lit: If the LED indicators on the Ethernet port are not lit, it may indicate a power issue or a faulty Ethernet port. Verify that the device is powered on and that the Ethernet cable is functioning properly. If the issue persists, try connecting the device to a different Ethernet port to see if the problem lies with the port itself.
3. Slow or Intermittent Connection: A slow or intermittent connection can be caused by various factors. Check for any physical damage or interference with the Ethernet cable. Additionally, ensure that the device’s network settings are properly configured and that the network infrastructure, such as the router or switch, has adequate performance capabilities.
4. IP Address Issues: If the device does not get an IP address or is assigned an incorrect IP address, try renewing the IP address through the network settings or restarting the device. You can also check the DHCP settings on your router or switch to ensure the DHCP server is functioning correctly.
5. Driver or Firmware Updates: Outdated drivers or firmware can cause compatibility issues with the Ethernet port. Check the manufacturer’s website for the latest driver or firmware updates for your device. Install the updates to ensure optimal performance and compatibility.
6. Network Adapter Configuration: Sometimes, the network adapter configuration may cause connectivity problems. Ensure that the network adapter settings, such as duplex mode, speed, and auto-negotiation, are correctly configured. The settings should match the capabilities of your network infrastructure.
7. Restart Networking Devices: If you are experiencing persistent connectivity issues, try restarting your networking devices, including the router, switches, and any connected network devices. Power cycling the devices can sometimes resolve temporary glitches or conflicts in the network.
8. Seek Professional Assistance: If you have exhausted your troubleshooting efforts and are still experiencing issues with your Ethernet port, it may be beneficial to consult a professional network technician. They can provide advanced diagnostics, identify complex networking issues, and offer specialized solutions.
By following these troubleshooting steps, you can diagnose and resolve common Ethernet port issues. It’s important to systematically eliminate possible causes, check all physical connections, and verify network configurations to ensure optimal Ethernet connectivity.