
What is Boot Camp Assistant?
Boot Camp Assistant is a built-in utility that comes with macOS, specifically designed to enable Mac users to install and run Windows operating system on their machines. It allows you to have the best of both worlds by providing a seamless way to switch between macOS and Windows on your Mac.
With Boot Camp Assistant, you can create a separate partition on your Mac’s hard drive to install Windows, effectively transforming your Mac into a dual-boot system. This means you can choose to boot into either macOS or Windows when you start up your computer.
Boot Camp Assistant simplifies the Windows installation process by automatically creating a Windows support software package, which includes all the necessary drivers for your Mac hardware. This ensures that your Windows installation has full functionality and compatibility with your Mac’s hardware components.
It is worth noting that Boot Camp Assistant is only compatible with Intel-based Mac computers, so if you have an older Mac with a PowerPC processor, you will not be able to use this utility. Additionally, Boot Camp Assistant supports a wide range of Windows versions, including Windows 7, Windows 8.1, and Windows 10.
The utility also provides an easy-to-follow step-by-step guide throughout the installation process, making it accessible even for users with limited technical knowledge. Boot Camp Assistant takes care of partitioning your hard drive, downloading the necessary Windows drivers, and guiding you through the Windows installation. Once Windows is installed, it even helps you set up your Mac to dual-boot between macOS and Windows.
Overall, Boot Camp Assistant is a powerful tool that allows Mac users to expand their computing capabilities by easily installing and using Windows on their Macs. Whether you need to run Windows-specific software, play Windows-only games, or simply dabble in a different operating system, Boot Camp Assistant provides a straightforward and reliable way to achieve that.
Why would you want to install Windows on your Mac?
While macOS offers a user-friendly and secure computing experience, there are several reasons why you might want to install Windows on your Mac. Here are some common scenarios where having Windows on your Mac could be beneficial:
- Software Compatibility: Certain software applications, especially industry-specific or legacy software, are only compatible with Windows. By installing Windows on your Mac, you gain access to a wider range of software options and can run specialized programs that are essential for your work or hobbies.
- Gaming: Although Macs have become more gaming-friendly in recent years, the availability of games for macOS still lags behind that of Windows. By installing Windows on your Mac, you can enjoy a broader selection of games and take advantage of the latest gaming technologies.
- Education or Work: If you are a student or professional in a field that requires Windows-specific software or tools, having Windows on your Mac can ensure compatibility and streamline your work or studies. This is particularly true for disciplines such as engineering, architecture, or finance, where certain applications are Windows-only.
- Testing and Development: If you are a developer or IT professional, having access to both macOS and Windows on your Mac allows you to test your software or websites on multiple platforms. This ensures cross-platform compatibility and allows you to troubleshoot any issues that may arise on either operating system.
- Specific Features or Functions: Some Windows features, such as certain productivity software, multimedia applications, or device management tools, may be more appealing or efficient for your specific needs. By installing Windows on your Mac, you can take advantage of these features while still benefiting from macOS’s other advantages.
Overall, installing Windows on your Mac gives you the flexibility to use both operating systems seamlessly, catering to your various needs and preferences. Whether it’s for software compatibility, gaming, productivity, or specialized work requirements, having Windows on your Mac expands your computing possibilities and ensures you have the best of both worlds.
Is your Mac compatible with Boot Camp Assistant?
Before diving into the process of installing Windows on your Mac using Boot Camp Assistant, it’s important to ensure that your Mac meets the compatibility requirements. Boot Camp Assistant is compatible with most Intel-based Mac computers, but there are a few things you need to consider:
- Processor type: Boot Camp Assistant requires an Intel processor to function properly. If your Mac has an older PowerPC processor, unfortunately, it is not compatible with Boot Camp Assistant.
- Supported macOS version: Ensure that your Mac is running a version of macOS that is supported by Boot Camp Assistant. You can check the system requirements on Apple’s official website to confirm compatibility.
- Available storage space: Installing Windows requires a substantial amount of disk space. You will need to have sufficient free space on your Mac’s hard drive to create a separate partition for Windows. Apple recommends having at least 64GB of free space, but it’s a good idea to have more if possible, especially if you plan to install a large number of applications or games.
- Memory (RAM) requirements: While there are no specific RAM requirements for Boot Camp Assistant, it’s generally recommended to have a sufficient amount of memory for smooth operation. Apple recommends a minimum of 4GB of RAM, but having 8GB or more will provide a better experience, particularly when running resource-intensive applications in Windows.
- Graphics card requirements: Some graphics-intensive applications or games may have specific graphics card requirements. Make sure that your Mac’s graphics card meets the minimum system requirements for the software you intend to use.
If your Mac meets the compatibility requirements listed above, you should be able to proceed with installing Windows using Boot Camp Assistant. However, it’s always a good idea to check Apple’s official documentation or contact their support if you have any specific questions or concerns about your Mac’s compatibility with Boot Camp Assistant.
Taking the time to confirm your Mac’s compatibility will help ensure a smooth installation process and prevent any potential issues that may arise during the installation of Windows.
Downloading and preparing the Windows ISO file
Before you can install Windows on your Mac using Boot Camp Assistant, you will need to download the Windows ISO file and prepare it for installation. Here’s a step-by-step guide to help you with this process:
- Check your Windows version: Determine the specific version of Windows you want to install on your Mac. Make sure it is compatible with Boot Camp Assistant and meets your requirements.
- Obtain a valid Windows ISO file: You can either purchase a Windows license and download the ISO file from Microsoft’s official website or use other trusted sources to acquire a legitimate ISO file.
- Verify the integrity of the ISO file: It is important to ensure the downloaded ISO file is not corrupted. You can use tools like HashTab or MD5 Checker to generate a hash value for the ISO file and compare it to the provided hash value from the official source.
- Create a bootable USB drive or DVD: Once you have confirmed the integrity of the ISO file, you need to create a bootable media to install Windows. You can use tools like Rufus or the built-in Disk Utility on macOS to create a bootable USB drive or burn the ISO file to a DVD.
- Prepare the bootable media: Connect the USB drive to your Mac or insert the DVD. If you’re using a USB drive, make sure it is empty as the Boot Camp Assistant will format it during the installation process.
- Open Boot Camp Assistant: Go to the “Applications” folder, select “Utilities,” and then click on “Boot Camp Assistant” to launch the utility.
- Follow the on-screen instructions: Boot Camp Assistant will guide you through the process of partitioning your hard drive and installing Windows. When prompted, select the Windows ISO file and the desired partition size for Windows.
- Wait for the installation: Boot Camp Assistant will automatically restart your Mac and begin the Windows installation process using the bootable media. Follow the on-screen prompts to complete the installation.
- Activate Windows: Once Windows is installed, you will need to activate it using the product key that came with your Windows license. Follow the activation process provided by Microsoft.
By carefully downloading and preparing the Windows ISO file, you can ensure a smooth installation process when using Boot Camp Assistant. Remember to always obtain a valid and legitimate ISO file from a trusted source to avoid any potential issues or security risks.
Running Boot Camp Assistant
Once you have downloaded and prepared the Windows ISO file, you can proceed with running Boot Camp Assistant to begin the installation of Windows on your Mac. Here’s a step-by-step guide on how to use Boot Camp Assistant:
- Open Boot Camp Assistant: Boot Camp Assistant can be found in the “Applications” folder, under the “Utilities” subfolder. Launch the utility by clicking on its icon.
- Introduction screen: After launching Boot Camp Assistant, a welcome screen will appear. Read the information provided, and click “Continue” to proceed.
- Partitioning your hard drive: Boot Camp Assistant will ask you to partition your hard drive. This step allows you to allocate a specific amount of disk space for the Windows installation. Use the slider to adjust the partition size or enter the desired size manually. Click “Install” to start the partitioning process.
- Creating a Windows support software: Boot Camp Assistant will automatically download the necessary Windows support software package. This package includes drivers that enable your Mac hardware to work seamlessly with Windows. Ensure that the “Download the latest Windows support software from Apple” box is checked and click “Continue.”
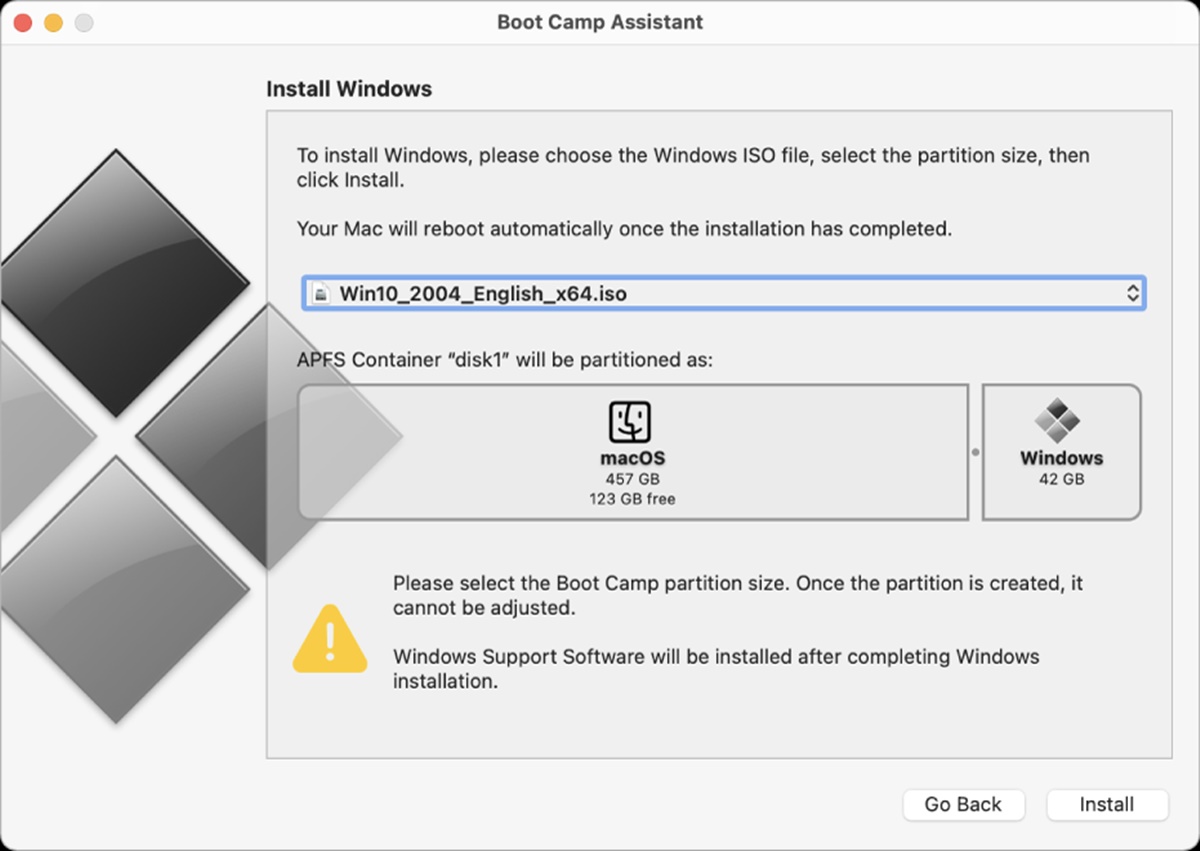
- Selecting the Windows ISO file: Boot Camp Assistant will ask you to select the Windows ISO file you prepared earlier. Click “Choose” and navigate to the location where the ISO file is stored. Select the file and click “Continue.”
- Creating a bootable USB drive: If you haven’t created a bootable USB drive or DVD yet, Boot Camp Assistant will provide an option to create one. Follow the on-screen instructions to create the bootable media if needed.
- Confirming the installation: Boot Camp Assistant will display a summary of the installation process. Review the information to ensure everything is correct. If you’re ready to proceed, click “Install” to start the installation of Windows.
- Installing Windows: Boot Camp Assistant will restart your Mac and boot from the Windows installation media. Follow the on-screen prompts to complete the installation process of Windows. This includes selecting the installation language, entering the Windows product key, and specifying the desired settings.
- Setting up Windows: Once the Windows installation is complete, you may be prompted to set up user accounts, network settings, and other preferences. Follow the on-screen instructions to customize your Windows experience.
Running Boot Camp Assistant is a straightforward process that guides you through the installation of Windows on your Mac. Take your time to follow each step carefully, and within no time, you’ll have a dual-boot system allowing you to switch between macOS and Windows on your Mac.
Partitioning your Mac’s hard drive
Partitioning your Mac’s hard drive is an essential step in the process of installing Windows using Boot Camp Assistant. This step involves creating a separate section on your hard drive dedicated to the Windows operating system. Here’s a step-by-step guide on how to partition your Mac’s hard drive:
- Open Boot Camp Assistant: Go to the “Applications” folder, select “Utilities,” and then click on “Boot Camp Assistant” to launch the utility.
- Introduction screen: Once Boot Camp Assistant is open, a welcome screen will appear. Read the information provided, and click “Continue” to proceed.
- Partition size: Boot Camp Assistant will ask you to specify the size of the partition for Windows. Use the slider to adjust the partition size according to your needs. You can also enter the desired size manually. Keep in mind that the macOS partition will remain untouched, so allocate enough space for Windows without compromising the available storage for macOS.
- Partitioning process: After specifying the partition size, click on “Install” to start the partitioning process. Boot Camp Assistant will resize your existing macOS partition and create a separate partition for Windows. This process might take some time depending on the size of your hard drive and the amount of data stored on it. It’s recommended to have a backup of your important files before proceeding.
- Formatting the partition: Once the partitioning process is complete, Boot Camp Assistant will prompt you to format the newly created partition. Select the partition and choose the format as “NTFS,” which is the recommended file system for Windows. Click “Continue” to begin the formatting process.
- Download the Windows support software: Boot Camp Assistant will automatically download the necessary Windows support software package. This package includes drivers that ensure your Mac hardware works seamlessly with Windows. Make sure the “Download the latest Windows support software from Apple” option is checked and click “Continue.”
- Finalizing the partition: After the Windows support software is downloaded, Boot Camp Assistant will display a summary of the partition setup. Review the information to confirm everything is correct. If you’re ready to proceed, click “Install” to finalize the partitioning process.
Partitioning your Mac’s hard drive with Boot Camp Assistant provides a clear separation between your macOS and Windows installations, allowing you to easily switch between the two operating systems. It’s essential to follow the partitioning process carefully, ensuring you allocate enough space for Windows while maintaining sufficient storage for macOS. Once the partitioning is complete, you’re ready to move on to the next steps of installing Windows using Boot Camp Assistant.
Installing Windows on your Mac
After partitioning your Mac’s hard drive using Boot Camp Assistant, you’re ready to proceed with the installation of Windows. This section will guide you through the process of installing Windows on your Mac:
- Restart your Mac: Restart your Mac while holding down the Option key. This will display the startup disk options.
- Select the Windows installation media: Use the arrow keys on your keyboard to select the Windows installation media (USB drive or DVD) labeled with the Windows logo. Once selected, press Enter to boot from the installation media.
- Language and other preferences: Select your preferred language, time, and currency format for the Windows installation. Click “Next” to proceed.
- Install now: Click on the “Install now” button to begin the installation process.
- Enter the product key: Enter the product key that came with your Windows license. This key activates your copy of Windows. Click “Next” to continue.
- Accept the license terms: Read and accept the license terms and conditions provided by Microsoft. Check the box next to “I accept the license terms” and click “Next.”
- Choose your installation type: Depending on your preference, select either “Upgrade” if you have a previous version of Windows and want to upgrade, or “Custom” if you want to perform a clean installation. For a fresh installation, select “Custom.”
- Select the partition: You will see a list of available partitions. Choose the partition labeled “BOOTCAMP” or the partition you created earlier for Windows. Select it and click “Next.”
- Windows installation: Windows will now begin the installation process. Follow the on-screen instructions to set up your account, choose privacy settings, and customize your Windows installation.
- Finalize the installation: Once the installation is complete, your Mac will restart. Follow the prompts to complete the final setup of Windows, including setting up a user account and configuring additional settings.
- Windows support software: After the Windows installation is finished, Boot Camp Assistant will automatically install the Windows support software that you downloaded earlier. This software ensures optimal performance and compatibility between your Mac hardware and Windows.
- Switching between macOS and Windows: To switch between macOS and Windows, restart your Mac and hold down the Option key. This will display the startup disk options, allowing you to choose between macOS and Windows.
The installation process may take some time, so be patient and follow the on-screen instructions carefully. Once Windows is successfully installed, you can enjoy the flexibility of dual-booting between macOS and Windows on your Mac.
Setting up Windows on your Mac
After installing Windows on your Mac using Boot Camp Assistant, you will need to perform the initial setup to configure Windows according to your preferences. Here’s a step-by-step guide on setting up Windows on your Mac:
- Welcome screen: After the Windows installation is complete, you will be greeted with a welcome screen. Click “Next” to proceed.
- Region and keyboard layout: Select your region and preferred keyboard layout. Click “Next” to continue.
- Connect to a network: Choose whether to connect your Windows installation to a network. If you have an available Wi-Fi network, you can connect to it by selecting your network and entering the network password. Alternatively, you can choose to skip this step and set up a network connection later.
- Sign in to your Microsoft account: If you have a Microsoft account, you can sign in to it to synchronize your settings, access the Windows Store, and enable other Microsoft services. If you don’t have an account or prefer not to sign in, you can click “Offline account” and proceed with a local account.
- Set up a user account: Create a new user account for your Windows installation. Enter a username and password, and choose whether to enable a password hint. Click “Next” to continue.
- Privacy settings: Customize your privacy settings according to your preferences. You can choose to accept the recommended settings or customize each option individually. Click “Next” to proceed.
- Choose a color scheme: Select your desired color scheme for the Windows interface. This is purely cosmetic and can be changed later if needed. Click “Next.”
- Set up OneDrive: If you have a Microsoft OneDrive account and want to set it up on your Windows installation, you can enter your account details here. You can also choose to skip this step and set up OneDrive later.
- Get to know Cortana: Cortana is Microsoft’s virtual assistant. You can choose to enable Cortana and follow the on-screen prompts to set it up, or you can choose to set it up later or not use it at all.
- Finalizing the setup: Windows will now take a few moments to apply the settings and prepare the desktop. Once the setup is complete, you will be taken to the Windows desktop, and you can start exploring and customizing your Windows experience.
Setting up Windows on your Mac is a crucial step to personalize your Windows installation and ensure it meets your specific preferences and requirements. Take the time to go through each step and adjust the settings according to your needs.
Troubleshooting common issues
While installing and running Windows on your Mac using Boot Camp Assistant is a relatively straightforward process, you may encounter some common issues along the way. Here are some troubleshooting tips to help you resolve these issues:
- Not enough free space for Windows: If you encounter an error message stating that there is not enough free space to install Windows, you may need to free up some space on your Mac’s hard drive. Delete unnecessary files or consider transferring files to an external storage device to create more space.
- Driver issues: Sometimes, after installing Windows using Boot Camp Assistant, you may experience driver-related issues, such as audio not working or graphics not displaying correctly. To resolve this, open the Boot Camp control panel in Windows and check for any available driver updates.
- Windows not booting properly: If Windows does not boot properly or you encounter a black screen, try holding down the Option key when restarting your Mac to access the startup disk options. From there, select the Windows partition to boot into Windows.
- Internet connectivity issues: If you are having trouble connecting to the internet in Windows, ensure that you have the necessary network drivers installed. You can check for driver updates in the Boot Camp control panel or download them manually from the manufacturer’s website using another device.
- Activation issues: If you encounter activation issues when trying to activate your Windows license, ensure that you have entered the correct product key. Verify the key and try again. If the issue persists, contact Microsoft support for further assistance.
- Mac-specific device compatibility: Some Mac-specific hardware components may not have full functionality in Windows. In such cases, check the Apple support website or contact Apple support for information on any available drivers or updates specific to your Mac model.
- Battery drain: If you notice that your Mac’s battery drains rapidly when running Windows, adjusting power and brightness settings within Windows can help optimize battery life. Additionally, keeping your Windows installation up to date with the latest updates and drivers can improve power management.
- Software compatibility: Certain software applications may not work as expected when running on Windows through Boot Camp on a Mac. It’s recommended to check the software developer’s website for any compatibility issues or updates specific to running their software on a Mac using Boot Camp.
If you continue to experience issues or encounter other problems not listed here, it is advisable to refer to official documentation, support forums, or contact Apple support or Microsoft support for further assistance. Resolving common issues during the installation and usage of Windows on your Mac will help ensure a smoother and more reliable experience.
Tips and tricks for using Windows on your Mac
When using Windows on your Mac through Boot Camp, there are several tips and tricks that can enhance your experience and make your workflow more efficient. Here are some helpful tips to get the most out of your Windows installation on your Mac:
- Customize the Boot Camp control panel: The Boot Camp control panel allows you to adjust various settings related to your Mac hardware in Windows. Take the time to explore the options available and customize them according to your preferences.
- Learn the keyboard shortcuts: Familiarize yourself with Windows keyboard shortcuts, as they can greatly enhance your productivity. Many macOS keyboard shortcuts can also be used in Windows, but there are additional Windows-specific shortcuts you can learn as well.
- Utilize virtual desktops: Windows 10 introduced the feature of virtual desktops, allowing you to create multiple desktops for different tasks or projects. This can help you stay organized and switch between different workspaces quickly.
- Install antivirus software: Just like on macOS, it’s crucial to have antivirus software installed on your Windows installation to protect against malware and viruses. Choose a reliable antivirus program and keep it up to date to ensure optimal security.
- Utilize cloud storage: If you have limited storage space on your Mac, consider utilizing cloud storage solutions like Dropbox, OneDrive, or Google Drive to store and sync your files across both macOS and Windows.
- Keep both macOS and Windows up to date: Regularly check for updates for both macOS and Windows. Keeping your operating systems up to date ensures you have the latest security patches, bug fixes, and compatibility improvements.
- Configure automatic updates: To ensure your Windows installation stays up to date, configure automatic updates in the Windows settings. This way, critical updates will be installed automatically, reducing the risk of security vulnerabilities.
- Take advantage of Windows-specific software: Windows offers a vast collection of software applications that may not be available on macOS. Explore different types of software and discover new tools that can enhance your productivity, gaming experience, or creative projects.
- Use virtualization software: If you require seamless integration between macOS and Windows applications, consider using virtualization software like Parallels Desktop or VMware Fusion. These programs allow you to run Windows within macOS, bringing the two operating systems together.
- Explore gaming options: If you’re a gamer, browse the wide selection of games available for Windows. Take advantage of the performance capabilities of your Mac and enjoy a variety of gaming experiences that may not be available on macOS.
By utilizing these tips and tricks, you can optimize your Windows experience on your Mac and make the most out of your dual-boot setup. Whether it’s customizing settings, mastering keyboard shortcuts, or exploring new software and gaming options, embracing Windows on your Mac opens up a world of possibilities.