
Create a New Automator Workflow
To begin utilizing the powerful automation capabilities of Automator, the first step is to create a new workflow. This can be easily done by following these simple steps:
- Open Automator by navigating to the Applications folder and selecting Automator.
- Once Automator opens, you will be prompted to choose a document type for your new workflow. Select ‘Workflow’ and click ‘Choose’.
- A blank workflow window will appear, ready for you to start adding actions.
Creating a new Automator workflow provides a blank canvas for you to add, modify, and customize actions that will perform specific tasks on files and folders. This allows you to automate repetitive actions and save time in the long run.
Automator provides a wide range of built-in actions that can be combined and customized to meet your specific needs. With these actions, you can manipulate files, apply filters, modify image files, and much more.
Once you have created a new workflow, you can begin adding actions by simply dragging and dropping them onto the workflow window. Actions can be added from the left-hand sidebar or searched for using the search bar at the top of the Automator window.
Actions are like building blocks that can be stacked together to create a sequence of tasks to perform on your files and folders. You can arrange, delete, and modify actions as needed to achieve the desired workflow.
The ability to create your own workflow allows you to customize and automate tasks exactly as you need them. Whether you want to batch rename files, resize images, convert file formats, or perform other common tasks, Automator provides the tools to do so efficiently.
By creating a new Automator workflow, you empower yourself with the ability to automate repetitive tasks and streamline your workflow. With a little creativity and experimentation, you can unlock the full potential of Automator and save valuable time and effort.
Choose the ‘Rename Finder Items’ Action
Once you have created a new Automator workflow, the next step is to select the appropriate action to rename the files or folders. In this case, we will focus on the ‘Rename Finder Items’ action. Follow these steps to add and customize this action:
- Click on the ‘Actions’ button in the top-left corner of the Automator window.
- In the search bar, type ‘Rename Finder Items’ to locate the action.
- Double-click on the ‘Rename Finder Items’ action or drag and drop it into the workflow window.
The ‘Rename Finder Items’ action allows you to rename multiple files or folders simultaneously by applying various techniques and conditions. This powerful action gives you the flexibility to organize your files according to your specific requirements.
Once you have added the ‘Rename Finder Items’ action to your workflow, you can customize it to match your renaming preferences. The action offers several options, including:
- Name Single Item: This option allows you to specify a new name for a single file or folder.
- Add Text: With this option, you can add a prefix or suffix to the existing file or folder name.
- Change Case: This option enables you to change the case of the file or folder name to uppercase, lowercase, or title case.
- Replace Text: You can use this option to find and replace specific text in the file or folder name.
- Format: This option allows you to apply a specific format, such as a date or time format, to the file or folder name.
These customization options provide you with the flexibility to rename your files and folders according to your specific requirements. You can combine these options and even add additional actions to further enhance your renaming workflow.
By selecting the ‘Rename Finder Items’ action and customizing it to your liking, you can efficiently rename multiple files or folders in a consistent and organized manner. This allows you to keep your files neatly arranged and easily searchable, saving you precious time and effort.
Set the Workflow to Rename Files or Folders
Once you have chosen the ‘Rename Finder Items’ action in your Automator workflow, the next step is to configure the settings to specify whether you want to rename files, folders, or both. Here’s how you can set the workflow to rename files or folders:
- Double-click on the ‘Rename Finder Items’ action in the workflow window to access its settings.
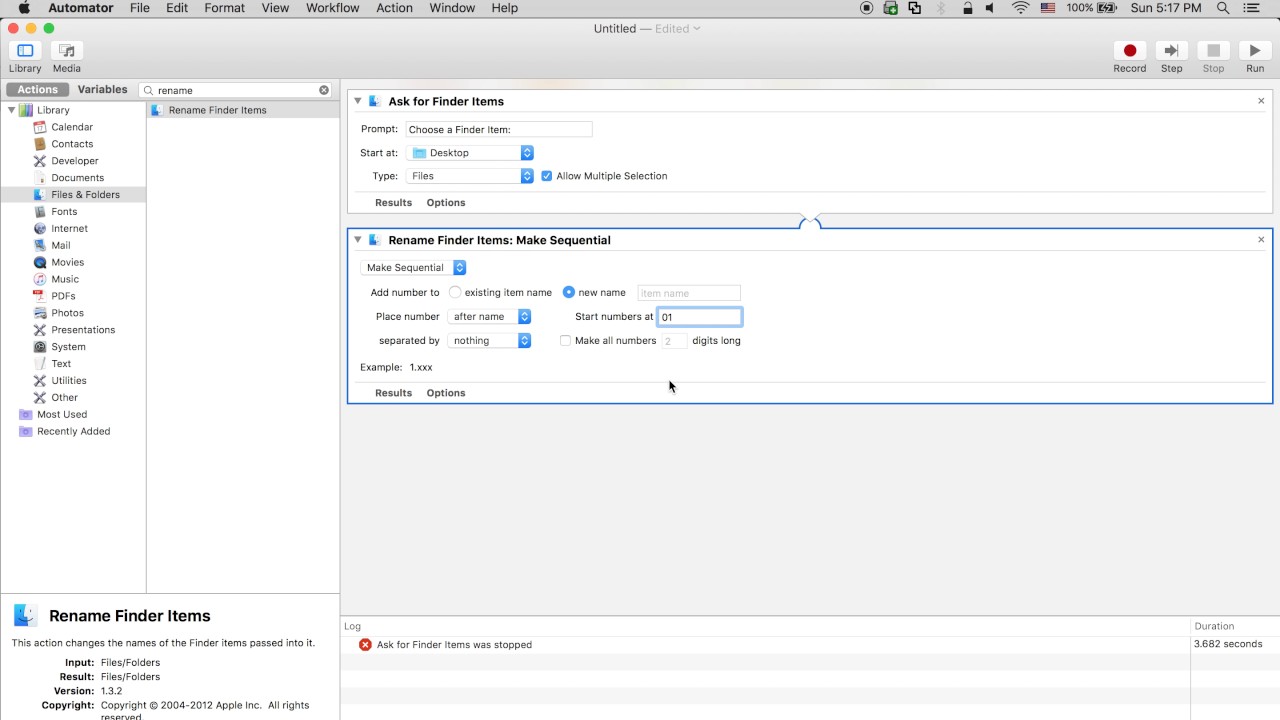
- In the ‘Rename Finder Items’ action settings, you will see options for ‘Rename’ and ‘Make Sequential’.
- To rename files, select the ‘Rename’ option, and ensure that ‘Files’ is selected in the ‘Options’ dropdown menu.
- To rename folders, select the ‘Rename’ option, and ensure that ‘Folders’ is selected in the ‘Options’ dropdown menu.
- If you want to rename both files and folders, select the ‘Rename’ option, and ensure that ‘Both’ is selected in the ‘Options’ dropdown menu.
By setting the workflow to rename files or folders, you can specify the scope of your renaming operations. This flexibility allows you to choose whether you want to focus exclusively on files, folders, or both, depending on your specific needs.
Additionally, the ‘Make Sequential’ option in the ‘Rename Finder Items’ action settings enables you to assign sequential numbers to the renamed files or folders. This feature is particularly useful when you want to maintain a specific order or sequence for your files or folders.
With the ability to customize the workflow settings, you can ensure that your renaming actions target the appropriate files, folders, or both. This level of control enhances the efficiency and precision of your automation process.
Remember to preview your workflow settings before executing the automation. This step allows you to verify that the renaming workflow is configured correctly and will produce the desired results.
By setting the workflow to rename files, folders, or both, you can streamline your organization process and maintain consistent naming conventions. This not only enhances the organization and accessibility of your files but also saves you valuable time when managing large volumes of data.
Select the Files or Folders to Rename
After configuring the naming options in your Automator workflow, the next step is to select the files or folders that you want to rename. Here’s how you can do it:
- In your Automator workflow, locate and add the appropriate action for selecting the files or folders.
- There are several actions available for selecting files or folders, such as the ‘Get Specified Finder Items’ action or the ‘Ask for Finder Items’ action.
- If you already know the specific files or folders you want to rename, you can use the ‘Get Specified Finder Items’ action. Simply drag and drop it into your workflow and add the files or folders by clicking the ‘+’ button.
- If you want to dynamically select the files or folders during the workflow execution, you can use the ‘Ask for Finder Items’ action. This action will prompt you to choose the necessary files or folders when the workflow runs.
By using the appropriate action to select the files or folders, you can ensure that only the intended items are included in the renaming process. This allows you to have more control over the scope of the automation and prevents renaming unintended files or folders.
Furthermore, you can combine the selection action with other actions in your workflow to filter and refine the set of items to be renamed. For example, you can add conditions to the workflow to include files or folders based on specific criteria, such as file extensions, creation dates, or file attributes.
The ability to selectively choose the files or folders to rename provides you with the flexibility and precision to tailor the automation to your specific needs. This level of control ensures that the renaming process is accurate and minimizes the chances of any unintended changes.
Before executing the workflow, it is recommended to preview the selected files or folders to verify that the correct items have been included. This step allows you to double-check the selection and make any necessary adjustments before performing the renaming actions.
By selecting the files or folders to rename, you can streamline the automation process and focus on the specific items that require renaming. This improves efficiency, reduces the risk of errors, and saves you valuable time when managing your files or folders.
Use Variables and Conditions for Customized Renaming
Automator provides powerful features that allow you to apply variables and conditions to customize your file or folder renaming process. By incorporating variables and conditions into your workflow, you can achieve highly personalized and dynamic renaming actions. Here’s how you can utilize these features:
- Within your Automator workflow, locate and add actions that allow for variables and conditions.
- Actions like ‘Set Value of Variable’, ‘If’, and ‘Ask for Text’ enable you to introduce variables and conditions to your renaming workflow.
- Use the ‘Set Value of Variable’ action to assign a value to a variable. This can be useful when you want to capture specific attributes or information from the selected files or folders for renaming purposes.
- The ‘If’ action allows you to set conditions based on specific criteria. You can define rules such as file type, file size, or any other relevant attribute to conditionally perform renaming actions.
- The ‘Ask for Text’ action enables you to prompt the user to input custom text or values during the workflow execution. This can be handy for adding unique identifiers or user-provided names to the renamed files or folders.
By utilizing variables and conditions, you can create more flexible and dynamic renaming workflows. For example, you can generate file names based on a combination of variables and conditions, allowing for customized and specific results.
Variables can be used to store and manipulate information, such as file names, file extensions, or even timestamps. You can then incorporate these variables into the renaming actions to achieve unique and tailored results.
Conditions, on the other hand, allow you to perform renaming actions based on specific criteria. This level of control ensures that the renaming process adapts to different scenarios and follows predefined rules, enhancing the flexibility and accuracy of the automation.
A crucial aspect of using variables and conditions is testing your renaming workflow thoroughly. By including sample files or folders that cover different scenarios, you can evaluate the results and adjust the variables and conditions as needed until you achieve the desired outcome.
With the ability to incorporate variables and conditions within your renaming workflow, you can create customized and dynamic renaming actions. This flexibility empowers you to handle various renaming scenarios effectively and efficiently, making your workflow more personalized and adaptable.
Test and Execute the Automator Workflow
After setting up your Automator workflow and customizing the renaming actions, it is essential to test and execute the workflow to ensure that it performs as intended. Here are the steps to properly test and execute your Automator workflow:
- Review the entire workflow to confirm that all actions are in the correct order and configured properly.
- Save your Automator workflow by clicking on ‘File’ in the menu bar, selecting ‘Save’, and providing a name for your workflow.
- Select a set of sample files or folders that you want to test the workflow on.
- Drag and drop the selected files or folders onto the Automator workflow icon or open the workflow and use the ‘Run’ button on the top right corner of the Automator window.
- Observe the execution of the workflow and review the results to ensure that the files or folders were renamed correctly.
- If necessary, make any adjustments to the workflow settings, actions, or variables based on the test results.
Testing your Automator workflow with sample files or folders is crucial to verify that the renaming actions produce the desired outcomes. It allows you to catch any potential issues or misconfigurations before applying the workflow to a large number of files.
During the testing process, carefully assess the renaming process to ensure that the files or folders are renamed accurately and according to your specific requirements. Pay attention to any error messages or unexpected behavior that may indicate a problem with the workflow.
If you encounter any issues or undesired results during the testing phase, review the workflow settings, actions, and variables to identify the source of the problem. You may need to make adjustments, refine your conditions, or modify the order of actions to resolve any issues and improve the workflow.
Additionally, it is a good practice to back up your files or folders before running the workflow to mitigate the risk of any accidental data loss or unintended changes.
By thoroughly testing your Automator workflow and making necessary adjustments, you can ensure the reliability and effectiveness of your renaming automation. This allows you to confidently apply the workflow to your desired files or folders, saving time and effort in managing your data.
Save and Use the Automator Workflow
Once you have tested and fine-tuned your Automator workflow, the final step is to save it and utilize it for your renaming needs. Here’s how you can save and use your Automator workflow:
- Click on ‘File’ in the menu bar and select ‘Save’ to save your Automator workflow.
- Choose a name and location for your workflow that is easily accessible for future use.
- Consider adding a meaningful description or notes to help you remember the purpose and functionality of the workflow.
- If desired, you can also save your workflow as a Quick Action, allowing you to execute it directly from the macOS Finder.
- To use your saved Automator workflow, simply double-click on the workflow file to open it in Automator.
- You can then drag and drop files or folders onto the workflow icon, or use the ‘Run’ button to execute the workflow.
By saving your Automator workflow, you are creating a reusable tool that streamlines your file or folder renaming process. It eliminates the need to recreate the workflow each time you want to perform a similar task, saving you both time and effort.
Consider organizing your saved workflows in a specific folder or adding them to the macOS Dock for easier access. This allows you to quickly locate and execute the desired workflow whenever you need it.
Furthermore, Automator workflows can be shared with others, enabling you to collaborate and help automate repetitive tasks for your team or colleagues. By sharing your workflow file, you empower others to benefit from your automation efforts and enhance productivity across the board.
Remember to periodically review and update your Automator workflows as needed. As your needs and requirements change, you may want to modify the actions or conditions within the workflow to better suit your evolving workflow needs.
By saving and using your Automator workflow, you can harness the power of automation to streamline your file or folder renaming tasks. This efficiency allows you to focus on more productive endeavors while maximizing the benefits of Automator’s capabilities.