
Why Remove the Battery?
Removing the battery from an iPhone might seem like a daunting task, but there are valid reasons for wanting to do so. Whether you're replacing a worn-out battery, troubleshooting power issues, or attempting to repair water damage, accessing the battery is a crucial step. Apple's devices are known for their sleek design and seamless integration, which makes accessing the internal components a bit more challenging compared to other smartphones. However, with the right tools and careful execution, removing the iPhone battery is entirely feasible.
One common reason for removing the battery is to replace it with a new one. Over time, the battery in an iPhone can lose its ability to hold a charge, leading to decreased battery life and potential shutdowns. In such cases, replacing the battery can breathe new life into the device, allowing it to function optimally once again. Additionally, if the iPhone experiences water damage, disconnecting the battery as quickly as possible can help prevent further harm to the internal components. This proactive step can increase the likelihood of successful repair and minimize the risk of permanent damage.
Furthermore, troubleshooting power-related issues often necessitates accessing the battery. If an iPhone fails to power on or experiences erratic behavior, disconnecting and reconnecting the battery can sometimes resolve the issue by resetting the device's power source. This simple action can serve as an initial troubleshooting step before delving into more complex diagnostics or repairs.
In essence, removing the iPhone battery is a fundamental aspect of maintaining, repairing, and troubleshooting the device. Understanding the process and the reasons behind it can empower users to take charge of their iPhone's maintenance and potentially save on costly repairs or replacements. With the right knowledge and approach, accessing the iPhone's battery can be a manageable task, providing users with the opportunity to extend the lifespan and functionality of their beloved device.
Tools Needed
Before embarking on the task of removing the battery from an iPhone, it is essential to gather the necessary tools. While the process does not require an extensive array of equipment, having the right tools on hand can significantly facilitate the task and ensure a smooth and safe removal of the battery.
1. Pentalobe Screwdriver: The iPhone is secured with specialized screws known as pentalobe screws. To access these screws, a pentalobe screwdriver is indispensable. It is crucial to use the correct size to avoid damaging the screws and ensure a secure fit during reassembly.
2. Spudger or Plastic Opening Tool: A spudger or a plastic opening tool is essential for prying open the iPhone without causing damage to the delicate components. These tools are designed to safely separate the display assembly from the rest of the device, allowing access to the internal components, including the battery.
3. Tweezers: Tweezers are useful for handling small components and disconnecting cables with precision. They provide a steady grip and enable careful manipulation of delicate parts during the battery removal process.
4. Suction Handle: A suction handle or suction cup is necessary for lifting the display assembly once the screws are removed. This tool creates a secure grip on the display, allowing for controlled and safe separation from the iPhone body.
5. Adhesive Strips or Adhesive Remover: Depending on the iPhone model, adhesive strips or adhesive remover may be required to loosen the adhesive securing the battery in place. These aids facilitate the safe removal of the battery without causing damage to the device.
By ensuring the availability of these essential tools, individuals can approach the battery removal process with confidence, knowing that they have the necessary equipment to execute the task effectively. Proper tools not only simplify the procedure but also contribute to the overall safety and success of the battery removal endeavor.
Step 1: Power Off the iPhone
Before initiating the process of removing the battery from an iPhone, it is crucial to power off the device to ensure safety and prevent potential damage. By following this initial step, individuals can minimize the risk of electrical mishaps and facilitate a smoother and safer battery removal process.
To power off the iPhone, users should:
- Unlock the Device: If the iPhone is locked, unlock it by entering the passcode or using Touch ID or Face ID, depending on the model.
- Press and Hold the Power Button: Locate the power button, typically situated on the right side of the device or on the top for older models. Press and hold the power button until the “slide to power off” slider appears on the screen.
- Slide to Power Off: Once the “slide to power off” slider is displayed, swipe the slider from left to right to power off the iPhone. This action effectively shuts down the device, preparing it for the subsequent steps in the battery removal process.
It is essential to ensure that the iPhone is completely powered off before proceeding with the battery removal to prevent potential electrical hazards and safeguard the internal components. By adhering to this preliminary step, individuals can lay the groundwork for a successful and secure battery removal process, setting the stage for the subsequent steps in the procedure.
Step 2: Remove the Screws
After powering off the iPhone, the next crucial step in the battery removal process involves removing the screws that secure the device’s display assembly. This step is instrumental in gaining access to the internal components, including the battery, and sets the stage for the subsequent phases of the removal procedure.
To remove the screws, users should:
- Identify the Pentalobe Screws: Locate the two pentalobe screws situated adjacent to the charging port at the bottom of the iPhone. These specialized screws require a pentalobe screwdriver for removal.
- Use the Pentalobe Screwdriver: Select the appropriate size of the pentalobe screwdriver and carefully insert it into the screw heads. Apply gentle pressure to loosen and remove the screws, ensuring that they are safely stored for reassembly.
- Keep the Screws Organized: It is essential to keep track of the removed screws and maintain their original placement to facilitate smooth reassembly later. Utilizing a magnetic mat or a designated container can help prevent misplacement and confusion.
Removing the screws that secure the iPhone’s display assembly is a pivotal step that grants access to the internal components, paving the way for the subsequent stages of the battery removal process. By executing this step with precision and care, individuals can prepare the device for the next critical actions in safely extracting the battery from the iPhone.
Step 3: Lift the Display
With the screws removed, the next pivotal step in the iPhone battery removal process involves carefully lifting the device’s display assembly. This delicate maneuver is essential for gaining access to the internal components, including the battery, and must be executed with precision and caution to prevent damage to the fragile components.
To lift the display, individuals should:
- Use a Suction Handle: Affix a suction handle or suction cup to the lower part of the display, just above the home button, ensuring a secure attachment.
- Apply Even Pressure: While firmly holding the iPhone, gently pull up on the suction handle to create a slight separation between the display assembly and the device’s body.
- Insert a Spudger: Once a small gap is created, carefully insert a spudger or a plastic opening tool into the opening to prevent the display from re-adhering to the body.
- Work Along the Edges: Gradually slide the spudger along the edges of the iPhone, gently separating the adhesive and loosening the display assembly from the device’s body.
By methodically lifting the display assembly, individuals can access the internal components, including the battery, in preparation for the subsequent phases of the battery removal process. This step requires patience and a gentle touch to ensure that the delicate components remain intact and undamaged, setting the stage for the safe and successful extraction of the iPhone’s battery.
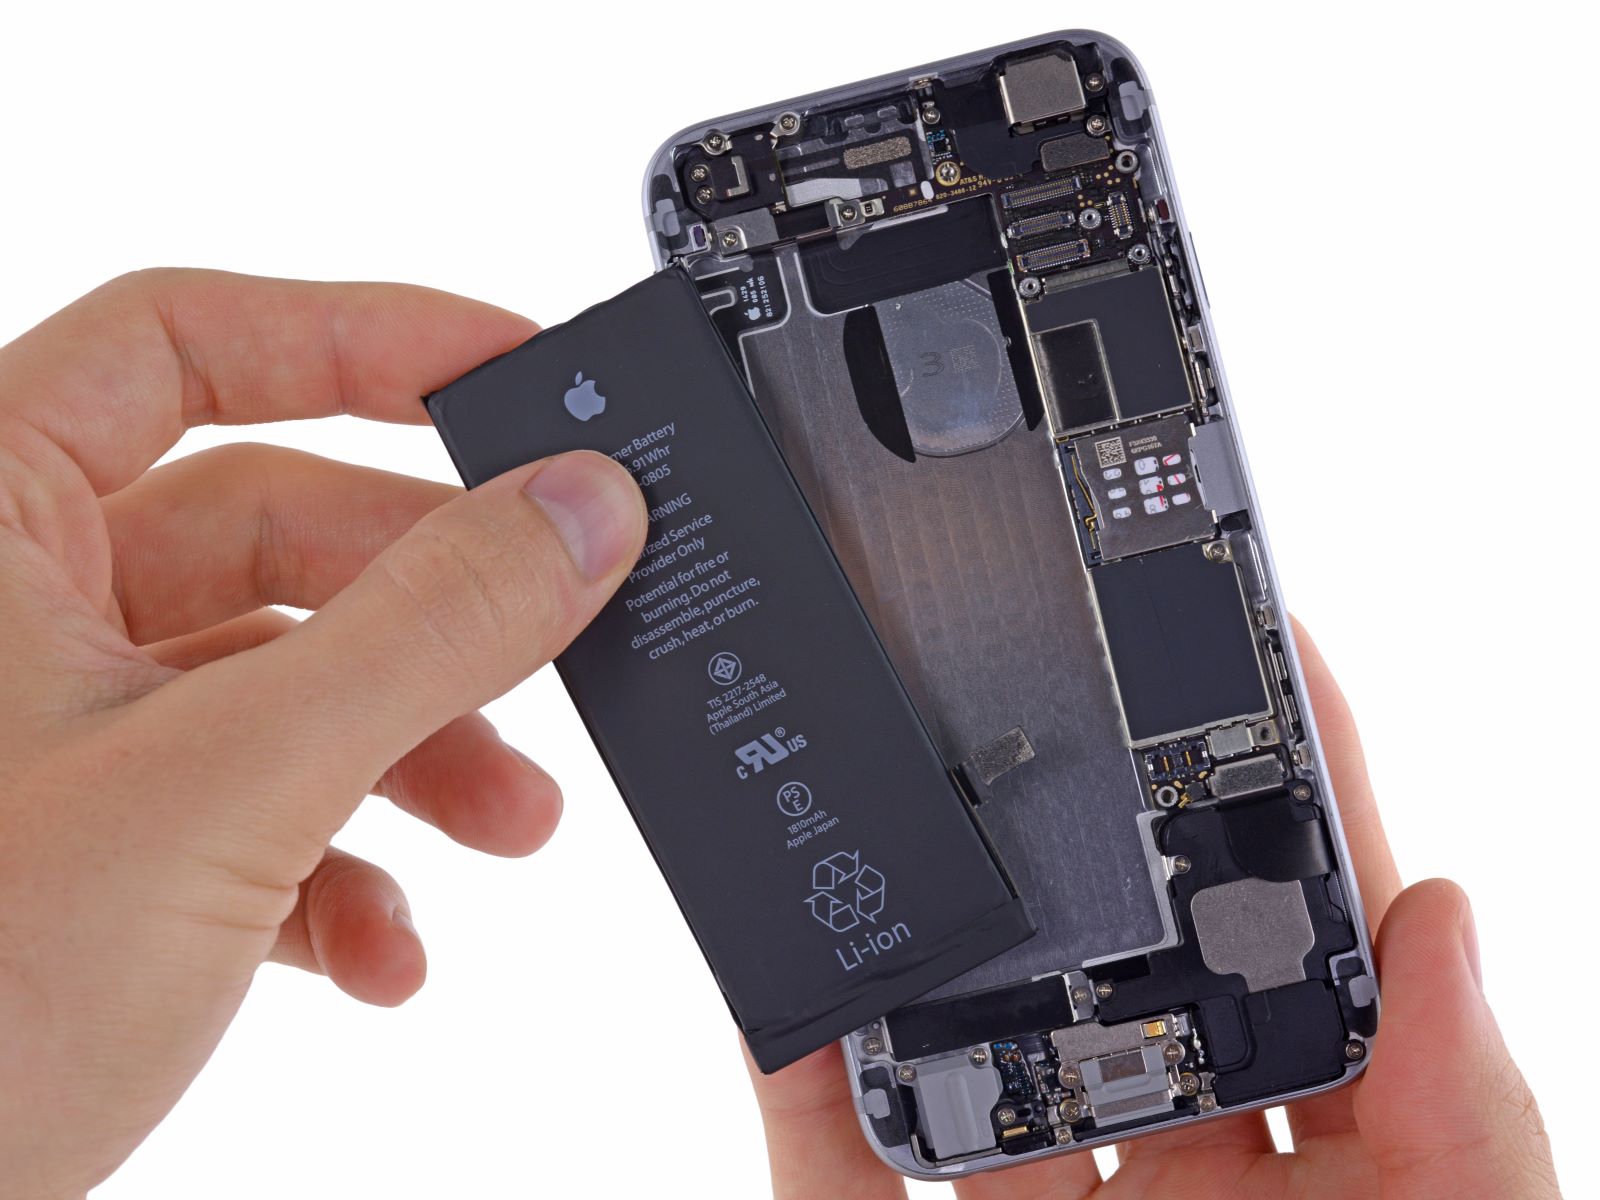
Step 4: Disconnect the Battery
After successfully lifting the display assembly and gaining access to the internal components, the next critical step in the iPhone battery removal process involves disconnecting the battery. This pivotal action is essential for ensuring the safety and integrity of the subsequent battery removal procedure and must be executed with precision and care to prevent damage to the device.
To disconnect the battery, individuals should:
- Locate the Battery Connector: Identify the battery connector, typically situated near the top of the iPhone’s internal structure. It is essential to exercise caution and avoid placing excessive pressure on the connector and surrounding components.
- Use a Spudger or Plastic Opening Tool: Carefully insert a spudger or a plastic opening tool under the edge of the battery connector and gently lift it from the logic board. It is crucial to exert even pressure and avoid bending or damaging the connector during this process.
- Ensure Complete Disconnection: Once the battery connector is lifted, ensure that it is completely disconnected from the logic board to prevent any residual electrical flow and minimize the risk of accidental damage during the subsequent battery removal steps.
By methodically disconnecting the battery, individuals can safeguard the integrity of the device and prepare for the final phases of the battery removal process. This step requires attention to detail and a steady hand to ensure that the delicate internal components remain unharmed, setting the stage for the safe and successful extraction of the iPhone’s battery.
Step 5: Remove the Battery
With the battery disconnected and the internal components accessible, the subsequent critical step in the iPhone battery removal process involves carefully extracting the battery from the device. This delicate task requires precision and caution to prevent damage to the internal components and ensure a safe and successful battery removal procedure.
To remove the battery, individuals should:
- Identify the Battery Adhesive: Depending on the iPhone model, the battery may be secured in place with adhesive strips or adhesive pads. It is essential to identify the type of adhesive used to secure the battery before proceeding with its removal.
- Apply Heat (if necessary): In cases where the battery is secured with adhesive, gentle heat application using a hairdryer or heat gun can help soften the adhesive, facilitating easier and safer removal of the battery.
- Use a Spudger or Plastic Card: Carefully insert a spudger or a plastic card underneath the edge of the battery and gently pry it upward, ensuring even pressure and avoiding damage to the battery or surrounding components.
- Work Slowly and Methodically: Gradually work around the edges of the battery, gently loosening it from the adhesive and ensuring that it can be safely lifted from the device without causing damage to the internal components.
By meticulously removing the battery from the iPhone, individuals can ensure the safety and integrity of the device’s internal structure, setting the stage for the subsequent reassembly and potential battery replacement. This step demands patience and a gentle touch to guarantee that the delicate components remain unscathed, paving the way for the successful extraction of the iPhone’s battery.
Step 6: Reassemble the iPhone
After the successful extraction of the battery, the final crucial step in the iPhone battery removal process involves reassembling the device. This pivotal phase requires meticulous attention to detail and precision to ensure that the internal components are securely reinstated, setting the stage for the device’s optimal functionality and potential battery replacement.
To reassemble the iPhone, individuals should:
- Position the Battery: Carefully place the extracted battery in its designated position within the device, ensuring that it aligns correctly with the connector and the internal structure of the iPhone.
- Secure the Battery (if applicable): If the battery is secured with adhesive, gently press it into place, ensuring that it adheres securely to the designated area within the device.
- Reconnect the Battery: Carefully reattach the battery connector to the logic board, ensuring a secure and snug connection without applying excessive force or causing damage to the delicate components.
- Lower the Display Assembly: Gradually lower the display assembly back onto the iPhone body, ensuring that it aligns correctly and gently applying pressure to secure it in place.
- Reinsert the Screws: Using the pentalobe screwdriver, carefully reinsert the pentalobe screws into their respective positions, securing the display assembly and ensuring its stability.
- Power On the iPhone: Once the reassembly is complete, power on the iPhone to verify its functionality and ensure that the internal components, including the newly reinstalled battery, are operating as intended.
By meticulously reassembling the iPhone, individuals can ensure the device’s structural integrity and optimal functionality following the battery removal process. This step demands precision and care to guarantee that the internal components are securely reinstated, setting the stage for the potential replacement of the battery and the continued usability of the iPhone.