
Tools and Equipment Needed for Disassembly
Before embarking on the disassembly of the iPhone 11, it is crucial to gather the necessary tools and equipment to ensure a smooth and efficient process. The intricate design of the device demands precision and care, making the selection of tools a critical aspect of the disassembly procedure. Here's a comprehensive list of the essential tools and equipment required for the disassembly of the iPhone 11:
-
Pentalobe Screwdriver: The iPhone 11 is secured with proprietary pentalobe screws, necessitating the use of a pentalobe screwdriver to remove the screws without causing damage to the device.
-
Phillips Screwdriver: Certain components within the iPhone 11, such as the logic board and battery connector, are fastened with Phillips screws. A Phillips screwdriver is indispensable for loosening and removing these screws.
-
Suction Cup: To facilitate the safe removal of the display assembly, a suction cup is employed to create a slight separation between the display and the device's chassis, enabling access to the internal components.
-
Spudger: A spudger, or a plastic opening tool, is utilized to carefully pry apart connectors and detach adhesive strips without causing harm to delicate components or cables.
-
Tweezers: Precision tweezers are essential for handling small screws, connectors, and delicate components during the disassembly process, ensuring accuracy and dexterity in maneuvering intricate parts.
-
Plastic Cards: Thin, flexible plastic cards aid in the separation of adhesive bonds and the gentle prying of components, minimizing the risk of damage to the device's internal structure.
-
Heat Gun or Hair Dryer: The application of heat is often necessary to soften adhesive securing components such as the display assembly and rear glass panel. A heat gun or hair dryer assists in loosening the adhesive for safe removal.
-
Heat Resistant Gloves: To protect against potential burns when using a heat gun or hair dryer, heat resistant gloves are recommended to ensure the safety of the individual performing the disassembly.
By assembling these essential tools and equipment, one can approach the disassembly of the iPhone 11 with confidence, knowing that they are equipped to navigate the intricate internal components with precision and care. Each tool plays a crucial role in ensuring the safe and efficient extraction of the device's components, underscoring the significance of proper preparation before undertaking the disassembly process.
Step 1: Removing the Display Assembly
The initial step in disassembling the iPhone 11 involves the careful removal of the display assembly, a pivotal component that encapsulates the device's visual interface and houses crucial internal elements. This process demands precision and a methodical approach to ensure the integrity of the display and other internal components. Here's a detailed breakdown of the steps involved in removing the display assembly:
-
Power Down the Device: Before commencing the disassembly, it is imperative to power off the iPhone 11 to prevent any electrical mishaps during the process. This precautionary measure ensures the safety of both the device and the individual performing the disassembly.
-
Loosening the Pentalobe Screws: The iPhone 11 is equipped with pentalobe screws securing the display assembly to the chassis. Utilizing a pentalobe screwdriver, the screws are carefully loosened, allowing for the subsequent separation of the display from the device's frame.
-
Utilizing a Suction Cup: To create a slight separation between the display assembly and the device's chassis, a suction cup is affixed to the lower portion of the display. Gentle, upward pressure is applied to the suction cup, creating a minute gap that facilitates the insertion of a plastic card for further separation.
-
Careful Insertion of a Plastic Card: With the aid of a thin, flexible plastic card, the adhesive bond securing the display assembly is delicately loosened by sliding the card along the edges. This gradual separation mitigates the risk of damage to the display and ensures the preservation of its functionality.
-
Disconnecting the Display Cables: Upon successfully creating a gap and loosening the adhesive, the display cables are cautiously disconnected from the device's logic board. Precision and attentiveness are crucial in this step to prevent any undue strain on the cables or connectors.
-
Removal of the Display Assembly: With the display cables detached, the display assembly can be lifted away from the device's chassis, revealing the internal components beneath. Care is exercised throughout this process to avoid any unnecessary tension on the cables or damage to the display assembly.
The meticulous execution of these steps ensures the safe removal of the display assembly, setting the stage for the subsequent disassembly of the iPhone 11's internal components. Each maneuver demands precision and delicacy to uphold the structural integrity of the device and its intricate display assembly.
Step 2: Disconnecting the Battery
The next critical phase in the disassembly of the iPhone 11 involves the careful disconnection of the device's battery. This pivotal step is fundamental to ensure the safety of the individual performing the disassembly and to prevent any potential electrical mishaps during the process. The intricate design of the iPhone 11 necessitates a methodical approach to disconnecting the battery, emphasizing precision and attentiveness to detail.
Ensuring Device Power-Off
Before initiating the disconnection of the battery, it is imperative to verify that the device is powered off. This precautionary measure mitigates the risk of electrical hazards and safeguards both the individual and the device from potential harm. By confirming the powered-off state of the iPhone 11, the disassembly process can proceed with a focus on safety and meticulous execution.
Identifying and Accessing the Battery Connector
The iPhone 11's battery connector is strategically positioned on the device's logic board, necessitating careful navigation to access and disconnect it. With the display assembly removed in the preceding step, the logic board and battery connector are exposed, allowing for unhindered access to the crucial components. The delicate nature of the battery connector underscores the need for precision and caution in the subsequent disconnection process.
Utilizing a Spudger for Disconnection
A spudger, or a plastic opening tool, is employed to delicately disconnect the battery connector from the logic board. This tool facilitates the careful prying and separation of the connector, ensuring that undue force is not exerted on the delicate components. The spudger's precision and non-conductive properties make it an ideal instrument for this intricate maneuver, minimizing the risk of damage to the battery connector and surrounding components.
Verifying Disconnection and Safety Measures
Upon successfully disconnecting the battery, it is essential to verify the disconnection and implement safety measures to prevent any inadvertent reconnection during the subsequent disassembly. This validation process ensures that the battery is effectively isolated from the device's power source, mitigating the risk of electrical mishaps and providing a secure environment for the continuation of the disassembly process.
The meticulous execution of the battery disconnection process underscores the significance of precision and attentiveness in navigating the iPhone 11's internal components. By adhering to these meticulous steps, the disassembly proceeds with a focus on safety and the preservation of the device's intricate internal structure.
Step 3: Removing the Taptic Engine and Speaker Assembly
The disassembly of the iPhone 11 progresses to the pivotal phase of removing the Taptic Engine and Speaker Assembly, integral components that contribute to the device's tactile feedback and audio output. This intricate process demands precision and a methodical approach to ensure the safe extraction of these components while preserving their functionality. Here's a detailed breakdown of the meticulous steps involved in removing the Taptic Engine and Speaker Assembly:
Accessing the Taptic Engine and Speaker Assembly
With the preceding steps completed, including the removal of the display assembly and disconnection of the battery, the internal components of the iPhone 11 are unveiled, providing access to the Taptic Engine and Speaker Assembly. These components are strategically positioned within the device, necessitating careful navigation to ensure their safe extraction.
Disconnecting the Speaker Assembly
The Speaker Assembly is delicately disconnected from the device's logic board, requiring precision and attentiveness to prevent any undue strain on the connectors. A spudger is employed to facilitate the separation of the Speaker Assembly, ensuring that the delicate connectors are handled with care to maintain their integrity.
Extraction of the Taptic Engine
The Taptic Engine, a sophisticated component responsible for haptic feedback, is meticulously removed from its housing within the device. Precision tweezers are utilized to delicately maneuver and extract the Taptic Engine, ensuring that its intricate components are safeguarded throughout the process.
Ensuring Component Integrity
Throughout the removal of the Taptic Engine and Speaker Assembly, emphasis is placed on preserving the integrity of these components. Careful handling and meticulous maneuvering mitigate the risk of damage, ensuring that both the Taptic Engine and Speaker Assembly remain fully functional and unharmed during the disassembly process.
Verifying Safe Extraction
Upon the successful removal of the Taptic Engine and Speaker Assembly, a thorough verification process is undertaken to ensure that these components have been safely extracted from the device. This validation underscores the meticulous approach taken to preserve the functionality and structural integrity of the iPhone 11's internal components.
The meticulous execution of these steps ensures the safe extraction of the Taptic Engine and Speaker Assembly, underscoring the significance of precision and attentiveness in navigating the intricate internal structure of the iPhone 11. Each maneuver is executed with care to uphold the functionality and integrity of these pivotal components, setting the stage for the subsequent phases of the disassembly process.
Step 4: Taking Apart the Rear Camera and Front Camera Modules
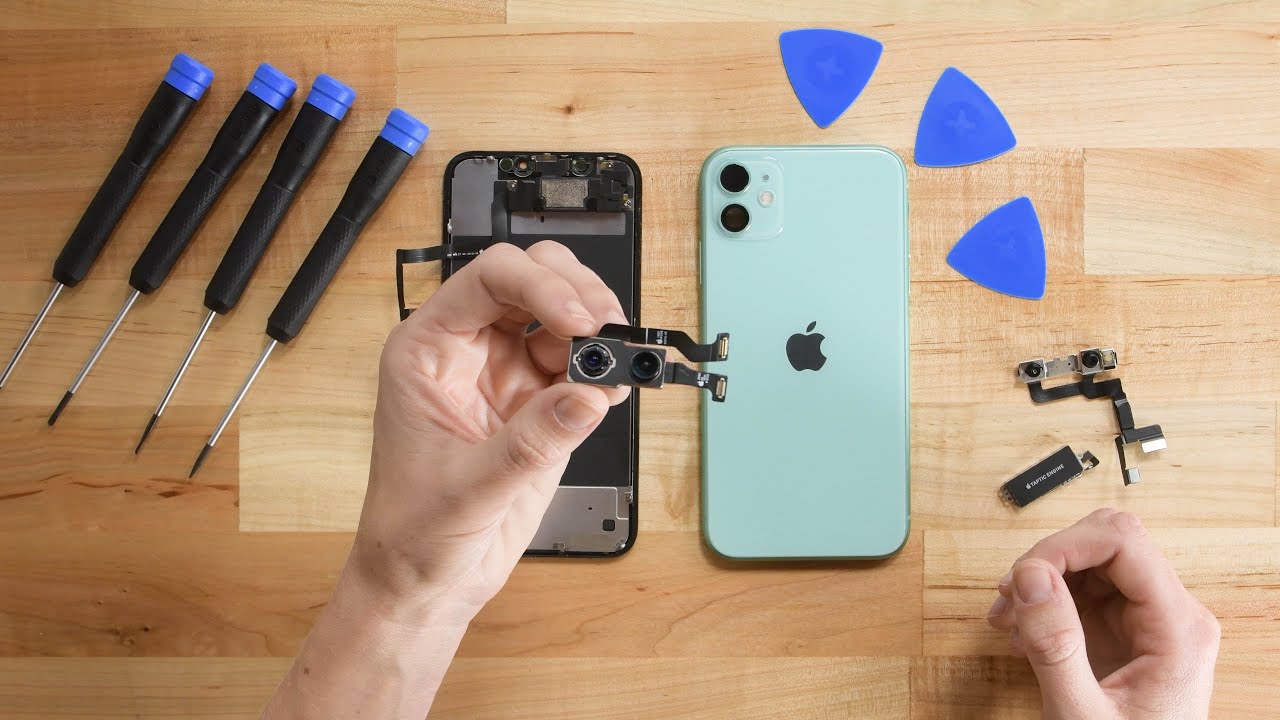
The disassembly process of the iPhone 11 delves into the intricate task of dismantling the Rear Camera and Front Camera Modules, pivotal components that define the device's imaging capabilities. This phase demands meticulous precision and a methodical approach to ensure the safe extraction of these sophisticated camera modules while preserving their functionality and structural integrity.
Accessing the Camera Modules
With the preceding steps completed, including the removal of the display assembly, disconnection of the battery, and extraction of the Taptic Engine and Speaker Assembly, the internal components of the iPhone 11 are unveiled, providing access to the Rear Camera and Front Camera Modules. These modules are strategically positioned within the device, necessitating careful navigation to ensure their safe extraction.
Disconnecting the Camera Connectors
The Rear Camera and Front Camera Modules are delicately disconnected from the device's logic board, requiring precision and attentiveness to prevent any undue strain on the connectors. Utilizing precision tweezers and a spudger, the connectors are meticulously separated, ensuring that the delicate components are handled with care to maintain their integrity.
Removal of Camera Modules
The Rear Camera and Front Camera Modules are meticulously removed from their housing within the device. Precision tweezers are utilized to delicately maneuver and extract the camera modules, ensuring that their intricate components are safeguarded throughout the process. Careful handling and meticulous maneuvering mitigate the risk of damage, ensuring that both the Rear Camera and Front Camera Modules remain fully functional and unharmed during the disassembly process.
Verifying Safe Extraction
Upon the successful removal of the Camera Modules, a thorough verification process is undertaken to ensure that these components have been safely extracted from the device. This validation underscores the meticulous approach taken to preserve the functionality and structural integrity of the iPhone 11's internal components.
The meticulous execution of these steps ensures the safe extraction of the Rear Camera and Front Camera Modules, underscoring the significance of precision and attentiveness in navigating the intricate internal structure of the iPhone 11. Each maneuver is executed with care to uphold the functionality and integrity of these pivotal components, setting the stage for the subsequent phases of the disassembly process.
Step 5: Removing the Logic Board
The disassembly process of the iPhone 11 reaches a critical juncture with the meticulous removal of the logic board, a central component that orchestrates the device's intricate functionalities. This phase demands precision, patience, and a methodical approach to ensure the safe extraction of the logic board while preserving its intricate circuitry and interconnected components.
Accessing the Logic Board
With the preceding steps completed, including the removal of the display assembly, disconnection of the battery, extraction of the Taptic Engine and Speaker Assembly, and dismantling of the camera modules, the internal architecture of the iPhone 11 is unveiled, providing access to the logic board. Positioned at the heart of the device, the logic board is intricately interconnected with various components, necessitating careful navigation to ensure its safe extraction.
Disconnecting Interconnected Components
The logic board is intricately linked to a myriad of components, including the display assembly, cameras, and various sensors. Prior to its removal, meticulous attention is directed towards disconnecting these interconnected components with precision and care. Delicate connectors and ribbon cables are methodically detached, ensuring that no undue strain is exerted on the intricate circuitry and connectors.
Loosening Securing Mechanisms
The logic board is secured within the device's chassis through fastening mechanisms and screws. Utilizing a Phillips screwdriver, the securing screws are carefully loosened, allowing for the subsequent extraction of the logic board. Each screw is meticulously removed and organized to facilitate the reassembly process, underscoring the importance of methodical disassembly practices.
Extraction of the Logic Board
With the interconnected components and securing mechanisms addressed, the logic board is delicately maneuvered out of its housing within the device. Precision tweezers and a spudger are employed to facilitate its safe extraction, ensuring that none of the delicate components or connectors are compromised during the process. Careful handling and a methodical approach mitigate the risk of damage, preserving the intricate circuitry and functionality of the logic board.
Verifying Safe Extraction
Upon the successful removal of the logic board, a thorough verification process is undertaken to ensure that this pivotal component has been safely extracted from the device. This validation underscores the meticulous approach taken to preserve the functionality and structural integrity of the iPhone 11's internal components, setting the stage for the subsequent phases of the disassembly process.
The meticulous execution of these steps ensures the safe extraction of the logic board, underscoring the significance of precision and attentiveness in navigating the intricate internal structure of the iPhone 11. Each maneuver is executed with care to uphold the functionality and integrity of this central component, laying the groundwork for the continuation of the disassembly process.
Step 6: Disassembling the Lightning Connector and Microphone
The disassembly process of the iPhone 11 progresses to the intricate task of disassembling the Lightning Connector and Microphone, pivotal components that facilitate charging and audio input functionalities. This phase demands meticulous precision and a methodical approach to ensure the safe extraction of these components while preserving their intricate functionality and structural integrity.
Accessing the Lightning Connector and Microphone
With the preceding steps completed, including the removal of the logic board, the internal architecture of the iPhone 11 is unveiled, providing access to the Lightning Connector and Microphone. These components are strategically positioned within the device, necessitating careful navigation to ensure their safe extraction.
Disconnecting the Lightning Connector
The Lightning Connector is delicately disconnected from the device's logic board, requiring precision and attentiveness to prevent any undue strain on the connectors. Utilizing a spudger and precision tweezers, the connector is meticulously separated, ensuring that the delicate components are handled with care to maintain their integrity.
Extraction of the Microphone
The Microphone, a crucial component responsible for audio input, is meticulously removed from its housing within the device. Precision tweezers are utilized to delicately maneuver and extract the Microphone, ensuring that its intricate components are safeguarded throughout the process. Careful handling and meticulous maneuvering mitigate the risk of damage, ensuring that the Microphone remains fully functional and unharmed during the disassembly process.
Verifying Safe Extraction
Upon the successful removal of the Lightning Connector and Microphone, a thorough verification process is undertaken to ensure that these components have been safely extracted from the device. This validation underscores the meticulous approach taken to preserve the functionality and structural integrity of the iPhone 11's internal components.
The meticulous execution of these steps ensures the safe extraction of the Lightning Connector and Microphone, underscoring the significance of precision and attentiveness in navigating the intricate internal structure of the iPhone 11. Each maneuver is executed with care to uphold the functionality and integrity of these pivotal components, setting the stage for the subsequent phases of the disassembly process.
Step 7: Separating the Vibrator Motor and SIM Card Tray
The disassembly process of the iPhone 11 advances to the intricate task of separating the Vibrator Motor and SIM Card Tray, essential components that contribute to the device's functionality and user experience. This phase demands meticulous precision and a methodical approach to ensure the safe extraction of these components while preserving their intricate functionality and structural integrity.
Accessing the Vibrator Motor and SIM Card Tray
With the preceding steps completed, including the disassembly of the Lightning Connector and Microphone, the internal architecture of the iPhone 11 is unveiled, providing access to the Vibrator Motor and SIM Card Tray. These components are strategically positioned within the device, necessitating careful navigation to ensure their safe extraction.
Disconnecting the Vibrator Motor
The Vibrator Motor, responsible for providing haptic feedback, is delicately disconnected from the device's framework, requiring precision and attentiveness to prevent any undue strain on the delicate connectors. Utilizing a spudger and precision tweezers, the connectors are meticulously separated, ensuring that the intricate components are handled with care to maintain their integrity.
Removal of the SIM Card Tray
The SIM Card Tray, a crucial component that houses the device's SIM card, is meticulously removed from its housing within the device. Precision tweezers are utilized to delicately maneuver and extract the SIM Card Tray, ensuring that its intricate components are safeguarded throughout the process. Careful handling and meticulous maneuvering mitigate the risk of damage, ensuring that the SIM Card Tray remains fully functional and unharmed during the disassembly process.
Verifying Safe Extraction
Upon the successful removal of the Vibrator Motor and SIM Card Tray, a thorough verification process is undertaken to ensure that these components have been safely extracted from the device. This validation underscores the meticulous approach taken to preserve the functionality and structural integrity of the iPhone 11's internal components.
The meticulous execution of these steps ensures the safe extraction of the Vibrator Motor and SIM Card Tray, underscoring the significance of precision and attentiveness in navigating the intricate internal structure of the iPhone 11. Each maneuver is executed with care to uphold the functionality and integrity of these pivotal components, setting the stage for the subsequent phases of the disassembly process.
Step 8: Removing the Wireless Charging Coil
The disassembly process of the iPhone 11 proceeds to the pivotal phase of removing the Wireless Charging Coil, a fundamental component that enables the device to harness the convenience of wireless charging technology. This intricate task demands meticulous precision and a methodical approach to ensure the safe extraction of the Wireless Charging Coil while preserving its intricate functionality and structural integrity.
Accessing the Wireless Charging Coil
With the preceding steps completed, including the separation of the Vibrator Motor and SIM Card Tray, the internal architecture of the iPhone 11 is unveiled, providing access to the Wireless Charging Coil. Positioned within the device's framework, the Wireless Charging Coil is strategically integrated, necessitating careful navigation to ensure its safe extraction.
Disconnecting the Coil
The Wireless Charging Coil is delicately disconnected from the device's framework, requiring precision and attentiveness to prevent any undue strain on the delicate connectors. Utilizing a spudger and precision tweezers, the connectors are meticulously separated, ensuring that the intricate components are handled with care to maintain their integrity.
Extraction of the Wireless Charging Coil
The Wireless Charging Coil is meticulously removed from its housing within the device. Precision tweezers are utilized to delicately maneuver and extract the coil, ensuring that its intricate components are safeguarded throughout the process. Careful handling and meticulous maneuvering mitigate the risk of damage, ensuring that the Wireless Charging Coil remains fully functional and unharmed during the disassembly process.
Verifying Safe Extraction
Upon the successful removal of the Wireless Charging Coil, a thorough verification process is undertaken to ensure that this pivotal component has been safely extracted from the device. This validation underscores the meticulous approach taken to preserve the functionality and structural integrity of the iPhone 11's internal components.
The meticulous execution of these steps ensures the safe extraction of the Wireless Charging Coil, underscoring the significance of precision and attentiveness in navigating the intricate internal structure of the iPhone 11. Each maneuver is executed with care to uphold the functionality and integrity of this pivotal component, setting the stage for the subsequent phases of the disassembly process.
Step 9: Disassembling the Face ID Components
The disassembly process of the iPhone 11 advances to the intricate task of disassembling the Face ID components, a sophisticated and integral feature that encompasses the device's facial recognition technology. This pivotal phase demands meticulous precision and a methodical approach to ensure the safe extraction of these components while preserving their intricate functionality and structural integrity.
Accessing the Face ID Components
With the preceding steps completed, including the removal of the Wireless Charging Coil, the internal architecture of the iPhone 11 is unveiled, providing access to the Face ID components. Positioned within the device's framework, the Face ID components are intricately integrated, necessitating careful navigation to ensure their safe extraction.
Disconnecting the Face ID Components
The Face ID components are delicately disconnected from the device's framework, requiring precision and attentiveness to prevent any undue strain on the delicate connectors. Utilizing a spudger and precision tweezers, the connectors are meticulously separated, ensuring that the intricate components are handled with care to maintain their integrity.
Removal of the Face ID Components
The Face ID components are meticulously removed from their housing within the device. Precision tweezers are utilized to delicately maneuver and extract these components, ensuring that their intricate components are safeguarded throughout the process. Careful handling and meticulous maneuvering mitigate the risk of damage, ensuring that the Face ID components remain fully functional and unharmed during the disassembly process.
Verifying Safe Extraction
Upon the successful removal of the Face ID components, a thorough verification process is undertaken to ensure that these components have been safely extracted from the device. This validation underscores the meticulous approach taken to preserve the functionality and structural integrity of the iPhone 11's internal components.
The meticulous execution of these steps ensures the safe extraction of the Face ID components, underscoring the significance of precision and attentiveness in navigating the intricate internal structure of the iPhone 11. Each maneuver is executed with care to uphold the functionality and integrity of these pivotal components, setting the stage for the subsequent phases of the disassembly process.
Step 10: Removing the Rear Glass Panel
The final phase of disassembling the iPhone 11 encompasses the meticulous process of removing the rear glass panel, a critical step that demands precision and care to ensure the safe extraction of this integral component. The rear glass panel not only contributes to the device's aesthetic appeal but also serves as a protective enclosure for the internal components, making its removal a delicate endeavor.
Preparing for Disassembly
Before initiating the removal of the rear glass panel, it is imperative to ensure that all preceding steps, including the disconnection of internal components and the extraction of pivotal elements, have been meticulously executed. This preparatory phase sets the stage for the focused and methodical approach required to safely extract the rear glass panel without compromising its structural integrity.
Loosening the Adhesive Bond
The rear glass panel of the iPhone 11 is secured to the device's framework through a resilient adhesive bond. To facilitate its safe removal, targeted application of heat is employed to soften the adhesive, allowing for the gradual separation of the glass panel from the chassis. A heat gun or hair dryer is utilized to gently warm the surface, ensuring that the adhesive reaches an optimal pliable state for safe extraction.
Utilizing a Suction Cup and Plastic Card
With the adhesive suitably softened, a suction cup is affixed to the rear glass panel, creating a slight separation between the glass and the device's framework. Subsequently, a thin, flexible plastic card is carefully inserted into the gap, enabling the gradual loosening of the adhesive bond. This meticulous maneuvering minimizes the risk of damage to the rear glass panel and ensures its safe extraction from the device.
Ensuring Structural Integrity
Throughout the process of removing the rear glass panel, emphasis is placed on preserving its structural integrity. Careful maneuvering and gentle prying mitigate the risk of damage, ensuring that the glass panel remains intact and free from any compromise to its aesthetic or functional attributes. This meticulous approach underscores the significance of precision and attentiveness in navigating the intricate internal structure of the iPhone 11.
Verifying Safe Extraction
Upon the successful removal of the rear glass panel, a thorough verification process is undertaken to ensure that this pivotal component has been safely extracted from the device. This validation underscores the meticulous approach taken to preserve the functionality and structural integrity of the iPhone 11's internal components, setting the stage for the subsequent phases of the disassembly process.
The meticulous execution of these steps ensures the safe extraction of the rear glass panel, underscoring the significance of precision and attentiveness in navigating the intricate internal structure of the iPhone 11. Each maneuver is executed with care to uphold the functionality and integrity of this pivotal component, laying the groundwork for the reassembly or further maintenance of the device.