
Step 1: Backup Contacts on Your Android Phone
Backing up your contacts on your Android phone is a crucial first step before transferring them to your new Redmi phone. By creating a backup, you ensure that your valuable contact information remains secure and accessible during the transition process.
Here's how you can back up your contacts on your Android phone:
-
Google Account Backup:
- Open the "Settings" app on your Android phone.
- Scroll down and tap on "Google" to access your Google account settings.
- Select "Backup" and ensure that the "Contacts" option is toggled on. This will automatically back up your contacts to your Google account.
-
Export to Storage:
- Open the "Contacts" app on your Android phone.
- Tap the three horizontal lines or "More" option to access the menu.
- Select "Settings" and then tap on "Export" or "Export to Storage" depending on your device.
- Choose the storage location, such as your phone's internal storage or an SD card, and save the exported file. This creates a local backup of your contacts.
-
Third-Party Backup Apps:
- Alternatively, you can explore third-party backup apps available on the Google Play Store. These apps offer additional features and flexibility for backing up your contacts, such as scheduling automatic backups and exporting contacts in various formats.
By following these steps to back up your contacts on your Android phone, you can proceed with confidence knowing that your valuable contact information is securely stored and ready to be transferred to your new Redmi phone.
Step 2: Transfer Contacts Using Google Account
Transferring contacts from your Android phone to your new Redmi device via your Google account offers a seamless and efficient method to ensure that your valuable contact information is readily accessible. Leveraging the power of cloud-based synchronization, this approach simplifies the transition process while maintaining the integrity of your contacts. Here's a detailed guide on how to transfer contacts using your Google account:
-
Check Google Account Sync: Before initiating the transfer process, ensure that your Google account is set to sync contacts. To verify this, navigate to the "Settings" app on your Android phone, tap on "Accounts," select your Google account, and ensure that the "Contacts" option is enabled for synchronization. This step ensures that your contacts are up to date and ready for transfer.
-
Sync Contacts to Google Account: If your contacts are not already synced to your Google account, you can manually initiate the synchronization process. Open the "Contacts" app on your Android phone, tap on the menu icon (usually represented by three horizontal lines), select "Settings," and then choose "Accounts" or "Contacts to Display." From there, select the option to sync your contacts with your Google account. This action ensures that all your contacts are securely stored in your Google account's cloud infrastructure.
-
Access Contacts on Redmi Phone: Once your contacts are synced with your Google account, setting up your Redmi phone to retrieve these contacts is straightforward. During the initial setup of your Redmi device, you will be prompted to sign in with your Google account. By entering the same Google account credentials used to sync your contacts, your Redmi phone will automatically retrieve the contacts associated with that account.
-
Verify Contact Transfer: After signing in with your Google account on your Redmi phone, navigate to the "Contacts" app to ensure that your contacts have been successfully transferred. Your contacts should seamlessly appear on your Redmi device, reflecting the same information and organization as on your previous Android phone.
By leveraging your Google account to transfer contacts, you can enjoy a hassle-free transition to your new Redmi phone. This method eliminates the need for manual data transfer and ensures that your contacts are effortlessly accessible across devices, streamlining the overall user experience.
Incorporating the use of your Google account for contact transfer not only simplifies the migration process but also lays the foundation for seamless synchronization of other essential data, such as calendars, emails, and app settings, further enhancing the continuity of your digital ecosystem.
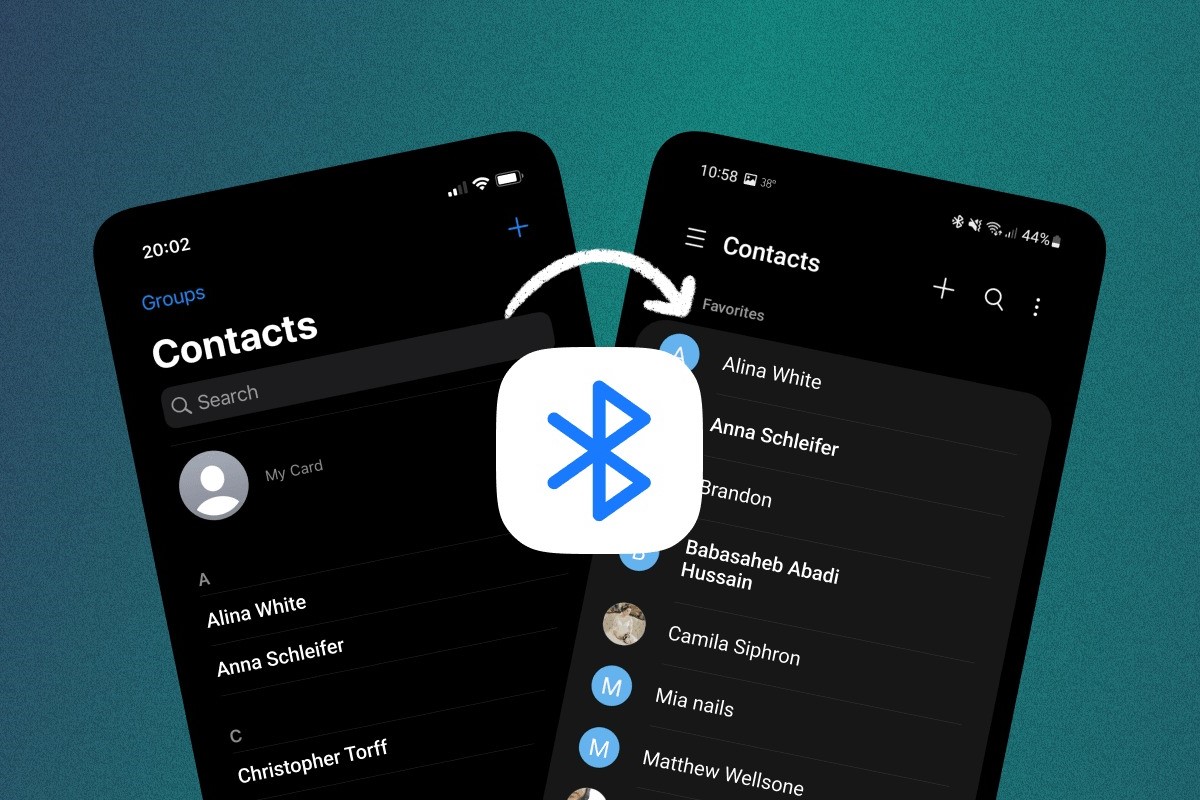
Step 3: Transfer Contacts Using Bluetooth
Transferring contacts from your Android phone to your new Redmi device using Bluetooth provides a convenient and direct method to migrate your valuable contact information. This wireless technology allows for the seamless transfer of data between devices in close proximity, making it an ideal solution for transferring contacts without relying on internet connectivity or third-party services. Here's a detailed guide on how to transfer contacts using Bluetooth:
-
Enable Bluetooth: Begin by ensuring that Bluetooth is enabled on both your Android phone and Redmi device. On your Android phone, navigate to the "Settings" app, select "Bluetooth," and toggle the Bluetooth switch to enable it. Similarly, on your Redmi phone, access the "Settings" app, tap on "Bluetooth," and activate Bluetooth functionality.
-
Pairing Devices: Once Bluetooth is enabled on both devices, initiate the pairing process by making your Android phone and Redmi device discoverable. In the Bluetooth settings of each device, select the option to make the device discoverable or visible to other Bluetooth-enabled devices. This action allows the devices to detect and connect with each other.
-
Initiate Contact Transfer: After successfully pairing the devices, navigate to the "Contacts" app on your Android phone and select the option to share or send contacts. Depending on your device model and software version, this option may be labeled as "Share," "Send Contacts," or "Export." Choose the contacts you want to transfer and then select the option to share via Bluetooth.
-
Select Redmi Device: Upon selecting the Bluetooth sharing option, your Android phone will search for nearby Bluetooth-enabled devices. From the list of available devices, choose your Redmi phone to initiate the contact transfer. Confirm the pairing request on your Redmi device to establish the connection.
-
Accept Contact Transfer: Once the connection is established, your Redmi device will receive the contact data from your Android phone. You may be prompted to accept the incoming contacts on your Redmi phone. Upon confirmation, the contacts will be seamlessly transferred and integrated into the contact list on your Redmi device.
By following these steps to transfer contacts using Bluetooth, you can efficiently migrate your contact information to your new Redmi phone without the need for internet connectivity or additional hardware. This method offers a straightforward and direct approach to contact transfer, ensuring that your valuable contacts are readily accessible on your Redmi device.
Utilizing Bluetooth for contact transfer exemplifies the versatility and convenience of wireless technology, empowering users to seamlessly transition their essential data between devices with minimal effort. This method is particularly beneficial for individuals seeking a simple and efficient means of transferring contacts while maintaining control over the data transfer process.
Step 4: Transfer Contacts Using a Third-Party App
When it comes to transferring contacts from an Android phone to a Redmi device, utilizing a third-party app offers a versatile and user-friendly approach. These apps are designed to streamline the contact transfer process, providing additional features and customization options to meet diverse user preferences. Here's a comprehensive guide on how to transfer contacts using a third-party app:
-
Explore App Options: Begin by exploring the Google Play Store or the respective app store on your Android device to discover a wide array of third-party contact transfer apps. Look for apps that have high user ratings, positive reviews, and a track record of reliable performance in contact migration.
-
Select and Install: Once you've identified a suitable third-party app for contact transfer, download and install it on your Android phone. Ensure that the app is compatible with both your Android device and the Redmi phone to which you intend to transfer the contacts.
-
Open the App: Launch the installed third-party app on your Android phone to initiate the contact transfer process. These apps typically offer intuitive interfaces and guided workflows to simplify the transfer procedure, making it accessible to users with varying levels of technical expertise.
-
Initiate Transfer: Within the app, locate the option to begin the contact transfer process. Depending on the app's functionality, you may be prompted to select the contacts you wish to transfer or initiate a comprehensive transfer of all contacts stored on your Android device.
-
Establish Connection: The third-party app will facilitate the establishment of a connection between your Android phone and the Redmi device. This connection may be established via Wi-Fi, a direct device-to-device connection, or through a cloud-based intermediary, depending on the app's design.
-
Confirm Transfer: Once the connection is established, review the transfer settings and confirm the initiation of the contact transfer process. The app will seamlessly transfer the selected contacts to your Redmi device, ensuring that the contact information is accurately replicated without loss or distortion.
By leveraging a third-party app for contact transfer, users can take advantage of advanced features such as selective contact migration, support for diverse file formats, and the ability to transfer additional data types such as photos, messages, and call logs. These apps offer a comprehensive solution for users seeking a tailored and efficient approach to contact migration, empowering them to seamlessly transition their essential data to their new Redmi device.
Utilizing a third-party app for contact transfer exemplifies the adaptability of modern mobile technology, providing users with a diverse range of tools to simplify and personalize their device migration experience. Whether transferring a handful of contacts or an extensive contact list, these apps offer a reliable and user-centric solution for seamless contact migration.
Step 5: Import Contacts to Redmi Phone
Importing contacts to your Redmi phone marks the final step in the seamless transition of your valuable contact information from your previous Android device. This pivotal process ensures that your essential contacts are readily accessible on your new Redmi phone, allowing you to stay connected with ease. Here's a detailed guide on how to import contacts to your Redmi phone:
-
Access Contact Import: Upon setting up your Redmi phone, navigate to the "Contacts" app, which is typically pre-installed on the device. If you have not signed in with your Google account during the initial setup, you can access the "Settings" menu within the "Contacts" app to add your Google account. By signing in with the same Google account used to back up your contacts, you enable seamless access to your synchronized contacts.
-
Sync Google Account: Once signed in with your Google account, your Redmi phone will automatically synchronize the contacts associated with that account. This synchronization process ensures that your contacts are seamlessly imported to the "Contacts" app on your Redmi device, reflecting the same organization and details as on your previous Android phone.
-
Verify Contact Import: After the synchronization process is complete, navigate to the "Contacts" app on your Redmi phone to verify that your contacts have been successfully imported. You should see your entire contact list populated with the familiar names, phone numbers, and additional information, mirroring the data from your previous Android device.
-
Additional Import Methods: In addition to importing contacts via your Google account, Redmi phones offer the flexibility to import contacts from various sources, including SIM cards, external storage, and other cloud services. By accessing the "Import/Export" feature within the "Contacts" app, you can explore additional options for importing contacts from different sources to ensure comprehensive access to your entire contact database.
By following these steps to import contacts to your Redmi phone, you complete the transition process with confidence, knowing that your essential contacts are seamlessly integrated and readily accessible on your new device. This final step ensures that you can maintain uninterrupted communication and connectivity, empowering you to make the most of your Redmi phone from the moment you start using it.