
Preparing Your iPhone 8 for Data Transfer
Before embarking on the exciting journey of transferring data from your trusty iPhone 8 to the sleek new iPhone 13, it's crucial to ensure that your iPhone 8 is primed and ready for the transition. This involves taking a few essential steps to safeguard your valuable data and streamline the transfer process.
1. Back Up Your iPhone 8
The first and most critical step in preparing for data transfer is to create a comprehensive backup of your iPhone 8. This ensures that all your important photos, videos, contacts, messages, and app data are securely stored, ready to be seamlessly transferred to your new iPhone 13. You can back up your iPhone 8 using iCloud or iTunes, both of which offer reliable and convenient backup options.
2. Update Your Apps and iOS
To ensure a smooth transition, it's advisable to update all your apps and the iOS on your iPhone 8 to the latest versions. This helps to mitigate compatibility issues and ensures that your data is fully compatible with the new iPhone 13. Updating your apps and iOS also enhances the overall security and performance of your iPhone 8, providing added peace of mind during the data transfer process.
3. Organize and Clean Up Your Data
Take some time to declutter and organize your data on the iPhone 8. This involves deleting unnecessary photos, videos, and apps, as well as organizing your files and documents. By streamlining your data, you can reduce the overall transfer time and ensure that only essential and relevant data is migrated to your new iPhone 13.
4. Charge Your iPhone 8
Before initiating the data transfer process, it's essential to ensure that your iPhone 8 is sufficiently charged. A fully charged iPhone 8 minimizes the risk of interruptions during the data transfer and ensures that the process can be completed without any hiccups.
By diligently preparing your iPhone 8 for data transfer, you can set the stage for a seamless and stress-free transition to your new iPhone 13. These preparatory steps not only safeguard your valuable data but also optimize the transfer process, allowing you to enjoy your new device to the fullest from the moment you power it on.
Using iCloud to Transfer Data
When it comes to transferring data from your iPhone 8 to the all-new iPhone 13, iCloud emerges as a powerful and user-friendly tool that simplifies the entire process. Leveraging iCloud for data transfer offers a seamless and wireless solution, allowing you to effortlessly migrate your photos, videos, contacts, messages, and more to your new device. Here's a comprehensive guide on how to utilize iCloud for a smooth data transfer experience.
1. Ensure Sufficient iCloud Storage
Before initiating the data transfer process, it's essential to ensure that your iCloud account has sufficient storage to accommodate the data from your iPhone 8. If needed, you can upgrade your iCloud storage plan to ensure that all your valuable data can be seamlessly transferred to your new iPhone 13 without any storage constraints.
2. Back Up Your iPhone 8 to iCloud
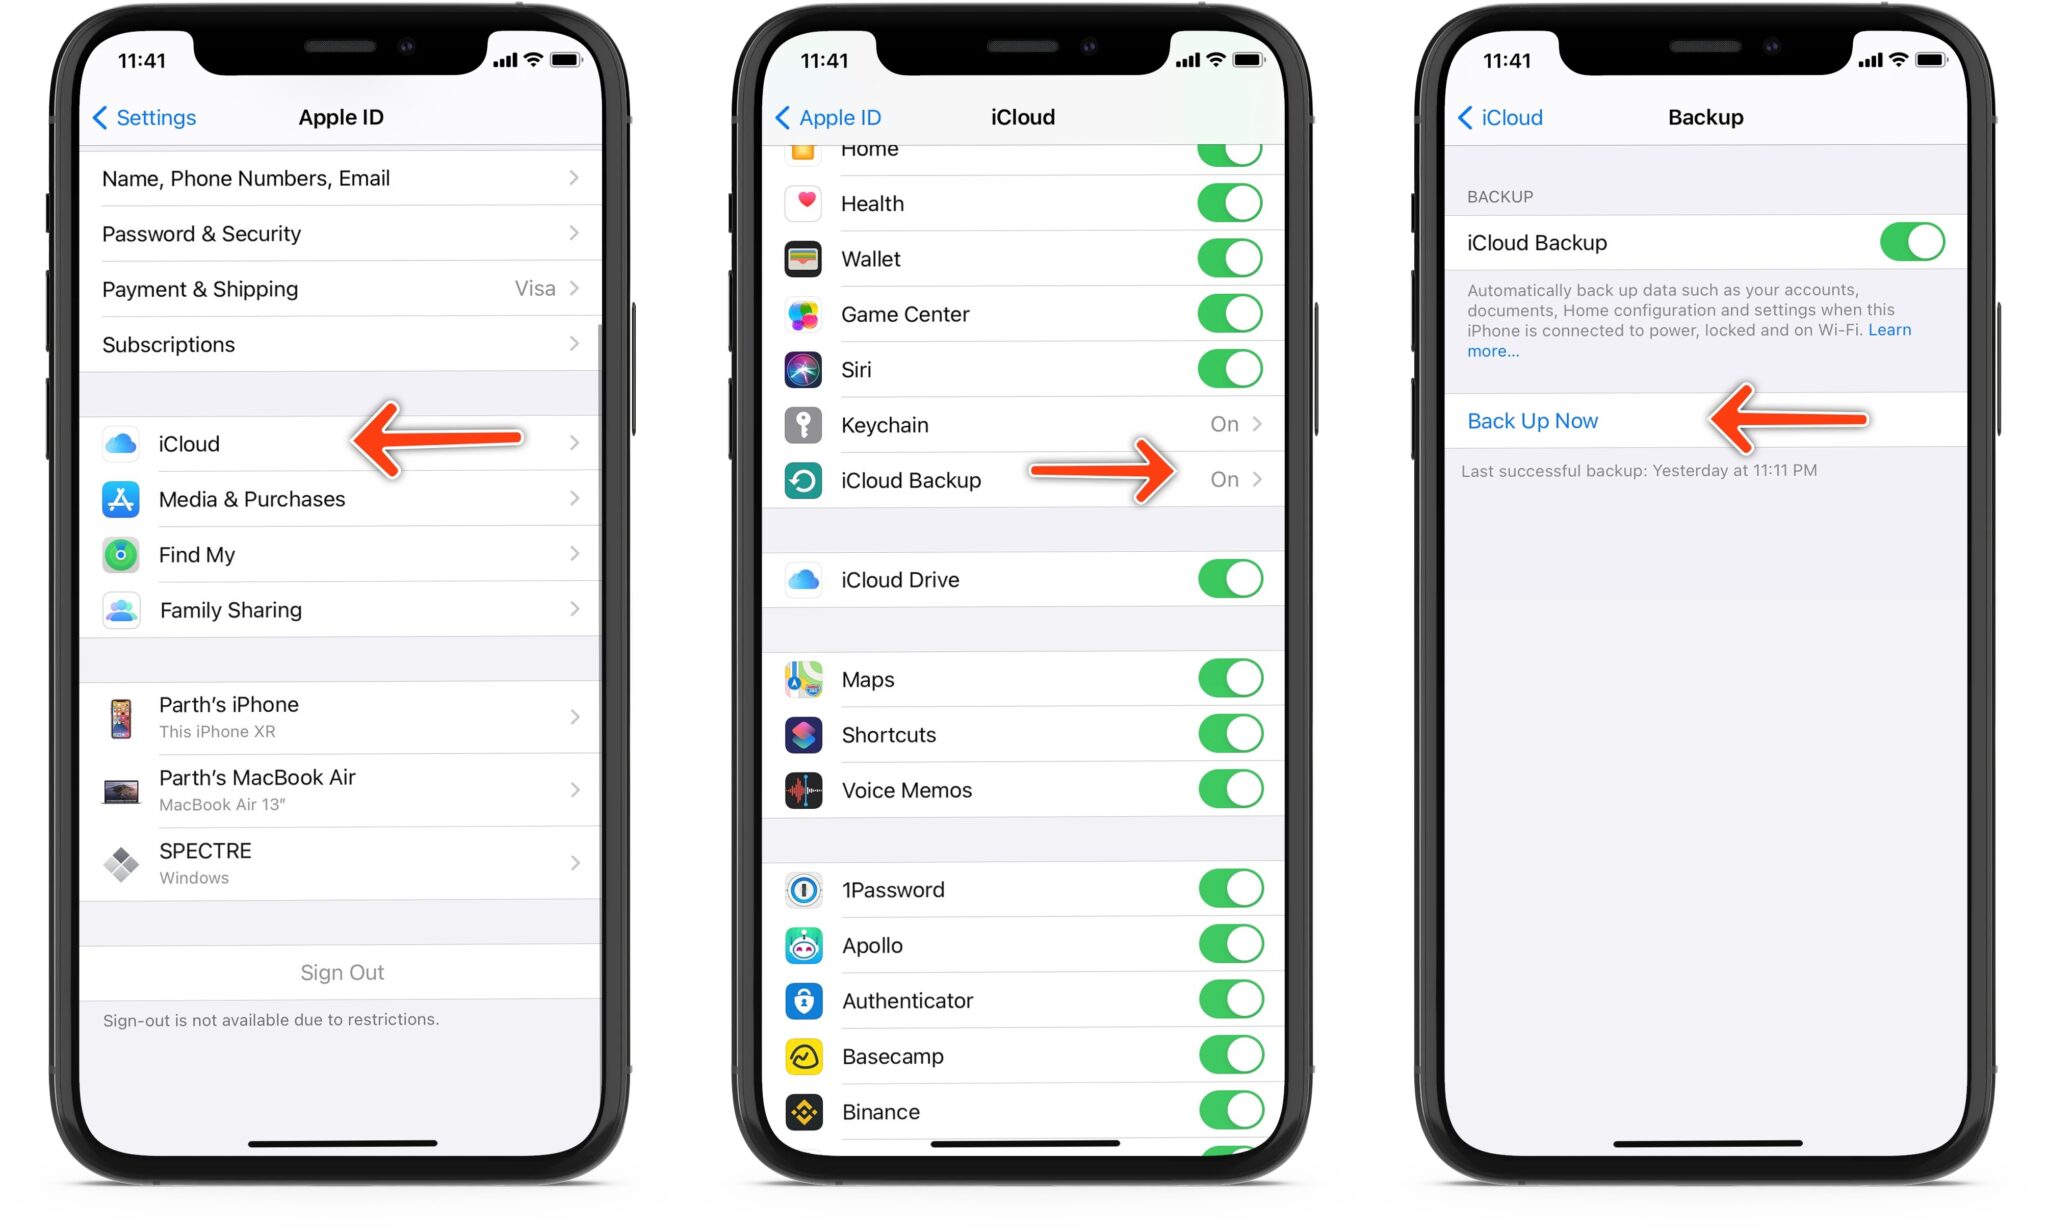
To begin the data transfer process, initiate a full backup of your iPhone 8 to iCloud. This can be done by navigating to Settings > [Your Name] > iCloud > iCloud Backup, and then selecting "Back Up Now." Ensure that your iPhone 8 is connected to a stable Wi-Fi network and plugged into a power source to facilitate the backup process.
3. Set Up Your iPhone 13 and Restore from iCloud Backup
Once your iPhone 8 backup is complete, power on your new iPhone 13 and follow the on-screen instructions until you reach the "Apps & Data" screen. From here, select "Restore from iCloud Backup" and sign in to your iCloud account. Choose the most recent backup of your iPhone 8 from the list of available backups, and let the data restoration process unfold.
4. Wait for the Data Transfer to Complete
Depending on the size of your backup and the speed of your internet connection, the data transfer process may take some time to complete. It's crucial to ensure that your iPhone 13 remains connected to a stable Wi-Fi network and a power source throughout the data restoration process to avoid any interruptions.
5. Verify the Data Transfer
Once the data transfer is complete, take a moment to verify that all your photos, videos, contacts, messages, and other important data have been successfully migrated to your new iPhone 13. Navigate through your apps and settings to ensure that everything is in place and ready for you to continue seamlessly from where you left off on your iPhone 8.
By leveraging iCloud for data transfer, you can seamlessly transition from your iPhone 8 to the all-new iPhone 13 with minimal hassle. This wireless and efficient method ensures that your valuable data is securely transferred, allowing you to embrace the exciting features and capabilities of your new device without missing a beat.
Using Quick Start to Transfer Data
Quick Start provides a hassle-free and expedited method for transferring data from your iPhone 8 to the cutting-edge iPhone 13. This feature leverages the power of proximity and wireless connectivity to seamlessly migrate your essential data, ensuring a smooth transition to your new device. Here's a detailed guide on how to utilize Quick Start for a swift and efficient data transfer experience.
-
Prepare Your iPhone 8 and iPhone 13
Before initiating the data transfer process using Quick Start, ensure that both your iPhone 8 and iPhone 13 are adequately charged. It's essential to have both devices powered on and in close proximity to each other to facilitate the seamless transfer of data. -
Initiate the Quick Start Process
To begin the data transfer process, power on your new iPhone 13 and place it near your iPhone 8. A prompt will appear on your iPhone 8, asking if you want to set up a new device. Simply follow the on-screen instructions and select the option to use Quick Start for data transfer. -
Establish a Connection
Once you've selected Quick Start on your iPhone 8, a dynamic pairing interface will appear on your iPhone 13. Simply hold your iPhone 8 over the animation, aligning it with the camera viewfinder on your iPhone 13. This initiates a secure wireless connection between the two devices, enabling the seamless transfer of data. -
Authenticate the Transfer
After establishing the connection, you may be prompted to authenticate the data transfer using your existing passcode or Touch ID/Face ID. This additional layer of security ensures that your data is transferred securely and only accessible to you. -
Wait for the Transfer to Complete
The Quick Start process will now commence the transfer of your data from the iPhone 8 to the iPhone 13. Depending on the amount of data being transferred, this process may take some time. It's crucial to ensure that both devices remain in close proximity and sufficiently charged throughout the transfer process. -
Verify the Data Transfer
Once the data transfer is complete, your iPhone 13 will be ready for use with all your essential data seamlessly migrated from your iPhone 8. Take a moment to verify that your photos, videos, contacts, messages, and other important data have been successfully transferred to your new device.
By leveraging Quick Start for data transfer, you can seamlessly transition to your new iPhone 13 with minimal effort. This intuitive and wireless method ensures that your valuable data is securely transferred, allowing you to embrace the exciting features and capabilities of your new device without missing a beat.
Using iTunes to Transfer Data
If you prefer a more traditional approach to transferring data from your iPhone 8 to the state-of-the-art iPhone 13, iTunes provides a robust and reliable solution. While iTunes has evolved over the years, it remains a steadfast tool for managing and transferring data between iOS devices. Here's a comprehensive guide on how to utilize iTunes for a seamless and efficient data transfer experience.
-
Update iTunes and Connect Your iPhone 8
Before initiating the data transfer process, ensure that you have the latest version of iTunes installed on your computer. Once updated, connect your iPhone 8 to your computer using a USB cable. Launch iTunes, and your iPhone 8 should appear in the device list. -
Back Up Your iPhone 8 to iTunes
Within iTunes, select your iPhone 8 from the device list. Navigate to the "Summary" tab, where you'll find the option to create a full backup of your iPhone 8. Click on "Back Up Now" to initiate the backup process. This will ensure that all your essential data, including photos, videos, contacts, messages, and app data, is securely stored on your computer. -
Set Up Your iPhone 13 and Restore from iTunes Backup
Once your iPhone 8 backup is complete, it's time to set up your new iPhone 13. Connect your iPhone 13 to the same computer where you created the backup using iTunes. Follow the on-screen instructions to set up your iPhone 13 until you reach the "Apps & Data" screen. From here, select "Restore from iTunes Backup" and choose the most recent backup of your iPhone 8 from the list of available backups within iTunes. -
Wait for the Data Transfer to Complete
The data transfer process will commence, and depending on the size of your backup, it may take some time to complete. It's essential to ensure that your iPhone 13 remains connected to the computer throughout the data restoration process to avoid any interruptions. -
Verify the Data Transfer
Once the data transfer is complete, take a moment to verify that all your photos, videos, contacts, messages, and other important data have been successfully migrated to your new iPhone 13. Navigate through your apps and settings to ensure that everything is in place and ready for you to continue seamlessly from where you left off on your iPhone 8.
By leveraging iTunes for data transfer, you can seamlessly transition from your iPhone 8 to the all-new iPhone 13 with confidence. This method ensures that your valuable data is securely transferred, allowing you to embrace the exciting features and capabilities of your new device without missing a beat.
Using Third-Party Apps to Transfer Data
In addition to the native methods provided by Apple for transferring data between iPhones, there are several third-party apps available that offer efficient and user-friendly solutions for seamless data migration. These apps are designed to simplify the transfer process, allowing users to effortlessly move their photos, videos, contacts, messages, and other essential data from their iPhone 8 to the all-new iPhone 13. Let's delve into the details of utilizing third-party apps for data transfer.
Research and Select a Reliable Third-Party App
The first step in using third-party apps for data transfer is to research and select a reputable app from the App Store. It's essential to choose an app with a proven track record of reliability, security, and positive user reviews. Look for apps that offer comprehensive data transfer capabilities and intuitive interfaces to ensure a smooth and hassle-free experience.
Install and Set Up the Chosen App on Both Devices
Once you've identified a suitable third-party app, proceed to install and set it up on both your iPhone 8 and iPhone 13. Follow the app's instructions to grant necessary permissions and establish the connection between the two devices. Many third-party apps utilize wireless connectivity or local Wi-Fi networks to facilitate the transfer, eliminating the need for cumbersome cables or complex configurations.
Initiate the Data Transfer Process
With the third-party app installed and configured on both devices, initiate the data transfer process as per the app's guidelines. This typically involves selecting the data types you wish to transfer, such as photos, videos, contacts, and more, and then initiating the transfer process. The app will seamlessly handle the transfer, ensuring that your data is securely migrated to your new iPhone 13.
Verify the Successful Transfer
Once the data transfer process is complete, take a moment to verify that all your selected data has been successfully migrated to your iPhone 13. Navigate through your apps, photos, contacts, and messages to ensure that everything has been seamlessly transferred and is readily accessible on your new device.
Enjoy the Seamless Transition
By leveraging third-party apps for data transfer, you can enjoy a seamless transition from your iPhone 8 to the advanced iPhone 13. These apps offer a convenient and efficient way to transfer your valuable data, allowing you to embrace the innovative features and capabilities of your new device without any data migration-related concerns.
Utilizing third-party apps for data transfer provides an additional layer of flexibility and customization, catering to individual preferences and specific data transfer needs. With the right app, the process can be streamlined and tailored to suit your unique requirements, ensuring a smooth and stress-free transition to your new iPhone 13.
Troubleshooting Common Issues
During the process of transferring data from your iPhone 8 to the new iPhone 13, you may encounter some common issues that can potentially disrupt the seamless transition. It's essential to be prepared to troubleshoot these issues effectively, ensuring that the data transfer process proceeds without any major hiccups. Here are some common issues you may encounter and the troubleshooting steps to address them:
Insufficient iCloud Storage
Issue: You may encounter a notification indicating that there is insufficient iCloud storage to complete the data transfer.
Troubleshooting Steps:
- Check your iCloud storage status by navigating to Settings > [Your Name] > iCloud > Manage Storage. Identify any unnecessary data or backups that can be removed to free up space.
- Consider upgrading your iCloud storage plan to accommodate the data transfer. This can be done by selecting "Change Storage Plan" within the iCloud settings.
Slow Data Transfer Speed
Issue: The data transfer process via iCloud, Quick Start, or third-party apps is progressing at a slow pace, causing delays.
Troubleshooting Steps:
- Ensure that both your iPhone 8 and iPhone 13 are connected to stable and high-speed Wi-Fi networks. A slow or unstable connection can impede the transfer speed.
- If using Quick Start, ensure that both devices are in close proximity and have sufficient battery charge to facilitate a swift data transfer.
Data Transfer Interruptions
Issue: The data transfer process is repeatedly interrupted, causing incomplete or failed transfers.
Troubleshooting Steps:
- Restart both your iPhone 8 and iPhone 13 to refresh their connectivity and resolve any potential software glitches.
- If using iTunes for data transfer, ensure that your computer's USB port and cable are functioning properly to maintain a stable connection.
Incomplete Data Restoration
Issue: After restoring from an iCloud or iTunes backup, certain data or settings are missing on the new iPhone 13.
Troubleshooting Steps:
- Verify that the backup from your iPhone 8 was completed successfully before initiating the data restoration process.
- If specific data is missing, consider restoring from a different backup or reinitiating the data transfer process using an alternative method.
By being aware of these common issues and the corresponding troubleshooting steps, you can navigate the data transfer process with confidence and address any challenges that may arise effectively. This proactive approach ensures that your valuable data is securely and completely transferred to your new iPhone 13, allowing you to embark on your exciting journey with your new device seamlessly.