
Preparing for the Removal
Before you begin the process of removing an oxygen sensor connector, it’s important to take some essential preparatory steps to ensure a smooth and safe procedure. Here’s what you need to do:
- Gather the Necessary Tools: Start by assembling the tools you’ll need for the job. This typically includes a ratchet, a socket set, and possibly a specialized oxygen sensor socket. Having the right tools on hand will make the process much easier and help prevent any damage to the connector or sensor.
- Allow the Vehicle to Cool: If the vehicle has been in operation, it’s crucial to allow the exhaust system to cool down before attempting to remove the oxygen sensor connector. This will prevent any burns or injuries from hot components.
- Ensure Proper Ventilation: Since you’ll be working in the vicinity of the vehicle’s exhaust system, it’s essential to have adequate ventilation in the workspace. If possible, perform the removal in a well-ventilated area to minimize exposure to exhaust fumes.
- Protective Gear: Consider wearing protective gloves and safety glasses to shield your hands and eyes from any potential debris or contaminants that may be present around the sensor or connector.
- Inspect the Connector: Take a moment to visually inspect the oxygen sensor connector. Look for any signs of damage, corrosion, or wear that may require additional care during the removal process.
By taking these preparatory measures, you’ll set the stage for a successful and safe removal of the oxygen sensor connector. This proactive approach helps minimize the risk of accidents or damage to the vehicle’s components, ensuring a smooth and efficient procedure.
Disconnecting the Oxygen Sensor Connector
Once you’ve completed the preparatory steps, it’s time to move on to the actual process of disconnecting the oxygen sensor connector. Follow these steps carefully to ensure a successful disconnection:
- Locate the Oxygen Sensor Connector: Depending on the vehicle’s make and model, the oxygen sensor connector may be located along the exhaust system, typically near the exhaust manifold or catalytic converter. Refer to the vehicle’s manual or seek professional guidance if you’re unsure about the exact location.
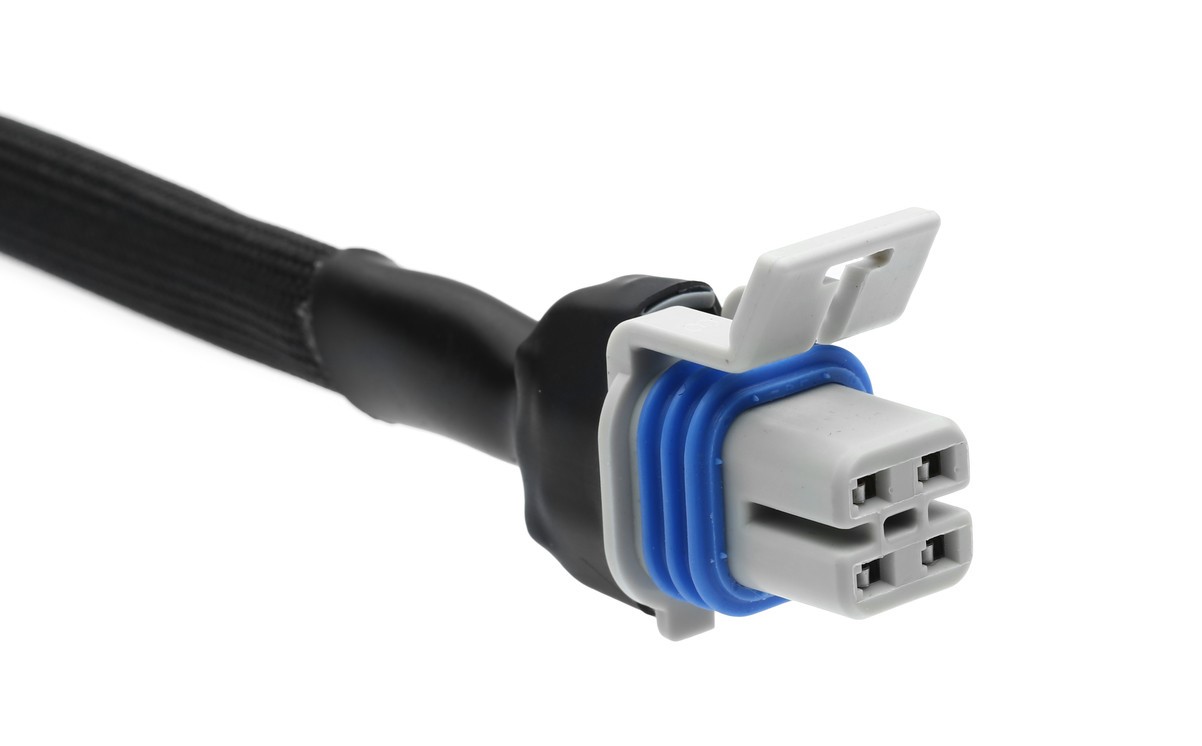
- Identify the Connector Type: Oxygen sensor connectors come in various types, such as the classic blade-style connectors or the more modern plug-and-socket designs. Understanding the specific type of connector you’re dealing with will help you approach the disconnection process correctly.
- Inspect the Connector Locking Mechanism: Before attempting to disconnect the connector, take a moment to identify the locking mechanism. Some connectors feature a tab that needs to be pressed or lifted, while others may require a twisting motion to unlock.
- Follow Safety Precautions: Ensure that the vehicle is securely supported on jack stands or a lift, and take necessary precautions to avoid contact with hot or moving components. If the vehicle has been in operation, allow the exhaust system to cool down before proceeding.
- Disconnect the Connector: With the locking mechanism identified, carefully manipulate it to release the connector. Avoid using excessive force, as this can lead to damage. If the connector is stubborn, consider using a specialized oxygen sensor socket or a gentle wiggling motion to aid in disconnection.
By following these steps, you can safely and effectively disconnect the oxygen sensor connector, paving the way for the next stages of the removal process. Taking the time to understand the connector type and locking mechanism will help you approach the disconnection with confidence and precision.
Removing the Retaining Clip
As you proceed with the removal of an oxygen sensor connector, it’s essential to address the presence of a retaining clip, which secures the connector in place. Here’s how to effectively remove the retaining clip:
- Locate the Retaining Clip: Take a moment to identify the retaining clip securing the oxygen sensor connector. It is often positioned near the connector and may feature a tab or locking mechanism that holds it in place.
- Inspect the Clip’s Design: Retaining clips come in various designs, including spring clips, push clips, or simple metal tabs. Understanding the specific type of clip you’re dealing with will guide your approach to its removal.
- Use the Appropriate Tool: Depending on the clip’s design, select the proper tool for its removal. This may include a flat-head screwdriver, a pair of pliers, or a specialized clip removal tool. Using the correct tool will minimize the risk of damage to the clip or surrounding components.
- Apply Gentle Pressure: With the appropriate tool in hand, carefully apply pressure to the clip to release it from its secured position. Exercise caution to avoid excessive force, as this can lead to damage or distortion of the clip.
- Secure the Retaining Clip: Once removed, set the retaining clip aside in a safe location to prevent misplacement. Inspect the clip for any signs of damage or wear that may necessitate replacement before reinstallation.
By following these steps, you can effectively remove the retaining clip, allowing for unhindered access to the oxygen sensor connector. Understanding the clip’s design and using the appropriate tools will facilitate a smooth and damage-free removal process, setting the stage for the next steps in the procedure.
Using the Proper Tools
Utilizing the appropriate tools is crucial when removing an oxygen sensor connector to ensure a safe and efficient process. Here’s how to select and use the right tools for the job:
- Ratchet and Socket Set: A ratchet and socket set are essential for accessing and removing the oxygen sensor connector. Select the appropriate socket size that matches the connector, ensuring a secure fit to avoid slippage and potential damage.
- Specialized Oxygen Sensor Socket: In some cases, a specialized oxygen sensor socket may be required, especially for hard-to-reach or deeply seated connectors. This specially designed socket features a cutout to accommodate the sensor’s wiring, allowing for a secure grip during removal.
- Flat-Head Screwdriver or Pliers: Depending on the type of retaining clip securing the connector, a flat-head screwdriver or a pair of pliers may be necessary for its removal. These tools provide leverage and precision when releasing the clip.
- Protective Gear: When working on the vehicle, it’s important to wear protective gloves and safety glasses to shield your hands and eyes from potential debris or contaminants. This precautionary measure enhances safety and minimizes the risk of injury.
- Inspection Light: A portable inspection light can be invaluable for illuminating the work area, especially if the connector is located in a dimly lit or confined space. Proper visibility is essential for a thorough and precise removal process.
By ensuring that you have the necessary tools at your disposal, you can approach the removal of the oxygen sensor connector with confidence and precision. Selecting the right tools and using them correctly will contribute to a successful and damage-free removal process, allowing for the smooth disconnection of the connector.
Inspecting the Connector for Damage
Before proceeding with the removal of an oxygen sensor connector, it’s crucial to thoroughly inspect the connector for any signs of damage or wear. This proactive step allows you to identify potential issues that may require additional care during the removal process. Here’s how to conduct a comprehensive inspection:
- Check for Corrosion: Examine the connector for any signs of corrosion, especially around the terminals and wiring. Corrosion can hinder the connector’s functionality and may necessitate additional cleaning or maintenance.
- Assess Wiring Integrity: Inspect the wiring connected to the sensor for any fraying, exposed conductors, or damage. Damaged wiring can compromise the sensor’s performance and may require repair or replacement.
- Look for Debris or Contaminants: Ensure that the connector and surrounding area are free from debris, dirt, or contaminants that could impede the removal process or affect the sensor’s operation. Clean any visible debris before proceeding.
- Verify Connector Alignment: Check that the connector is properly aligned and seated, with no signs of misalignment or loose connections. A secure and properly aligned connector ensures optimal electrical contact and sensor functionality.
- Inspect Connector Housing: Examine the connector housing for any cracks, damage, or signs of wear. A damaged housing can compromise the connector’s integrity and may require replacement to ensure a secure connection.
By meticulously inspecting the oxygen sensor connector for damage or irregularities, you can preemptively address any issues that may impact the removal process or the sensor’s performance. Taking the time to conduct a thorough inspection sets the stage for a successful and cautious removal, ultimately contributing to the overall maintenance and functionality of the vehicle’s oxygen sensor system.