
Safety Precautions
Before undertaking any automotive maintenance, it is crucial to prioritize safety to prevent accidents and injuries. When working on the heater hose connector, follow these essential safety precautions:
- Allow the Engine to Cool: Before starting any work, ensure that the engine has cooled down. The cooling system in a vehicle is pressurized, and opening it while hot can lead to severe burns from hot coolant or steam.
- Wear Protective Gear: It’s essential to protect yourself from potential hazards. Wear safety goggles to shield your eyes from debris and chemicals, and use gloves to safeguard your hands from sharp edges and hot components.
- Work in a Well-Ventilated Area: When dealing with automotive components, it’s common to encounter fumes and exhaust. To prevent inhalation of toxic gases, work in a properly ventilated space or outdoors.
- Use Proper Lifting Techniques: If the vehicle needs to be raised, utilize a jack and jack stands according to the manufacturer’s instructions. Never work under a vehicle supported only by a jack.
- Disconnect the Battery: To avoid electrical accidents, disconnect the vehicle’s battery before starting any work. This is especially important when working on electrical components near the heater hose connector.
By adhering to these safety precautions, you can minimize the risks associated with working on the heater hose connector, ensuring a safe and successful maintenance process.
Gather Necessary Tools and Materials
Before beginning the process of replacing a heater hose connector, it’s essential to gather all the required tools and materials. Having everything on hand will streamline the task and prevent unnecessary interruptions. Here’s a list of the tools and materials you’ll need:
- Socket Set: A set of sockets and ratchets in various sizes will be necessary for loosening and tightening bolts and clamps.
- Pliers: Long-nose pliers and hose clamp pliers will aid in gripping and maneuvering the hose clamps and connectors.
- Screwdrivers: Both flathead and Phillips head screwdrivers may be needed to remove fasteners securing the connector or hose clamps.
- Hose Clamp Pliers: These specialized pliers are designed to compress hose clamps, facilitating their removal without damaging the hoses.
- New Heater Hose Connector: Acquire a replacement heater hose connector that matches the specifications of your vehicle’s make and model.
- Protective Gear: Safety goggles, gloves, and possibly a face mask will provide protection from debris, chemicals, and fumes.
- Container for Coolant: A suitable container to catch and store any coolant that may leak during the process.
- Rags or Towels: Have plenty of clean rags or towels on hand to wipe up spills and keep the work area tidy.
By ensuring you have all the necessary tools and materials before starting the project, you can work efficiently and minimize the risk of delays or complications.
Locate the Heater Hose Connector
Before you can begin the process of replacing the heater hose connector, it’s crucial to locate the specific component within the vehicle’s engine bay. The heater hose connector is typically situated near the firewall, connecting the heater hoses to the vehicle’s cooling system. Here’s a step-by-step guide to help you locate the heater hose connector:
- Consult the Vehicle Manual: If you are unfamiliar with the location of the heater hose connector in your vehicle, refer to the owner’s manual or a repair guide for detailed diagrams and descriptions.
- Identify the Heater Hoses: The heater hoses are generally made of rubber and are connected to the vehicle’s cooling system. Follow these hoses from the engine to the firewall, where they connect to the heater core. The connector will be located along these hoses.
- Look for a Junction or Connection: Once you’ve located the heater hoses, inspect them for any junctions or connections. The heater hose connector may appear as a plastic or metal component joining the hoses or connecting them to the engine or heater core.
- Check for Hose Clamps or Fasteners: The connector may be secured in place with hose clamps or fasteners. These can help in identifying the specific location of the connector.
- Inspect for Signs of Leakage: If the connector is damaged, there may be visible signs of coolant leakage in the vicinity. Look for dampness, residue, or discoloration that could indicate a leak originating from the connector.
By carefully following these steps, you can successfully locate the heater hose connector, setting the stage for the subsequent steps of the replacement process.
Prepare the Work Area
Before commencing the replacement of the heater hose connector, it’s essential to prepare the work area to ensure a smooth and efficient process. Proper preparation can help prevent accidents, minimize mess, and provide better access to the components involved. Here’s a detailed guide on how to prepare the work area:
- Park the Vehicle on a Level Surface: Ensure the vehicle is parked on a flat surface and engage the parking brake to prevent any unexpected movement.
- Allow Sufficient Lighting: Adequate lighting is crucial for visibility. If working indoors, use a bright, portable work light. If working outdoors, choose a well-lit area.
- Gather Necessary Tools and Materials: As outlined previously, ensure all required tools and materials are within reach to avoid interruptions during the process.
- Protect Surrounding Components: Use towels or rags to cover nearby components and surfaces to prevent accidental damage or contamination from coolant or debris.
- Clear Access to the Connector: Remove any obstructions or clutter around the heater hose connector to facilitate easy access for the replacement process.
- Position a Coolant Collection Container: Place a suitable container beneath the work area to catch any coolant that may spill during the disconnection of the hoses.
- Put on Protective Gear: Prior to starting the work, don safety goggles, gloves, and any other necessary protective gear to ensure personal safety.
- Review Safety Procedures: Remind yourself of the safety precautions and procedures to be followed during the replacement process to avoid any accidents or mishaps.
By meticulously preparing the work area, you can create a safe, organized, and efficient environment for replacing the heater hose connector, setting the stage for a successful maintenance task.
Remove the Hose Clamp
Removing the hose clamp is a crucial step in the process of replacing the heater hose connector. The hose clamp secures the hose to the connector, and its removal allows for the disconnection of the hose. Here’s a detailed guide on how to remove the hose clamp:
- Identify the Hose Clamp: Locate the hose clamp that is securing the hose to the heater hose connector. It is typically a metal ring with a screw mechanism or a spring-loaded clamp.
- Select the Appropriate Tool: Depending on the type of hose clamp, choose the suitable tool for its removal. For screw-type clamps, a flathead or Phillips screwdriver may be used, while spring-loaded clamps may require hose clamp pliers.
- Loosen the Clamp: If it’s a screw-type clamp, turn the screw counterclockwise to loosen the clamp. For spring-loaded clamps, compress the clamp’s tabs using hose clamp pliers to release its grip on the hose.
- Slide the Clamp Away: Once the clamp is sufficiently loosened, slide it away from the connection point towards the end of the hose. This will free the hose from the connector, allowing for its disconnection.
- Inspect the Clamp: While the clamp is off, take a moment to inspect its condition. If it shows signs of wear or damage, consider replacing it with a new clamp to ensure a secure connection when reassembling the components.
- Set Aside the Clamp: Keep the removed clamp in a safe place where it won’t be misplaced, as it will be needed when reattaching the hose after the replacement of the heater hose connector.
By carefully following these steps, you can successfully remove the hose clamp, paving the way for the disconnection of the hose from the heater hose connector as part of the replacement process.
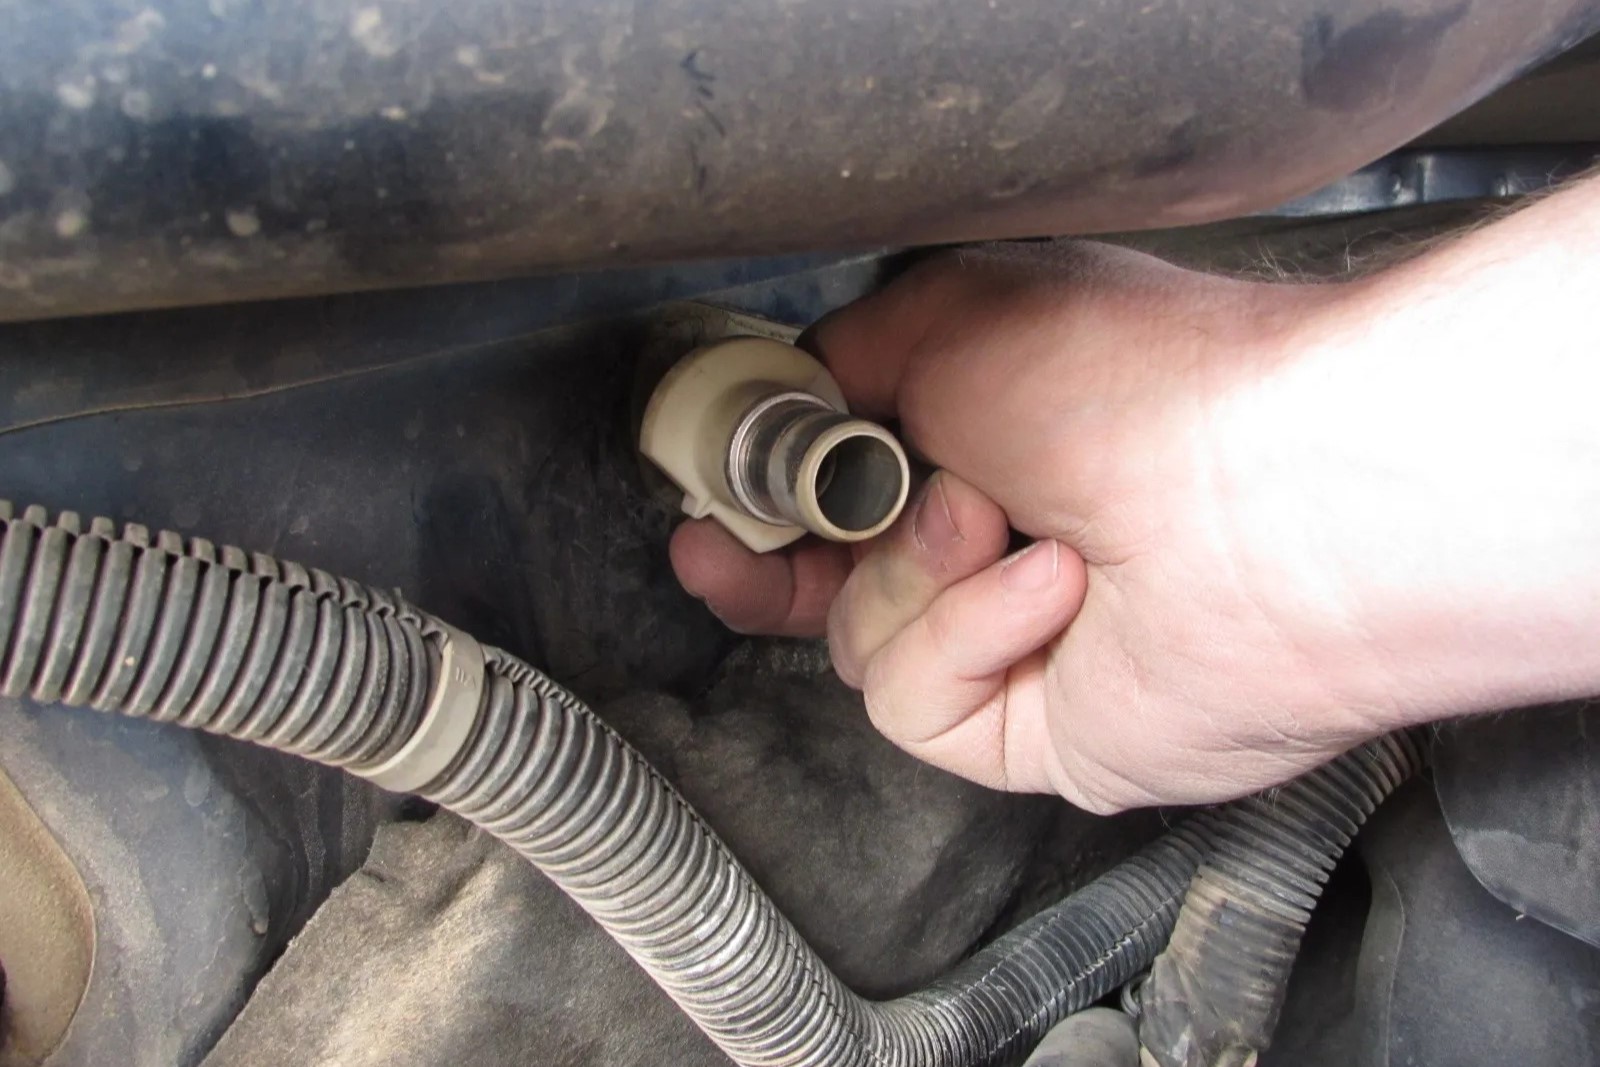
Disconnect the Hose from the Connector
Once the hose clamp has been removed, the next step in replacing the heater hose connector is to disconnect the hose from the connector. This process requires care to avoid damaging the hose or the connector. Here’s a detailed guide on how to disconnect the hose:
- Inspect the Connection: Before proceeding, visually inspect the area where the hose meets the connector. Look for any signs of corrosion, damage, or stubborn debris that may impede the disconnection.
- Twist and Wiggle the Hose: Gently twist and wiggle the hose near the connection point. This can help break any seal created by dried coolant or corrosion, making it easier to separate the hose from the connector.
- Use Hose Removal Tool (if necessary): In some cases, a hose removal tool or pick may be needed to separate the hose from the connector. Insert the tool between the hose and the connector, gently prying and twisting to loosen the connection.
- Avoid Excessive Force: It’s important to exercise patience and avoid using excessive force to disconnect the hose. Applying too much pressure can lead to damage, especially if the hose or connector is old or fragile.
- Be Mindful of Coolant Spillage: As the hose is disconnected, be prepared for coolant to spill from the hose and the connector. Have a container or rags ready to catch any excess coolant and prevent it from spilling onto the work area.
- Inspect the Hose: While the hose is disconnected, take the opportunity to inspect its condition. Look for signs of wear, cracks, or soft spots that may indicate the need for a replacement hose.
- Set Aside the Disconnected Hose: Keep the disconnected hose in a safe place, away from the work area, to prevent any tripping hazards and to ensure it remains clean and undamaged.
By following these steps carefully, you can successfully disconnect the hose from the connector, preparing the way for the removal of the old heater hose connector and the installation of a new one.
Remove the Heater Hose Connector
With the hose disconnected, the next critical step in replacing the heater hose connector is to remove the old connector from the vehicle. This process requires precision and attention to detail to ensure a smooth transition to the new component. Here’s a detailed guide on how to remove the heater hose connector:
- Inspect the Connector: Before proceeding, examine the old connector for any visible damage, corrosion, or signs of wear. This inspection can provide insight into the condition of the connector and any potential challenges in its removal.
- Identify Mounting Points: Take note of how the connector is secured in place. It may be held by bolts, screws, or other fasteners. Locate and access these mounting points for the removal process.
- Use the Appropriate Tools: Depending on the mounting mechanism, select the necessary tools, such as a socket wrench or screwdriver, to loosen and remove the fasteners holding the connector in place.
- Support Adjacent Components: While removing the old connector, be mindful of any adjacent components or hoses that may be connected to it. Support these components as needed to prevent strain or damage during the removal process.
- Carefully Extract the Connector: Once the fasteners are removed, carefully extract the old connector from its position. It may require gentle wiggling or twisting to disengage it from any seals or fittings.
- Inspect the Mounting Area: After removing the old connector, inspect the mounting area for any debris, corrosion, or remnants of the old connector. Clean the area as needed to ensure a smooth and secure fit for the new connector.
- Set Aside the Old Connector: Keep the removed connector in a safe location, as it may need to be referenced when installing the new connector or for identification if a replacement is required.
By following these steps meticulously, you can successfully remove the old heater hose connector, paving the way for the inspection and installation of the new connector as part of the replacement process.
Inspect and Clean the Connection
After removing the old heater hose connector, it’s essential to thoroughly inspect and clean the connection area to ensure optimal performance and a secure fit for the new connector. This critical step involves assessing the condition of the connection and preparing it for the installation of the replacement component. Here’s a detailed guide on how to inspect and clean the connection:
- Examine the Connection Area: Carefully inspect the area where the old connector was situated. Look for signs of corrosion, debris, or any irregularities that may affect the fit and function of the new connector.
- Check for Seal Residue: If the old connector had a seal or gasket, ensure that any remnants are removed from the connection area. Residual seal material can interfere with the sealing of the new connector.
- Remove Corrosion or Buildup: Use a suitable cleaning tool, such as a wire brush or a soft abrasive pad, to gently remove any corrosion or buildup from the connection area. This will promote a clean surface for the new connector to seat properly.
- Cleanse with a Mild Solvent: If the connection area is contaminated with stubborn residue, lightly dampen a clean cloth with a mild solvent or automotive cleaner to wipe away the debris. Ensure that the solvent is compatible with the materials in the vicinity.
- Inspect Adjacent Components: While cleaning the connection area, inspect any adjacent components or hoses for signs of damage, wear, or leaks. Address any issues that may compromise the integrity of the connection or surrounding components.
- Dry the Connection Area: After cleaning, thoroughly dry the connection area using a clean, lint-free cloth. A dry surface is essential for ensuring a proper seal and preventing contamination during the installation of the new connector.
- Verify Proper Alignment: Before proceeding with the installation of the new connector, ensure that the connection area is free of obstructions and that the alignment is conducive to a secure and leak-free connection.
By diligently following these steps, you can effectively inspect and clean the connection area, preparing it for the installation of the new heater hose connector and ensuring a reliable and durable connection within the vehicle’s cooling system.
Install the New Connector
With the connection area thoroughly inspected and prepared, it’s time to proceed with the installation of the new heater hose connector. This pivotal step involves securely fitting the new component in place, ensuring proper alignment, and establishing a reliable connection for the vehicle’s cooling system. Here’s a comprehensive guide on how to install the new connector:
- Verify Compatibility: Before installation, confirm that the new connector is the correct match for the vehicle’s make, model, and cooling system specifications. Ensure that the size, shape, and connection points align with the original component.
- Apply Lubrication (if necessary): If the new connector features seals or O-rings, lightly lubricate these components with a compatible lubricant to facilitate a smooth and secure fit. Be cautious not to over-lubricate, as excess lubrication can lead to leaks.
- Position the New Connector: Carefully seat the new connector in the cleaned and prepared connection area. Ensure that it aligns properly with the hose and mounting points, and that any seals or gaskets are positioned correctly.
- Secure Fasteners: If the new connector requires fasteners, such as bolts or screws, use the appropriate tools to secure it in place. Tighten the fasteners to the manufacturer’s specified torque to ensure a secure and stable fit.
- Connect the Hose: Reconnect the hose to the new connector, ensuring a snug and proper fit. If applicable, reposition the hose clamp and tighten it securely to prevent leaks or disconnection.
- Double-Check Alignment: Verify that the new connector and the connected hose are aligned correctly and free from any kinks or obstructions that could impede the flow of coolant.
- Inspect for Leaks: Before proceeding to the next steps, inspect the newly installed connector and the connected hose for any signs of leakage. Address any leaks immediately to prevent coolant loss or system inefficiency.
By meticulously following these steps, you can effectively install the new heater hose connector, ensuring a secure and reliable connection within the vehicle’s cooling system and setting the stage for the subsequent reconnection of the remaining components.
Reconnect the Hose
After successfully installing the new heater hose connector, the next critical step in the replacement process is to reconnect the hose to the vehicle’s cooling system. Proper reconnection ensures a secure and leak-free interface between the hose and the new connector. Here’s a detailed guide on how to reconnect the hose:
- Inspect the Hose End: Before reconnecting, inspect the end of the hose to ensure it is free from damage, debris, or deterioration. Trim any frayed edges if necessary to promote a clean and secure connection.
- Align the Hose: Position the end of the hose securely onto the new connector, ensuring that it aligns with the connection point and any corresponding marks or indicators on the connector.
- Reposition the Hose Clamp: If a hose clamp is utilized, reposition it over the hose connection area. Ensure that the clamp is oriented to provide maximum grip and security without causing undue stress on the hose.
- Tighten the Hose Clamp: Using the appropriate tool, such as hose clamp pliers or a screwdriver, tighten the hose clamp to secure the hose onto the connector. Apply sufficient pressure to prevent leaks without damaging the hose.
- Double-Check the Connection: Verify that the hose is securely attached to the new connector and that the hose clamp is properly positioned and tightened. Confirm that the connection is free from twists or kinks that could impede coolant flow.
- Inspect for Leaks: After reconnection, carefully inspect the hose and the connection point for any signs of leakage. Look for drips, seepage, or dampness that may indicate an insecure connection or a damaged hose.
- Address Any Leaks: If leaks are detected, promptly address the issue by repositioning the hose, adjusting the hose clamp, or replacing the hose if necessary. It’s essential to resolve any leaks before proceeding.
By diligently following these steps, you can effectively reconnect the hose to the new heater hose connector, ensuring a secure and reliable connection that promotes efficient coolant flow within the vehicle’s cooling system.
Test for Leaks
After completing the installation of the new heater hose connector and reconnecting the hose, it’s crucial to perform a comprehensive leak test to ensure the integrity of the cooling system. This final step is essential for identifying and addressing any potential leaks before returning the vehicle to regular operation. Here’s a detailed guide on how to test for leaks:
- Visually Inspect Connection Points: Carefully examine the area around the new connector and the reconnected hose for any signs of coolant leakage. Look for drips, wet spots, or discoloration that may indicate a leak.
- Start the Engine: With the new connector and hose in place, start the vehicle’s engine and allow it to reach operating temperature. This will pressurize the cooling system and simulate normal operating conditions.
- Observe for Leakage: While the engine is running, closely monitor the connection points, especially the area around the new connector and the reconnected hose. Look for any signs of coolant leakage, paying attention to both the connector and the hose clamp area.
- Check for Drips or Puddles: Inspect the ground beneath the vehicle for any drips, puddles, or pooling of coolant. This can indicate a leak originating from the new connector or the hose, necessitating immediate attention.
- Perform a Pressure Test (if available): If a pressure testing kit is available, conduct a pressure test on the cooling system to verify the integrity of the newly installed connector and the reconnected hose. Follow the manufacturer’s instructions for the pressure testing procedure.
- Address Any Identified Leaks: If leaks are detected during the testing process, promptly address the issue by tightening the hose clamp, readjusting the hose, or evaluating the seal of the new connector. If necessary, seek professional assistance to rectify persistent leaks.
- Recheck After Cooling Down: Once the engine is turned off and the vehicle has cooled down, reinspect the connection points for any delayed signs of leakage. Coolant may seep from the connection area as the system depressurizes, warranting a thorough recheck.
By conscientiously performing these steps, you can effectively test for leaks and ensure the proper functioning of the newly installed heater hose connector and the reconnected hose within the vehicle’s cooling system.