
Benefits of Installing A Whole House Water Filter System
A whole house water filter system is a valuable addition to any home, providing numerous benefits for you and your family. Here are some of the key advantages of installing a whole house water filter system:
- Clean and Safe Drinking Water: One of the primary benefits of a whole house water filter system is that it ensures clean and safe drinking water for your household. The filter system effectively removes impurities, such as sediment, chlorine, and heavy metals, leaving you with fresh and pure water from every tap.
- Improved Taste and Odor: Tap water often has an unpleasant taste or odor due to chlorine and other chemical additives. A whole house water filter system can significantly improve the taste and odor of your water, making it more enjoyable to drink and cook with.
- Protection for Household Appliances: Installing a whole house water filter system helps protect your household appliances, such as washing machines, dishwashers, and water heaters, from sediment and mineral build-up. This can extend the lifespan of your appliances and reduce maintenance costs.
- Healthier Hair and Skin: Chlorine and other chemicals found in tap water can strip natural oils from your hair and skin, leading to dryness, irritation, and dullness. By filtering out these impurities, a whole house water filter system can help improve the health and appearance of your hair and skin.
- Reduction in Plumbing Repair Costs: Sediment and mineral build-up in your plumbing system can cause clogs and corrosion, leading to costly repairs. With a whole house water filter system, you can minimize the risk of these issues, saving you money on plumbing repairs in the long run.
- Environmental Benefits: By using a whole house water filter system, you can significantly reduce your reliance on bottled water, which contributes to plastic waste and carbon emissions. Choosing filtered tap water over bottled water is a more sustainable and eco-friendly choice.
Overall, installing a whole house water filter system is a wise investment in the health and well-being of your family, as well as the longevity of your household appliances. With clean and safe water flowing from every tap, you can enjoy the benefits of pure water for drinking, cooking, bathing, and more.
Determine the Right Size and Type of Whole House Water Filter System
Choosing the correct size and type of whole house water filter system is crucial to ensure optimal filtration and efficiency. Here are the steps to help you determine the right size and type for your specific needs:
- Assess Your Water Usage: Start by evaluating your household’s water usage. Consider the number of occupants and the average daily water consumption. This will give you an idea of the flow rate and capacity requirements for the filter system.
- Understand Your Water Quality: Test your water to identify the impurities present. Common contaminants include sediment, chlorine, iron, and bacteria. Knowing the specific impurities will help you choose the appropriate filter media and technology for effective filtration.
- Determine the Flow Rate: Measure the flow rate of your main water supply. This is typically expressed in gallons per minute (GPM). It is crucial to select a filter system that can handle the maximum flow rate to prevent compromising water pressure throughout your home.
- Select the Type of Filtration: There are various types of filtration systems available, such as activated carbon filters, reverse osmosis systems, and UV filters. Each type targets specific contaminants, so choose one that addresses the impurities found in your water supply.
- Consider Maintenance and Replacement: Evaluate the ease of maintenance and replacement for the chosen filter system. Some systems require frequent cartridge changes, while others have longer lifespan filters. Choose a system that aligns with your preferences and lifestyle.
- Consult With Professionals: If you are unsure about the right size and type of filter system, it is advisable to consult with water treatment professionals or plumbers. They can analyze your water quality report and provide expert recommendations tailored to your specific needs.
Remember that investing in a reliable and correctly sized whole house water filter system ensures efficient and effective filtration, providing you with clean and safe water throughout your home. Taking the time to determine the right size and type of system will save you from potential issues and maximize the benefits of filtered water.
Tools and Materials Needed
Before installing a whole house water filter system, gather the necessary tools and materials to ensure a smooth and hassle-free process. Here is a list of the items you will need:
- Adjustable Wrench: This tool will be used to tighten fittings and connections.
- Pipe Cutter or Hacksaw: Depending on your existing plumbing setup, you may need a pipe cutter or hacksaw to cut the pipes and create the necessary connections for the filter system.
- Tape Measure: Use a tape measure to accurately measure the pipe lengths for installing the filter system.
- Plumber’s Tape: Plumber’s tape is used to create a leak-proof seal on threaded connections.
- Screwdriver: Depending on the type of filter system, you may need a screwdriver for securing housing or filter cartridges in place.
- Pipe Fittings and Connectors: Purchase the appropriate pipe fittings and connectors to connect the filter system to your existing plumbing. This can include couplings, elbows, tees, and union fittings.
- Filter System and Cartridges: Choose a whole house water filter system that suits your specific needs and requirements. Ensure you have the necessary filter cartridges that are compatible with the system you have chosen.
- Teflon Tape: Teflon tape or thread sealant can be used to create a tight and leak-free seal on threaded connections.
- Bucket or Container: Have a bucket or container on hand to catch any excess water when disconnecting pipes or during the installation process.
It’s important to have all the necessary tools and materials ready before starting the installation. This will help you save time and ensure a successful installation of your whole house water filter system.
Turn Off the Main Water Supply
Prior to installing a whole house water filter system, it is essential to turn off the main water supply to your home. This ensures that no water is flowing through the pipes and allows for a safe and efficient installation process. Follow these steps to turn off the main water supply:
- Locate the Water Shut-Off Valve: The main water shut-off valve is typically located near the water meter or at the point where the water line enters your home. It is often found in basements, crawl spaces, utility rooms, or near the water heater.
- Turn Off the Valve: To turn off the main water supply, locate the valve handle and turn it clockwise until it is fully closed. This will shut off the water flow to your entire house.
- Check for Water Flow: After closing the valve, check your faucets, showers, and toilets to ensure that no water is flowing. If you notice any remaining water flow, double-check that the valve is completely closed. It may take a few minutes for the remaining water in the pipes to drain out.
Turning off the main water supply is a critical step to prevent any water damage or flooding during the installation of your whole house water filter system. It ensures a dry and safe work area while you connect the filter system to your existing plumbing.
Drain the Pipes
Before installing a whole house water filter system, it is important to drain the pipes to remove any remaining water from the plumbing system. This ensures a clean and dry installation process while minimizing the risk of leaks. Follow these steps to drain the pipes:
- Open Faucets and Flush Toilets: Start by opening all the faucets in your home, including the highest and lowest points such as upstairs and basement sinks. Additionally, flush all the toilets to allow water to drain from the toilet tanks and bowls.
- Flush the Hot Water Tank: If you have a hot water tank, turn off the power or gas supply to the heater. Then, connect a garden hose to the drain valve at the bottom of the tank. Open the valve and let the water drain into a suitable drainage area. Be cautious as the water may be hot.
- Open Outdoor Faucets: If you have outdoor faucets, open them to allow any remaining water to drain out. This includes garden hoses, sprinkler systems, and any other outdoor water connections.
- Keep Faucets Open until No Water Flows: Leave all faucets, including outdoor and indoor ones, open until no more water flows from them. As the water drains from the pipes, you may hear air escaping. This is normal and indicates that the pipes are draining properly.
Draining the pipes ensures that there is no residual water in the plumbing system, preventing any potential leaks or water damage during the installation of your whole house water filter system. By following these steps, you can proceed with the installation on dry pipes, ensuring a successful and secure connection.
Install the Whole House Water Filter System
Installing a whole house water filter system is a straightforward process that can be completed with basic plumbing knowledge and the right tools. Follow these steps to install the filter system:
- Select an Installation Location: Choose a suitable location for the filter system near the main water supply entrance. Ensure there is enough space for the system and accessible for maintenance and cartridge replacement.
- Turn Off the Power: If your filter system has an electrical component, such as a UV filter, turn off the power supply before proceeding with the installation.
- Prepare the Mounting Surface: If needed, install a mounting bracket or secure the filter system to the chosen location using screws and appropriate fixtures.
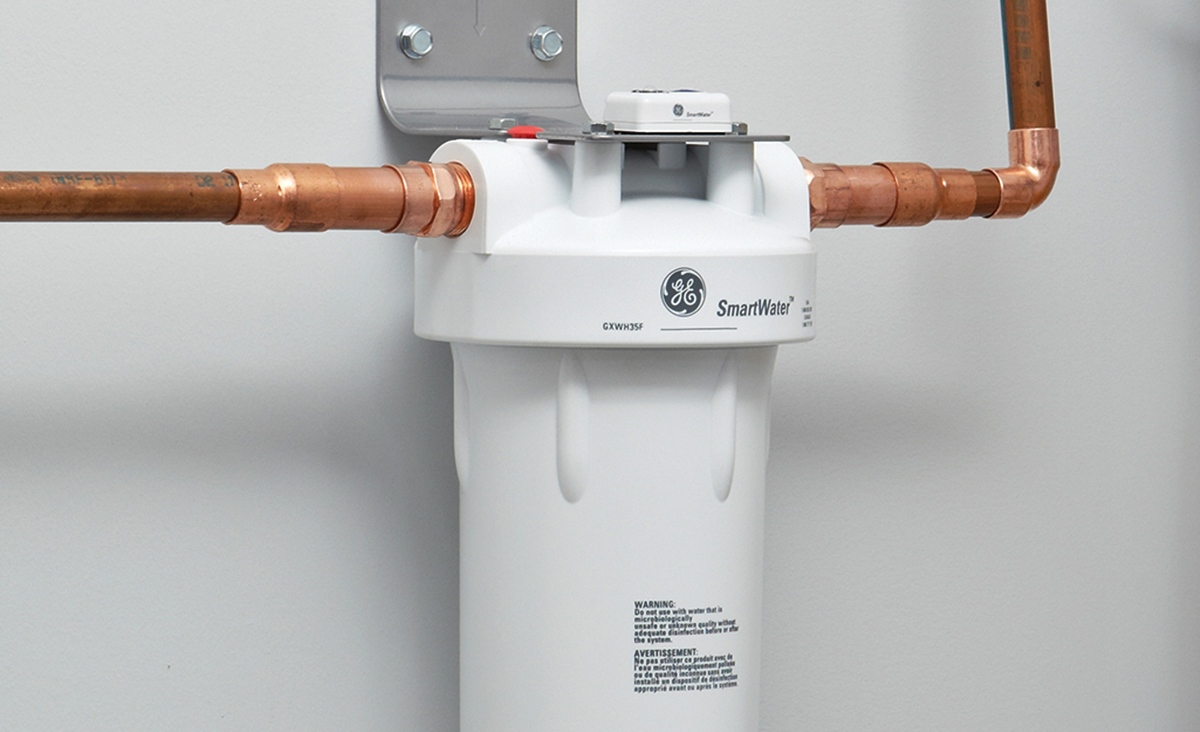
- Connect the Inlet and Outlet Pipes: Connect the incoming water supply pipe to the inlet port of the filter system and the outgoing pipe to the outlet port. Use appropriate fittings and connectors, ensuring a secure and leak-free connection.
- Install and Prime the Filter Cartridges: Follow the manufacturer’s instructions to install the filter cartridges in the filter housing. Make sure to properly prime the cartridges by flushing them with water before connecting the housing to the system.
- Secure the Filter Housing: Attach the filter housing to the system, ensuring a tight seal and proper alignment. Use a wrench or screwdriver, if necessary, to securely fasten the housing in place.
- Turn On the Water Supply: Once the filter system is properly installed, turn on the main water supply valve to allow water to flow into the system. Check for any leaks around the filter housing or connections.
- Purge Air from the System: Open the faucets throughout your home to purge any air trapped in the plumbing system. Run the water for a few minutes until a steady flow is achieved without any air sputtering.
By following these steps, you can successfully install a whole house water filter system and start enjoying the benefits of clean and filtered water throughout your home. If you are unsure about any step of the installation process, consult the manufacturer’s instructions or seek the assistance of a plumbing professional.
Connect the Filter System to the Existing Plumbing
Connecting the whole house water filter system to the existing plumbing is a crucial step in the installation process. Follow these steps to ensure a proper connection:
- Shut off the Main Water Supply: Before making any connections, ensure the main water supply to your home is turned off to prevent any water flow during the installation.
- Locate the Pipe for Connection: Identify the appropriate spot in your existing plumbing system where you will connect the filter system. It should be after the water meter or any other water treatment devices.
- Cut the Pipe: Use a pipe cutter or hacksaw to carefully cut the pipe at the selected connection point. Make sure the cut is clean and straight.
- Install Fittings: Depending on the type of filter system you have, you may need specific fittings or connectors to join the filter system to the cut pipe. Follow the manufacturer’s instructions to ensure the proper installation of these fittings.
- Apply Sealant: Wrap plumber’s tape or apply Teflon tape to the threads of the connectors or fittings to ensure a watertight seal when joining them together.
- Connect the Filter System: Attach the filter system to the cut pipe, ensuring the fittings are securely fastened. Use an adjustable wrench or other appropriate tools to tighten the connections.
- Check for Leaks: Once the connections are made, turn on the main water supply and check for any leaks around the connections, fittings, or filter housing. If you notice any leaks, tighten the connections or replace any faulty parts as needed.
- Recheck Water Flow: After the connections are secure, open the faucets throughout your home to ensure that the water flow is normal and there are no issues with water pressure or flow rate.
By carefully following these steps, you can successfully connect the whole house water filter system to your existing plumbing. Remember to double-check all connections and monitor for any leaks to ensure a properly functioning system.
Check for Leaks
After installing a whole house water filter system and connecting it to the existing plumbing, it is crucial to thoroughly check for any leaks. This step ensures the proper functioning of the system and prevents any water damage or wastage. Follow these steps to check for leaks:
- Visual Inspection: Carefully examine all the connections, fittings, and the filter housing for any visible signs of leaks. Look for dripping water, moisture, or water stains around the connections.
- Listen for Unusual Sounds: Pay attention to any unusual sounds such as hissing or dripping noises coming from the filter system or pipes. These sounds could indicate a leak in the system.
- Feel for Moisture: Run your fingers along the connections and fittings, feeling for any dampness or moisture. Even a small amount of moisture can indicate a leak.
- Check Water Pressure: Test the water pressure throughout your home by opening multiple faucets simultaneously. Observe if the water pressure remains consistent and there are no sudden drops or fluctuations, which could indicate leaks in the plumbing system.
- Inspect the Filter Housing: Examine the filter housing for any leaks or water seepage around the housing seal. Ensure that the housing is securely fastened and there are no gaps where water could escape.
- Monitor for a Period of Time: After the initial inspection, leave the filter system running for some time and periodically check for any new leaks. Some leaks may only become apparent after the system has been in operation for a while.
If you discover any leaks during the inspection, take the necessary steps to address them promptly. This may involve tightening connections, replacing faulty fittings, or seeking professional assistance if needed.
Regularly checking for leaks in your whole house water filter system helps to maintain its efficiency and prevents any water-related issues. By ensuring a leak-free system, you can enjoy clean and filtered water throughout your home without any unnecessary wastage or potential damages.
Turn On the Water Supply and Test the System
Once your whole house water filter system is installed and any leaks have been addressed, it’s time to turn on the water supply and test the system to ensure proper functionality. Follow these steps to turn on the water supply and test your new filter system:
- Open All Faucets: Start by opening all the faucets in your home, both hot and cold, to release any air that may be trapped in the plumbing system. Let the water run for a few minutes until you have a steady stream without any sputtering or air bubbles.
- Check for Consistent Water Flow: Verify that water flows consistently from all faucets and showers throughout your home. Ensure that there are no significant changes in water pressure or flow rate, which could indicate an issue with the filter system or plumbing connections.
- Test Water Quality: Run the water for a few minutes and taste, smell, or observe the water for any noticeable improvement in quality. The whole house water filter should effectively remove impurities, such as chlorine, sediments, and odors, resulting in cleaner, better-tasting water.
- Inspect Filter Housing: Check the filter housing for any signs of leakage or moisture. Make sure that the housing remains secure and properly sealed as the water flows through the system.
- Monitor the System: Leave the water running for a longer period of time and periodically check the filter system and connections for any new leaks or issues. Keeping an eye on the system during this initial test phase helps identify any potential problems that may arise.
By thoroughly testing your whole house water filter system, you can ensure that it is functioning properly and effectively providing clean and filtered water to all areas of your home. If you encounter any issues during the testing process, consult the manufacturer’s instructions or seek assistance from a professional plumber or water treatment specialist.
Maintain and Replace the Filter Cartridges
To maintain the efficiency and effectiveness of your whole house water filter system, regular maintenance and timely replacement of filter cartridges are essential. Follow these guidelines to ensure proper maintenance and replacement:
- Refer to Manufacturer’s Guidelines: Familiarize yourself with the manufacturer’s recommendations for filter cartridge maintenance and replacement. This information can typically be found in the product manual or on the manufacturer’s website.
- Monitor Filter Lifespan: Keep track of the lifespan of your filter cartridges. Most manufacturers recommend replacing them every 6 to 12 months, although this can vary depending on the specific model and the quality of your water supply. Some filter cartridges may have indicators that show when they need to be replaced.
- Inspect Filter Housing and Seals: Regularly check the filter housing for any signs of leaks, cracks, or damage. Ensure that the housing is properly sealed and securely fastened. If any issues are detected, address them promptly to maintain the integrity of the filtration system.
- Follow Proper Replacement Procedures: When replacing filter cartridges, carefully follow the manufacturer’s instructions. This may involve turning off the water supply, releasing any pressure, unscrewing the filter housing, removing the old cartridge, and inserting the new one. Take note of any important steps, such as priming the new cartridge with water before installation.
- Flush the System: After replacing the filter cartridges, flush the system by running the water for a few minutes to remove any air or loose particles. This helps ensure the optimal performance of the newly installed cartridges.
- Keep a Replacement Schedule: Establish a schedule for replacing filter cartridges based on the manufacturer’s recommendations and your water quality. Create reminders or mark a calendar to keep track of when replacements are due. Consistently replacing the cartridges will maintain the efficiency of the filtration system.
- Water Quality Testing: Regularly test the quality of your water to verify the effectiveness of the filter cartridges. This can be done through water testing kits or by consulting a professional water testing service. Testing can help ensure that the cartridges are adequately removing impurities and providing clean, safe water.
By following these maintenance and replacement practices, you can ensure that your whole house water filter system continues to deliver clean and filtered water throughout your home. Consistent and timely cartridge replacement is crucial to maintaining the effectiveness and performance of the system.